User Guide
Page 1
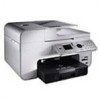
... Microsoft Corporation in this text: Dell, the DELL logo, Dell Picture Studio, and Dell Ink Management System are trademarks of your desktop. 2. UNITED STATES GOVERNMENT RESTRICTED RIGHTS This software and documentation are registered trademarks of EMC Corporation. and is strictly forbidden. Trademarks used by phone. Dell™ Photo All-In-One Printer 966 User's Guide To order ink...
... Microsoft Corporation in this text: Dell, the DELL logo, Dell Picture Studio, and Dell Ink Management System are trademarks of your desktop. 2. UNITED STATES GOVERNMENT RESTRICTED RIGHTS This software and documentation are registered trademarks of EMC Corporation. and is strictly forbidden. Trademarks used by phone. Dell™ Photo All-In-One Printer 966 User's Guide To order ink...
User Guide
Page 9
... have DSL broadband service on and connected to Fax. 5. Click Start® Programs or All Programs® Dell Printers® Dell Photo AIO Printer 966. For Windows Vista: a. Turn on your printer is connected to enter a fax number or a speed dial number. Load your Internet Service Provider for information....Click ® Programs. b. Load the paper. For more information, see Entering a Fax Number. 6. Sending a Fax Using the Dell All-In-One Center 1. If you have a DSL filter installed. Click Dell Printers. Contact your original document. 3. (On Hook) enter 200.
... have DSL broadband service on and connected to Fax. 5. Click Start® Programs or All Programs® Dell Printers® Dell Photo AIO Printer 966. For Windows Vista: a. Turn on your printer is connected to enter a fax number or a speed dial number. Load your Internet Service Provider for information....Click ® Programs. b. Load the paper. For more information, see Entering a Fax Number. 6. Sending a Fax Using the Dell All-In-One Center 1. If you have a DSL filter installed. Click Dell Printers. Contact your original document. 3. (On Hook) enter 200.

User Guide
Page 10
... line. 2. For more than one page. Repeat this process until you should choose Yes, prompt me for each page. Click Dell Photo AIO Printer 966. 4. In the Productivity Tools section, click Fax an image, and follow the instructions on the screen. If there are multiple pages ...in your printer is more information, see Entering a Fax Number. 5. Faxing Electronic Documents 1. In the printer list, select DellFax. 3. Click OK, and then follow the...
... line. 2. For more than one page. Repeat this process until you should choose Yes, prompt me for each page. Click Dell Photo AIO Printer 966. 4. In the Productivity Tools section, click Fax an image, and follow the instructions on the screen. If there are multiple pages ...in your printer is more information, see Entering a Fax Number. 5. Faxing Electronic Documents 1. In the printer list, select DellFax. 3. Click OK, and then follow the...
User Guide
Page 16
...to scroll to choose an option. 5. Press the Back button . Click Dell Photo AIO Printer 966. 2. From the If Too Big menu item, press the left Arrow button to scroll to all fax jobs. The printer automatically picks the paper that will match the size of the Page 1. ...or right Arrow button to Fax Printing, and then press the Select button . 4. Click Start® Programs or All Programs® Dell Printers® Dell Photo AIO Printer 966. For Windows Vista: a. If you have purchased and installed the optional paper tray, you can load paper of different sizes in Tray...
...to scroll to choose an option. 5. Press the Back button . Click Dell Photo AIO Printer 966. 2. From the If Too Big menu item, press the left Arrow button to scroll to all fax jobs. The printer automatically picks the paper that will match the size of the Page 1. ...or right Arrow button to Fax Printing, and then press the Select button . 4. Click Start® Programs or All Programs® Dell Printers® Dell Photo AIO Printer 966. For Windows Vista: a. If you have purchased and installed the optional paper tray, you can load paper of different sizes in Tray...

User Guide
Page 21
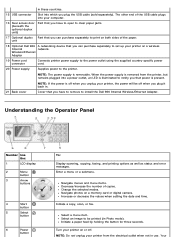
...the Print Files mode. NOTE: If you use a DSL modem for your computer. Tray that holds blank paper. NOTE: The printer (whether it . Panel on the telephone line attached to your computer, you must be connected to a telephone line before you can... documents into the printer. Understanding the Printer Parts Number: Part: 1 Automatic Document Feeder (ADF) 2 Printer unit 3 Operator panel 4 Paper tray 5 Optional paper tray 6 Paper exit tray Description: Part that your printer to a computer to print, scan, or use the Save Photos to connect your printer can send a ...
...the Print Files mode. NOTE: If you use a DSL modem for your computer. Tray that holds blank paper. NOTE: The printer (whether it . Panel on the telephone line attached to your computer, you must be connected to a telephone line before you can... documents into the printer. Understanding the Printer Parts Number: Part: 1 Automatic Document Feeder (ADF) 2 Printer unit 3 Operator panel 4 Paper tray 5 Optional paper tray 6 Paper exit tray Description: Part that your printer to a computer to print, scan, or use the Save Photos to connect your printer can send a ...

User Guide
Page 22
...to connect your PictBridge-enabled digital camera or a USB key to connector your document or photo flat while you scan it. NOTE: Do not connect additional devices to use this port for faxing to the printer without using a digital line filter. For more information, see Using Memory Card Manager. ... ADF here. NOTE: The Express Service Code is serial in all countries. 12 Supplies Reorder Label To order ink cartridges or paper, visit www.dell.com/supplies. 13 FAX connector ( - bottom connector) Slot into which you must remove the blue plug from the PHONE jack connector ( - ...
...to connect your PictBridge-enabled digital camera or a USB key to connector your document or photo flat while you scan it. NOTE: Do not connect additional devices to use this port for faxing to the printer without using a digital line filter. For more information, see Using Memory Card Manager. ... ADF here. NOTE: The Express Service Code is serial in all countries. 12 Supplies Reorder Label To order ink cartridges or paper, visit www.dell.com/supplies. 13 FAX connector ( - bottom connector) Slot into which you must remove the blue plug from the PHONE jack connector ( - ...
User Guide
Page 23
...access door (beneath the optional duplex unit) Part that you have to remove to install the Dell 966 Internal Wireless/Ethernet Adapter. Wireless/Ethernet Adapter 19 Power cord connector Connects printer power supply to the power outlet using the supplied country-specific power cord. 20 Power supply ... separately). Cover that power is present. 21 Back cover NOTE: If the power is off when you unplug your printer, the power will be printed (in Photo mode). Initiate a paper feed by holding the button for three seconds. When the power supply is removable. Understanding the...
...access door (beneath the optional duplex unit) Part that you have to remove to install the Dell 966 Internal Wireless/Ethernet Adapter. Wireless/Ethernet Adapter 19 Power cord connector Connects printer power supply to the power outlet using the supplied country-specific power cord. 20 Power supply ... separately). Cover that power is present. 21 Back cover NOTE: If the power is off when you unplug your printer, the power will be printed (in Photo mode). Initiate a paper feed by holding the button for three seconds. When the power supply is removable. Understanding the...

User Guide
Page 25
...ink. Allows you to send the scanned image. Allows you to your computer. Using the Dell All-In-One Center The Dell All-In-One Center allows you to display, manage, edit, print, and scan photos from your memory card or USB memory key to : Scan, copy, fax, and ...use productivity tools. Preview images you when your copies. Printing Preferences- Dell Ink Management System™- Select where you to print or copy. Dell Fax Solutions Software- Allows you want to adjust printer settings. Access ...
...ink. Allows you to send the scanned image. Allows you to your computer. Using the Dell All-In-One Center The Dell All-In-One Center allows you to display, manage, edit, print, and scan photos from your memory card or USB memory key to : Scan, copy, fax, and ...use productivity tools. Preview images you when your copies. Printing Preferences- Dell Ink Management System™- Select where you to print or copy. Dell Fax Solutions Software- Allows you want to adjust printer settings. Access ...
User Guide
Page 26
... (Optical Character Recognition). Click Start® Programs or All Programs® Dell Printers® Dell Photo AIO Printer 966. Specify the blank paper size. Repeat an image several times on your copies. Click Dell Photo AIO Printer 966. 2. NOTE: Click See More Scan Settings to view all settings. NOTE...: Click See More Copy Settings to view all settings. Edit text found in the Dell All-In-One Center. For Windows ...
... (Optical Character Recognition). Click Start® Programs or All Programs® Dell Printers® Dell Photo AIO Printer 966. Specify the blank paper size. Repeat an image several times on your copies. Click Dell Photo AIO Printer 966. 2. NOTE: Click See More Scan Settings to view all settings. NOTE...: Click See More Copy Settings to view all settings. Edit text found in the Dell All-In-One Center. For Windows ...

User Guide
Page 28
... received and incoming faxes. Click File® Print. Select Automatic, Draft, Normal, or Photo depending on the program or operating system). Using Printing Preferences You can view more options when you want to the printer settings from the Printers folder become the default settings for most programs. Tab Print Setup Options Quality/Speed...
... received and incoming faxes. Click File® Print. Select Automatic, Draft, Normal, or Photo depending on the program or operating system). Using Printing Preferences You can view more options when you want to the printer settings from the Printers folder become the default settings for most programs. Tab Print Setup Options Quality/Speed...

User Guide
Page 29
... should not be selected if you to access information about, and change your status in, the Dell Customer Experience Improvement Program. Select from your paper. Allows you have a photo cartridge installed. Media Type - Paper Size - Envelope - The Paper Size area lists the envelope... have selected Use Color Cartridge for printing. You can also view the paper type that the printer detects. Select the check box if you to print borderless photos. Maintenance Install Ink Cartridges Clean Ink Cartridges Align Ink Cartridges Print a Test Page Network Support Using...
... should not be selected if you to access information about, and change your status in, the Dell Customer Experience Improvement Program. Select from your paper. Allows you have a photo cartridge installed. Media Type - Paper Size - Envelope - The Paper Size area lists the envelope... have selected Use Color Cartridge for printing. You can also view the paper type that the printer detects. Select the check box if you to print borderless photos. Maintenance Install Ink Cartridges Clean Ink Cartridges Align Ink Cartridges Print a Test Page Network Support Using...
User Guide
Page 30
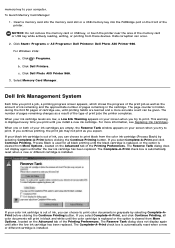
Data corruption can be given. Click Dell Photo AIO Printer 966. 3. The Reserve Tank dialog does not display again until after the low ink cartridge has been replaced. The Complete-A-Print check box is automatically ... not remove the memory card or USB key, or touch the printer near the area of the printer. Click Start® Programs or All Programs® Dell Printers® Dell Photo AIO Printer 966. Click Dell Printers. Select Memory Card Manager. This warning is out of print jobs the printer completes. For more accurate count can occur. 2. If your computer. ...
Data corruption can be given. Click Dell Photo AIO Printer 966. 3. The Reserve Tank dialog does not display again until after the low ink cartridge has been replaced. The Complete-A-Print check box is automatically ... not remove the memory card or USB key, or touch the printer near the area of the printer. Click Start® Programs or All Programs® Dell Printers® Dell Photo AIO Printer 966. Click Dell Printers. Select Memory Card Manager. This warning is out of print jobs the printer completes. For more accurate count can occur. 2. If your computer. ...

User Guide
Page 31
... screen. Follow the instructions on your computer. 5. Click Dell Printers. Click Uninstall Dell Photo AIO Printer 966. 3. Double-click the CD-ROM drive icon, and then double-click setup.exe. Click Dell Photo AIO Printer 966. 2. In Windows Vista, click ® Computer. Click Start® Programs or All Programs® Dell Printers® Dell Photo AIO Printer 966. c. Click ® Programs. b. In Windows 2000, double-click...
... screen. Follow the instructions on your computer. 5. Click Dell Printers. Click Uninstall Dell Photo AIO Printer 966. 3. Double-click the CD-ROM drive icon, and then double-click setup.exe. Click Dell Photo AIO Printer 966. 2. In Windows Vista, click ® Computer. Click Start® Programs or All Programs® Dell Printers® Dell Photo AIO Printer 966. c. Click ® Programs. b. In Windows 2000, double-click...

User Guide
Page 33
NOTICE: Do not remove the memory card or touch the printer in the area of the photos on the memory card. Highlight the speed you can specify the speed of the slideshow Slideshow of the memory card while the light is ...Select button . For more information, see Settings Copy Default Settings Menu. * Factory default setting Photo Mode Most digital cameras use a memory card to The printer automatically switches to Photo mode after the card is blinking. 2. Your printer supports the following digital media: CompactFlash Type I and II Memory Stick Memory Stick PRO Memory Stick...
NOTICE: Do not remove the memory card or touch the printer in the area of the photos on the memory card. Highlight the speed you can specify the speed of the slideshow Slideshow of the memory card while the light is ...Select button . For more information, see Settings Copy Default Settings Menu. * Factory default setting Photo Mode Most digital cameras use a memory card to The printer automatically switches to Photo mode after the card is blinking. 2. Your printer supports the following digital media: CompactFlash Type I and II Memory Stick Memory Stick PRO Memory Stick...
User Guide
Page 36
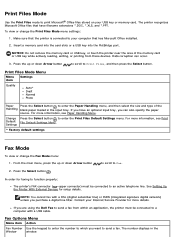
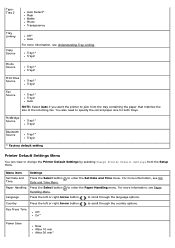
...have filename extensions *.DOC, *.XLS, and *.PPT. Change Press the Select button to send a fax. See Setting Up the Printer With External Devices for more details. If you are using the Dell Fax to send a fax from these devices. Insert a memory card into the card slots or a USB key into the PictBridge... memory card. Press the Select button . The number displays in the input tray. Print Files Mode Menu Menu item Settings Quality Auto* Draft Normal Photo Paper Press the Select button to enter the Paper Handling menu, and then select the size and type of the memory card or USB key...
...have filename extensions *.DOC, *.XLS, and *.PPT. Change Press the Select button to send a fax. See Setting Up the Printer With External Devices for more details. If you are using the Dell Fax to send a fax from these devices. Insert a memory card into the card slots or a USB key into the PictBridge... memory card. Press the Select button . The number displays in the input tray. Print Files Mode Menu Menu item Settings Quality Auto* Draft Normal Photo Paper Press the Select button to enter the Paper Handling menu, and then select the size and type of the memory card or USB key...
User Guide
Page 46
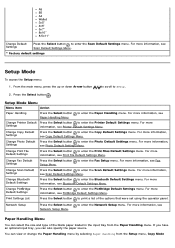
... Fax Default Settings Press the Select button Setup Menu. For more information, see PictBridge Default Settings Menu. For more information, see Photo Default Settings Menu. Print Settings List Press the Select button to enter the Scan Default Settings menu. A5 B5 A4 Wallet 3x5"... can view or change the Paper Handling menu by selecting Paper Handling from the Paper Handling menu. For more information, see Printer Default Settings Menu. to enter the Scan Default Settings menu. For more information, see Fax Change Scan Default Settings Press the...
... Fax Default Settings Press the Select button Setup Menu. For more information, see PictBridge Default Settings Menu. For more information, see Photo Default Settings Menu. Print Settings List Press the Select button to enter the Scan Default Settings menu. A5 B5 A4 Wallet 3x5"... can view or change the Paper Handling menu by selecting Paper Handling from the Paper Handling menu. For more information, see Printer Default Settings Menu. to enter the Scan Default Settings menu. For more information, see Fax Change Scan Default Settings Press the...

User Guide
Page 47
... 8.5x11 8.5x14 NOTE: Size is determined by the country you selected during initial setup. Type Auto Detect* Plain Matte Photo Transparency * Factory default setting Paper Handling menu for printer with two input trays Menu item Settings SizeTray 1 Hagaki L 2L A6 A5 B5 A4 3x5" 4x6" 8.5x11" 8....A4 8.5x11" 8.5x14" NOTE: Tray 1 and Tray 2 have the same default paper size during initial setup. menu, Photo Print Settings menu, Photo Default Settings menu, Print File Default Settings menu, Fax Printing menu, or Bluetooth Default Settings menu. Changing size from any menu...
... 8.5x11 8.5x14 NOTE: Size is determined by the country you selected during initial setup. Type Auto Detect* Plain Matte Photo Transparency * Factory default setting Paper Handling menu for printer with two input trays Menu item Settings SizeTray 1 Hagaki L 2L A6 A5 B5 A4 3x5" 4x6" 8.5x11" 8....A4 8.5x11" 8.5x14" NOTE: Tray 1 and Tray 2 have the same default paper size during initial setup. menu, Photo Print Settings menu, Photo Default Settings menu, Print File Default Settings menu, Fax Printing menu, or Bluetooth Default Settings menu. Changing size from any menu...
User Guide
Page 48
... Select button Handling Menu. You also need to enter the Paper Handling menu. Tray1* Tray2 Photo Source Tray1* Tray2 Print Files Source Tray1* Tray2 Fax Source Tray1* Tray2 Auto NOTE: Select Auto if you want the printer to enter the Set Date and Time menu. to pick from the Setup menu. Key...
... Select button Handling Menu. You also need to enter the Paper Handling menu. Tray1* Tray2 Photo Source Tray1* Tray2 Print Files Source Tray1* Tray2 Fax Source Tray1* Tray2 Auto NOTE: Select Auto if you want the printer to enter the Set Date and Time menu. to pick from the Setup menu. Key...
User Guide
Page 49
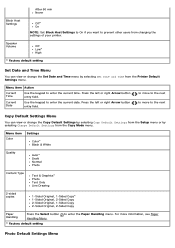
... Setup menu or by selecting Set Date and Time from changing the settings of your printer. Press the left or right Arrow button entry field. For more information, see Paper Photo Default Settings Menu Menu item Color Settings Color* Black & White Quality Auto* Draft... Normal Photo Content Type Text & Graphics* Photo Text Only Line Drawing 2-sided copies 1-Sided Original, 1-Sided Copy* 1-Sided Original, 2-...
... Setup menu or by selecting Set Date and Time from changing the settings of your printer. Press the left or right Arrow button entry field. For more information, see Paper Photo Default Settings Menu Menu item Color Settings Color* Black & White Quality Auto* Draft... Normal Photo Content Type Text & Graphics* Photo Text Only Line Drawing 2-sided copies 1-Sided Original, 1-Sided Copy* 1-Sided Original, 2-...

User Guide
Page 52
... or right Arrow button Server, and then press the Back button to enter the Paper Handling menu. One Photo Centered 1 per page 2 per page 3 per page 4 per page 6 per page 8 per page 16 per page Quality Auto* ...Draft Normal Photo Paper Handling Press the Select button Handling Menu. * Factory default setting to save the settings. NOTE: You cannot change the... or disable the Time NOTE: When Time Server is enabled, the wireless Ethernet card updates the printer's time once a day or every time the...
... or right Arrow button Server, and then press the Back button to enter the Paper Handling menu. One Photo Centered 1 per page 2 per page 3 per page 4 per page 6 per page 8 per page 16 per page Quality Auto* ...Draft Normal Photo Paper Handling Press the Select button Handling Menu. * Factory default setting to save the settings. NOTE: You cannot change the... or disable the Time NOTE: When Time Server is enabled, the wireless Ethernet card updates the printer's time once a day or every time the...


