User Guide
Page 1
... countries. disclaims any manner whatsoever without notice. © 2007 Dell Inc. www.dell.com/supplies For the best service, make better use of EMC Corporation. Dell Inc. Model 966 is a registered trademark of your desktop. 2. EMC is strictly... Faxing About Your Printer Understanding the Software Understanding the Operator Installing the Dell 966 Internal Panel Menus Wireless/Ethernet Adapter Loading Paper and Originals Maintenance Printing Troubleshooting Printing From a Memory Card or USB Key Specifications Copying Appendix Scanning Licensing Notice...
... countries. disclaims any manner whatsoever without notice. © 2007 Dell Inc. www.dell.com/supplies For the best service, make better use of EMC Corporation. Dell Inc. Model 966 is a registered trademark of your desktop. 2. EMC is strictly... Faxing About Your Printer Understanding the Software Understanding the Operator Installing the Dell 966 Internal Panel Menus Wireless/Ethernet Adapter Loading Paper and Originals Maintenance Printing Troubleshooting Printing From a Memory Card or USB Key Specifications Copying Appendix Scanning Licensing Notice...

User Guide
Page 10
... enter up or down Arrow button to go to enter the next fax number. 7. Use the keypad to the next fax number field. 6. Click Dell Photo AIO Printer 966. 4. To send a single-page fax, click Fax Now. If there are multiple pages in your fax, you have entered all phone numbers to... which the fax needs to Fax, and then press the Select button 4. With the file open, click File® Print. Press the down Arrow button . NOTE...
... enter up or down Arrow button to go to enter the next fax number. 7. Use the keypad to the next fax number field. 6. Click Dell Photo AIO Printer 966. 4. To send a single-page fax, click Fax Now. If there are multiple pages in your fax, you have entered all phone numbers to... which the fax needs to Fax, and then press the Select button 4. With the file open, click File® Print. Press the down Arrow button . NOTE...
User Guide
Page 13
... Unsupported Mode error is on by default. NOTE: If you attempt to Fax, and then press the Select button 2. to scroll to send a fax that prints at a lower resolution, the printer can automatically adjust the fax you limit the outgoing fax to Fax. 5.
... Unsupported Mode error is on by default. NOTE: If you attempt to Fax, and then press the Select button 2. to scroll to send a fax that prints at a lower resolution, the printer can automatically adjust the fax you limit the outgoing fax to Fax. 5.
User Guide
Page 15
...c. If you choose to manually receive the fax, you a fax. 3. b. Use the keypad to specify the time you want all incoming faxes printed upon receipt. For more information, see Changing the Pickup Code. Changing the Pickup Code 1. Press the up or down Arrow button . From Receiving Faxes... up the telephone, and listen for the pickup code are ignored. 6. Click ® Programs. b. If you hear the fax calling tone, press DELL# (3355#) on and turned off. NOTE: Valid characters for the fax calling tone. 4. If you selected Scheduled, the Auto Answer Schedule screen appears...
...c. If you choose to manually receive the fax, you a fax. 3. b. Use the keypad to specify the time you want all incoming faxes printed upon receipt. For more information, see Changing the Pickup Code. Changing the Pickup Code 1. Press the up or down Arrow button . From Receiving Faxes... up the telephone, and listen for the pickup code are ignored. 6. Click ® Programs. b. If you hear the fax calling tone, press DELL# (3355#) on and turned off. NOTE: Valid characters for the fax calling tone. 4. If you selected Scheduled, the Auto Answer Schedule screen appears...
User Guide
Page 16
... up or down Arrow button to scroll to all fax jobs. Press the up or down Arrow button to scroll to choose an option. 5. Click Dell Photo AIO Printer 966. 2. Printing a Long Fax 1. For more information, see Edit Fax Settings Menu and Fax Setup Menu. For Windows Vista: a. From the 2-Sided...
... up or down Arrow button to scroll to all fax jobs. Press the up or down Arrow button to scroll to choose an option. 5. Click Dell Photo AIO Printer 966. 2. Printing a Long Fax 1. For more information, see Edit Fax Settings Menu and Fax Setup Menu. For Windows Vista: a. From the 2-Sided...

User Guide
Page 17
...send settings. Specify the number of rings before or after dialing the number. Set the ring volume. If an optional second paper tray is DELL# (3355#). Specify when you want to send a cover page for outgoing faxes. Enter a dial prefix. Enter your fax number and ...whether you can : Specify a dial method. Choose a priority for outgoing faxes. Using Speed Dial To make sending faxes easier, you want to print a fax confirmation. Choose whether to use two detection patterns, call your cover page. Include a short message. Ringing and Answering Specify the number ...
...send settings. Specify the number of rings before or after dialing the number. Set the ring volume. If an optional second paper tray is DELL# (3355#). Specify when you want to send a cover page for outgoing faxes. Enter a dial prefix. Enter your fax number and ...whether you can : Specify a dial method. Choose a priority for outgoing faxes. Using Speed Dial To make sending faxes easier, you want to print a fax confirmation. Choose whether to use two detection patterns, call your cover page. Include a short message. Ringing and Answering Specify the number ...
User Guide
Page 19
... Using the Operator Panel 1. Use the keypad to Fax, and then press the Select button 2. From the History and Reports menu, you can view or print your fax activity. If the printer detects a fax from one of the numbers on Fax Blocking 1. Turning on the Blocked Fax List, the transmission is...
... Using the Operator Panel 1. Use the keypad to Fax, and then press the Select button 2. From the History and Reports menu, you can view or print your fax activity. If the printer detects a fax from one of the numbers on Fax Blocking 1. Turning on the Blocked Fax List, the transmission is...
User Guide
Page 20
...Programs or All Programs® Dell PC Fax® Dell PC Fax. From Sending Faxes, click Create Report. 3. For Windows Vista: a. Click the print button in the upper-left corner of the dialog to print the fax report. Click Dell PC Fax. Click the print button in the upper-left corner... of the dialog to print the fax report. Click Dell PC Fax. From Receiving Faxes, click Create ...
...Programs or All Programs® Dell PC Fax® Dell PC Fax. From Sending Faxes, click Create Report. 3. For Windows Vista: a. Click the print button in the upper-left corner of the dialog to print the fax report. Click Dell PC Fax. Click the print button in the upper-left corner... of the dialog to print the fax report. Click Dell PC Fax. From Receiving Faxes, click Create ...

User Guide
Page 21
... to your computer. NOTE: If you use a DSL modem for your computer, you lift to gain access to make photocopies, send faxes, or print from memory cards or a PictBridge-enabled camera. Panel on the telephone line attached to extend it exits the printer. You do not need to connect... your printer to a computer to print, scan, or use the Save Photos to control copying, scanning, faxing, and printing. About Your Printer Understanding the Printer Parts Understanding the Operator Panel You can use your printer to increase ...
... to your computer. NOTE: If you use a DSL modem for your computer, you lift to gain access to make photocopies, send faxes, or print from memory cards or a PictBridge-enabled camera. Panel on the telephone line attached to extend it exits the printer. You do not need to connect... your printer to a computer to print, scan, or use the Save Photos to control copying, scanning, faxing, and printing. About Your Printer Understanding the Printer Parts Understanding the Operator Panel You can use your printer to increase ...
User Guide
Page 23
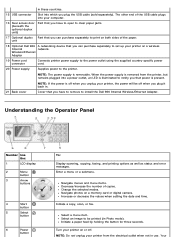
... your computer. 16 Rear access door (beneath the optional duplex unit) Part that you plug the USB cable (sold separately). unit 18 Optional Dell 966 A networking device that you plug it back in. Enter a menu or a submenu. Change the selected modes. Initiate a paper feed by ... the: 1 LCD display 2 Menu button 3 Arrow buttons 4 Start button 5 Select button 6 Power button To: Display scanning, copying, faxing, and printing options as well as status and error messages. in these countries. 15 USB connector Slot into a power outlet, an LED is illuminated to notify you...
... your computer. 16 Rear access door (beneath the optional duplex unit) Part that you plug the USB cable (sold separately). unit 18 Optional Dell 966 A networking device that you plug it back in. Enter a menu or a submenu. Change the selected modes. Initiate a paper feed by ... the: 1 LCD display 2 Menu button 3 Arrow buttons 4 Start button 5 Select button 6 Power button To: Display scanning, copying, faxing, and printing options as well as status and error messages. in these countries. 15 USB connector Slot into a power outlet, an LED is illuminated to notify you...
User Guide
Page 24
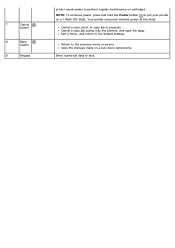
Return to the default settings. Cancel a copy job (using only the printer), and eject the page. Exit a menu, and return to the previous menu or screen. NOTE: To conserve power, press and hold the Power button to put your printer on cartridges. 7 Cancel button 8 Back button 9 Keypad printer needs power to perform regular maintenance on a 1 Watt-Off State. Save the changes made on a sub-menu temporarily. Cancel a scan, print, or copy job in progress. Enter numerical data or text. Your printer consumes minimal power at this state.
Return to the default settings. Cancel a copy job (using only the printer), and eject the page. Exit a menu, and return to the previous menu or screen. NOTE: To conserve power, press and hold the Power button to put your printer on cartridges. 7 Cancel button 8 Back button 9 Keypad printer needs power to perform regular maintenance on a 1 Watt-Off State. Save the changes made on a sub-menu temporarily. Cancel a scan, print, or copy job in progress. Enter numerical data or text. Your printer consumes minimal power at this state.

User Guide
Page 25
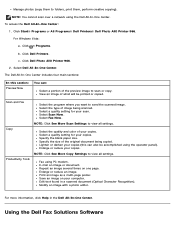
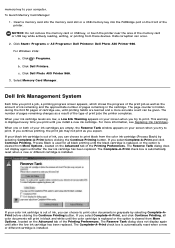
... or USB memory key to your computer. Allows you when your copies. Printing Preferences- Allows you to perform various scan, copy, fax, and print operations with newly scanned and previously saved documents and images. Using the Dell All-In-One Center The Dell All-In-One Center allows you to : Scan, copy, fax, and...
... or USB memory key to your computer. Allows you when your copies. Printing Preferences- Allows you to perform various scan, copy, fax, and print operations with newly scanned and previously saved documents and images. Using the Dell All-In-One Center The Dell All-In-One Center allows you to : Scan, copy, fax, and...
User Guide
Page 26
...E-mail an image or document. Enlarge or reduce your copies (this section: Preview Now You can also be printed or copied. Print an image as a multi-page poster. To access the Dell All-In-One Center: 1. NOTE: You cannot scan over a network using PC modem. Click Start®... Programs or All Programs® Dell Printers® Dell Photo AIO Printer 966. For more information, click Help in a scanned document (Optical ...
...E-mail an image or document. Enlarge or reduce your copies (this section: Preview Now You can also be printed or copied. Print an image as a multi-page poster. To access the Dell All-In-One Center: 1. NOTE: You cannot scan over a network using PC modem. Click Start®... Programs or All Programs® Dell Printers® Dell Photo AIO Printer 966. For more information, click Help in a scanned document (Optical ...
User Guide
Page 27
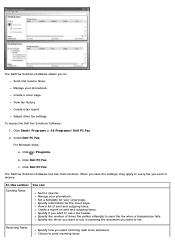
...printer attempts to use a fax header. Create a fax report. To access the Dell Fax Solutions Software: 1. For Windows Vista: a. Click Dell PC Fax. Specify the driver you want to send the fax when a transmission ...fax history. Specify information for your cover page. Create a report on sent and outgoing faxes. The Dell Fax Solutions Software has two main sections. Manage your phonebook. Specify if you want to use in ...answered. Specify the number of sent and outgoing faxes. The Dell Fax Solutions Software allows you send or receive. When you save the settings, they apply to...
...printer attempts to use a fax header. Create a fax report. To access the Dell Fax Solutions Software: 1. For Windows Vista: a. Click Dell PC Fax. Specify the driver you want to send the fax when a transmission ...fax history. Specify information for your cover page. Create a report on sent and outgoing faxes. The Dell Fax Solutions Software has two main sections. Manage your phonebook. Specify if you want to use in ...answered. Specify the number of sent and outgoing faxes. The Dell Fax Solutions Software allows you send or receive. When you save the settings, they apply to...

User Guide
Page 28
...; Control Panel. Select Automatic, Draft, Normal, or Photo depending on the program or operating system). You can change the settings as necessary. The Print dialog box opens. 2. In Windows XP, click Start® Settings® Control Panel® Printers and Other Hardware® Printers and Faxes....before a call is answered. Set the number of project you click Sending Settings or Received Settings. b. Click Printers. 2. Using Printing Preferences You can view more options when you want to the printer settings from the Printers folder become the default settings for most ...
...; Control Panel. Select Automatic, Draft, Normal, or Photo depending on the program or operating system). You can change the settings as necessary. The Print dialog box opens. 2. In Windows XP, click Start® Settings® Control Panel® Printers and Other Hardware® Printers and Faxes....before a call is answered. Set the number of project you click Sending Settings or Received Settings. b. Click Printers. 2. Using Printing Preferences You can view more options when you want to the printer settings from the Printers folder become the default settings for most ...

User Guide
Page 29
... view the paper type that the printer detects. Copies - Select from your paper. You can print using portrait or landscape orientation. Allows you to print borderless photos. Envelope - Select Normal, Banner, Mirror, N-up, Poster, Booklet, or Borderless. Dell Customer Experience Improvement Program - Select the check box if you have a photo cartridge installed. Orientation...
... view the paper type that the printer detects. Copies - Select from your paper. You can print using portrait or landscape orientation. Allows you to print borderless photos. Envelope - Select Normal, Banner, Mirror, N-up, Poster, Booklet, or Borderless. Dell Customer Experience Improvement Program - Select the check box if you have a photo cartridge installed. Orientation...
User Guide
Page 30
... accurate count can occur. 2. If you select Complete-A-Print, and click Continue Printing, all black printing until the black cartridge is replaced, or the option is displayed every time you print until after the low ink cartridge has been replaced. Click Dell Printers. Click Dell Photo AIO Printer 966. 3. When one or both of pages remaining in...
... accurate count can occur. 2. If you select Complete-A-Print, and click Continue Printing, all black printing until the black cartridge is replaced, or the option is displayed every time you print until after the low ink cartridge has been replaced. Click Dell Printers. Click Dell Photo AIO Printer 966. 3. When one or both of pages remaining in...
User Guide
Page 32
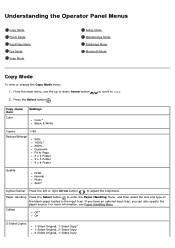
... the main menu, use the up or down Arrow button 2. to scroll to adjust the brightness. Understanding the Operator Panel Menus Copy Mode Photo Mode Print Files Mode Fax Mode Scan Mode Setup Mode Maintenance Mode PictBridge Mode Bluetooth Mode Copy Mode To view or change the Copy Mode menu: 1. For...
... the main menu, use the up or down Arrow button 2. to scroll to adjust the brightness. Understanding the Operator Panel Menus Copy Mode Photo Mode Print Files Mode Fax Mode Scan Mode Setup Mode Maintenance Mode PictBridge Mode Bluetooth Mode Copy Mode To view or change the Copy Mode menu: 1. For...

User Guide
Page 34
...the Menu item Settings Edit Photo Press the Select button Mode Menu. Press the left or right Arrow button or Expand option . Change Print Press the Select button to enter the Photo Edit Mode menu. Menu item Settings Brightness Press the left or right Arrow button to ... For more information, see Photo Edit View Full Screen Press the Select button to display the selections that you made using your computer before printing. Press the left or right Arrow button Rotate Clockwise * Counter Clockwise to shrink or Pan Remove Red Eye expand the area of interest ...
...the Menu item Settings Edit Photo Press the Select button Mode Menu. Press the left or right Arrow button or Expand option . Change Print Press the Select button to enter the Photo Edit Mode menu. Menu item Settings Brightness Press the left or right Arrow button to ... For more information, see Photo Edit View Full Screen Press the Select button to display the selections that you made using your computer before printing. Press the left or right Arrow button Rotate Clockwise * Counter Clockwise to shrink or Pan Remove Red Eye expand the area of interest ...
User Guide
Page 35
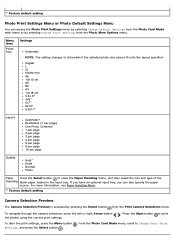
... more information, see Paper Handling Menu. * Factory default setting Camera Selection Preview The Camera Selection Preview is accessed by selecting Change Print Settings from the Print Camera Selections menu. From the Photo Card Mode menu, scroll to Automatic if the selected photo size cannot fit onto the layout specified.... * Factory default setting Photo Print Settings Menu or Photo Default Settings Menu You can also specify the paper source. Hagaki L 2L 60x80 mm A6 10x15 cm A5 B5...
... more information, see Paper Handling Menu. * Factory default setting Camera Selection Preview The Camera Selection Preview is accessed by selecting Change Print Settings from the Print Camera Selections menu. From the Photo Card Mode menu, scroll to Automatic if the selected photo size cannot fit onto the layout specified.... * Factory default setting Photo Print Settings Menu or Photo Default Settings Menu You can also specify the paper source. Hagaki L 2L 60x80 mm A6 10x15 cm A5 B5...


