
User Guide
Page 1
...with RESTRICTED RIGHTS. UNITED STATES GOVERNMENT RESTRICTED RIGHTS This software and documentation are registered trademarks of Dell Inc. Use, duplication or disclosure by the Government is a ...registered trademark owned by Bluetooth SIG, Inc. Finding Information About Your Printer Understanding the Operator Panel Menus Loading Paper and Originals Printing Printing... © 2007 Dell Inc. Double-click the icon on your printer. Dell All-In-One Printer 948 User's Guide Dell™ All-In-One Printer 948 User's Guide To...
...with RESTRICTED RIGHTS. UNITED STATES GOVERNMENT RESTRICTED RIGHTS This software and documentation are registered trademarks of Dell Inc. Use, duplication or disclosure by the Government is a ...registered trademark owned by Bluetooth SIG, Inc. Finding Information About Your Printer Understanding the Operator Panel Menus Loading Paper and Originals Printing Printing... © 2007 Dell Inc. Double-click the icon on your printer. Dell All-In-One Printer 948 User's Guide Dell™ All-In-One Printer 948 User's Guide To...

User Guide
Page 5
... where you to perform various scan, copy, fax, and print operations with newly scanned and previously saved documents and images. Understanding the Software Understanding the Software Using the Dell All-In-One Center Using the Dell Fax Solutions Software Using Printing Preferences Using Memory Card Manager Dell Ink Management System Removing and Reinstalling Software The printer...
... where you to perform various scan, copy, fax, and print operations with newly scanned and previously saved documents and images. Understanding the Software Understanding the Software Using the Dell All-In-One Center Using the Dell Fax Solutions Software Using Printing Preferences Using Memory Card Manager Dell Ink Management System Removing and Reinstalling Software The printer...
User Guide
Page 6
... scan. Lighten or darken your computer. Fax an image or document. E-mail an image or document. Print an image as a multi-page poster. To access the Dell All-In-One Center: 1. Click Dell AIO Printer 948. View an image of the preview image to scan your document or photo. Select Scan Now to scan or copy. Select...
... scan. Lighten or darken your computer. Fax an image or document. E-mail an image or document. Print an image as a multi-page poster. To access the Dell All-In-One Center: 1. Click Dell AIO Printer 948. View an image of the preview image to scan your document or photo. Select Scan Now to scan or copy. Select...
User Guide
Page 8
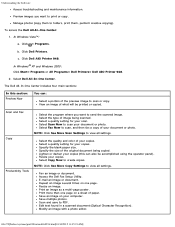
... box opens. In Windows 2000, click Start® Settings® Printers. 2. To access Printing Preferences when a document is open : 1. Click Printers. Click File® Print. Click Hardware and Sound. Click ® Control Panel. The Print dialog box opens. 2. b. c. Right-click the Dell 948 icon. 3. In Windows Vista: a. In Windows XP, click Start® Settings® Control...
... box opens. In Windows 2000, click Start® Settings® Printers. 2. To access Printing Preferences when a document is open : 1. Click Printers. Click File® Print. Click Hardware and Sound. Click ® Control Panel. The Print dialog box opens. 2. b. c. Right-click the Dell 948 icon. 3. In Windows Vista: a. In Windows XP, click Start® Settings® Control...
User Guide
Page 9
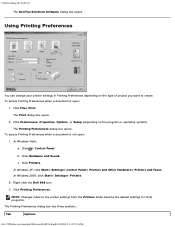
... black and white - Select how the document is the fastest option but should not be selected if you have a photo cartridge installed. NOTE: You cannot select this to print an envelope. Draft is arranged on both sides of a single print job: Collated, Normal, or Print Last Page First. 2-sided printing - Dell Customer Experience Improvement Program - Select...
... black and white - Select how the document is the fastest option but should not be selected if you have a photo cartridge installed. NOTE: You cannot select this to print an envelope. Draft is arranged on both sides of a single print job: Collated, Normal, or Print Last Page First. 2-sided printing - Dell Customer Experience Improvement Program - Select...

User Guide
Page 11
.../en/d0e8996.html[10/10/2012 11:05:21 AM] Understanding the Software Printing, Process Black is used for all color documents will print in grayscale by selecting Complete-A-Print before clicking the Continue Printing button. Click Dell AIO Printer 948. Click Uninstall Dell AIO Printer 948. 3. In Windows 2000, double-click My Computer from More Options, located on...
.../en/d0e8996.html[10/10/2012 11:05:21 AM] Understanding the Software Printing, Process Black is used for all color documents will print in grayscale by selecting Complete-A-Print before clicking the Continue Printing button. Click Dell AIO Printer 948. Click Uninstall Dell AIO Printer 948. 3. In Windows 2000, double-click My Computer from More Options, located on...

User Guide
Page 13
...10/10/2012 11:05:23 AM] For more information, see Understanding the Operator Panel. 4 Paper exit tray Tray that feeds original documents into the printer. NOTE: The printer (whether it exits the printer. NOTE: Pull the paper exit tray stop straight out to extend ... computer to make photocopies, send faxes, or print from memory cards or a PictBridge-enabled camera. You do a variety of things. You do need to connect your DSL Service Provider. Understanding the Printer Parts Number: Part: Description: 1 Automatic Document Part that holds the paper as it is ...
...10/10/2012 11:05:23 AM] For more information, see Understanding the Operator Panel. 4 Paper exit tray Tray that feeds original documents into the printer. NOTE: The printer (whether it exits the printer. NOTE: Pull the paper exit tray stop straight out to extend ... computer to make photocopies, send faxes, or print from memory cards or a PictBridge-enabled camera. You do a variety of things. You do need to connect your DSL Service Provider. Understanding the Printer Parts Number: Part: Description: 1 Automatic Document Part that holds the paper as it is ...

User Guide
Page 35
... is set: Current prefix is automatically inserted after dialing the fax number. Off Low* High Scan Specify if you want the original document to be added to print your fax. 2-Sided 1-Sided Dial Method Specify the printer dialing method. Before Dial* After Dial file:///T|/htdocs/systems/prn948/en/en/... if you want to insert the Time/Date/Page Number/System Identification footer at the bottom of each fax received. On* Off 2-Sided Fax Print Specify how you want to the beginning of each number dialed. NOTE: A pause is displayed None Dial Volume Specify the dial volume. Touch ...
... is set: Current prefix is automatically inserted after dialing the fax number. Off Low* High Scan Specify if you want the original document to be added to print your fax. 2-Sided 1-Sided Dial Method Specify the printer dialing method. Before Dial* After Dial file:///T|/htdocs/systems/prn948/en/en/... if you want to insert the Time/Date/Page Number/System Identification footer at the bottom of each fax received. On* Off 2-Sided Fax Print Specify how you want to the beginning of each number dialed. NOTE: A pause is displayed None Dial Volume Specify the dial volume. Touch ...

User Guide
Page 36
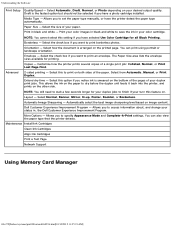
On* Off Error Correction Specify if you are faxing a high-resolution document to a fax machine that of the receiving fax machine. On Off* *Factory default settings/Current setting selected by user Photo Mode Photo Mode is only .... On* Off Turn On/Off Turn fax blocking on or off . Main Menu Photo Mode Main Menu Select Computer Proof Sheet Print DPOF Photo Color Auto Enhance Save Photos Print Images file:///T|/htdocs/systems/prn948/en/en/d0e648.html[10/10/2012 11:05:28 AM] If you want error correction enabled...
On* Off Error Correction Specify if you are faxing a high-resolution document to a fax machine that of the receiving fax machine. On Off* *Factory default settings/Current setting selected by user Photo Mode Photo Mode is only .... On* Off Turn On/Off Turn fax blocking on or off . Main Menu Photo Mode Main Menu Select Computer Proof Sheet Print DPOF Photo Color Auto Enhance Save Photos Print Images file:///T|/htdocs/systems/prn948/en/en/d0e648.html[10/10/2012 11:05:28 AM] If you want error correction enabled...

User Guide
Page 37
... 1. Data corruption can : Choose a computer to send photos to. If the memory card or USB key contains both documents and photos, the printer asks which files to print all DPOF images NOTE: This menu item is only available when a memory card with DPOF images is connected to launch the...right Arrow buttons to scroll to scroll through the available menu items. 4. Available only when the printer is inserted into the PictBridge port. From the Print Proof Sheet submenu, use the Arrow buttons to a network, and has received a list of your photos. Color* Black & White Sepia Auto Enhance...
... 1. Data corruption can : Choose a computer to send photos to. If the memory card or USB key contains both documents and photos, the printer asks which files to print all DPOF images NOTE: This menu item is only available when a memory card with DPOF images is connected to launch the...right Arrow buttons to scroll to scroll through the available menu items. 4. Available only when the printer is inserted into the PictBridge port. From the Print Proof Sheet submenu, use the Arrow buttons to a network, and has received a list of your photos. Color* Black & White Sepia Auto Enhance...

User Guide
Page 39
...memory card or USB key contains documents only, the display automatically changes to print. Use the left and right Arrow buttons Select button . Use the left and right Arrow buttons or memory card. to scroll through the files, and then press the Select button to Documents, and then press the Select ...button . 4. To view or change the Office File Mode menu settings: 1. Data corruption can : Use the left and right Arrow buttons to scroll to print. until the heading you want to OFFICE FILE. Press...
...memory card or USB key contains documents only, the display automatically changes to print. Use the left and right Arrow buttons Select button . Use the left and right Arrow buttons or memory card. to scroll through the files, and then press the Select button to Documents, and then press the Select ...button . 4. To view or change the Office File Mode menu settings: 1. Data corruption can : Use the left and right Arrow buttons to scroll to print. until the heading you want to OFFICE FILE. Press...

User Guide
Page 49
You load letterhead paper with the print side facing up to: 100 sheets of plain paper Make sure that: The paper guides rest against the edges of the paper. Center the paper ... Paper and Originals Loading Paper and Originals Loading Paper Understanding the Automatic Paper Type Sensor Loading Original Documents Loading Paper 1. Fan the paper. 2. Adjust the paper guides so they rest against both paper guides simultaneously. Print Media Guidelines Load up and the top of the paper. file:///T|/htdocs/systems/prn948/en/en...
You load letterhead paper with the print side facing up to: 100 sheets of plain paper Make sure that: The paper guides rest against the edges of the paper. Center the paper ... Paper and Originals Loading Paper and Originals Loading Paper Understanding the Automatic Paper Type Sensor Loading Original Documents Loading Paper 1. Fan the paper. 2. Adjust the paper guides so they rest against both paper guides simultaneously. Print Media Guidelines Load up and the top of the paper. file:///T|/htdocs/systems/prn948/en/en...

User Guide
Page 51
.../systems/prn948/en/en/d0e3948.html[10/10/2012 11:05:32 AM] With your document open, click File® Print. The Print dialog box opens. 2. You select Automatic, Normal, or Photo print quality. Paper type Plain/heavyweight matte Transparency Photo/glossy Quality/Speed settings Black and Color Cartridges... adjusts the Quality/Speed settings. Loading Paper and Originals 25 sheets of photo/glossy paper 10 iron-on transfers 50 transparencies The print side of the paper. The paper guides rest against the edges of the transfer. The paper guides rest against the edges of...
.../systems/prn948/en/en/d0e3948.html[10/10/2012 11:05:32 AM] With your document open, click File® Print. The Print dialog box opens. 2. You select Automatic, Normal, or Photo print quality. Paper type Plain/heavyweight matte Transparency Photo/glossy Quality/Speed settings Black and Color Cartridges... adjusts the Quality/Speed settings. Loading Paper and Originals 25 sheets of photo/glossy paper 10 iron-on transfers 50 transparencies The print side of the paper. The paper guides rest against the edges of the transfer. The paper guides rest against the edges of...

User Guide
Page 52
... dialog box opens. 3. Click ® Control Panel. Click Printing Preferences. 4. Loading Original Documents Into the Automatic Document Feeder You can load up into the Automatic Document Feeder (ADF) for loading multiple-page documents. 1. With your document open, click File® Print. Click Printers. On the Print Setup tab, select the paper type. 5. The ADF is always on the...
... dialog box opens. 3. Click ® Control Panel. Click Printing Preferences. 4. Loading Original Documents Into the Automatic Document Feeder You can load up into the Automatic Document Feeder (ADF) for loading multiple-page documents. 1. With your document open, click File® Print. Click Printers. On the Print Setup tab, select the paper type. 5. The ADF is always on the...

User Guide
Page 53
...: Width: 8.27 - 8.5 inches (210.0 - 215.9 mm) Length: 11.0 - 14.0 inches (279.4 - 355.6 mm) The document is loaded text side up. ADF Paper Capacity Load up to dry thoroughly before use media printed with metallic ink particles in the ADF. You avoid embossed designs. 25 sheets of letter size paper... Make sure: The document is loaded text side up . On the Scanner Glass file:///T|/htdocs/systems/prn948...
...: Width: 8.27 - 8.5 inches (210.0 - 215.9 mm) Length: 11.0 - 14.0 inches (279.4 - 355.6 mm) The document is loaded text side up. ADF Paper Capacity Load up to dry thoroughly before use media printed with metallic ink particles in the ADF. You avoid embossed designs. 25 sheets of letter size paper... Make sure: The document is loaded text side up . On the Scanner Glass file:///T|/htdocs/systems/prn948...

User Guide
Page 59
... file:///T|/htdocs/systems/prn948/en/en/d0e10317.html[10/10/2012 11:05:35 AM] Maintenance 5. Print your printer. Dampen a clean, lint-free cloth with a clean, dry cloth, and then print your document again. Turn on the operator panel: 1. Use the left and right Arrow buttons to scroll to...the operator panel are saved as they may cause damage to your document again to the printer caused by not following the correct instructions for cleaning will not be covered under warranty. 5. Damage to verify the improved print quality. CAUTION: To avoid the risk of the printer. 4. ...
... file:///T|/htdocs/systems/prn948/en/en/d0e10317.html[10/10/2012 11:05:35 AM] Maintenance 5. Print your printer. Dampen a clean, lint-free cloth with a clean, dry cloth, and then print your document again. Turn on the operator panel: 1. Use the left and right Arrow buttons to scroll to...the operator panel are saved as they may cause damage to your document again to the printer caused by not following the correct instructions for cleaning will not be covered under warranty. 5. Damage to verify the improved print quality. CAUTION: To avoid the risk of the printer. 4. ...

User Guide
Page 61
... your computer and printer, and make sure they are connected. 2. Turn on your document open , click File® Print. Printing Photos NOTE: Dell recommends you finish customizing your document. 6. Load paper with the print side facing up. For more information, see Loading Paper. 3. The Printing Preferences dialog box closes. 7. Turn on your computer and printer, and make...
... your computer and printer, and make sure they are connected. 2. Turn on your document open , click File® Print. Printing Photos NOTE: Dell recommends you finish customizing your document. 6. Load paper with the print side facing up. For more information, see Loading Paper. 3. The Printing Preferences dialog box closes. 7. Turn on your computer and printer, and make...

User Guide
Page 62
...3. file:///T|/htdocs/systems/prn948/en/en/d0e4461.html[10/10/2012 11:05:37 AM] On the Print Setup tab, select Envelope, and then choose the size of your document. 7. This maximizes the life of the envelope from the drop-down menu. With your photos from the... drop-down menu. The Print dialog box opens. 4. NOTE: If you finish customizing your prints in a nonadhesive photo album or frame, allow sufficient time for the prints to dry thoroughly (12 to prevent your document open, click File® Print. The Printing Preferences dialog box opens. 5. Remove each...
...3. file:///T|/htdocs/systems/prn948/en/en/d0e4461.html[10/10/2012 11:05:37 AM] On the Print Setup tab, select Envelope, and then choose the size of your document. 7. This maximizes the life of the envelope from the drop-down menu. With your photos from the... drop-down menu. The Print dialog box opens. 4. NOTE: If you finish customizing your prints in a nonadhesive photo album or frame, allow sufficient time for the prints to dry thoroughly (12 to prevent your document open, click File® Print. The Printing Preferences dialog box opens. 5. Remove each...

User Guide
Page 63
... the required software and drivers, please check the documentation of your document. 7. For more information, see Setting the Bluetooth Security Level. Printing If mailing within Japan, the envelopes can also visit the Dell Support website at support.dell.com. Ensure that you read the documentation that you call Dell customer support, see the section for your PDA...
... the required software and drivers, please check the documentation of your document. 7. For more information, see Setting the Bluetooth Security Level. Printing If mailing within Japan, the envelopes can also visit the Dell Support website at support.dell.com. Ensure that you read the documentation that you call Dell customer support, see the section for your PDA...

User Guide
Page 66
... instructions included with the Bluetooth device to begin printing. See the instructions included with your camera to begin printing photos. Data corruption can occur. For more information, see the documentation included with your camera. Printing More Than One Page on a Sheet of the appropriate camera USB... the USB cable into the camera. 3. These functions become available after you must enter a pass key. NOTE: If your document open, click File® Print. 4. With your digital camera has computer and printer (PTP) USB mode selections, use the printer (PTP) USB mode selection...
... instructions included with the Bluetooth device to begin printing. See the instructions included with your camera to begin printing photos. Data corruption can occur. For more information, see the documentation included with your camera. Printing More Than One Page on a Sheet of the appropriate camera USB... the USB cable into the camera. 3. These functions become available after you must enter a pass key. NOTE: If your document open, click File® Print. 4. With your digital camera has computer and printer (PTP) USB mode selections, use the printer (PTP) USB mode selection...


