User Guide
Page 2
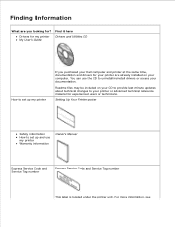
... printer at the same time, documentation and drivers for experienced users or technicians. You can use my printer Warranty information Owner's Manual Express Service Code and Service Tag number Express Service Code and Service Tag number This label is located under the printer unit. Readme files may be included on your computer. Finding Information What are already installed on your CD to provide last-minute updates about technical changes to uninstall/reinstall drivers or access your documentation...
... printer at the same time, documentation and drivers for experienced users or technicians. You can use my printer Warranty information Owner's Manual Express Service Code and Service Tag number Express Service Code and Service Tag number This label is located under the printer unit. Readme files may be included on your computer. Finding Information What are already installed on your CD to provide last-minute updates about technical changes to uninstall/reinstall drivers or access your documentation...
User Guide
Page 3
...problem. 4. Upgrade information for my printer Windows XP Help and Support Center 1. Printer documentation and product specifications How to technical service and support questions Documentation for my printer Dell Support Website The Dell Support website provides several online tools, including: Solutions - Contact information, order status, warranty, and repair information Downloads - Click Start Help and Support. 2. Troubleshooting hints and tips, articles from technicians, and online courses Upgrades - Drivers Reference - Follow the instructions shown on the screen. Type...
...problem. 4. Upgrade information for my printer Windows XP Help and Support Center 1. Printer documentation and product specifications How to technical service and support questions Documentation for my printer Dell Support Website The Dell Support website provides several online tools, including: Solutions - Contact information, order status, warranty, and repair information Downloads - Click Start Help and Support. 2. Troubleshooting hints and tips, articles from technicians, and online courses Upgrades - Drivers Reference - Follow the instructions shown on the screen. Type...
User Guide
Page 5
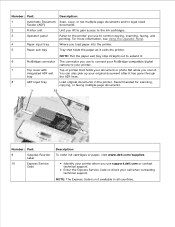
.... NOTE: The Express Code is not available in the printer. Number: Part: Description: 1 Automatic Document Scan, copy, or fax multiple page documents and/or legal sized Feeder (ADF) documents. 2 Printer unit Unit you lift to gain access to the ink cartridges. 3 Operator panel Panel on the printer you load paper into the printer. 5 Paper exit tray Tray that holds your document or photo flat while you use to control copying, scanning, faxing, and printing. For more information, see Using the Operator Panel. 4 Paper input tray Where you use support.dell.com or contact...
.... NOTE: The Express Code is not available in the printer. Number: Part: Description: 1 Automatic Document Scan, copy, or fax multiple page documents and/or legal sized Feeder (ADF) documents. 2 Printer unit Unit you lift to gain access to the ink cartridges. 3 Operator panel Panel on the printer you load paper into the printer. 5 Paper exit tray Tray that holds your document or photo flat while you use to control copying, scanning, faxing, and printing. For more information, see Using the Operator Panel. 4 Paper input tray Where you use support.dell.com or contact...
User Guide
Page 6
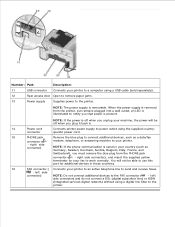
.... Number: Part: Description: 11 USB connector Connects your printer to a computer using a USB cable (sold separately). 12 Rear access door Open to remove paper jams. 13 Power supply Supplies power to send and receive faxes. - You will be off when you plug it back in. 14 Power cord Connects printer power supply to work correctly. right side connector), and insert the supplied yellow terminator for additional devices in your country (such as a data/fax connector...
.... Number: Part: Description: 11 USB connector Connects your printer to a computer using a USB cable (sold separately). 12 Rear access door Open to remove paper jams. 13 Power supply Supplies power to send and receive faxes. - You will be off when you plug it back in. 14 Power cord Connects printer power supply to work correctly. right side connector), and insert the supplied yellow terminator for additional devices in your country (such as a data/fax connector...
User Guide
Page 7
... answering machine can be attached to a computer. If necessary, you can change the settings for details. and initiate a scan, copy, or fax using the Select button , and left and right Arrow buttons ; If you power on the printer. You can change settings using the Start button . NOTE: Your printer modem is illuminated. To set up your Internet Service Provider for language, country, date, time, fax number, and fax name by accessing the Setup menu. right side connector...
... answering machine can be attached to a computer. If necessary, you can change the settings for details. and initiate a scan, copy, or fax using the Select button , and left and right Arrow buttons ; If you power on the printer. You can change settings using the Start button . NOTE: Your printer modem is illuminated. To set up your Internet Service Provider for language, country, date, time, fax number, and fax name by accessing the Setup menu. right side connector...

User Guide
Page 8
... menus on the display. Number Part: 1 Power 2 Error message light 3 Back 4 Left arrow 5 Cancel 6 Select 7 Right arrow 8 Pause 9 A keypad number or symbol Purpose: To turn your printer on the display. In fax mode: Enter fax numbers. To choose the option that appears on the display. Increase a number on the display. Type numbers to the fax default. Exit a menu. In copy mode, select the number of errors such as paper out or a paper jam. Cancel a scan, print, or copy job in the number to be dialed...
... menus on the display. Number Part: 1 Power 2 Error message light 3 Back 4 Left arrow 5 Cancel 6 Select 7 Right arrow 8 Pause 9 A keypad number or symbol Purpose: To turn your printer on the display. In fax mode: Enter fax numbers. To choose the option that appears on the display. Increase a number on the display. Type numbers to the fax default. Exit a menu. In copy mode, select the number of errors such as paper out or a paper jam. Cancel a scan, print, or copy job in the number to be dialed...
User Guide
Page 22
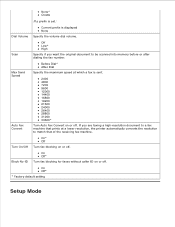
... Send Speed Auto Fax Convert Before Dial* After Dial Specify the maximum speed at a lower resolution, the printer automatically converts the resolution to be scanned into memory before or after dialing the fax number. If you want the original document to match that prints at which a fax is displayed None Specify the volume dial volume. On Off* * Factory default setting Setup Mode Block No-ID On Off* Turn fax...
... Send Speed Auto Fax Convert Before Dial* After Dial Specify the maximum speed at a lower resolution, the printer automatically converts the resolution to be scanned into memory before or after dialing the fax number. If you want the original document to match that prints at which a fax is displayed None Specify the volume dial volume. On Off* * Factory default setting Setup Mode Block No-ID On Off* Turn fax...
User Guide
Page 23
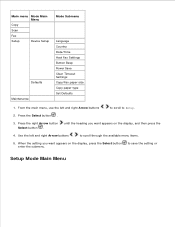
... 4. Press the right Arrow button Select button . Main menu Mode Main Menu Copy Scan Fax Setup Device Setup Defaults Maintenance Mode Submenu Language Country Date/Time Host Fax Settings Button Beep Power Save Clear Timeout Settings Copy/Fax paper size Copy paper type Set Defaults 1. until the heading you want appears on the display, press the Select button to save the setting or enter the submenu. From the main menu, use the left and right Arrow buttons to Setup. 2. Use the left and right Arrow buttons to scroll to scroll...
... 4. Press the right Arrow button Select button . Main menu Mode Main Menu Copy Scan Fax Setup Device Setup Defaults Maintenance Mode Submenu Language Country Date/Time Host Fax Settings Button Beep Power Save Clear Timeout Settings Copy/Fax paper size Copy paper type Set Defaults 1. until the heading you want appears on the display, press the Select button to save the setting or enter the submenu. From the main menu, use the left and right Arrow buttons to Setup. 2. Use the left and right Arrow buttons to scroll to scroll...
User Guide
Page 54
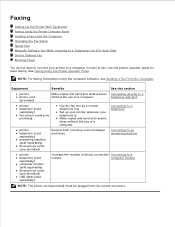
Use the printer operator panel for basic faxing. Make copies and send and receive faxes without the use of a computer. Connecting to a outlets. Connecting to an answering machine printer telephone (sold separately) computer modem (sold separately) three phone cords (one provided) USB cable (sold separately) Increase the number of a computer. NOTE: For faxing instructions using the computer software, see Sending a Fax From the Computer. telephone wall jack printer telephone (sold separately) three phone cords (one...
Use the printer operator panel for basic faxing. Make copies and send and receive faxes without the use of a computer. Connecting to a outlets. Connecting to an answering machine printer telephone (sold separately) computer modem (sold separately) three phone cords (one provided) USB cable (sold separately) Increase the number of a computer. NOTE: For faxing instructions using the computer software, see Sending a Fax From the Computer. telephone wall jack printer telephone (sold separately) three phone cords (one...

User Guide
Page 59
... the list has been completed. The number to which the fax needs to be sent. For more information, see Fax Setup Menu. Make sure your printer is currently within the scheduled on and connected to the next number in the Dialing and Sending options. Make sure Auto Answer is turned on or is on period. Press the right Arrow button Select button . Use the keypad to enter the fax number...
... the list has been completed. The number to which the fax needs to be sent. For more information, see Fax Setup Menu. Make sure your printer is currently within the scheduled on and connected to the next number in the Dialing and Sending options. Make sure Auto Answer is turned on or is on period. Press the right Arrow button Select button . Use the keypad to enter the fax number...

User Guide
Page 67
..., Behind a PBX). Speed Dial Add to print a fax usage report. 2. Specify a distinctive ring if your name and fax number. Press the right Arrow button button . Creating a Speed Dial List From the Operator Panel 1. Press the right Arrow button . 4. Printer Setup Utility Tabs On this tab: You can enter up to 99 speed dial numbers. Specify when to use error correction. From the main menu, use the left and right...
..., Behind a PBX). Speed Dial Add to print a fax usage report. 2. Specify a distinctive ring if your name and fax number. Press the right Arrow button button . Creating a Speed Dial List From the Operator Panel 1. Press the right Arrow button . 4. Printer Setup Utility Tabs On this tab: You can enter up to 99 speed dial numbers. Specify when to use error correction. From the main menu, use the left and right...

User Guide
Page 75
... to adjust printer settings. Printing Preferences - Dell Picture Studio™ - Allows you to : Scan, copy, fax, and use productivity tools. Allows you to manage, edit, display, print, and convert photos and other types of images. Warns you to perform various scan, copy, fax, and print operations with newly scanned and previously saved documents and images. Understanding the Software Using the Dell All-In-One Center Using Printing Preferences Using Dell Picture Studio Dell Ink Management System Removing and Reinstalling Software The printer software includes: Dell All...
... to adjust printer settings. Printing Preferences - Dell Picture Studio™ - Allows you to : Scan, copy, fax, and use productivity tools. Allows you to manage, edit, display, print, and convert photos and other types of images. Warns you to perform various scan, copy, fax, and print operations with newly scanned and previously saved documents and images. Understanding the Software Using the Dell All-In-One Center Using Printing Preferences Using Dell Picture Studio Dell Ink Management System Removing and Reinstalling Software The printer software includes: Dell All...
User Guide
Page 77
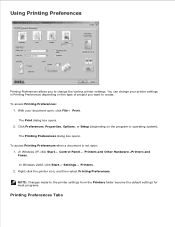
... Control Panel Printers and Other Hardware Printers and Faxes. In Windows 2000, click Start Settings Printers. 2. Right-click the printer icon, and then select Printing Preferences. To access Printing Preferences when a document is not open , click File Print. You can change the various printer settings. With your printer settings in Printing Preferences depending on the program or operating system). The Printing Preferences dialog box opens. To access Printing Preferences: 1. Click Preferences, Properties, Options, or Setup (depending on the type...
... Control Panel Printers and Other Hardware Printers and Faxes. In Windows 2000, click Start Settings Printers. 2. Right-click the printer icon, and then select Printing Preferences. To access Printing Preferences when a document is not open , click File Print. You can change the various printer settings. With your printer settings in Printing Preferences depending on the program or operating system). The Printing Preferences dialog box opens. To access Printing Preferences: 1. Click Preferences, Properties, Options, or Setup (depending on the type...
User Guide
Page 78
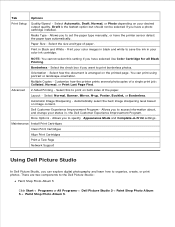
... Install Print Cartridges Clean Print Cartridges Align Print Cartridges Print a Test Page Network Support Using Dell Picture Studio In Dell Picture Studio, you to print borderless photos. Print in your desired output quality. Multiple Copies - Advanced 2-Sided Printing - Automatic Image Sharpening - Draft is arranged on image content. Borderless - Dell Customer Experience Improvement Program - Media Type - Layout - There are two components to save the ink in Black and White - Select the check box if you have the printer sensor detect the paper...
... Install Print Cartridges Clean Print Cartridges Align Print Cartridges Print a Test Page Network Support Using Dell Picture Studio In Dell Picture Studio, you to print borderless photos. Print in your desired output quality. Multiple Copies - Advanced 2-Sided Printing - Automatic Image Sharpening - Draft is arranged on image content. Borderless - Dell Customer Experience Improvement Program - Media Type - Layout - There are two components to save the ink in Black and White - Select the check box if you have the printer sensor detect the paper...

User Guide
Page 80
... the printer software. 1. Removing and Reinstalling Software If your printer does not function properly, or communication error messages appear when using your screen to complete the installation. Click Start Programs or All Programs Dell Printers Dell AIO Printer 946. 2. The Complete-A-Print check box is automatically reset when a new or different cartridge is installed. Follow the instructions on the screen. Double-click the CD-ROM drive icon, and then double-click setup.exe. In Windows XP...
... the printer software. 1. Removing and Reinstalling Software If your printer does not function properly, or communication error messages appear when using your screen to complete the installation. Click Start Programs or All Programs Dell Printers Dell AIO Printer 946. 2. The Complete-A-Print check box is automatically reset when a new or different cartridge is installed. Follow the instructions on the screen. Double-click the CD-ROM drive icon, and then double-click setup.exe. In Windows XP...
User Guide
Page 81
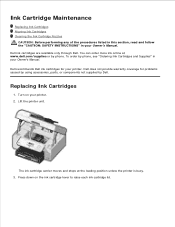
... Dell ink cartridges for problems caused by using accessories, parts, or components not supplied by phone. Replacing Ink Cartridges 1. Press down on your printer. 2. Lift the printer unit. Dell does not provide warranty coverage for your printer. Turn on the ink cartridge lever to raise each ink cartridge lid. To order by phone, see "Ordering Ink Cartridges and Supplies" in your Owner's Manual. The ink cartridge carrier moves and stops at www.dell.com/supplies or by Dell. Ink Cartridge Maintenance Replacing Ink Cartridges Aligning Ink Cartridges Cleaning...
... Dell ink cartridges for problems caused by using accessories, parts, or components not supplied by phone. Replacing Ink Cartridges 1. Press down on your printer. 2. Lift the printer unit. Dell does not provide warranty coverage for your printer. Turn on the ink cartridge lever to raise each ink cartridge lid. To order by phone, see "Ordering Ink Cartridges and Supplies" in your Owner's Manual. The ink cartridge carrier moves and stops at www.dell.com/supplies or by Dell. Ink Cartridge Maintenance Replacing Ink Cartridges Aligning Ink Cartridges Cleaning...
User Guide
Page 87
... the Setting Up Your Printer poster, and then restart the computer. Check the USB cable. When the printer software installation screen appears, click Personal Installation or Network Installation. 5. If Dell AIO Printer 946 does not appear in the list of programs, the printer software is installed. Setup Problems Computer Problems Verify your printer is compatible with your desktop. 3. Insert the Drivers and Utilities CD. 2. Troubleshooting Setup Problems General Problems Error Messages Improving Print Quality Follow these tips when you turned on the operator panel display...
... the Setting Up Your Printer poster, and then restart the computer. Check the USB cable. When the printer software installation screen appears, click Personal Installation or Network Installation. 5. If Dell AIO Printer 946 does not appear in the list of programs, the printer software is installed. Setup Problems Computer Problems Verify your printer is compatible with your desktop. 3. Insert the Drivers and Utilities CD. 2. Troubleshooting Setup Problems General Problems Error Messages Improving Print Quality Follow these tips when you turned on the operator panel display...

User Guide
Page 88
... Control Panel Printers and Other Hardware Printers and Faxes. Print a job to see Error Messages. Ensure you always plug the USB cable back into the same USB port that print object as the default printer. 1. Turn off the printer. In Windows 2000, click Start Settings Printers. 2. In Windows XP, click Start Control Panel Printers and Other Hardware Printers and Faxes. Set that was originally used for your computer. To prevent multiple instances of these print objects to each cartridge. Determine if the printer...
... Control Panel Printers and Other Hardware Printers and Faxes. Print a job to see Error Messages. Ensure you always plug the USB cable back into the same USB port that print object as the default printer. 1. Turn off the printer. In Windows 2000, click Start Settings Printers. 2. In Windows XP, click Start Control Panel Printers and Other Hardware Printers and Faxes. Set that was originally used for your computer. To prevent multiple instances of these print objects to each cartridge. Determine if the printer...

User Guide
Page 89
... the printer is set correctly. Use only paper recommended for the Paper Input Tray. Make sure the fax number, country code, and date/time are set correctly. Make sure the original document is not full. Make sure the printer detects the dial tone. For more information, see Print Media Guidelines for your original document one page at a time. Make sure the memory is loaded correctly. Make sure the printer doesn't have a paper jam. For more information, see Loading Paper. Make sure...
... the printer is set correctly. Use only paper recommended for the Paper Input Tray. Make sure the fax number, country code, and date/time are set correctly. Make sure the original document is not full. Make sure the printer detects the dial tone. For more information, see Print Media Guidelines for your original document one page at a time. Make sure the memory is loaded correctly. Make sure the printer doesn't have a paper jam. For more information, see Loading Paper. Make sure...

User Guide
Page 99
... details to access help tools and information. Electronic Support Service mobile_support@us.dell.com support@us.dell.com apsupport@dell.com (for Asian/Pacific countries only) support.jp.dell.com/jp/jp/tech/email/ (for Japan only) support.euro.dell.com (for the printer and any Dell-installed software and peripherals. Select your region on the WELCOME TO DELL SUPPORT page, and fill in as user: anonymous, and use your email address as the...
... details to access help tools and information. Electronic Support Service mobile_support@us.dell.com support@us.dell.com apsupport@dell.com (for Asian/Pacific countries only) support.jp.dell.com/jp/jp/tech/email/ (for Japan only) support.euro.dell.com (for the printer and any Dell-installed software and peripherals. Select your region on the WELCOME TO DELL SUPPORT page, and fill in as user: anonymous, and use your email address as the...


