Owner's Manual
Page 1
Dell™ Photo All-In-One Printer 942 Owner's Manual Look Inside For: • Ordering Supplies • Getting Started • Using the Printer • Understanding the Printer Software • Maintenance and Troubleshooting www.dell.com/supplies | support.dell.com
Dell™ Photo All-In-One Printer 942 Owner's Manual Look Inside For: • Ordering Supplies • Getting Started • Using the Printer • Understanding the Printer Software • Maintenance and Troubleshooting www.dell.com/supplies | support.dell.com

Owner's Manual
Page 2
Ordering Supplies Your Dell Photo AIO Printer 942 includes software installed to order supplies. US Australia Austria Belgium Canada Chile Chile Colombia Denmark Finland France Germany Ireland Italy 877-INK-2-YOU 1300 303 ... is not listed, contact your computer to print using the following ink cartridges. During a print job, a screen appears on your Dell distributor to detect the ink levels in the printer. Your printer has been designed to warn you of low ink levels. Supply Item Standard Capacity black ink cartridge Standard Capacity color ink...
Ordering Supplies Your Dell Photo AIO Printer 942 includes software installed to order supplies. US Australia Austria Belgium Canada Chile Chile Colombia Denmark Finland France Germany Ireland Italy 877-INK-2-YOU 1300 303 ... is not listed, contact your computer to print using the following ink cartridges. During a print job, a screen appears on your Dell distributor to detect the ink levels in the printer. Your printer has been designed to warn you of low ink levels. Supply Item Standard Capacity black ink cartridge Standard Capacity color ink...

Owner's Manual
Page 3
Dell Inc. Refer to Part 15 of the FCC rules. All rights reserved. FCC emissions information This equipment has been tested and found to comply with RESTRICTED RIGHTS. is subject to change without the written permission of your printer. Use, duplication or disclosure by the Government... to refer to either potential damage to hardware or loss of data and tells you make better use of Dell Inc. Reproduction in applicable FAR provisions: Dell Inc., One Dell Way, Round Rock, Texas, 78682, USA. Microsoft and Windows are trademarks of Microsoft Corporation. Other trademarks...
Dell Inc. Refer to Part 15 of the FCC rules. All rights reserved. FCC emissions information This equipment has been tested and found to comply with RESTRICTED RIGHTS. is subject to change without the written permission of your printer. Use, duplication or disclosure by the Government... to refer to either potential damage to hardware or loss of data and tells you make better use of Dell Inc. Reproduction in applicable FAR provisions: Dell Inc., One Dell Way, Round Rock, Texas, 78682, USA. Microsoft and Windows are trademarks of Microsoft Corporation. Other trademarks...
Owner's Manual
Page 5
Contents 1 Getting Started Understanding the Printer Parts 11 Setting Up Your Printer 12 Accessing Your User's Guide 13 Replacing the Operator Panel 13 Using the Operator Panel 15 Operator Panel Functionality 16 Operator Panel Menus 18 Print... Media Guidelines 26 Loading Paper 28 Understanding the Automatic Paper Type Sensor 29 Placing Your Document on the Scanner Glass 31 2 Using the Printer Printing 33 Printing a Document 33 Printing Photos 33 Printing Borderless Photos 34 Printing Other Projects 35 Copying 35 Copying Documents Without a Computer 35 Copying ...
Contents 1 Getting Started Understanding the Printer Parts 11 Setting Up Your Printer 12 Accessing Your User's Guide 13 Replacing the Operator Panel 13 Using the Operator Panel 15 Operator Panel Functionality 16 Operator Panel Menus 18 Print... Media Guidelines 26 Loading Paper 28 Understanding the Automatic Paper Type Sensor 29 Placing Your Document on the Scanner Glass 31 2 Using the Printer Printing 33 Printing a Document 33 Printing Photos 33 Printing Borderless Photos 34 Printing Other Projects 35 Copying 35 Copying Documents Without a Computer 35 Copying ...

Owner's Manual
Page 6
... or Fax Service Management 47 Viewing the Status of a Fax Using Fax Console or Fax Service Management 47 Changing the Fax Configuration 47 Using Your Printer in Photo Mode 48 Using Memory Cards 48 Using a PictBridge-Enabled Digital Camera 49 Working With Digital Photos 50 Saving Photos to Your Computer 51...
... or Fax Service Management 47 Viewing the Status of a Fax Using Fax Console or Fax Service Management 47 Changing the Fax Configuration 47 Using Your Printer in Photo Mode 48 Using Memory Cards 48 Using a PictBridge-Enabled Digital Camera 49 Working With Digital Photos 50 Saving Photos to Your Computer 51...
Owner's Manual
Page 7
3 Understanding the Printer Software Using the Dell Printer Solution Center 53 Using the Dell All-In-One Center 55 Using Printing Preferences 57 Printing Preferences Tabs 58 Using Dell Picture Studio v2.0 58 Using the Memory Card Manager 59 Ink Management 60 4 Ink Cartridge Maintenance Replacing Ink Cartridges 63 Aligning Ink Cartridges 66 Cleaning the Ink Cartridge Nozzles 67 5 Troubleshooting Setup Problems 69 Computer Problems 69 Printer Problems 71 General Problems 72 Fax Problems 72 Paper Problems 72 Error Messages and Lights 74 Improving Print Quality 75 Contents 7
3 Understanding the Printer Software Using the Dell Printer Solution Center 53 Using the Dell All-In-One Center 55 Using Printing Preferences 57 Printing Preferences Tabs 58 Using Dell Picture Studio v2.0 58 Using the Memory Card Manager 59 Ink Management 60 4 Ink Cartridge Maintenance Replacing Ink Cartridges 63 Aligning Ink Cartridges 66 Cleaning the Ink Cartridge Nozzles 67 5 Troubleshooting Setup Problems 69 Computer Problems 69 Printer Problems 71 General Problems 72 Fax Problems 72 Paper Problems 72 Error Messages and Lights 74 Improving Print Quality 75 Contents 7

Owner's Manual
Page 9
... documentation, to a professional service person. CAUTION: SAFETY INSTRUCTIONS Use the following safety guidelines to help ensure your own personal safety and to help protect your printer and working environment from potential damage. • Use only the power cable provided with this product or make any electrical or cabling connections, such as...
... documentation, to a professional service person. CAUTION: SAFETY INSTRUCTIONS Use the following safety guidelines to help ensure your own personal safety and to help protect your printer and working environment from potential damage. • Use only the power cable provided with this product or make any electrical or cabling connections, such as...
Owner's Manual
Page 11
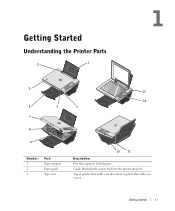
Getting Started 11 Guide that holds your document or photo flat while you scan it. Top of printer that helps the paper feed into the printer properly. 1 Getting Started Understanding the Printer Parts 1 2 3 4 5 7 8 9 Number: 1 2 3 Part: Paper support Paper guide Top cover 13 12 6 10 11 Description: Part that supports loaded paper.
Getting Started 11 Guide that holds your document or photo flat while you scan it. Top of printer that helps the paper feed into the printer properly. 1 Getting Started Understanding the Printer Parts 1 2 3 4 5 7 8 9 Number: 1 2 3 Part: Paper support Paper guide Top cover 13 12 6 10 11 Description: Part that supports loaded paper.
Owner's Manual
Page 12
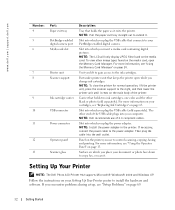
...the Memory Card Manager" on page 59. Carrier that holds the paper as it . NOTE: Dell recommends use to the ink cartridges. Setting Up Your Printer NOTE: The Dell Photo AIO Printer 942 supports Microsoft® Windows® 2000 and Windows XP. Follow the instructions on which you ...pictures. If necessary, connect the power cable to your computer. www.dell.com | support.dell.com Number: 4 5 6 7 8 9 10 11 12 13 Part: Paper exit tray PictBridge-enabled digital camera port Media card slot Printer unit Scanner support Ink cartridge carrier USB connector Power connector Operator panel ...
...the Memory Card Manager" on page 59. Carrier that holds the paper as it . NOTE: Dell recommends use to the ink cartridges. Setting Up Your Printer NOTE: The Dell Photo AIO Printer 942 supports Microsoft® Windows® 2000 and Windows XP. Follow the instructions on which you ...pictures. If necessary, connect the power cable to your computer. www.dell.com | support.dell.com Number: 4 5 6 7 8 9 10 11 12 13 Part: Paper exit tray PictBridge-enabled digital camera port Media card slot Printer unit Scanner support Ink cartridge carrier USB connector Power connector Operator panel ...
Owner's Manual
Page 13
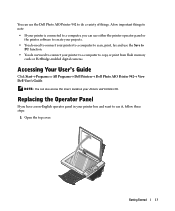
...and Utilities CD. A few important things to note: • If your printer is connected to a computer, you have a non-English operator panel in your printer box and want to use the Dell Photo AIO Printer 942 to do not need to copy or print from flash memory cards or ... Click Start→ Programs or All Programs→ Dell Printers→ Dell Photo AIO Printer 942→ View Dell User's Guide. NOTE: You can use either the printer operator panel or the printer software to create your projects. • You do need to connect your printer to a computer to scan, print, fax and use...
...and Utilities CD. A few important things to note: • If your printer is connected to a computer, you have a non-English operator panel in your printer box and want to use the Dell Photo AIO Printer 942 to do not need to copy or print from flash memory cards or ... Click Start→ Programs or All Programs→ Dell Printers→ Dell Photo AIO Printer 942→ View Dell User's Guide. NOTE: You can use either the printer operator panel or the printer software to create your projects. • You do need to connect your printer to a computer to scan, print, fax and use...

Owner's Manual
Page 15
Getting Started 15 Using the Operator Panel 1 2 15 3 14 4 13 5 12 6 11 7 10 8 9 Button Description 1 LCD Panel on the display. For more information, see "Using the Operator Panel" on page 15. 2 Number of Copies Select the desired number of copies by using the navigation button. 3 Navigation button • Increase or decrease a number on the display. • Scroll through a list on the printer that displays scanning, copying, faxing, and printing options as well as status and error messages.
Getting Started 15 Using the Operator Panel 1 2 15 3 14 4 13 5 12 6 11 7 10 8 9 Button Description 1 LCD Panel on the display. For more information, see "Using the Operator Panel" on page 15. 2 Number of Copies Select the desired number of copies by using the navigation button. 3 Navigation button • Increase or decrease a number on the display. • Scroll through a list on the printer that displays scanning, copying, faxing, and printing options as well as status and error messages.

Owner's Manual
Page 16
... on page 74. 9 Mode Scroll through the available modes: Photo, Copy, Scan, and Fax. 10 Mode lights Displays next to the current printer mode. 11 Black Make a black and white copy. 12 Menu Scroll through the available menus and modes. Preview Scans the document in the Copy...Cancel • Cancel a scan, print, or copy job in progress. • Cancel a copy job (using only the printer) and it to the Dell All-In-One Center. www.dell.com | support.dell.com Button Description 4 Preview Scans the document in the Copy or Scan mode and displays a preview. 5 Save to PC &#...
... on page 74. 9 Mode Scroll through the available modes: Photo, Copy, Scan, and Fax. 10 Mode lights Displays next to the current printer mode. 11 Black Make a black and white copy. 12 Menu Scroll through the available menus and modes. Preview Scans the document in the Copy...Cancel • Cancel a scan, print, or copy job in progress. • Cancel a copy job (using only the printer) and it to the Dell All-In-One Center. www.dell.com | support.dell.com Button Description 4 Preview Scans the document in the Copy or Scan mode and displays a preview. 5 Save to PC &#...
Owner's Manual
Page 17
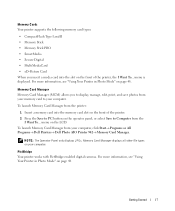
... Computer from the I Want To... menu is displayed. menu on your computer, click Start→ Programs or All Programs→ Dell Printers→ Dell Photo AIO Printer 942→ Memory Card Manager. PictBridge Your printer works with PictBridge-enabled digital cameras. Memory Card Manager displays all other file types on the LCD. For more information, see...
... Computer from the I Want To... menu is displayed. menu on your computer, click Start→ Programs or All Programs→ Dell Printers→ Dell Photo AIO Printer 942→ Memory Card Manager. PictBridge Your printer works with PictBridge-enabled digital cameras. Memory Card Manager displays all other file types on the LCD. For more information, see...
Owner's Manual
Page 22
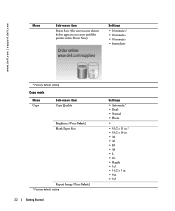
... Menu Sub-menu item Power Save (the screen saver shown below appears on screen until the printer enters Power Save) Order online: www.dell.com/supplies Settings • 10 minutes* • 20 minutes • 30 minutes • Immediate * Factory default setting Copy mode Menu Copy Sub-menu item Copy ...
... Menu Sub-menu item Power Save (the screen saver shown below appears on screen until the printer enters Power Save) Order online: www.dell.com/supplies Settings • 10 minutes* • 20 minutes • 30 minutes • Immediate * Factory default setting Copy mode Menu Copy Sub-menu item Copy ...
Owner's Manual
Page 26
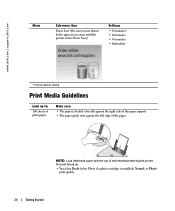
... Menu Sub-menu item Power Save (the screen saver shown below appears on screen until the printer enters Power Save) Order online: www.dell.com/supplies Settings • 10 minutes* • 20 minutes • 30 minutes • Immediate * Factory default setting Print Media Guidelines Load up . • You select ...: • The paper is installed), Normal, or Photo print quality. 26 Getting Started NOTE: Load letterhead paper with the top of the letterhead entering the printer first and facing up to: 100 sheets of the paper.
... Menu Sub-menu item Power Save (the screen saver shown below appears on screen until the printer enters Power Save) Order online: www.dell.com/supplies Settings • 10 minutes* • 20 minutes • 30 minutes • Immediate * Factory default setting Print Media Guidelines Load up . • You select ...: • The paper is installed), Normal, or Photo print quality. 26 Getting Started NOTE: Load letterhead paper with the top of the letterhead entering the printer first and facing up to: 100 sheets of the paper.
Owner's Manual
Page 27
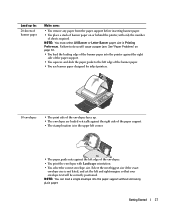
... your envelope text will cause a paper jam. See "Paper Problems" on or behind the printer, with Landscape orientation. • You select the correct envelope size. NOTE: You can load a single envelope into the printer against the right side of the paper support. • You squeeze and slide the paper...guide to do so will be correctly positioned. Failure to the left edge of the banner paper. • You use banner paper designed for inkjet printers. 10 envelopes • The print side of the envelopes faces up to: 20 sheets of banner paper Make sure: • You remove any...
... your envelope text will cause a paper jam. See "Paper Problems" on or behind the printer, with Landscape orientation. • You select the correct envelope size. NOTE: You can load a single envelope into the printer against the right side of the paper support. • You squeeze and slide the paper...guide to do so will be correctly positioned. Failure to the left edge of the banner paper. • You use banner paper designed for inkjet printers. 10 envelopes • The print side of the envelopes faces up to: 20 sheets of banner paper Make sure: • You remove any...
Owner's Manual
Page 29
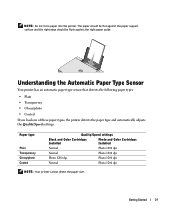
...and the right edge should be flush against the right paper guide. Getting Started 29 NOTE: Do not force paper into the printer. Paper type Plain Transparency Glossy/photo Coated Quality/Speed settings Black and Color Cartridges Installed Photo and Color Cartridges Installed Normal Photo ...1200 dpi Normal Photo 1200 dpi Photo 1200 dpi Photo 1200 dpi Normal Photo 1200 dpi NOTE: Your printer cannot detect the paper size. Understanding the Automatic Paper Type Sensor Your printer has an automatic paper type sensor that detects the following paper types: • Plain • ...
...and the right edge should be flush against the right paper guide. Getting Started 29 NOTE: Do not force paper into the printer. Paper type Plain Transparency Glossy/photo Coated Quality/Speed settings Black and Color Cartridges Installed Photo and Color Cartridges Installed Normal Photo ...1200 dpi Normal Photo 1200 dpi Photo 1200 dpi Photo 1200 dpi Normal Photo 1200 dpi NOTE: Your printer cannot detect the paper size. Understanding the Automatic Paper Type Sensor Your printer has an automatic paper type sensor that detects the following paper types: • Plain • ...

Owner's Manual
Page 30
... button. 5 Select the paper type in the drop-down menu. 6 Click OK. In Windows 2000, click Start→ Settings→ Printers. 2 Right-click the Printer icon. 3 Click Printing Preferences. 4 Click the Quality/Copies tab, and then click Paper Type Sensor Options. 5 Click the Use my choice...→ Printers and Faxes. To turn off the automatic paper type sensor for a specific print job: 1 With your document open , click File→ Print. 2 In the Print dialog box, click Preferences or Properties (depending on your program or operating system). www.dell.com | support.dell.com To...
... button. 5 Select the paper type in the drop-down menu. 6 Click OK. In Windows 2000, click Start→ Settings→ Printers. 2 Right-click the Printer icon. 3 Click Printing Preferences. 4 Click the Quality/Copies tab, and then click Paper Type Sensor Options. 5 Click the Use my choice...→ Printers and Faxes. To turn off the automatic paper type sensor for a specific print job: 1 With your document open , click File→ Print. 2 In the Print dialog box, click Preferences or Properties (depending on your program or operating system). www.dell.com | support.dell.com To...
Owner's Manual
Page 31
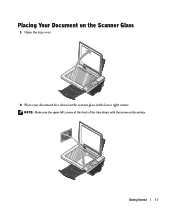
Getting Started 31 NOTE: Make sure the upper left corner of the front of the item aligns with the arrow on the scanner glass in the lower right corner. Placing Your Document on the Scanner Glass 1 Open the top cover. 2 Place your document face down on the printer.
Getting Started 31 NOTE: Make sure the upper left corner of the front of the item aligns with the arrow on the scanner glass in the lower right corner. Placing Your Document on the Scanner Glass 1 Open the top cover. 2 Place your document face down on the printer.
Owner's Manual
Page 33
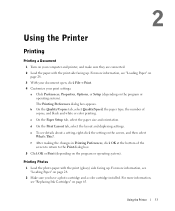
... screen to return to the Print dialog box. 5 Click OK or Print (depending on the program or operating system). Using the Printer 33 For more information, see "Loading Paper" on page 28. 3 With your document open, click File→ Print. 4 Customize your computer ...and printer, and make sure they are connected. 2 Load the paper with the print (glossy) side facing up . 2 Using the Printer Printing Printing a Document 1 Turn on your print settings: a Click Preferences, Properties, Options, or ...
... screen to return to the Print dialog box. 5 Click OK or Print (depending on the program or operating system). Using the Printer 33 For more information, see "Loading Paper" on page 28. 3 With your document open, click File→ Print. 4 Customize your computer ...and printer, and make sure they are connected. 2 Load the paper with the print (glossy) side facing up . 2 Using the Printer Printing Printing a Document 1 Turn on your print settings: a Click Preferences, Properties, Options, or ...


