
User Guide
Page 6
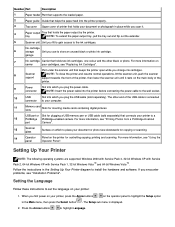
... operations, lift the scanner unit, push the scanner support support towards the front of the printer, then lower the scanner unit until it . 4 Paper output Tray that holds two ink cartridges, one colour and the other end of printer that holds your document or photograph in place while you scan it rests on which...
... operations, lift the scanner unit, push the scanner support support towards the front of the printer, then lower the scanner unit until it . 4 Paper output Tray that holds two ink cartridges, one colour and the other end of printer that holds your document or photograph in place while you scan it rests on which...
User Guide
Page 8
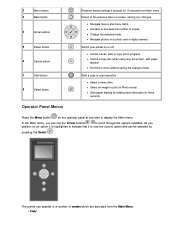
...image to display the Main menu. Operator Panel Menus Press the Menu button on a photo card or digital camera. Copy Change the selected mode. The printer can operate in Photo mode). Navigate photos on the operator panel at any time to print (in a number of copies. Cancel a copy job ...(when using only the printer), with paper ejection. Select a menu item. In the Main menu, you position on or off. Navigate menus and menu items. Increase or decrease the number of...
...image to display the Main menu. Operator Panel Menus Press the Menu button on a photo card or digital camera. Copy Change the selected mode. The printer can operate in Photo mode). Navigate photos on the operator panel at any time to print (in a number of copies. Cancel a copy job ...(when using only the printer), with paper ejection. Select a menu item. In the Main menu, you position on or off. Navigate menus and menu items. Increase or decrease the number of...
User Guide
Page 10
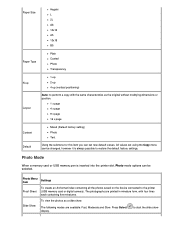
Photo Menu Settings Item Proof Sheet To create an A4 format index containing all the photos saved on the device connected to the printer (USB memory card or digital camera). Press Select display. The photographs are available: Fast, Moderate and Slow. Slide Show To view the photos ...Mode When a memory card or USB memory pen is inserted into the printer slot, Photo mode options can be selected. All values set new default values. to start the slide show . Paper Size Hagaki L 2L A6 10x15 A5 13x18 B5 Paper Type Plain Coated Photo Transparency N-up Layout 1-up 2-up 4-up (...
Photo Menu Settings Item Proof Sheet To create an A4 format index containing all the photos saved on the device connected to the printer (USB memory card or digital camera). Press Select display. The photographs are available: Fast, Moderate and Slow. Slide Show To view the photos ...Mode When a memory card or USB memory pen is inserted into the printer slot, Photo mode options can be selected. All values set new default values. to start the slide show . Paper Size Hagaki L 2L A6 10x15 A5 13x18 B5 Paper Type Plain Coated Photo Transparency N-up Layout 1-up 2-up 4-up (...
User Guide
Page 11
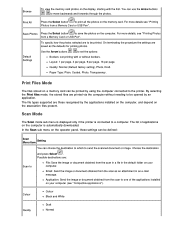
...defined: Scan Menu Item Setting You can choose the destination to which to a computer. Paper Type: Plain, Coated, Photo, Transparency. By selecting the Print files mode, the stored ...Press the Select button to and press Select . On terminating the procedure the settings are to one of applications on the computer is connected to send the scanned document or image. The file ... folder on your computer (see "Compatible applications"). Default Settings Use the Arrow buttons to the printer. Print Files Mode The files stored on a memory card can be opened by the applications ...
...defined: Scan Menu Item Setting You can choose the destination to which to a computer. Paper Type: Plain, Coated, Photo, Transparency. By selecting the Print files mode, the stored ...Press the Select button to and press Select . On terminating the procedure the settings are to one of applications on the computer is connected to send the scanned document or image. The file ... folder on your computer (see "Compatible applications"). Default Settings Use the Arrow buttons to the printer. Print Files Mode The files stored on a memory card can be opened by the applications ...
User Guide
Page 13
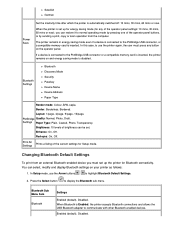
... set up the printer for any button on your printer as follows: 1. When the printer is automatically switched off: 10 mins, 30 mins, 60 mins or now. In this case, to use the Arrow buttons to normal operating mode by pressing one of the operator...to highlight Bluetooth Default Settings. 2. Bluetooth Settings Bluetooth Discovery Mode Security Passkey Device Name Device Address Paper Type Render mode: Colour, B/W, sepia. Border: Borderless, Bordered. Settings Paper Type: Plain, Coated, Photo, Transparency. Changing Bluetooth Default Settings To print from the computer. You...
... set up the printer for any button on your printer as follows: 1. When the printer is automatically switched off: 10 mins, 30 mins, 60 mins or now. In this case, to use the Arrow buttons to normal operating mode by pressing one of the operator...to highlight Bluetooth Default Settings. 2. Bluetooth Settings Bluetooth Discovery Mode Security Passkey Device Name Device Address Paper Type Render mode: Colour, B/W, sepia. Border: Borderless, Bordered. Settings Paper Type: Plain, Coated, Photo, Transparency. Changing Bluetooth Default Settings To print from the computer. You...
User Guide
Page 14
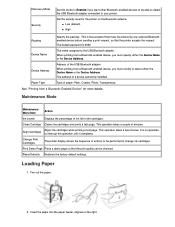
... of minutes. Aligns the cartridges while printing a test page. Print Demo Page Prints a demo page so that the printer accepts the request. Loading Paper 1. Discovery Mode Security Set this mode to Enabled if you want other Bluetooth-enabled devices to be modified. Device Name...Low (default) High Passkey Specify the passkey. Clean Cartridge Cleans the cartridges and prints a test page. Fan out the paper. 2. Insert the paper into the paper feeder, aligned on the Bluetooth network. Reset Defaults Restores the factory default settings. The address of actions to be checked...
... of minutes. Aligns the cartridges while printing a test page. Print Demo Page Prints a demo page so that the printer accepts the request. Loading Paper 1. Discovery Mode Security Set this mode to Enabled if you want other Bluetooth-enabled devices to be modified. Device Name...Low (default) High Passkey Specify the passkey. Clean Cartridge Cleans the cartridges and prints a test page. Fan out the paper. 2. Insert the paper into the paper feeder, aligned on the Bluetooth network. Reset Defaults Restores the factory default settings. The address of actions to be checked...
User Guide
Page 15
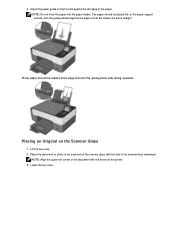
... edge so that it rests against the left corner of the paper. The paper should be loaded short-edge first with the side to be scanned face downward NOTE: Align the upper left edge of the document with the arrow on the printer. 3. Lower the top cover. Place the document or photo ...to be scanned on the Scanner Glass 1. NOTE: Do not force the paper into the paper feeder. Adjust the paper guide so that the sheets are fed in straight. Lift the top...
... edge so that it rests against the left corner of the paper. The paper should be loaded short-edge first with the side to be scanned face downward NOTE: Align the upper left edge of the document with the arrow on the printer. 3. Lower the top cover. Place the document or photo ...to be scanned on the Scanner Glass 1. NOTE: Do not force the paper into the paper feeder. Adjust the paper guide so that the sheets are fed in straight. Lift the top...
User Guide
Page 18
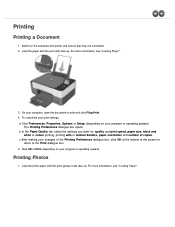
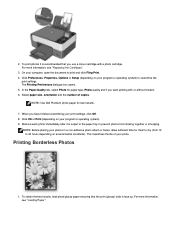
... 4. c After making your program or operating system). For more information, see "Loading Paper". 3. The Printing Preferences dialogue box opens. Click OK or Print (depending on your ...OK at the bottom of copies. b In the Paper/Quality tab, select the settings you want for: quality and print speed, paper size, black and white or colour printing, printing with... Printing Printing a Document 1. On your program or operating system). For more information, see "Loading Paper". To customise your print settings: a Click Preferences, Properties, Options or Setup (depending on your ...
... 4. c After making your program or operating system). For more information, see "Loading Paper". 3. The Printing Preferences dialogue box opens. Click OK or Print (depending on your ...OK at the bottom of copies. b In the Paper/Quality tab, select the settings you want for: quality and print speed, paper size, black and white or colour printing, printing with... Printing Printing a Document 1. On your program or operating system). For more information, see "Loading Paper". To customise your print settings: a Click Preferences, Properties, Options or Setup (depending on your ...
User Guide
Page 19
...maximises the life of copies. Printing Borderless Photos 1. Click Preferences, Properties, Options or Setup (depending on your prints. NOTE: Use Dell Premium photo paper for them to print and click Fileg Print. 4. NOTE: Before placing your print settings, click OK. 8. For more information, see "...in a non-adhesive photo album or frame, allow sufficient time for best results. 7. To obtain the best results, load photo/glossy paper ensuring that the print (glossy) side is recommended that you use a colour cartridge with or without borders. 6. Remove each photo immediately...
...maximises the life of copies. Printing Borderless Photos 1. Click Preferences, Properties, Options or Setup (depending on your prints. NOTE: Use Dell Premium photo paper for them to print and click Fileg Print. 4. NOTE: Before placing your print settings, click OK. 8. For more information, see "...in a non-adhesive photo album or frame, allow sufficient time for best results. 7. To obtain the best results, load photo/glossy paper ensuring that the print (glossy) side is recommended that you use a colour cartridge with or without borders. 6. Remove each photo immediately...
User Guide
Page 20
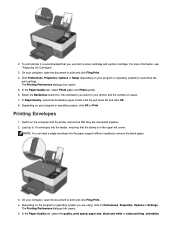
...customise the print settings. Click Preferences, Properties, Options or Setup (depending on your computer, open the document to remove the blank paper. 3. On your program or operating system, click OK or Print. Depending on Preferences, Properties, Options or Settings. Switch on the computer and... the printer and ensure that they are using, click on the program or operating system you use both a colour cartridge and a photo cartridge....
...customise the print settings. Click Preferences, Properties, Options or Setup (depending on your computer, open the document to remove the blank paper. 3. On your program or operating system, click OK or Print. Depending on Preferences, Properties, Options or Settings. Switch on the computer and... the printer and ensure that they are using, click on the program or operating system you use both a colour cartridge and a photo cartridge....

User Guide
Page 29
.... Enhance Red eyes Settings Option Setting Allows you to modify these characteristics of the selected photo: Brightness: Allows you to set Border, Layout, Quality and Paper Type. This operation does not damage the original photo in Edit mode, press the Cancel button. Defining the Photo Setup When browsing your modifications. Use...
.... Enhance Red eyes Settings Option Setting Allows you to modify these characteristics of the selected photo: Brightness: Allows you to set Border, Layout, Quality and Paper Type. This operation does not damage the original photo in Edit mode, press the Cancel button. Defining the Photo Setup When browsing your modifications. Use...

User Guide
Page 30
... without saving, press the Cancel button and confirm Settings Menu Item Settings Border Border Borderless Layout 1 x page 4 x page 9 x page 16 x page Quality Normal Photo Draft Paper Type Plain Coated Photo Transparency Viewing or Printing Photos 1. For each option, you can be printed directly from the memory card or the USB memory...
... without saving, press the Cancel button and confirm Settings Menu Item Settings Border Border Borderless Layout 1 x page 4 x page 9 x page 16 x page Quality Normal Photo Draft Paper Type Plain Coated Photo Transparency Viewing or Printing Photos 1. For each option, you can be printed directly from the memory card or the USB memory...

User Guide
Page 32
... to set is aligned with the arrow on your printer. 2. Scroll through the values. Now use the Arrow buttons to scroll through the options available using the Arrow buttons until the option you want to set is highlighted. 7. For more information, see "Loading Paper". 3. Place the document to select it is displayed...
... to set is aligned with the arrow on your printer. 2. Scroll through the values. Now use the Arrow buttons to scroll through the options available using the Arrow buttons until the option you want to set is highlighted. 7. For more information, see "Loading Paper". 3. Place the document to select it is displayed...

User Guide
Page 33
... the upper left corner of the document is displayed on the computer and printer and ensure they are connected. 2. Click Startg Programs or All Programsg Dell Printers g All-In-One Centerg All-In-One Center. Close the top cover. 6. Copying Documents from Your Computer 1. ...Press the button on the scanner glass. For more information, see "Loading Paper". 3. You can interrupt the operation in colour...
... the upper left corner of the document is displayed on the computer and printer and ensure they are connected. 2. Click Startg Programs or All Programsg Dell Printers g All-In-One Centerg All-In-One Center. Close the top cover. 6. Copying Documents from Your Computer 1. ...Press the button on the scanner glass. For more information, see "Loading Paper". 3. You can interrupt the operation in colour...

User Guide
Page 34
... Photos from the Operator Panel 1. Close the top cover. 6. Load photo paper with the arrow on the scanner glass. select the copy quality - reduce or enlarge the document. 12. Open the top cover. 4. Place the photo to copy face down on the printer. 5. - select the colour setting - For more information, see "Loading...
... Photos from the Operator Panel 1. Close the top cover. 6. Load photo paper with the arrow on the scanner glass. select the copy quality - reduce or enlarge the document. 12. Open the top cover. 4. Place the photo to copy face down on the printer. 5. - select the colour setting - For more information, see "Loading...

User Guide
Page 35
...without changing the image dimensions: Single copy per print The default selection, the printer prints the copy of the document or photo on the screen. From the pull-down list, select the paper type and the paper size you want to set the number of copies you want to use ...). Select the layout you can also set for defining copy settings has the following aspect: Option Setting Document Define the characteristics of grey. Paper setup Click Millimetres or Inches to print without changing the image dimensions. Brightness If necessary, you want to copy by moving the cursor on...
...without changing the image dimensions: Single copy per print The default selection, the printer prints the copy of the document or photo on the screen. From the pull-down list, select the paper type and the paper size you want to set the number of copies you want to use ...). Select the layout you can also set for defining copy settings has the following aspect: Option Setting Document Define the characteristics of grey. Paper setup Click Millimetres or Inches to print without changing the image dimensions. Brightness If necessary, you want to copy by moving the cursor on...

User Guide
Page 36
... options Click the Cancel button to return to the size of the original to the previous screen. Select the number of paper. until the number is smaller than one sheet of copies you want by clicking the Arrow buttons Click the Preview button to view the image to be selected, ...Indicate the desired scale. When you to spread the image over. Switch on the computer and the printer and ensure they are : left to right down, right to left ; these depend on the number of paper to set printing order. The Order pull-down right, top to start copying. Multiple copies per...
... options Click the Cancel button to return to the size of the original to the previous screen. Select the number of paper. until the number is smaller than one sheet of copies you want by clicking the Arrow buttons Click the Preview button to view the image to be selected, ...Indicate the desired scale. When you to spread the image over. Switch on the computer and the printer and ensure they are : left to right down, right to left ; these depend on the number of paper to set printing order. The Order pull-down right, top to start copying. Multiple copies per...

User Guide
Page 37
...White. 11. lighten or darken document - reduce or enlarge document. 13. When you want to be copied face down on the printer. 5. select the paper size - Select the Photo option from the Document type tab and then specify if the photo is aligned with the arrow on the... scanner glass. indicate the original document size - Changing Default Copy Settings Click Startg Programs or All Programsg Dell Printers g All-In-One Centerg All-In-One Center...
...White. 11. lighten or darken document - reduce or enlarge document. 13. When you want to be copied face down on the printer. 5. select the paper size - Select the Photo option from the Document type tab and then specify if the photo is aligned with the arrow on the... scanner glass. indicate the original document size - Changing Default Copy Settings Click Startg Programs or All Programsg Dell Printers g All-In-One Centerg All-In-One Center...

User Guide
Page 47
... The Scan dialogue opens on the scanner glass. When document processing completes, you are asked if you want to mail icon. 6. Load the paper. Place the document or photo face down on your computer screen. 7. NOTE: If you finish customising your e-mail program's Help information. Open.... Enlarging or Reducing Images or Documents You can enlarge or reduce your default e-mail program is aligned with the arrow on the printer. For more information, see "Loading Paper". 2. After you have a query about how to attach a document to 400 percent using the AIO Center. 1. Add a ...
... The Scan dialogue opens on the scanner glass. When document processing completes, you are asked if you want to mail icon. 6. Load the paper. Place the document or photo face down on your computer screen. 7. NOTE: If you finish customising your e-mail program's Help information. Open.... Enlarging or Reducing Images or Documents You can enlarge or reduce your default e-mail program is aligned with the arrow on the printer. For more information, see "Loading Paper". 2. After you have a query about how to attach a document to 400 percent using the AIO Center. 1. Add a ...
User Guide
Page 49
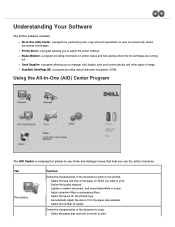
..., print and convert photos and other types of copies. Understanding Your Software The printer software includes: All-In-One (AIO) Center: a program for the printed copy. · Automatically adjust the size to fit to the paper size selected. · Select the number of image. ScanSoft OmniPage SE: a... information on which to copy. · Select the paper type and size on new, and previously saved, documents and images. Using the All-In-One (AIO) Center Program The AIO Center is composed of the document to print. Printer driver: a program allowing you use forms and dialogue ...
..., print and convert photos and other types of copies. Understanding Your Software The printer software includes: All-In-One (AIO) Center: a program for the printed copy. · Automatically adjust the size to fit to the paper size selected. · Select the number of image. ScanSoft OmniPage SE: a... information on which to copy. · Select the paper type and size on new, and previously saved, documents and images. Using the All-In-One (AIO) Center Program The AIO Center is composed of the document to print. Printer driver: a program allowing you use forms and dialogue ...


