
User Manual
Page 2
Contents 2 Contents Safety information 6 About your printer 7 Thank you for choosing this printer!...7 Minimizing your printer's environmental impact 7 Finding information about the printer...8 Understanding the parts of the printer 10 Ordering and replacing supplies 12 Ordering ink cartridges...12 Replacing ink cartridges...13 Recycling Dell products...14 Using the printer control panel buttons and menus 16 Replacing the language sheet...
Contents 2 Contents Safety information 6 About your printer 7 Thank you for choosing this printer!...7 Minimizing your printer's environmental impact 7 Finding information about the printer...8 Understanding the parts of the printer 10 Ordering and replacing supplies 12 Ordering ink cartridges...12 Replacing ink cartridges...13 Recycling Dell products...14 Using the printer control panel buttons and menus 16 Replacing the language sheet...
User Manual
Page 4
... an Ethernet network 104 Performing network management tasks 105 Networking FAQ...110 Maintaining the printer 124 Maintaining ink cartridges...124 Cleaning the exterior of the printer...125 Cleaning the scanner glass...126 Moving the printer to another location 126 Troubleshooting 128 Before you troubleshoot...128 If Troubleshooting does not solve your problem 128 Setup...
... an Ethernet network 104 Performing network management tasks 105 Networking FAQ...110 Maintaining the printer 124 Maintaining ink cartridges...124 Cleaning the exterior of the printer...125 Cleaning the scanner glass...126 Moving the printer to another location 126 Troubleshooting 128 Before you troubleshoot...128 If Troubleshooting does not solve your problem 128 Setup...
User Manual
Page 8
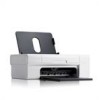
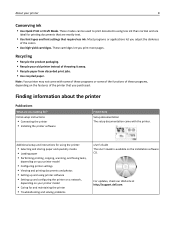
...'s Guide is available on the installation software CD. Recycling • Recycle the product packaging. • Recycle your printer 8 Conserving ink • Use Quick Print or Draft Mode. For updates, check our Web site at http://support.dell.com. Most programs or applications let you print more pages. Initial setup instructions: • Connecting the...
...'s Guide is available on the installation software CD. Recycling • Recycle the product packaging. • Recycle your printer 8 Conserving ink • Use Quick Print or Draft Mode. For updates, check our Web site at http://support.dell.com. Most programs or applications let you print more pages. Initial setup instructions: • Connecting the...
User Manual
Page 11
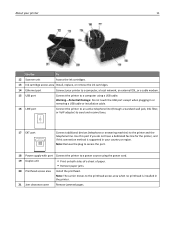
... • Print on both sides of a sheet of paper. • Remove paper jams. 20 Printhead access area Install the printhead. About your printer 11 Use the To 12 Scanner unit Access the ink cartridges. 13 Ink cartridge access area Install, replace, or remove the ink cartridges. 14 Ethernet port Connect your country or region.
... • Print on both sides of a sheet of paper. • Remove paper jams. 20 Printhead access area Install the printhead. About your printer 11 Use the To 12 Scanner unit Access the ink cartridges. 13 Ink cartridge access area Install, replace, or remove the ink cartridges. 14 Ethernet port Connect your country or region.
User Manual
Page 13
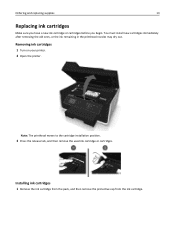
Removing ink cartridges 1 Turn on your printer. 2 Open the printer. Note: The printhead moves to the cartridge installation position. 3 Press the release tab, and then remove the used ink cartridge or cartridges. Ordering and replacing supplies 13 Replacing ink cartridges Make sure you have a new ink cartridge or cartridges before you begin. Installing ink cartridges 1 Remove the ink cartridge...
Removing ink cartridges 1 Turn on your printer. 2 Open the printer. Note: The printhead moves to the cartridge installation position. 3 Press the release tab, and then remove the used ink cartridge or cartridges. Ordering and replacing supplies 13 Replacing ink cartridges Make sure you have a new ink cartridge or cartridges before you begin. Installing ink cartridges 1 Remove the ink cartridge...

User Manual
Page 14
... All Programs or Programs, and then select the printer program folder from the list. 3 Select Printer Home. 4 Choose your finger along the ink cartridge until the cartridge clicks into place. Recycling Dell products To return Dell products to air. 3 Close the printer. Ordering and replacing supplies 14 If your ink cartridge comes with a twist cap, then remove...
... All Programs or Programs, and then select the printer program folder from the list. 3 Select Printer Home. 4 Choose your finger along the ink cartridge until the cartridge clicks into place. Recycling Dell products To return Dell products to air. 3 Close the printer. Ordering and replacing supplies 14 If your ink cartridge comes with a twist cap, then remove...
User Manual
Page 25
... the supplies status of your printer. • Order supplies online. Printer software Use the Dell Printer Home (referred to as Printer Home) Dell Ink Management System Dell Phone Book (referred to as Phone Book) Abbyy Sprint OCR Dell Wireless Setup Utility (referred to as Wireless Setup Utility) Dell Tools for the printer. • Order supplies. • Maintain ink cartridges. • Register the...
... the supplies status of your printer. • Order supplies online. Printer software Use the Dell Printer Home (referred to as Printer Home) Dell Ink Management System Dell Phone Book (referred to as Phone Book) Abbyy Sprint OCR Dell Wireless Setup Utility (referred to as Wireless Setup Utility) Dell Tools for the printer. • Order supplies. • Maintain ink cartridges. • Register the...
User Manual
Page 40
...a document, you can choose to print each sheet as it is enough ink in the ink cartridges. • Remove each copy as a set the printer, paper size, and orientation. 3 Click OK. 4 From the menu bar, choose File > Print. 5 From the Printer pop‑up menu, choose your print job. • Select a ...• Do not touch the duplex latch or latches while actively printing. Printing 40 Printing Tips for printing • Use the appropriate paper for your printer. 6 From the print options menu, choose the print quality, the number of copies to print, the type of paper to use , and how...
...a document, you can choose to print each sheet as it is enough ink in the ink cartridges. • Remove each copy as a set the printer, paper size, and orientation. 3 Click OK. 4 From the menu bar, choose File > Print. 5 From the Printer pop‑up menu, choose your print job. • Select a ...• Do not touch the duplex latch or latches while actively printing. Printing 40 Printing Tips for printing • Use the appropriate paper for your printer. 6 From the print options menu, choose the print quality, the number of copies to print, the type of paper to use , and how...

User Manual
Page 50
...Both Sides (Duplex) area > select a dry time setting Note: Under conditions of high humidity, or if the normal drying time does not allow the ink to dry completely, select Extended. 4 Click OK. For Macintosh users 1 From the Apple menu, navigate to: System Preferences > Print & Fax > ...select your prints. Printing 50 Setting the duplex printing dry time Using the control panel 1 From the printer control panel, navigate to: > Setup > > Print Mode Setup > > Page Dry Time > 2 Press the up menu, choose a dry time setting. Select...
...Both Sides (Duplex) area > select a dry time setting Note: Under conditions of high humidity, or if the normal drying time does not allow the ink to dry completely, select Extended. 4 Click OK. For Macintosh users 1 From the Apple menu, navigate to: System Preferences > Print & Fax > ...select your prints. Printing 50 Setting the duplex printing dry time Using the control panel 1 From the printer control panel, navigate to: > Setup > > Print Mode Setup > > Page Dry Time > 2 Press the up menu, choose a dry time setting. Select...
User Manual
Page 52
... users 1 Click , or click Start and then click Run. 2 In the Start Search or Run box, type control printers. 3 Press Enter, or click OK. Changing the default printing mode To conserve ink, you can change to a different print mode to : Quality tab > select a print quality > OK For Macintosh users..., then you can select a different mode from the Print dialog before sending the print job. It uses less ink and is not the default printer. Printing 52 Setting your printer as Default Printer. For Macintosh users 1 From the Apple menu, navigate to Draft or Quick Print. If you send a print...
... users 1 Click , or click Start and then click Run. 2 In the Start Search or Run box, type control printers. 3 Press Enter, or click OK. Changing the default printing mode To conserve ink, you can change to a different print mode to : Quality tab > select a print quality > OK For Macintosh users..., then you can select a different mode from the Print dialog before sending the print job. It uses less ink and is not the default printer. Printing 52 Setting your printer as Default Printer. For Macintosh users 1 From the Apple menu, navigate to Draft or Quick Print. If you send a print...
User Manual
Page 92
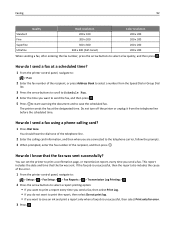
...Enter the fax number of the recipient, or press Address Book to save on ink and print a report only when a fax job is unsuccessful, then select Print only for error. 3 Press . Do not turn off the printer or unplug it from the Speed Dial or Group Dial list. 3 Press the... information, and then when you are connected to the telephone carrier, follow the prompts. 3 When prompted, enter the fax number of the error. 1 From the printer control panel, navigate to: > Setup > > Fax Setup > > Fax Reports > > Transmission Log Printing > 2 Press the arrow buttons to select a report printing option: &#...
...Enter the fax number of the recipient, or press Address Book to save on ink and print a report only when a fax job is unsuccessful, then select Print only for error. 3 Press . Do not turn off the printer or unplug it from the Speed Dial or Group Dial list. 3 Press the... information, and then when you are connected to the telephone carrier, follow the prompts. 3 When prompted, enter the fax number of the error. 1 From the printer control panel, navigate to: > Setup > > Fax Setup > > Fax Reports > > Transmission Log Printing > 2 Press the arrow buttons to select a report printing option: &#...
User Manual
Page 94
... prints an error report the next time it lets you can block up to block. If the printer runs out of ink or runs out of paper, then you know who sent the fax and how many pages were not sent. a ...Press the arrow buttons to scroll to save the setting. The printer saves an incoming fax to enter the fax number, and then press ....numbers that you cannot retrieve a failed fax if the failure is resolved. Faxing 94 d Use the keypad to the printer memory before it prints the fax.
... prints an error report the next time it lets you can block up to block. If the printer runs out of ink or runs out of paper, then you know who sent the fax and how many pages were not sent. a ...Press the arrow buttons to scroll to save the setting. The printer saves an incoming fax to enter the fax number, and then press ....numbers that you cannot retrieve a failed fax if the failure is resolved. Faxing 94 d Use the keypad to the printer memory before it prints the fax.
User Manual
Page 124
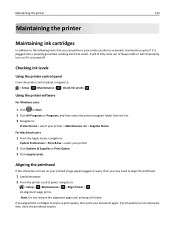
... it is plugged into a properly grounded, working electrical outlet. Maintaining the printer 124 Maintaining the printer Maintaining ink cartridges In addition to the following tasks that you can perform, your printer performs automatic maintenance cycles if it is turned off. Note: Do not... If print quality has not improved, then clean the printhead nozzles. Checking ink levels Using the printer control panel From the printer control panel, navigate to: > Setup > >Maintenance > > Check Ink Levels > Using the printer software For Windows users 1 Click or Start. 2 Click All Programs or...
... it is plugged into a properly grounded, working electrical outlet. Maintaining the printer 124 Maintaining the printer Maintaining ink cartridges In addition to the following tasks that you can perform, your printer performs automatic maintenance cycles if it is turned off. Note: Do not... If print quality has not improved, then clean the printhead nozzles. Checking ink levels Using the printer control panel From the printer control panel, navigate to: > Setup > >Maintenance > > Check Ink Levels > Using the printer software For Windows users 1 Click or Start. 2 Click All Programs or...
User Manual
Page 125
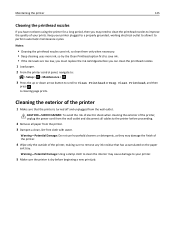
... the exterior of your prints. Maintaining the printer 125 Cleaning the printhead nozzles If you have not been using the printer for a long period, then you must replace the ink cartridges before proceeding. 2 Remove all cables to the printer before you can clean the printhead nozzles. ...1 Load paper. 2 From the printer control panel, navigate to: > Setup > > Maintenance...
... the exterior of your prints. Maintaining the printer 125 Cleaning the printhead nozzles If you have not been using the printer for a long period, then you must replace the ink cartridges before proceeding. 2 Remove all cables to the printer before you can clean the printhead nozzles. ...1 Load paper. 2 From the printer control panel, navigate to: > Setup > > Maintenance...

User Manual
Page 126
... another location When moving the printer to support the full footprint of the printer and the dimensions of the paper trays. • Remove all ink or corrective fluid on the document is turned off. • Any cart used to move the printer must have a surface able to another location, follow these... precautions: • Make sure the printer is dry before placing the document on the scanner...
... another location When moving the printer to support the full footprint of the printer and the dimensions of the paper trays. • Remove all ink or corrective fluid on the document is turned off. • Any cart used to move the printer must have a surface able to another location, follow these... precautions: • Make sure the printer is dry before placing the document on the scanner...

User Manual
Page 127
Maintaining the printer 127 • Keep the printer in an upright position to prevent the ink from leaking. • Avoid severe jarring movements.
Maintaining the printer 127 • Keep the printer in an upright position to prevent the ink from leaking. • Avoid severe jarring movements.
User Manual
Page 128
Press and hold for three seconds to turn the printer back on. Troubleshooting 128 Troubleshooting Before you want, and then press . If Troubleshooting does not solve your problem Visit our Web site at http://support.dell.com to find the following: • Live online customer support • ..., or network access point. • Check the printer for error messages, and resolve any errors. • Check for paper jam messages, and clear any jams. • Check the ink cartridges, and install new cartridges if necessary. • Turn the printer off, wait about 10 seconds, and then turn ...
Press and hold for three seconds to turn the printer back on. Troubleshooting 128 Troubleshooting Before you want, and then press . If Troubleshooting does not solve your problem Visit our Web site at http://support.dell.com to find the following: • Live online customer support • ..., or network access point. • Check the printer for error messages, and resolve any errors. • Check for paper jam messages, and clear any jams. • Check the ink cartridges, and install new cartridges if necessary. • Turn the printer off, wait about 10 seconds, and then turn ...

User Manual
Page 130
...not in the Default tab, select your printer does not appear in the Printer list, then choose Add Printer. If your printer does not appear in the list, then try one or more of the following : MAKE SURE THE INK CARTRIDGES ARE INSERTED CORRECTLY 1 Turn the printer on, and then open , choose File ...> Print. 2 From the printer pop-up menu, choose your printer, and then click Print. Press and hold for three seconds to Macintosh users only...
...not in the Default tab, select your printer does not appear in the Printer list, then choose Add Printer. If your printer does not appear in the list, then try one or more of the following : MAKE SURE THE INK CARTRIDGES ARE INSERTED CORRECTLY 1 Turn the printer on, and then open , choose File ...> Print. 2 From the printer pop-up menu, choose your printer, and then click Print. Press and hold for three seconds to Macintosh users only...
User Manual
Page 131
...10 seconds. 2 Insert the power cord into the USB port of the computer. REINSTALL THE INK CARTRIDGES AND DEEP CLEAN AND ALIGN THE PRINTHEAD 1 Reinstall the ink cartridges, see "Replacing ink cartridges" on the printer. Printer is busy or does not respond If the "Before you continue to have connected to Deep... any obvious damage. If the cartridges do not seem to Align Printer, and then press . You may be caused by improperly installed ink cartridges. If the printer will not come out of the following: MAKE SURE THE PRINTER IS NOT IN SLEEP MODE If the power light is blinking on...
...10 seconds. 2 Insert the power cord into the USB port of the computer. REINSTALL THE INK CARTRIDGES AND DEEP CLEAN AND ALIGN THE PRINTHEAD 1 Reinstall the ink cartridges, see "Replacing ink cartridges" on the printer. Printer is busy or does not respond If the "Before you continue to have connected to Deep... any obvious damage. If the cartridges do not seem to Align Printer, and then press . You may be caused by improperly installed ink cartridges. If the printer will not come out of the following: MAKE SURE THE PRINTER IS NOT IN SLEEP MODE If the power light is blinking on...
User Manual
Page 133
...; Press to cancel the current job. Change [Paper Source] to [Size] [Type] Paper Try one or more of the following : • Check the ink cartridges. 1 Open the printer, and then remove and reinstall the ink cartridges. 2 Load a plain and unmarked A4‑ or letter‑size paper. Troubleshooting 133 REMOVE AND REINSTALL THE...
...; Press to cancel the current job. Change [Paper Source] to [Size] [Type] Paper Try one or more of the following : • Check the ink cartridges. 1 Open the printer, and then remove and reinstall the ink cartridges. 2 Load a plain and unmarked A4‑ or letter‑size paper. Troubleshooting 133 REMOVE AND REINSTALL THE...


