User Guide
Page 84
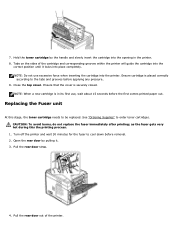
NOTE: When a new cartridge is in the printer. 8. Pull the rear door strap. 4. See "Ordering Supplies" to cool down before removal. 2. Replacing the Fuser unit At this the printing process. 1. Pull the rear door out of the cartridge and corresponding grooves within the printer will guide the cartridge into the correct position until it . 3. Ensure cartridge...
NOTE: When a new cartridge is in the printer. 8. Pull the rear door strap. 4. See "Ordering Supplies" to cool down before removal. 2. Replacing the Fuser unit At this the printing process. 1. Pull the rear door out of the cartridge and corresponding grooves within the printer will guide the cartridge into the correct position until it . 3. Ensure cartridge...
User Guide
Page 87
Close the rear door. 13. Reconnect the power cord and printer cable, and turn the printer on and insert the rear door strap to avoid print quality and paper feed problems resulting from worn parts. Replacement parts From time to time, you need to replace the rollers and fuser unit to maintain top performance and to the printer. 12. 10. Put the rear door back on . Insert the duplex unit into the slot. 11.
Close the rear door. 13. Reconnect the power cord and printer cable, and turn the printer on and insert the rear door strap to avoid print quality and paper feed problems resulting from worn parts. Replacement parts From time to time, you need to replace the rollers and fuser unit to maintain top performance and to the printer. 12. 10. Put the rear door back on . Insert the duplex unit into the slot. 11.
User Guide
Page 110
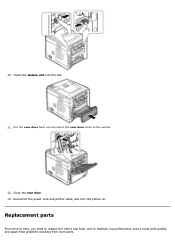
...2mm) and length of your printer by pulling it down ) You can increase the paper output capacity of the printer face up ) When using the rear door, paper comes out of your printer becomes very hot when in the ouput expander. CAUTION: The fuser area inside the rear door of 5.82"(148.5mm) cannot... be print out in use the rear door: Open the rear door by installing an Output...
...2mm) and length of your printer by pulling it down ) You can increase the paper output capacity of the printer face up ) When using the rear door, paper comes out of your printer becomes very hot when in the ouput expander. CAUTION: The fuser area inside the rear door of 5.82"(148.5mm) cannot... be print out in use the rear door: Open the rear door by installing an Output...

User Guide
Page 156
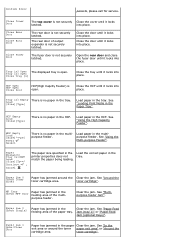
In the feeding area of Jam Go to clear the jam. Paper Exit Jam "In the paper exit area". Between the duplex unit and fuser area "Duplex jam 1". Pull paper tray 1 open. In the duplex unit "Duplex jam 0". Paper Feed Jam (tray 1 or optional trays) "Paper Feed Jam (...paper out gently and slowly. Operator Panel Message Paper Jam 0 Open/Close Door MP Tray Paper Jam 0 Tray [x] Paper Jam 0 Paper Jam 1 Open/Close Door Paper Jam 2 Check Inside Duplex Jam 0 Check Inside Duplex Jam 1 Open/Close Door Location of the "Multi-purpose feeder multi-purpose feeder Jam". In the...
In the feeding area of Jam Go to clear the jam. Paper Exit Jam "In the paper exit area". Between the duplex unit and fuser area "Duplex jam 1". Pull paper tray 1 open. In the duplex unit "Duplex jam 0". Paper Feed Jam (tray 1 or optional trays) "Paper Feed Jam (...paper out gently and slowly. Operator Panel Message Paper Jam 0 Open/Close Door MP Tray Paper Jam 0 Tray [x] Paper Jam 0 Paper Jam 1 Open/Close Door Paper Jam 2 Check Inside Duplex Jam 0 Check Inside Duplex Jam 1 Open/Close Door Location of the "Multi-purpose feeder multi-purpose feeder Jam". In the...
User Guide
Page 161
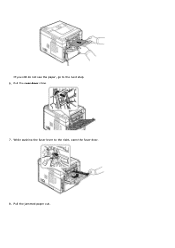
Pull the jammed paper out. While pushing the fuser lever to the next step. 6. Pull the rear door strap. 7. If you still do not see the paper, go to the right, open the fuser door. 8.
Pull the jammed paper out. While pushing the fuser lever to the next step. 6. Pull the rear door strap. 7. If you still do not see the paper, go to the right, open the fuser door. 8.

User Guide
Page 162
Printing automatically resumes. Pull the duplex unit out of the printer. 2. Ensure that the duplex unit is not inserted correctly, paper jam may occur. Locate the paper and remove it. 3. In the Duplex Unit Area If the the duplex unit is inserted correctly. Return the pressure levers to original position and insert the rear door connector in the printer. 10. Duplex jam 0 1. Return the fuser lever to their original position and close the rear door. Insert the duplex unit into the slot. 9.
Printing automatically resumes. Pull the duplex unit out of the printer. 2. Ensure that the duplex unit is not inserted correctly, paper jam may occur. Locate the paper and remove it. 3. In the Duplex Unit Area If the the duplex unit is inserted correctly. Return the pressure levers to original position and insert the rear door connector in the printer. 10. Duplex jam 0 1. Return the fuser lever to their original position and close the rear door. Insert the duplex unit into the slot. 9.
User Guide
Page 165
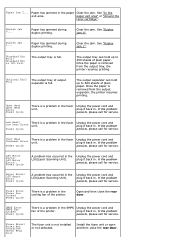
... latched. See "Using the Multi-purpose Feeder". purpose feeder. Paper Jam 1 Open/Close Door Paper has jammed in the printer properties does not tray. See "In the exit area or around the Clear the jam. toner cartridge". The fuser door is no paper in the tray. [Size][Type] Load paper in the HCF. Tray...
... latched. See "Using the Multi-purpose Feeder". purpose feeder. Paper Jam 1 Open/Close Door Paper has jammed in the printer properties does not tray. See "In the exit area or around the Clear the jam. toner cartridge". The fuser door is no paper in the tray. [Size][Type] Load paper in the HCF. Tray...
User Guide
Page 166
.... The output expander can hold up to 600 sheets of the printer. plug it back in . See "Duplex jam 0". Open and then close the rear door. Fuser Error/ Fuser Not Installed Check Rear Door The fuser unit is full. Paper has jammed in the LSU(Laser Scanning Unit). Duplex jam 0... Paper has jammed during duplex printing. Standard...
.... The output expander can hold up to 600 sheets of the printer. plug it back in . See "Duplex jam 0". Open and then close the rear door. Fuser Error/ Fuser Not Installed Check Rear Door The fuser unit is full. Paper has jammed in the LSU(Laser Scanning Unit). Duplex jam 0... Paper has jammed during duplex printing. Standard...

