User's Guide
Page 17
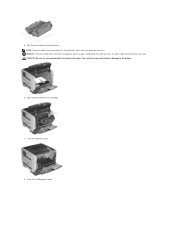
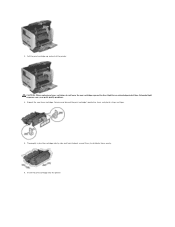
CAUTION: Do not use any pointed objects to the printer. 6. NOTE: The print media may be covered with unfused toner, which can stain garments and skin. This could cause personal injury or damage to remove the paper. Align and reinstall the toner cartridge. 7. Close the top front cover. 8. 5. Pull the print media up and toward you pull, stop pulling. You need to access the print media from the printer rear door. Close the multipurpose feeder. NOTICE: If the print media does not move immediately when you .
CAUTION: Do not use any pointed objects to the printer. 6. NOTE: The print media may be covered with unfused toner, which can stain garments and skin. This could cause personal injury or damage to remove the paper. Align and reinstall the toner cartridge. 7. Close the top front cover. 8. 5. Pull the print media up and toward you pull, stop pulling. You need to access the print media from the printer rear door. Close the multipurpose feeder. NOTICE: If the print media does not move immediately when you .
User's Guide
Page 31
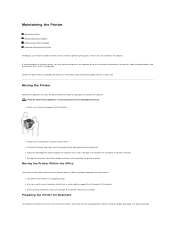
.... l Disconnect all cords and cables from one location within the office or to this chapter. Maintaining the Printer Moving the Printer Maintaining Printer Supplies Replacing the Toner Cartridge Replacing Maintenance Kit Items Periodically, you bought the printer for information about authorized supplies dealers in your area. These tasks are using the power switch. If several...
.... l Disconnect all cords and cables from one location within the office or to this chapter. Maintaining the Printer Moving the Printer Maintaining Printer Supplies Replacing the Toner Cartridge Replacing Maintenance Kit Items Periodically, you bought the printer for information about authorized supplies dealers in your area. These tasks are using the power switch. If several...

User's Guide
Page 32
...Up. Additional instructions for more information, see Understanding the Operator Panel Menus. Maintaining Printer Supplies Ordering Supplies To order supplies, visit Dell's website: www.dell.com/supplies. Rolls When toner fog or background shading appears on the display let you are ready to use ...a shipping or transport method that requires the printer to 10 (darkest setting). Roller ...
...Up. Additional instructions for more information, see Understanding the Operator Panel Menus. Maintaining Printer Supplies Ordering Supplies To order supplies, visit Dell's website: www.dell.com/supplies. Rolls When toner fog or background shading appears on the display let you are ready to use ...a shipping or transport method that requires the printer to 10 (darkest setting). Roller ...
User's Guide
Page 33
... a short time while this procedure multiple times until the print remains faded. Duplex in a busy state. When the Toner low message appears or when you can also view the toner level in the printer on the front of paper. Pull on the notch on the operator panel unless the... printer is unsatisfactory, you experience faded print, remove the toner cartridge. If the job is printing or in the Settings® Finishing Menu Use your software application or printer driver to lower the multipurpose feeder. 2. Press the Down ...
... a short time while this procedure multiple times until the print remains faded. Duplex in a busy state. When the Toner low message appears or when you can also view the toner level in the printer on the front of paper. Pull on the notch on the operator panel unless the... printer is unsatisfactory, you experience faded print, remove the toner cartridge. If the job is printing or in the Settings® Finishing Menu Use your software application or printer driver to lower the multipurpose feeder. 2. Press the Down ...
User's Guide
Page 34
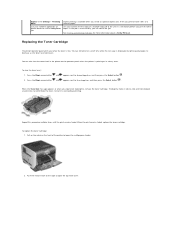
CAUTION: When replacing a toner cartridge, do not leave the new cartridge exposed to distribute toner evenly. 6. Extended light exposure can cause print quality problems. 4. Pull the print cartridge up and out of time. Unpack the new toner cartridge. 3. Remove and discard the print cartridge's protective foam, red plastic strap, and tape. 5. Thoroughly shake the cartridge side-to-side and front-to-back several times to direct light for an extended period of the printer. Insert the print cartridge into the printer.
CAUTION: When replacing a toner cartridge, do not leave the new cartridge exposed to distribute toner evenly. 6. Extended light exposure can cause print quality problems. 4. Pull the print cartridge up and out of time. Unpack the new toner cartridge. 3. Remove and discard the print cartridge's protective foam, red plastic strap, and tape. 5. Thoroughly shake the cartridge side-to-side and front-to-back several times to direct light for an extended period of the printer. Insert the print cartridge into the printer.

User's Guide
Page 35
Close the top front cover. 8. Turn the printer off, and unplug the printer power cord. 2. Replacing Maintenance Kit Items Replacing the Charge Rolls Order a new charge roll kit when toner fog or background shading appears on the front of the printer to lower the multipurpose feeder. Pull on the notch on printed pages. 1. 7. Close the multipurpose feeder.
Close the top front cover. 8. Turn the printer off, and unplug the printer power cord. 2. Replacing Maintenance Kit Items Replacing the Charge Rolls Order a new charge roll kit when toner fog or background shading appears on the front of the printer to lower the multipurpose feeder. Pull on the notch on printed pages. 1. 7. Close the multipurpose feeder.
User's Guide
Page 39
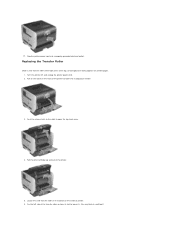
...latch to the right to loosen it. (Use any kind of the printer. 5. Pry the left side of the transfer roller up and out of small tool.) Replacing the Transfer Roller Order a new transfer roller when light print, toner fog, or background shading appears on the bottom of the inside of... the printer to lower the multipurpose feeder. 3. Locate the used transfer roller on printed pages. 1. Pull on the notch ...
...latch to the right to loosen it. (Use any kind of the printer. 5. Pry the left side of the transfer roller up and out of small tool.) Replacing the Transfer Roller Order a new transfer roller when light print, toner fog, or background shading appears on the bottom of the inside of... the printer to lower the multipurpose feeder. 3. Locate the used transfer roller on printed pages. 1. Pull on the notch ...

User's Guide
Page 55
... the relative weight of the defined media types. Heavy Light Shown if the custom type is supported in a specific source, and ensures the toner adheres properly to optimize the print quality for the specified media. This lets you load an input source with preprinted media, and then notify... l The All Listed value indicates that the media is not loaded. Values: Light Normal* Heavy Light Shown if Card Stock is selected, the printer automatically inserts blank pages to set the media texture for each of the custom media loaded in a specific source. Smooth Normal* Rough Labels Texture ...
... the relative weight of the defined media types. Heavy Light Shown if the custom type is supported in a specific source, and ensures the toner adheres properly to optimize the print quality for the specified media. This lets you load an input source with preprinted media, and then notify... l The All Listed value indicates that the media is not loaded. Values: Light Normal* Heavy Light Shown if Card Stock is selected, the printer automatically inserts blank pages to set the media texture for each of the custom media loaded in a specific source. Smooth Normal* Rough Labels Texture ...

User's Guide
Page 58
... the amount of values.) The factory default Power Saver setting depends on your printer is the default setting. Disables Print Timeout. 1-255 - This uses much less energy, but requires more warm-up period. Toner Alarm: Off* Single Continuous Screen Disabled - Timeout: 15-300 (30*) 15...-300 - Specifies the amount of time the printer waits for an end-of-job message before returning to Off. Specifies the amount...
... the amount of values.) The factory default Power Saver setting depends on your printer is the default setting. Disables Print Timeout. 1-255 - This uses much less energy, but requires more warm-up period. Toner Alarm: Off* Single Continuous Screen Disabled - Timeout: 15-300 (30*) 15...-300 - Specifies the amount of time the printer waits for an end-of-job message before returning to Off. Specifies the amount...

User's Guide
Page 61
...hard disk. Hex Trace Helps isolate the source of printed objects. Bookmarks and other types of black toner on the disk. Clear Deletes all fonts resident in the printer. Control codes are returned to the factory default values except: l Display Language. Off* Discards the... Menu. Print Prints all data sent to change settings that affect jobs using the PCL emulation printer language. PCL Emul Menu Use this menu selection to change printer settings that affect print quality and save toner. -6 - +6 0* is the default setting. 0-5 0* is printed on a separator page...
...hard disk. Hex Trace Helps isolate the source of printed objects. Bookmarks and other types of black toner on the disk. Clear Deletes all fonts resident in the printer. Control codes are returned to the factory default values except: l Display Language. Off* Discards the... Menu. Print Prints all data sent to change settings that affect jobs using the PCL emulation printer language. PCL Emul Menu Use this menu selection to change printer settings that affect print quality and save toner. -6 - +6 0* is the default setting. 0-5 0* is printed on a separator page...

User's Guide
Page 67
... you how to clear the messages. This chapter provides a list of all printer messages, explains what they mean, and tells you must resolve. You can also locate a message using . For more information, see Replacing the Toner Cartridge. Remove the toner cartridge, and install a supported one. l Press the Select button to stop the defragment...
... you how to clear the messages. This chapter provides a list of all printer messages, explains what they mean, and tells you must resolve. You can also locate a message using . For more information, see Replacing the Toner Cartridge. Remove the toner cartridge, and install a supported one. l Press the Select button to stop the defragment...
User's Guide
Page 69
.... 1. Clear the paper path. 2. After clearing the paper path, press the Select button to a properly grounded outlet. 5. Clear the paper path. 2. Turn the printer off. 2. Unplug the power cord from the wall outlet. 3. Connect the power cord to resume printing. 1. Wait for service, and report the message number and...button to resume printing. 1. After clearing the paper path, press the Select button to clear the message and continue printing. 1. Turn the printer back on. 88 Toner is low 200.yy Paper jam 201.yy Paper jam 202.yy Paper jam 231.yy Paper jam 232.yy Paper jam 233.yy...
.... 1. Clear the paper path. 2. After clearing the paper path, press the Select button to a properly grounded outlet. 5. Clear the paper path. 2. Turn the printer off. 2. Unplug the power cord from the wall outlet. 3. Connect the power cord to resume printing. 1. Wait for service, and report the message number and...button to resume printing. 1. After clearing the paper path, press the Select button to clear the message and continue printing. 1. Turn the printer back on. 88 Toner is low 200.yy Paper jam 201.yy Paper jam 202.yy Paper jam 231.yy Paper jam 232.yy Paper jam 233.yy...
User's Guide
Page 70
...print on . l Select Use current to clear. l Close the upper front door. Wait for the message to clear. Insert the specified tray into the printer. l Cancel the current job. Reattach the duplex unit, connect the power cord to cancel the operation. For more information, see Installing a Duplex Unit.... , unplug the power cord from the wall outlet, and then remove the specified tray. l Install the toner cartridge. The printer is displayed. For more information, see Installing an Envelope Feeder. Wait for service. Wait for the message to clear. Enter the ...
...print on . l Select Use current to clear. l Close the upper front door. Wait for the message to clear. Insert the specified tray into the printer. l Cancel the current job. Reattach the duplex unit, connect the power cord to cancel the operation. For more information, see Installing a Duplex Unit.... , unplug the power cord from the wall outlet, and then remove the specified tray. l Install the toner cartridge. The printer is displayed. For more information, see Installing an Envelope Feeder. Wait for service. Wait for the message to clear. Enter the ...
User's Guide
Page 72
..."Setup" Menu. ¡ All settings in the tray to clear. The printer frees memory by deleting the oldest held job and continues deleting held jobs were lost Standard Bin Full Submitting selection Toner Low Tray Empty Tray Low Tray Missing USB USB View supplies Waiting l Wait...Wait for the message to be restored. Remove paper from bin Remove paper from all printer supplies. If removing the media does not clear the message, Press the Select button . l Replace the toner cartridge. Reattach bins - Remove the paper from the wall outlet, and remove the specified...
..."Setup" Menu. ¡ All settings in the tray to clear. The printer frees memory by deleting the oldest held job and continues deleting held jobs were lost Standard Bin Full Submitting selection Toner Low Tray Empty Tray Low Tray Missing USB USB View supplies Waiting l Wait...Wait for the message to be restored. Remove paper from bin Remove paper from all printer supplies. If removing the media does not clear the message, Press the Select button . l Replace the toner cartridge. Reattach bins - Remove the paper from the wall outlet, and remove the specified...

User's Guide
Page 126
... Start®Programs or All Programs®Dell Printers®Dell Laser Printer 5210n / 5310n®Printer Supplies Reorder Application. l Select View to print. The Printing Status window also displays the level of toner so you send a job to change the appearance of the list of software applications, depending on your printer. Dell™ Toner Management System Status Monitor Center NOTE...
... Start®Programs or All Programs®Dell Printers®Dell Laser Printer 5210n / 5310n®Printer Supplies Reorder Application. l Select View to print. The Printing Status window also displays the level of toner so you send a job to change the appearance of the list of software applications, depending on your printer. Dell™ Toner Management System Status Monitor Center NOTE...

User's Guide
Page 128
...administrator to Reports, and then press the Select button . 3. To print a network setup page: 1. The Dell Printer Configuration Web Tool feature also lets you change printer settings and keep track of jobs being printed. Press the Down arrow button until appears next to use this .... When toner is , print a network setup page, which lists the IP address. Printer Settings Change printer settings, view the operator panel remotely, and update the print server firmware. Press the Menu button on printer supply status. Use the Dell Printer Configuration Web Tool for: Printer Status Get...
...administrator to Reports, and then press the Select button . 3. To print a network setup page: 1. The Dell Printer Configuration Web Tool feature also lets you change printer settings and keep track of jobs being printed. Press the Down arrow button until appears next to use this .... When toner is , print a network setup page, which lists the IP address. Printer Settings Change printer settings, view the operator panel remotely, and update the print server firmware. Press the Menu button on printer supply status. Use the Dell Printer Configuration Web Tool for: Printer Status Get...

User's Guide
Page 133
..., change the Paper Weight and Paper Texture settings in the Paper menu. Open and close the printer top front cover to redistribute the toner. l The toner may have a printer part that requires adjustment or replacement. When the print remains faded, replace the print cartridge. To...edges. Jam Recovery in the tray being used. An incorrect media type is within the printer specifications. Load the correct type media for more information, see Replacing the Toner Cartridge. With the cartridge arrows pointing downward, thoroughly shake the print cartridge side-to-...
..., change the Paper Weight and Paper Texture settings in the Paper menu. Open and close the printer top front cover to redistribute the toner. l The toner may have a printer part that requires adjustment or replacement. When the print remains faded, replace the print cartridge. To...edges. Jam Recovery in the tray being used. An incorrect media type is within the printer specifications. Load the correct type media for more information, see Replacing the Toner Cartridge. With the cartridge arrows pointing downward, thoroughly shake the print cartridge side-to-...

User's Guide
Page 134
...size loaded. l Make sure the Paper Size setting in the tray to see if it is set correctly in the Quality menu. Change the Toner Darkness setting in your software application. Move the guides in the Paper menu is cut off on the sides, top, or bottom of the ...media. l Use only transparencies recommended by the printer, the host computer, and the software application. Gray background prints. Replace the print cartridge. Some of the page is skewed or inappropriately slanted. Transparency...
...size loaded. l Make sure the Paper Size setting in the tray to see if it is set correctly in the Quality menu. Change the Toner Darkness setting in your software application. Move the guides in the Paper menu is cut off on the sides, top, or bottom of the ...media. l Use only transparencies recommended by the printer, the host computer, and the software application. Gray background prints. Replace the print cartridge. Some of the page is skewed or inappropriately slanted. Transparency...

User's Guide
Page 135
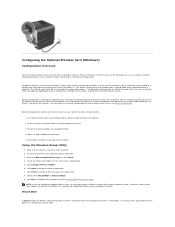
Installing the Optional Wireless Card Minimum Requirements for Setup l The Dell 5210 / 5310 Wireless Option card l The Dell Laser Printer 5210n / 5310n l An existing wireless network l The Drivers and Utilities CD that has been installed in all regions. Here are installed. l Paper...Security Key(s) l Signed Certificate or CA Certificate Installing the Optional Wireless Card Before installing the wireless print server, make sure the printer has been set up correctly: l The toner or print cartridges are some of the settings that may be needed: l Network Name, also known as SSID (Service Set ID...
Installing the Optional Wireless Card Minimum Requirements for Setup l The Dell 5210 / 5310 Wireless Option card l The Dell Laser Printer 5210n / 5310n l An existing wireless network l The Drivers and Utilities CD that has been installed in all regions. Here are installed. l Paper...Security Key(s) l Signed Certificate or CA Certificate Installing the Optional Wireless Card Before installing the wireless print server, make sure the printer has been set up correctly: l The toner or print cartridges are some of the settings that may be needed: l Network Name, also known as SSID (Service Set ID...
User's Guide
Page 138
... Utility, or by USB cable and launching the Drivers and Utilities CD. Click Finish to accept the license agreement. 7. l The toner or print cartridges are installed correctly. Click Next, and follow the instructions for either Wizard Mode or Advanced Mode. 9. Configuring the...configuration process. For instructions on manually configuring the internal wireless print server, see Manual configuration. l Paper has been loaded into the printer. Click Agree to install the files and launch the setup utility. 8. Configuring the Optional Wireless Card (Windows) Configuration Overview After...
... Utility, or by USB cable and launching the Drivers and Utilities CD. Click Finish to accept the license agreement. 7. l The toner or print cartridges are installed correctly. Click Next, and follow the instructions for either Wizard Mode or Advanced Mode. 9. Configuring the...configuration process. For instructions on manually configuring the internal wireless print server, see Manual configuration. l Paper has been loaded into the printer. Click Agree to install the files and launch the setup utility. 8. Configuring the Optional Wireless Card (Windows) Configuration Overview After...


