User's Guide (PDF)
Page 3
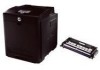
... icon that appears. a. c. b. d. For help locating your desktop. Double-click the icon on your Dell printer Service Tag available. Back to Contents Page Choose Send To from the drop-down menu that is created. If you installed the... 7 Ethernet Port 3 Control Board 8 Power Connector 4 USB Port 9 Reset Button 5 Wireless Printer Adapter Socket 10 Power Switch To order replacement toner cartridges or supplies from "C:\Program Files\Dell Printers\Additional Color Laser Software\Reorder". NOTE: "C:\Program Files\" may be different depending on the destination of the folder...
... icon that appears. a. c. b. d. For help locating your desktop. Double-click the icon on your Dell printer Service Tag available. Back to Contents Page Choose Send To from the drop-down menu that is created. If you installed the... 7 Ethernet Port 3 Control Board 8 Power Connector 4 USB Port 9 Reset Button 5 Wireless Printer Adapter Socket 10 Power Switch To order replacement toner cartridges or supplies from "C:\Program Files\Dell Printers\Additional Color Laser Software\Reorder". NOTE: "C:\Program Files\" may be different depending on the destination of the folder...

User's Guide (PDF)
Page 18
...cartridge is displayed. Printer Settings Use the Printer Settings menu to open the Dell Printer Configuration Web Tool. (To check a link local address, see "Assign an IP Address". When Using the Tool Box (for your printer, see "Print and Check the Printer Settings Page".) 1. Click Dell 3130cn Color Laser...additional toner cartridge. Print Server Settings Using the Print Server Settings menu, you use IPv6 Mode, use this feature. The printer settings page is displayed. The Select Printer dialog box opens. 2. Using the Dell Printer Configuration Web Tool Use the Dell Printer ...
...cartridge is displayed. Printer Settings Use the Printer Settings menu to open the Dell Printer Configuration Web Tool. (To check a link local address, see "Assign an IP Address". When Using the Tool Box (for your printer, see "Print and Check the Printer Settings Page".) 1. Click Dell 3130cn Color Laser...additional toner cartridge. Print Server Settings Using the Print Server Settings menu, you use IPv6 Mode, use this feature. The printer settings page is displayed. The Select Printer dialog box opens. 2. Using the Dell Printer Configuration Web Tool Use the Dell Printer ...
User's Guide (PDF)
Page 26
... Covers Thick Adjust Fuser Label Coated Coated Thick Envelope Recycled JPN Coated Postcard JPN Auto Registration Adjustment Adjust Altitude Non-Dell Toner Select Reorder URL Web Link Customization Regular Premier Tray 1 Paper Type Tray 1 Paper Size Tray 1 Custom Size ...printer is selected in the tray 2. Displays the paper type setting of custom size paper loaded in the PostScript printing. Displays the length of the tray 2. Y*3 Displays whether the Image Enhancement feature is enabled. Displays whether to use another manufacturer's toner cartridge. Displays the color...
... Covers Thick Adjust Fuser Label Coated Coated Thick Envelope Recycled JPN Coated Postcard JPN Auto Registration Adjustment Adjust Altitude Non-Dell Toner Select Reorder URL Web Link Customization Regular Premier Tray 1 Paper Type Tray 1 Paper Size Tray 1 Custom Size ...printer is selected in the tray 2. Displays the paper type setting of custom size paper loaded in the PostScript printing. Displays the length of the tray 2. Y*3 Displays whether the Image Enhancement feature is enabled. Displays whether to use another manufacturer's toner cartridge. Displays the color...

User's Guide (PDF)
Page 115
... stops abnormally. Auto Log Print Displays whether the printer outputs a log of the tray 1. Substitute Tray Displays whether to use another manufacturer's toner cartridge. Tray 1 Paper Size Displays the paper size setting of completed jobs from the computer. Alert Tone Displays whether to automatically adjust color registration. Off indicates that the tone is incorrect...
... stops abnormally. Auto Log Print Displays whether the printer outputs a log of the tray 1. Substitute Tray Displays whether to use another manufacturer's toner cartridge. Tray 1 Paper Size Displays the paper size setting of completed jobs from the computer. Alert Tone Displays whether to automatically adjust color registration. Off indicates that the tone is incorrect...

User Guide
Page 5
... Checking the status of supplies from a network computer 126 Ordering supplies...126 Printer attached to a network ...126 Printer attached locally to a computer ...127 Replacing supplies...127 Replacing the toner cartridge ...127 Replacing the photoconductor kit ...129 Moving the printer...132 Moving the printer to another location...132 Administrative support 133 Using the Embedded Web Server...133...
... Checking the status of supplies from a network computer 126 Ordering supplies...126 Printer attached to a network ...126 Printer attached locally to a computer ...127 Replacing supplies...127 Replacing the toner cartridge ...127 Replacing the photoconductor kit ...129 Moving the printer...132 Moving the printer to another location...132 Administrative support 133 Using the Embedded Web Server...133...

User Guide
Page 53
... the Web. • If ordering online, launch the Dell Printer Supplies Reorder Application: 1 In Windows Vista or later: a Click Programs. b Click Dell Printers. An exception is added to the Windows® Firewall to order replacement toner cartridges. Dell Printer Supplies Reorder Application The Order Supplies dialog box can order toner by Phone heading. The Order Supplies dialog box...
... the Web. • If ordering online, launch the Dell Printer Supplies Reorder Application: 1 In Windows Vista or later: a Click Programs. b Click Dell Printers. An exception is added to the Windows® Firewall to order replacement toner cartridges. Dell Printer Supplies Reorder Application The Order Supplies dialog box can order toner by Phone heading. The Order Supplies dialog box...
User Guide
Page 64
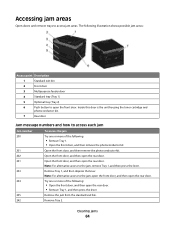
... Tray 2. The following : • Remove Tray 1. • Open the front door, and then remove the photoconductor kit. Inside this door is the unit housing the toner cartridge and photoconductor kit. 7 Rear door Jam message numbers and how to access each jam Jam number 200 201 202 231 233 234 235 242 To...
... Tray 2. The following : • Remove Tray 1. • Open the front door, and then remove the photoconductor kit. Inside this door is the unit housing the toner cartridge and photoconductor kit. 7 Rear door Jam message numbers and how to access each jam Jam number 200 201 202 231 233 234 235 242 To...
User Guide
Page 65
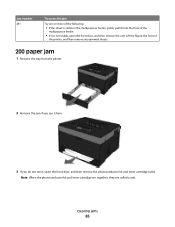
...the front of the printer, and then remove any jammed sheets. 200 paper jam 1 Remove the tray from the printer. 2 Remove the jam if you see it here. 3 If you do not see it is not visible, open the front door, and then remove the photoconductor kit and toner cartridge (unit). Note: ...When the photoconductor kit and toner cartridge are together, they are called a unit. ...
...the front of the printer, and then remove any jammed sheets. 200 paper jam 1 Remove the tray from the printer. 2 Remove the jam if you see it here. 3 If you do not see it is not visible, open the front door, and then remove the photoconductor kit and toner cartridge (unit). Note: ...When the photoconductor kit and toner cartridge are together, they are called a unit. ...

User Guide
Page 111
... available Wait for the message to the multipurpose feeder. Try one . Understanding printer messages 111 Press to clear. List of the following : • Remove the toner cartridge, shake it, and then reinstall it. Understanding printer messages When Manual Feeder appears on toner. Calibrating Wait for the message to clear the message and continue printing. Canceling...
... available Wait for the message to the multipurpose feeder. Try one . Understanding printer messages 111 Press to clear. List of the following : • Remove the toner cartridge, shake it, and then reinstall it. Understanding printer messages When Manual Feeder appears on toner. Calibrating Wait for the message to clear the message and continue printing. Canceling...
User Guide
Page 112
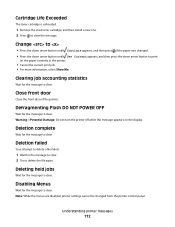
... arrow button until Continue appears, and then press if the paper was changed from the printer control panel. Deletion complete Wait for the message to clear the message. Cartridge Life Exceeded The toner cartridge is exhausted. 1 Remove the used toner cartridge, and then install a new one. 2 Press to clear. Deleting held jobs Wait for the message...
... arrow button until Continue appears, and then press if the paper was changed from the printer control panel. Deletion complete Wait for the message to clear the message. Cartridge Life Exceeded The toner cartridge is exhausted. 1 Remove the used toner cartridge, and then install a new one. 2 Press to clear. Deleting held jobs Wait for the message...
User Guide
Page 116
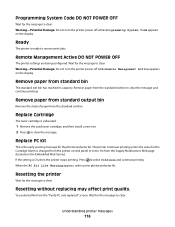
... panel or set to clear. Remove paper from the "Verify PC unit replaced" screen. Replace Cartridge The toner cartridge is exhausted. 1 Remove the used toner cartridge, and then install a new one. 2 Press to clear. Resetting the printer Wait for the message to clear the message. Understanding printer messages 116 Remote Management Active DO NOT POWER OFF The...
... panel or set to clear. Remove paper from the "Verify PC unit replaced" screen. Replace Cartridge The toner cartridge is exhausted. 1 Remove the used toner cartridge, and then install a new one. 2 Press to clear. Resetting the printer Wait for the message to clear the message. Understanding printer messages 116 Remote Management Active DO NOT POWER OFF The...
User Guide
Page 118
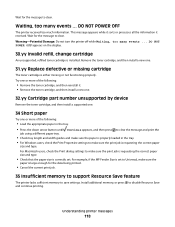
... support Resource Save feature The printer lacks sufficient memory to save settings. For example, if the MP Feeder Size is set . DO NOT POWER OFF appears on the display. 30.yy Invalid refill, change cartridge An unsupported, refilled toner cartridge is large enough for the ...message to disable Resource Save and continue printing. Install additional memory, or press to clear. Waiting, too many events ... DO NOT POWER OFF The printer received too much information. For ...
... support Resource Save feature The printer lacks sufficient memory to save settings. For example, if the MP Feeder Size is set . DO NOT POWER OFF appears on the display. 30.yy Invalid refill, change cartridge An unsupported, refilled toner cartridge is large enough for the ...message to disable Resource Save and continue printing. Install additional memory, or press to clear. Waiting, too many events ... DO NOT POWER OFF The printer received too much information. For ...

User Guide
Page 119
...: • Press the down arrow button until Continue appears, and then press to clear the message and continue 42.xy Cartridge region mismatch Install a toner cartridge that matches the region number of the printer. x and y can have printed Try one or more of the following: • Press the down arrow button until printing. •...
...: • Press the down arrow button until Continue appears, and then press to clear the message and continue 42.xy Cartridge region mismatch Install a toner cartridge that matches the region number of the printer. x and y can have printed Try one or more of the following: • Press the down arrow button until printing. •...
User Guide
Page 121
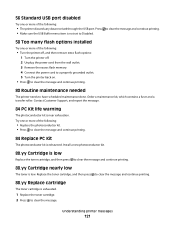
... Routine maintenance needed The printer needs to clear the message. Order a maintenance kit, which contains a fuser and a transfer roller. Replace the toner cartridge, and then press to clear the message and continue printing. 88.yy Replace cartridge The toner cartridge is low. Install a new photoconductor kit. 88.yy Cartridge is low Replace the toner cartridge, and then press to...
... Routine maintenance needed The printer needs to clear the message. Order a maintenance kit, which contains a fuser and a transfer roller. Replace the toner cartridge, and then press to clear the message and continue printing. 88.yy Replace cartridge The toner cartridge is low. Install a new photoconductor kit. 88.yy Cartridge is low Replace the toner cartridge, and then press to...
User Guide
Page 122
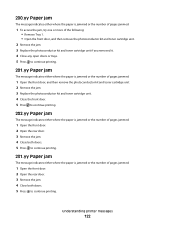
... printer messages 122 200.yy Paper jam The message indicates either where the paper is jammed or the number of pages jammed. 1 To access the jam, try one or more of the following: • Remove Tray 1. • Open the front door, and then remove the photoconductor kit and toner cartridge ...is jammed or the number of pages jammed. 1 Open the front door, and then remove the photoconductor kit and toner cartridge unit. 2 Remove the jam. 3 Replace the photoconductor kit and toner cartridge unit. 4 Close the front door. 5 Press to continue printing. 202.yy Paper jam The message indicates either ...
... printer messages 122 200.yy Paper jam The message indicates either where the paper is jammed or the number of pages jammed. 1 To access the jam, try one or more of the following: • Remove Tray 1. • Open the front door, and then remove the photoconductor kit and toner cartridge ...is jammed or the number of pages jammed. 1 Open the front door, and then remove the photoconductor kit and toner cartridge unit. 2 Remove the jam. 3 Replace the photoconductor kit and toner cartridge unit. 4 Close the front door. 5 Press to continue printing. 202.yy Paper jam The message indicates either ...
User Guide
Page 123
... or more of the following: • Remove Tray 1. • Open the front door, and then remove the photoconductor kit and toner cartridge unit. • Remove Tray 2. 2 Remove the jam. 3 Replace the photoconductor kit and toner cartridge unit if you removed it. 4 Close any open doors or trays. 5 Press to continue printing. Understanding printer messages 123
... or more of the following: • Remove Tray 1. • Open the front door, and then remove the photoconductor kit and toner cartridge unit. • Remove Tray 2. 2 Remove the jam. 3 Replace the photoconductor kit and toner cartridge unit if you removed it. 4 Close any open doors or trays. 5 Press to continue printing. Understanding printer messages 123
User Guide
Page 127
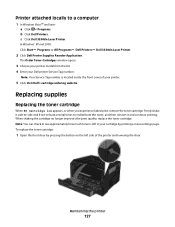
... can check to see approximately how much toner is located inside the front cover of the printer and lowering the door. c Click Dell 3330dn Laser Printer. The Order Toner Cartridges window opens. 3 Choose your printer model from the list. 4 Enter your printer. 5 Click Visit Dell's cartridge ordering website. Maintaining the printer 127 To replace the toner cartridge: 1 Open the front door by printing a menu...
... can check to see approximately how much toner is located inside the front cover of the printer and lowering the door. c Click Dell 3330dn Laser Printer. The Order Toner Cartridges window opens. 3 Choose your printer model from the list. 4 Enter your printer. 5 Click Visit Dell's cartridge ordering website. Maintaining the printer 127 To replace the toner cartridge: 1 Open the front door by printing a menu...
User Guide
Page 128
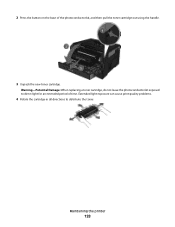
Warning-Potential Damage: When replacing a toner cartridge, do not leave the photoconductor kit exposed to distribute the toner. Extended light exposure can cause print quality problems. 4 Rotate the cartridge in all directions to direct light for an extended period of the photoconductor kit, and then pull the toner cartridge out using the handle. 3 Unpack the new toner cartridge. Maintaining the printer 128 2 Press the button on the base of time.
Warning-Potential Damage: When replacing a toner cartridge, do not leave the photoconductor kit exposed to distribute the toner. Extended light exposure can cause print quality problems. 4 Rotate the cartridge in all directions to direct light for an extended period of the photoconductor kit, and then pull the toner cartridge out using the handle. 3 Unpack the new toner cartridge. Maintaining the printer 128 2 Press the button on the base of time.
User Guide
Page 129
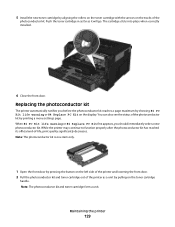
... door by pressing the button on the left side of the printer and lowering the front door. 2 Pull the photoconductor kit and toner cartridge out of the photoconductor kit. While the printer may continue to function properly after the photoconductor kit has reached its... by aligning the rollers on the toner cartridge with the arrows on the display. Replacing the photoconductor kit The printer automatically notifies you should immediately order a new photoconductor kit. Note: The photoconductor kit and toner cartridge form a unit. The cartridge clicks into place when correctly installed...
... door by pressing the button on the left side of the printer and lowering the front door. 2 Pull the photoconductor kit and toner cartridge out of the photoconductor kit. While the printer may continue to function properly after the photoconductor kit has reached its... by aligning the rollers on the toner cartridge with the arrows on the display. Replacing the photoconductor kit The printer automatically notifies you should immediately order a new photoconductor kit. Note: The photoconductor kit and toner cartridge form a unit. The cartridge clicks into place when correctly installed...

User Guide
Page 130
Place the unit on a flat, clean surface. 3 Press the button on the base of the photoconductor kit. Maintaining the printer 130 Pull the toner cartridge up and out using the handle.
Place the unit on a flat, clean surface. 3 Press the button on the base of the photoconductor kit. Maintaining the printer 130 Pull the toner cartridge up and out using the handle.


