User's Guide (PDF)
Page 91
... quality in color, use 75 g/m2 (20 lb bond) grain long paper. It is recommended that you try a sample first before buying large quantities of humidity. It is too smooth, it can cause paper feeding problems. Curl usually occurs after the paper passes through the printer, where it...print side on a variety of paper smoothness directly affects print quality. The multipurpose feeder (MPF) automatically feeds paper weights from 60 to 216 g/m2 (16 to high temperatures. Paper lighter than 60 g/m2 (16 lb) may not feed properly, and could cause paper jams. For best performance, use 75 ...
... quality in color, use 75 g/m2 (20 lb bond) grain long paper. It is recommended that you try a sample first before buying large quantities of humidity. It is too smooth, it can cause paper feeding problems. Curl usually occurs after the paper passes through the printer, where it...print side on a variety of paper smoothness directly affects print quality. The multipurpose feeder (MPF) automatically feeds paper weights from 60 to 216 g/m2 (16 to high temperatures. Paper lighter than 60 g/m2 (16 lb) may not feed properly, and could cause paper jams. For best performance, use 75 ...
User's Guide (PDF)
Page 93
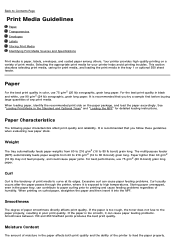
...remove the tray while a job is acceptable for laser printers. Straighten the edges of 225 °C (437 °F) without melting or releasing hazardous emissions. The ink must withstand temperatures of the stack on a level surface. Use paper printed with heat-resistant inks designed for best ...loading letterheads in the same source. The following table. Ensure that are in a paper jam. Use inks that the paper is important when printing on a Letterhead (Pre-Printed and Pre-Punched Paper) Check with rough or heavily textured surfaces. If you are not affected by ...
...remove the tray while a job is acceptable for laser printers. Straighten the edges of 225 °C (437 °F) without melting or releasing hazardous emissions. The ink must withstand temperatures of the stack on a level surface. Use paper printed with heat-resistant inks designed for best ...loading letterheads in the same source. The following table. Ensure that are in a paper jam. Use inks that the paper is important when printing on a Letterhead (Pre-Printed and Pre-Punched Paper) Check with rough or heavily textured surfaces. If you are not affected by ...
User's Guide (PDF)
Page 94
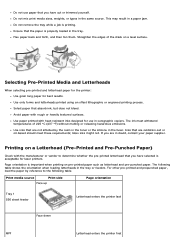
... the paper type to Transparency from the printer driver to 75 sheets of light wrinkling. This may result in laser printers. Use transparencies designed specifically for a single print job. Selecting Pre-Punched Paper When selecting pre-punched paper for the printer: Test paper from sticking together. This may result in the MPF for laser printers. Transparencies You can cause jams when...
... the paper type to Transparency from the printer driver to 75 sheets of light wrinkling. This may result in laser printers. Use transparencies designed specifically for a single print job. Selecting Pre-Punched Paper When selecting pre-punched paper for the printer: Test paper from sticking together. This may result in the MPF for laser printers. Transparencies You can cause jams when...
User's Guide (PDF)
Page 99
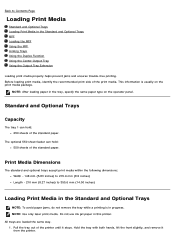
Do not use ink jet paper in this printer. Hold the tray with both hands, lift the front slightly, and remove it stops. Standard and Optional Trays Capacity The tray 1 can hold : 250 sheets of the printer until it from the printer. All trays are loaded the same way. 1. This ... the Center Output Tray Using the Output Tray Extension Loading print media properly helps prevent jams and ensures trouble-free printing. NOTE: Use only laser print media. Pull the tray out of the standard paper. The optional 550 sheet feeder can hold : 550 sheets of the print media. ...
Do not use ink jet paper in this printer. Hold the tray with both hands, lift the front slightly, and remove it stops. Standard and Optional Trays Capacity The tray 1 can hold : 250 sheets of the printer until it from the printer. All trays are loaded the same way. 1. This ... the Center Output Tray Using the Output Tray Extension Loading print media properly helps prevent jams and ensures trouble-free printing. NOTE: Use only laser print media. Pull the tray out of the standard paper. The optional 550 sheet feeder can hold : 550 sheets of the print media. ...

User's Guide (PDF)
Page 100
... the recommended print side facing up. The width guides should be loaded by squeezing the length guide at the back of the paper to the 8.5" position. 3. NOTE: For Letter paper, push the lever to be fully extended. Before loading the print media, flex the sheets back and forth, and then fan them...: Do not exceed the maximum fill line in the tray. Slide the width guides to the size of the tray. 4. Overfilling the tray may cause paper jams. NOTE: When loading user-specified print media, fully extend the tray by using the length guide.
... the recommended print side facing up. The width guides should be loaded by squeezing the length guide at the back of the paper to the 8.5" position. 3. NOTE: For Letter paper, push the lever to be fully extended. Before loading the print media, flex the sheets back and forth, and then fan them...: Do not exceed the maximum fill line in the tray. Slide the width guides to the size of the tray. 4. Overfilling the tray may cause paper jams. NOTE: When loading user-specified print media, fully extend the tray by using the length guide.
User's Guide (PDF)
Page 104
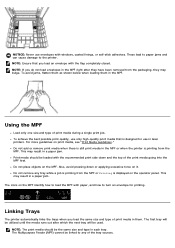
... closed. NOTE: Ensure that is printing from the packaging, they have been removed from the MPF. To achieve the best possible print quality, use in laser printers. Also, avoid pressing down and the top of the tray sources. NOTE: The print media should be linked to load the MPF with the recommended... self-stick adhesives. Do not add or remove print media when there is displayed on the MPF. The Multipurpose Feeder (MPF) cannot be loaded with paper, and how to the printer. Print media should be the same size and type in a paper jam.
... closed. NOTE: Ensure that is printing from the packaging, they have been removed from the MPF. To achieve the best possible print quality, use in laser printers. Also, avoid pressing down and the top of the tray sources. NOTE: The print media should be linked to load the MPF with the recommended... self-stick adhesives. Do not add or remove print media when there is displayed on the MPF. The Multipurpose Feeder (MPF) cannot be loaded with paper, and how to the printer. Print media should be the same size and type in a paper jam.
User's Guide (PDF)
Page 127
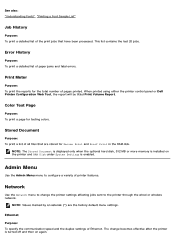
... print a list of paper jams and fatal errors. NOTE: Values marked by an asterisk (*) are stored for testing colors. This list contains the last 20 jobs. Error History Purpose: To print a detailed list of all files that have been processed. Admin Menu Use the Admin Menu menu to the printer through the wired or...
... print a list of paper jams and fatal errors. NOTE: Values marked by an asterisk (*) are stored for testing colors. This list contains the last 20 jobs. Error History Purpose: To print a detailed list of all files that have been processed. Admin Menu Use the Admin Menu menu to the printer through the wired or...
User's Guide (PDF)
Page 151
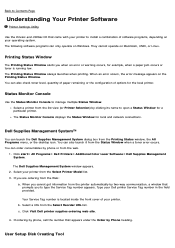
... for example, when a paper jam occurs or toner is located inside the front cover of software programs, depending on Windows. You can also launch it from the Printing Status window, the All Programs menu, or the desktop icon. Click start® All Programs® Dell Printers® Additional Color Laser Software® Dell Supplies Management System. They...
... for example, when a paper jam occurs or toner is located inside the front cover of software programs, depending on Windows. You can also launch it from the Printing Status window, the All Programs menu, or the desktop icon. Click start® All Programs® Dell Printers® Additional Color Laser Software® Dell Supplies Management System. They...
User's Guide (PDF)
Page 154
... that you try a limited sample of any print media you want to print or the number of copies). 4. Avoiding Paper Jams NOTE: It is recommended that the correct printer is selected in the Standard and Optional Trays" (which includes the tray 1 and the optional 550 sheet feeder) "Loading...of the available system settings you are not familiar with the printer before purchasing large quantities. Select the appropriate settings for the specific job you can avoid paper jams. See the following instructions on Storing Print Media Store your printer, and how to cancel a job. To print a job...
... that you try a limited sample of any print media you want to print or the number of copies). 4. Avoiding Paper Jams NOTE: It is recommended that the correct printer is selected in the Standard and Optional Trays" (which includes the tray 1 and the optional 550 sheet feeder) "Loading...of the available system settings you are not familiar with the printer before purchasing large quantities. Select the appropriate settings for the specific job you can avoid paper jams. See the following instructions on Storing Print Media Store your printer, and how to cancel a job. To print a job...
User's Guide (PDF)
Page 173
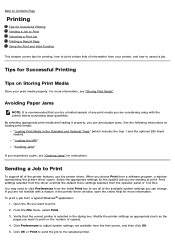
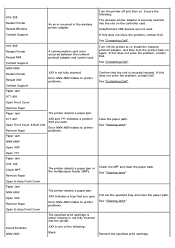
... open . Contact Support If this does not solve the problem, contact Dell. Paper Jam 077-901 Open Front Cover Remove Paper Paper Jam The printer detects a paper jam. 077-907 Open Front Cover & Belt Unit Remove Paper XXX and YYY indicates a position that the unit is not fully inserted. See "Clearing Jams" The specified print cartridge is securely inserted into the...
... open . Contact Support If this does not solve the problem, contact Dell. Paper Jam 077-901 Open Front Cover Remove Paper Paper Jam The printer detects a paper jam. 077-907 Open Front Cover & Belt Unit Remove Paper XXX and YYY indicates a position that the unit is not fully inserted. See "Clearing Jams" The specified print cartridge is securely inserted into the...

User's Guide (PDF)
Page 177
..., or types in the Standard and Optional Trays" and "Loading the MPF" to load printer media properly. Identifying the Location of Paper Jams The following illustration shows where paper jams may cause jams. Wipe the feeder rollers in the trays. Avoiding Jams Use only recommended print media. Do not overload the print media sources. Push all cables...
..., or types in the Standard and Optional Trays" and "Loading the MPF" to load printer media properly. Identifying the Location of Paper Jams The following illustration shows where paper jams may cause jams. Wipe the feeder rollers in the trays. Avoiding Jams Use only recommended print media. Do not overload the print media sources. Push all cables...
User's Guide (PDF)
Page 185
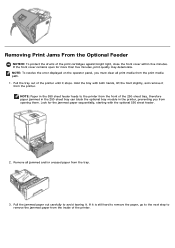
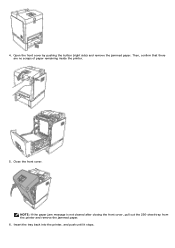
... the front cover remains open for the jammed paper sequentially, starting with both hands, lift the front slightly, and remove it is still hard to remove the paper, go to the next step to the printer from the front of the 250-sheet tray, therefore paper jammed in the 250-sheet tray can block ...the optional tray module in the printer, preventing you must clear all jammed and/or creased paper from the printer. NOTE: To resolve the ...
... the front cover remains open for the jammed paper sequentially, starting with both hands, lift the front slightly, and remove it is still hard to remove the paper, go to the next step to the printer from the front of the 250-sheet tray, therefore paper jammed in the 250-sheet tray can block ...the optional tray module in the printer, preventing you must clear all jammed and/or creased paper from the printer. NOTE: To resolve the ...
User's Guide (PDF)
Page 186
Insert the tray back into the printer, and push until it stops. Close the front cover. Then, confirm that there are no scraps of paper remaining inside the printer. 5. NOTE: If the paper jam message is not cleared after closing the front cover, pull out the 250-sheet tray from the printer and remove the jammed paper. 6. Open the front cover by pushing the button (right side) and remove the jammed paper. 4.
Insert the tray back into the printer, and push until it stops. Close the front cover. Then, confirm that there are no scraps of paper remaining inside the printer. 5. NOTE: If the paper jam message is not cleared after closing the front cover, pull out the 250-sheet tray from the printer and remove the jammed paper. 6. Open the front cover by pushing the button (right side) and remove the jammed paper. 4.
User Guide
Page 4
... jam areas...64 200 paper jam...65 201 paper jam...66 202 paper jam...67 231 paper jam...69 233 paper jam...70 234 paper jam...70 235 paper jam...71 242 paper jam...71 251 paper jam...72 Understanding printer menus 74 Menus list...74 Paper menu...75 Default Source menu...75 Paper Size/Type menu ...75 Configure MP menu...78 Substitute Size menu...79 Paper Texture menu ...79 Paper Weight menu ...80 Paper...
... jam areas...64 200 paper jam...65 201 paper jam...66 202 paper jam...67 231 paper jam...69 233 paper jam...70 234 paper jam...70 235 paper jam...71 242 paper jam...71 251 paper jam...72 Understanding printer menus 74 Menus list...74 Paper menu...75 Default Source menu...75 Paper Size/Type menu ...75 Configure MP menu...78 Substitute Size menu...79 Paper Texture menu ...79 Paper Weight menu ...80 Paper...
User Guide
Page 6
Restoring the factory default settings...136 Troubleshooting 137 Solving basic printer problems...137 Printer control panel display is blank or displays only diamonds 137 Solving printing problems...137 Jobs do not print...137 Confidential and other... is installed 140 Drawers...141 Flash memory card...141 Memory card ...141 Solving paper feed problems...142 Paper frequently jams ...142 Paper jam message remains after jam is cleared ...142 Page that jammed does not reprint after you clear the jam 142 Solving print quality problems...143 Isolating print quality problems...143 Blank pages...144...
Restoring the factory default settings...136 Troubleshooting 137 Solving basic printer problems...137 Printer control panel display is blank or displays only diamonds 137 Solving printing problems...137 Jobs do not print...137 Confidential and other... is installed 140 Drawers...141 Flash memory card...141 Memory card ...141 Solving paper feed problems...142 Paper frequently jams ...142 Paper jam message remains after jam is cleared ...142 Page that jammed does not reprint after you clear the jam 142 Solving print quality problems...143 Isolating print quality problems...143 Blank pages...144...
User Guide
Page 65
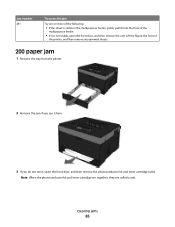
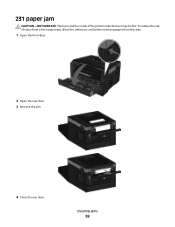
Note: When the photoconductor kit and toner cartridge are together, they are called a unit. Clearing jams 65 Jam number 251 To access the jam Try one or more of the following: • If the sheet is not visible, open the front door, and then remove the photoconductor kit and ... multipurpose feeder. • If it is visible in the multipurpose feeder, gently pull it from the front of the printer, and then remove any jammed sheets. 200 paper jam 1 Remove the tray from the printer. 2 Remove the jam if you see it here. 3 If you do not see it, open the front door, and then remove...
Note: When the photoconductor kit and toner cartridge are together, they are called a unit. Clearing jams 65 Jam number 251 To access the jam Try one or more of the following: • If the sheet is not visible, open the front door, and then remove the photoconductor kit and ... multipurpose feeder. • If it is visible in the multipurpose feeder, gently pull it from the front of the printer, and then remove any jammed sheets. 200 paper jam 1 Remove the tray from the printer. 2 Remove the jam if you see it here. 3 If you do not see it, open the front door, and then remove...
User Guide
Page 66
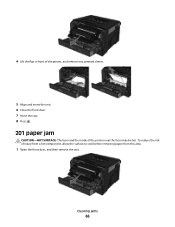
To reduce the risk of the printer near the fuser may be hot. 4 Lift the flap in front of the printer, and remove any jammed sheets. 5 Align and insert the unit. 6 Close the front door. 7 Insert the tray. 8 Press . 201 paper jam CAUTION-HOT SURFACE: The fuser and the inside of injury from a hot component, allow the surface to cool before removing paper from this area. 1 Open the front door, and then remove the unit. Clearing jams 66
To reduce the risk of the printer near the fuser may be hot. 4 Lift the flap in front of the printer, and remove any jammed sheets. 5 Align and insert the unit. 6 Close the front door. 7 Insert the tray. 8 Press . 201 paper jam CAUTION-HOT SURFACE: The fuser and the inside of injury from a hot component, allow the surface to cool before removing paper from this area. 1 Open the front door, and then remove the unit. Clearing jams 66
User Guide
Page 67
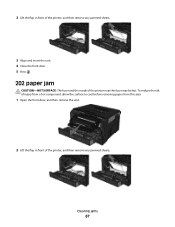
To reduce the risk of injury from a hot component, allow the surface to cool before removing paper from this area. 1 Open the front door, and then remove the unit. 2 Lift the flap in front of the printer near the fuser may be hot. Clearing jams 67 2 Lift the flap in front of the printer, and then remove any jammed sheets. 3 Align and insert the unit. 4 Close the front door. 5 Press . 202 paper jam CAUTION-HOT SURFACE: The fuser and the inside of the printer, and then remove any jammed sheets.
To reduce the risk of injury from a hot component, allow the surface to cool before removing paper from this area. 1 Open the front door, and then remove the unit. 2 Lift the flap in front of the printer near the fuser may be hot. Clearing jams 67 2 Lift the flap in front of the printer, and then remove any jammed sheets. 3 Align and insert the unit. 4 Close the front door. 5 Press . 202 paper jam CAUTION-HOT SURFACE: The fuser and the inside of the printer, and then remove any jammed sheets.
User Guide
Page 69
Clearing jams 69 231 paper jam CAUTION-HOT SURFACE: The fuser and the inside of injury from a hot component, allow the surface to cool before removing paper from this area. 1 Open the front door. 2 Open the rear door. 3 Remove the jam. 4 Close the rear door. To reduce the risk of the printer near the fuser may be hot.
Clearing jams 69 231 paper jam CAUTION-HOT SURFACE: The fuser and the inside of injury from a hot component, allow the surface to cool before removing paper from this area. 1 Open the front door. 2 Open the rear door. 3 Remove the jam. 4 Close the rear door. To reduce the risk of the printer near the fuser may be hot.
User Guide
Page 70
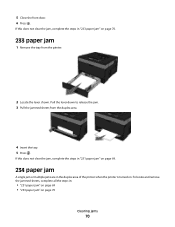
... jam, complete the steps in "231 paper jam" on page 69. 234 paper jam A single jam or multiple jams are in the duplex area of the printer when the printer is turned on page 70. 233 paper jam 1 Remove the tray from the duplex area. 4 Insert the tray. 5 Press . Pull the lever down to release the jam. 3 Pull the jammed sheets from the printer...
... jam, complete the steps in "231 paper jam" on page 69. 234 paper jam A single jam or multiple jams are in the duplex area of the printer when the printer is turned on page 70. 233 paper jam 1 Remove the tray from the duplex area. 4 Insert the tray. 5 Press . Pull the lever down to release the jam. 3 Pull the jammed sheets from the printer...


