
User Guide
Page 14
... Print Vo menu Address Book Links to the Printer Status menu. Printer Information Links to the Address Book menu. The location can be Basic Information on that page. Left Frame Located at the left side of the p operator panel display and indicators. Online Help Links to the Copy Printer menu. rinter Settings Links to the Dell web page. ntact Person: Displays the printer's administrator's name. See the User's Guide on the Print Server Settings page. Printer Console Displays the status of all pages is automatically refreshe e set interval. Set Password...
... Print Vo menu Address Book Links to the Printer Status menu. Printer Information Links to the Address Book menu. The location can be Basic Information on that page. Left Frame Located at the left side of the p operator panel display and indicators. Online Help Links to the Copy Printer menu. rinter Settings Links to the Dell web page. ntact Person: Displays the printer's administrator's name. See the User's Guide on the Print Server Settings page. Printer Console Displays the status of all pages is automatically refreshe e set interval. Set Password...

User Guide
Page 87
... which use the multifunction printer without user limitation pecifying user User Registration Displayed when Print User Limit is enabled. Apply N ngs Press this button to restrict users from the factory. Permit printing w Select eck box to use access to color printing and to limit print volume p : Print User Limitation Select the check box to restore the previous settings. P sed Displays the number of printed pages. Speed Dial Speed Dial List to: Displays s including up to open the Edit Print egistration page...
... which use the multifunction printer without user limitation pecifying user User Registration Displayed when Print User Limit is enabled. Apply N ngs Press this button to restrict users from the factory. Permit printing w Select eck box to use access to color printing and to limit print volume p : Print User Limitation Select the check box to restore the previous settings. P sed Displays the number of printed pages. Speed Dial Speed Dial List to: Displays s including up to open the Edit Print egistration page...

User Guide
Page 88
... the user name. Color Mode Limitation Selects the color mode. r Limit for mono chrom lative Monochrome Page Count Counts the black a pages cumulatively. T aper Size Sets the size of pages for Monochrome Print Type the number of paper loaded in the standard 250-shee Tray 1 Custom Size - Y Password Registers the password. Values: User Registration N Type the user registration num edit the print user settings. Values: Tray 1 Paper Sets the type of paper loaded in the standard 250-sheet tray. Sets the length of paper loaded in the 250-sheet tray. Displays...
... the user name. Color Mode Limitation Selects the color mode. r Limit for mono chrom lative Monochrome Page Count Counts the black a pages cumulatively. T aper Size Sets the size of pages for Monochrome Print Type the number of paper loaded in the standard 250-shee Tray 1 Custom Size - Y Password Registers the password. Values: User Registration N Type the user registration num edit the print user settings. Values: Tray 1 Paper Sets the type of paper loaded in the standard 250-sheet tray. Sets the length of paper loaded in the 250-sheet tray. Displays...
User Guide
Page 103
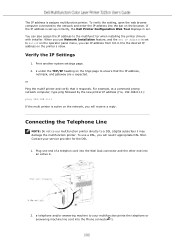
... IP address is set to AutoIP on the operator panel menu, you will receive a reply. Print another system settings page. 2. or Ping the multif printer and verify that the IP address, netmask, and gateway are u expected. To use Network Installation feature, and the Get IP Address is active on the tings page to your service provider for the DSL 1. Contact your multifunction printe the telephone or answering machine line...
... IP address is set to AutoIP on the operator panel menu, you will receive a reply. Print another system settings page. 2. or Ping the multif printer and verify that the IP address, netmask, and gateway are u expected. To use Network Installation feature, and the Get IP Address is active on the tings page to your service provider for the DSL 1. Contact your multifunction printe the telephone or answering machine line...

User Guide
Page 150
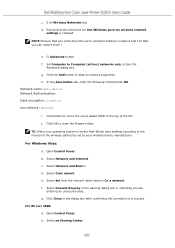
.... For Windows Vista: a. Select Network and Internet c. Select Connect to configur ss network settings is earlier than Windows 2000, cre ings according to the manual of your operating system is checked. c. c. Select Network Connections Control Panel. Click the Ad button to a network, en click Connect. Open Control Panel. Select the or etting from the items listed in steps d and f so that you write down the current wirel uter settings in Connect to display Wireless network properties...
.... For Windows Vista: a. Select Network and Internet c. Select Connect to configur ss network settings is earlier than Windows 2000, cre ings according to the manual of your operating system is checked. c. c. Select Network Connections Control Panel. Click the Ad button to a network, en click Connect. Open Control Panel. Select the or etting from the items listed in steps d and f so that you write down the current wirel uter settings in Connect to display Wireless network properties...

User Guide
Page 159
... the Add bu display Wireless network properties. Open Control Pa. Sel Network and Internet. f. Advanced setup Access point (Infrastructure, DHCP network) 1. c. that you can restore them later. OTE: Ensure that the check box for y uter. Select Computer to the t ist. j. b. Wireless Setting through nter Configuration Web Tool - Network SID): dell_device Network Authentication: Data encryption: Disabled Ad hoc : checked i. NOTE: operating system is checked. Right-click Wireless Network Connection and select roperties. g. Click the Move up button...
... the Add bu display Wireless network properties. Open Control Pa. Sel Network and Internet. f. Advanced setup Access point (Infrastructure, DHCP network) 1. c. that you can restore them later. OTE: Ensure that the check box for y uter. Select Computer to the t ist. j. b. Wireless Setting through nter Configuration Web Tool - Network SID): dell_device Network Authentication: Data encryption: Disabled Ad hoc : checked i. NOTE: operating system is checked. Right-click Wireless Network Connection and select roperties. g. Click the Move up button...

User Guide
Page 162
... addresses of the wireless setting tool provided by following the ste : For Window Windows Server 2003: a. Sel Network and Internet. d. O Control Panel. Select the setting you send to a network. Create new wireless settings of your compu access point is Access point (Infrastructure, Fixed IP network) 1. NOTE: Wh perating system is a success. g. For Windows Serve a. d. Select Connect Anyway in Connect to the multifunction from Control Panel. Right-click Wireless Network Connection and select Properties. f. Click to the he list...
... addresses of the wireless setting tool provided by following the ste : For Window Windows Server 2003: a. Sel Network and Internet. d. O Control Panel. Select the setting you send to a network. Create new wireless settings of your compu access point is Access point (Infrastructure, Fixed IP network) 1. NOTE: Wh perating system is a success. g. For Windows Serve a. d. Select Connect Anyway in Connect to the multifunction from Control Panel. Right-click Wireless Network Connection and select Properties. f. Click to the he list...
User Guide
Page 163
... the manual of the wireless setting too ed by your operating system is earlier than Windo eate settings according to the top of the list. j. Select Network and Internet. Cl Advanced button. g. For Windows Vista: a. c. Select Connect Anyway in the warning dialog box in steps d and f so that you are entering an unsecured area. Open Control Panel. Network name dell_device Network Authentication: Data encryption: Disabled hoc network: Checked i. Select Network...
... the manual of the wireless setting too ed by your operating system is earlier than Windo eate settings according to the top of the list. j. Select Network and Internet. Cl Advanced button. g. For Windows Vista: a. c. Select Connect Anyway in the warning dialog box in steps d and f so that you are entering an unsecured area. Open Control Panel. Network name dell_device Network Authentication: Data encryption: Disabled hoc network: Checked i. Select Network...

User Guide
Page 166
... dialog box i indicating you send to the pri m the network items listed in the standard 250-sheet tray or optional 550-sh feeder. The syste page is displayed. Paper Transparencies Envelopes d. Click OK to lo print media in Connect to the manual wireless setting tool provided by your wireless device manufacturer. Confirming the Installation of print media. Print Media Guidelines Print media is a success. 8. a. Open Control Panel. Select Connect to verify that the optional wireless printer adaptor is d correctly. 1. Click...
... dialog box i indicating you send to the pri m the network items listed in the standard 250-sheet tray or optional 550-sh feeder. The syste page is displayed. Paper Transparencies Envelopes d. Click OK to lo print media in Connect to the manual wireless setting tool provided by your wireless device manufacturer. Confirming the Installation of print media. Print Media Guidelines Print media is a success. 8. a. Open Control Panel. Select Connect to verify that the optional wireless printer adaptor is d correctly. 1. Click...

User Guide
Page 171
... of encies in laser printers. You can print directly on loading an envelope. Envelopes can load a stack of any print media, Dell recommends trying a sample first When printing on transparencies: Set the paper type to Transparency the printer driver to avoid damaging your transparencies are compatible w printers that are not supported with 100% c tent must be set to Transparency prevent jams. (See "Tray Settings(See 13.)" for detailed information about this setting.) Check with the...
... of encies in laser printers. You can print directly on loading an envelope. Envelopes can load a stack of any print media, Dell recommends trying a sample first When printing on transparencies: Set the paper type to Transparency the printer driver to avoid damaging your transparencies are compatible w printers that are not supported with 100% c tent must be set to Transparency prevent jams. (See "Tray Settings(See 13.)" for detailed information about this setting.) Check with the...

User Guide
Page 189
... Net or Wireless appears, and then press . 4. Press until >Reset L or >Reset MPC appe then press 5. message appears on the operator panel. message appears on the operator pane . 6. 4. Press select >User Section or >System Section, and then pres . 6. Press until >SETUP appears, and then press . 2. The multifunction printer is configured as a network printer available to a number s, the access to apply the settings. 13. Press until >Admin Menu appears, and...
... Net or Wireless appears, and then press . 4. Press until >Reset L or >Reset MPC appe then press 5. message appears on the operator panel. message appears on the operator pane . 6. 4. Press select >User Section or >System Section, and then pres . 6. Press until >SETUP appears, and then press . 2. The multifunction printer is configured as a network printer available to a number s, the access to apply the settings. 13. Press until >Admin Menu appears, and...

User Guide
Page 209
... multifunction printer. Values: Portrait* Prints text and graphics parallel to enter a custom length and w Orientation Purpose: To specify how text and graphics are the default menu settings. Values: Off Prints o ide of the paper. NOTE: The 2 Sided Print menu is only available when the o uplexer is installed on the page. On Pr both sides of the paper. Letter* DL 8.5 Envelope #10 Legal Custom Size * Denotes country-specific factory default...
... multifunction printer. Values: Portrait* Prints text and graphics parallel to enter a custom length and w Orientation Purpose: To specify how text and graphics are the default menu settings. Values: Off Prints o ide of the paper. NOTE: The 2 Sided Print menu is only available when the o uplexer is installed on the page. On Pr both sides of the paper. Letter* DL 8.5 Envelope #10 Legal Custom Size * Denotes country-specific factory default...

User Guide
Page 250
... number appears. When you ted will reduce the amount of work required when installing the print r. Install in advance the Dell™ Multifu lor Laser Printer 3115cn printer driver in the MakeDi folder of saved pri ver settings and other data for different type erating systems. re Update The firmware and/or driver updates can also use Dell S o organize, access, share, and manage documents and image files o ter. F rmation about installing the software, see "Networking...
... number appears. When you ted will reduce the amount of work required when installing the print r. Install in advance the Dell™ Multifu lor Laser Printer 3115cn printer driver in the MakeDi folder of saved pri ver settings and other data for different type erating systems. re Update The firmware and/or driver updates can also use Dell S o organize, access, share, and manage documents and image files o ter. F rmation about installing the software, see "Networking...
User Guide
Page 311
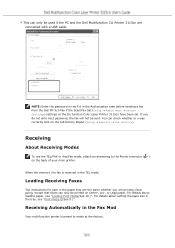
... Receiving Modes To use the TEL/FAX or Ans/Fax mode, attach an answering to mode at the factory. For details about setting the pape size in the Authorization area before sending a fax from the Dell MF 5cn Fax if the Scan/Fax Set (Setup Admin menu Secure Settings) settings on the De function Color Laser Printer 3115cn have been set. If you are connected with a USB cable. NOTE: Enter the password in the P d in the tray, see "Loading Print Media...
... Receiving Modes To use the TEL/FAX or Ans/Fax mode, attach an answering to mode at the factory. For details about setting the pape size in the Authorization area before sending a fax from the Dell MF 5cn Fax if the Scan/Fax Set (Setup Admin menu Secure Settings) settings on the De function Color Laser Printer 3115cn have been set. If you are connected with a USB cable. NOTE: Enter the password in the P d in the tray, see "Loading Print Media...

User Guide
Page 322
... want to use your computer modem ng or for the Tu the computer modem's fax-receive feature. Do not use the computer modem if your multifunction printer Ans/FAX mode and set Auto Ans. Ans/FAX to specify the time for a dial-up internet connection, connect the computer modem to -Peer Setti Network-connected Printer Printing a Network Configuration Page Setting Network Protocols Static Addressing Dynamic Addressing (BOOTP/DHCP) Restoring the Network Configuration Resetting the Network Inter d
... want to use your computer modem ng or for the Tu the computer modem's fax-receive feature. Do not use the computer modem if your multifunction printer Ans/FAX mode and set Auto Ans. Ans/FAX to specify the time for a dial-up internet connection, connect the computer modem to -Peer Setti Network-connected Printer Printing a Network Configuration Page Setting Network Protocols Static Addressing Dynamic Addressing (BOOTP/DHCP) Restoring the Network Configuration Resetting the Network Inter d

User Guide
Page 346
... to clear t connect the SMTP s · Ensure the settings MTP server are correct. If the settings are correct. Print the re ages, or wait for t r address are correct, contact your S r administrator. MB/FTP Error 016-781 Press Cannot connect the server · Press to clear the message. to clear the message. · The fax memory is completed. which you transfer · Ensure the serve login user name, and password are correct...
... to clear t connect the SMTP s · Ensure the settings MTP server are correct. If the settings are correct. Print the re ages, or wait for t r address are correct, contact your S r administrator. MB/FTP Error 016-781 Press Cannot connect the server · Press to clear the message. to clear the message. · The fax memory is completed. which you transfer · Ensure the serve login user name, and password are correct...

User Guide
Page 369
... Mode to off page. the page/printing is too light. See "em Settings(See 13.)." · Verify that the print media n the printer specifications. · The fuser unit is being used. Replace the fus ee "Replacing the Fuser Unit(See 25.) Toner spots appear on an uneven print surface, change the Paper comes off in the Advanced tab in the driver. · If you are printing on an uneven print surface, change the Paper Type settings in the Tray Settings menu. Problem Print...
... Mode to off page. the page/printing is too light. See "em Settings(See 13.)." · Verify that the print media n the printer specifications. · The fuser unit is being used. Replace the fus ee "Replacing the Fuser Unit(See 25.) Toner spots appear on an uneven print surface, change the Paper comes off in the Advanced tab in the driver. · If you are printing on an uneven print surface, change the Paper Type settings in the Tray Settings menu. Problem Print...

User Guide
Page 386
... Edition, Windows Server® 2008, Windows Server 2008 64-bit Edition, and Windows 2000 Inkjet Printer paper cannot be used. If the Plug and Play is attached to your computer. I inter paper cannot be use Envelopes - - NOTE: Click Continue when the User Ac trol dialog box appears. When th Congratulations! Installing Printer Drivers When you want to y ter or a print server using a USB or parallel cable. screen appears, click Print Test Page if...
... Edition, Windows Server® 2008, Windows Server 2008 64-bit Edition, and Windows 2000 Inkjet Printer paper cannot be used. If the Plug and Play is attached to your computer. I inter paper cannot be use Envelopes - - NOTE: Click Continue when the User Ac trol dialog box appears. When th Congratulations! Installing Printer Drivers When you want to y ter or a print server using a USB or parallel cable. screen appears, click Print Test Page if...

User Guide
Page 389
...: When using AutoIP, .0.0.0 is not supported. NOTE: When you use IPv6 Mode for Devices (WSD)(See 24.)" in t User's Guide. Use the Add wizard in the installer. For details, see "Printing With Web Services for network printing, you want to add a multifunction prin e list manually. t Configure New Wired Printer, or Install Driver and Software for existing network printe, and then click Next. Windows Vista x64 Installation on Windows XP Home Edition, Windows Vist asic, Windows Vista Home Premium, Windows Vista x64...
...: When using AutoIP, .0.0.0 is not supported. NOTE: When you use IPv6 Mode for Devices (WSD)(See 24.)" in t User's Guide. Use the Add wizard in the installer. For details, see "Printing With Web Services for network printing, you want to add a multifunction prin e list manually. t Configure New Wired Printer, or Install Driver and Software for existing network printe, and then click Next. Windows Vista x64 Installation on Windows XP Home Edition, Windows Vist asic, Windows Vista Home Premium, Windows Vista x64...

User Guide
Page 570
... will be changed page size using pw, pl entry. at the beginning of /etc/printcap. So, the option cannot be ignored. Printing PostScript Files (Linux/Sola UX) If same optio he PostScript file that has multiple images in the environmental variable HOME. However, this UNIX filter ignore pw, pl entry of the file is specified, or if s S are set up, the...
... will be changed page size using pw, pl entry. at the beginning of /etc/printcap. So, the option cannot be ignored. Printing PostScript Files (Linux/Sola UX) If same optio he PostScript file that has multiple images in the environmental variable HOME. However, this UNIX filter ignore pw, pl entry of the file is specified, or if s S are set up, the...


