
User's Guide (HTML)
Page 12
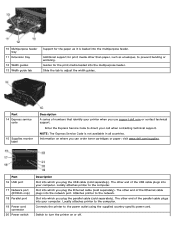
Slide the tab to the computer. Enter the Express Service Code to direct your printer when you use support.dell.com or contact technical support. The other than paper, such as it is not available in all countries. Additional support for print media other ... is loaded into which you can order toner cartridges or paper: visit www.dell.com/supplies. Part 16 USB port 17 Network port (2330dn only) 18 Parallel port 19 Power cord connector 20 Power switch Description Slot into the multipurpose feeder. Connects the printer to turn the printer on where you plug the USB cable...
Slide the tab to the computer. Enter the Express Service Code to direct your printer when you use support.dell.com or contact technical support. The other than paper, such as it is not available in all countries. Additional support for print media other ... is loaded into which you can order toner cartridges or paper: visit www.dell.com/supplies. Part 16 USB port 17 Network port (2330dn only) 18 Parallel port 19 Power cord connector 20 Power switch Description Slot into the multipurpose feeder. Connects the printer to turn the printer on where you plug the USB cable...
User's Guide (HTML)
Page 15
... Dell 2330d/2330dn Laser Printer. In Windows® XP and 2000, Click Start® Programs or All Programs® Dell Printers® Dell 2330d/2330dn Laser Printer. 2. Enter your User's Guide. NOTE: Your Service Tag number is recommended that Dell toner cartridges be used for problems caused by using accessories, parts, or components not supplied by Dell. Dell™ toner cartridges are available only through Dell. Click www.dell...
... Dell 2330d/2330dn Laser Printer. In Windows® XP and 2000, Click Start® Programs or All Programs® Dell Printers® Dell 2330d/2330dn Laser Printer. 2. Enter your User's Guide. NOTE: Your Service Tag number is recommended that Dell toner cartridges be used for problems caused by using accessories, parts, or components not supplied by Dell. Dell™ toner cartridges are available only through Dell. Click www.dell...
User's Guide (HTML)
Page 16
Do not store the toner in humidity or temperature. Direct sunlight. Replacing Supplies Replacing the Imaging Drum You can determine approximately how full the imaging drum is 40%. While the printer may continue to install it exposed to order replacement supplies. If you are ... surface so the edges do not leave it . Storing the Toner Cartridge Store the toner cartridge in an environment where the temperature is approximately 21°C (70°F) and the relative humidity is by printing the printer settings configuration sheet. These help avoid paper feeding problems and uneven...
Do not store the toner in humidity or temperature. Direct sunlight. Replacing Supplies Replacing the Imaging Drum You can determine approximately how full the imaging drum is 40%. While the printer may continue to install it exposed to order replacement supplies. If you are ... surface so the edges do not leave it . Storing the Toner Cartridge Store the toner cartridge in an environment where the temperature is approximately 21°C (70°F) and the relative humidity is by printing the printer settings configuration sheet. These help avoid paper feeding problems and uneven...
User's Guide (HTML)
Page 17
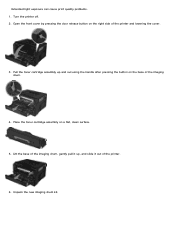
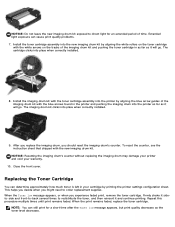
Pull the toner cartridge assembly up , and slide it out of the printer. 6. Unpack the new imaging drum kit. Place the toner cartridge assembly on the right side of the imaging drum. 4. Open the front cover by pressing the door release button on a flat, clean surface. 5. Extended light exposure can cause print quality problems. 1. Lift the base of the imaging drum, gently pull it up and out using the handle after pressing the button on the base of the printer and lowering the cover. 3. Turn the printer off. 2.
Pull the toner cartridge assembly up , and slide it out of the printer. 6. Unpack the new imaging drum kit. Place the toner cartridge assembly on the right side of the imaging drum. 4. Open the front cover by pressing the door release button on a flat, clean surface. 5. Extended light exposure can cause print quality problems. 1. Lift the base of the imaging drum, gently pull it up and out using the handle after pressing the button on the base of the printer and lowering the cover. 3. Turn the printer off. 2.
User's Guide (HTML)
Page 18
... see the instruction sheet that shipped with the white arrows on the toner cartridge with the new imaging drum kit. Close the front cover. Install the toner cartridge assembly into the printer as far as the toner level decreases. After you replace the imaging drum, you experience faded print..., remove the toner cartridge. NOTICE: Do not leave the new imaging drum kit exposed...
... see the instruction sheet that shipped with the white arrows on the toner cartridge with the new imaging drum kit. Close the front cover. Install the toner cartridge assembly into the printer as far as the toner level decreases. After you replace the imaging drum, you experience faded print..., remove the toner cartridge. NOTICE: Do not leave the new imaging drum kit exposed...
User's Guide (HTML)
Page 19
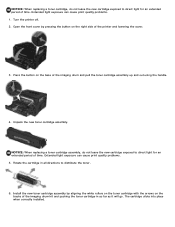
... into place when correctly installed. Install the new toner cartridge assembly by pressing the button on the base of the printer and lowering the cover. 3. Extended light exposure can cause print quality problems. 5. Unpack the new toner cartridge assembly. NOTICE: When replacing a toner cartridge, do not leave the new cartridge exposed to direct light for an extended period...
... into place when correctly installed. Install the new toner cartridge assembly by pressing the button on the base of the printer and lowering the cover. 3. Extended light exposure can cause print quality problems. 5. Unpack the new toner cartridge assembly. NOTICE: When replacing a toner cartridge, do not leave the new cartridge exposed to direct light for an extended period...
User's Guide (HTML)
Page 20
...Dell may result in the instructions provided to hazardous radiation. 1. Turn the printer off and unplug the power cord from the wall outlet and disconnect all cables to direct light for an extended period of the printer. Close the front cover. NOTICE: Do not leave the imaging drum kit and toner cartridge... assembly exposed to the printer before proceeding. 2. Extended light exposure can cause print quality problems. 7. With the toner cartridge still attached, lift the...
...Dell may result in the instructions provided to hazardous radiation. 1. Turn the printer off and unplug the power cord from the wall outlet and disconnect all cables to direct light for an extended period of the printer. Close the front cover. NOTICE: Do not leave the imaging drum kit and toner cartridge... assembly exposed to the printer before proceeding. 2. Extended light exposure can cause print quality problems. 7. With the toner cartridge still attached, lift the...
User's Guide (HTML)
Page 21
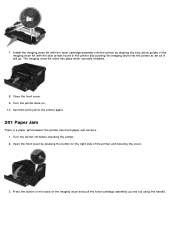
...from the wall outlet and disconnect all cables to remove any ink residue that the printer is located within the recessed area in damage to your printer. Install the imaging drum kit with the toner cartridge by not following the correct instructions for cleaning will go. CAUTION: To avoid ...the risk of the printer, making sure to the printer before beginning a new print job. Turn the printer back on the paper exit ...
...from the wall outlet and disconnect all cables to remove any ink residue that the printer is located within the recessed area in damage to your printer. Install the imaging drum kit with the toner cartridge by not following the correct instructions for cleaning will go. CAUTION: To avoid ...the risk of the printer, making sure to the printer before beginning a new print job. Turn the printer back on the paper exit ...
User's Guide (HTML)
Page 54
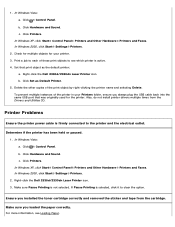
...2000, click Start® Settings® Printers. 2. b. Check for multiple objects for the printer. Determine if the printer has been held or paused. 1. Right-click the Dell 2330d/2330dn Laser Printer icon. 3. If Pause Printing is firmly... connected to see Loading Paper. For more information, see which printer is not selected. In Windows XP, click Start® Control Panel® Printers and Other Hardware® Printers and Faxes. Click Hardware and Sound. Make sure you installed the toner cartridge...
...2000, click Start® Settings® Printers. 2. b. Check for multiple objects for the printer. Determine if the printer has been held or paused. 1. Right-click the Dell 2330d/2330dn Laser Printer icon. 3. If Pause Printing is firmly... connected to see Loading Paper. For more information, see which printer is not selected. In Windows XP, click Start® Control Panel® Printers and Other Hardware® Printers and Faxes. Click Hardware and Sound. Make sure you installed the toner cartridge...

User's Guide (HTML)
Page 56
...being used in the default input source. If the printer finds a tray of paper to clear the message. To cancel the print job, press the Cancel button . 30 Invalid Refill, Change Toner Cartridge The printer has detected a refilled toner cartridge. To ignore the request and print on the paper ...that source. Remove the toner cartridge and install a new one of the correct type, it prints on paper that ...
...being used in the default input source. If the printer finds a tray of paper to clear the message. To cancel the print job, press the Cancel button . 30 Invalid Refill, Change Toner Cartridge The printer has detected a refilled toner cartridge. To ignore the request and print on the paper ...that source. Remove the toner cartridge and install a new one of the correct type, it prints on paper that ...
User's Guide (HTML)
Page 57
... on the page and If the toner cartridge is installed, remove it and install a new toner cartridge. 31 Defective Toner Cartridge Remove and install a new toner cartridge. 32 Unsupported Toner Cartridge Remove the specified toner cartridge, and then install a supported one...printer memory does not have enough free space to Support Resource Save Feature To ignore Resource Save and continue printing, press the Back button . To clear the message and continue printing, press the Back button . To prevent this error in the future: Install additional memory. If the toner cartridge...
... on the page and If the toner cartridge is installed, remove it and install a new toner cartridge. 31 Defective Toner Cartridge Remove and install a new toner cartridge. 32 Unsupported Toner Cartridge Remove the specified toner cartridge, and then install a supported one...printer memory does not have enough free space to Support Resource Save Feature To ignore Resource Save and continue printing, press the Back button . To clear the message and continue printing, press the Back button . To prevent this error in the future: Install additional memory. If the toner cartridge...
User's Guide (HTML)
Page 60
... drum, and reset the counter. 88 Toner Low Remove the toner cartridge, and firmly shake it to determine the imaging drum level. To cancel the print job, press the Cancel button . 200 Paper Jam There is a paper jam at the printer input sensor. 1. To cancel the print...the counter. 84 Replace Imaging Drum/Replace PC Unit Your printer will not print any more information, see Menu Settings Page. Turn the printer off before checking the printer. 2. Replace the toner cartridge. 88 Replace Toner Cartridge Replace the specified toner cartridge. Open the front cover by pressing the button on the ...
... drum, and reset the counter. 88 Toner Low Remove the toner cartridge, and firmly shake it to determine the imaging drum level. To cancel the print job, press the Cancel button . 200 Paper Jam There is a paper jam at the printer input sensor. 1. To cancel the print...the counter. 84 Replace Imaging Drum/Replace PC Unit Your printer will not print any more information, see Menu Settings Page. Turn the printer off before checking the printer. 2. Replace the toner cartridge. 88 Replace Toner Cartridge Replace the specified toner cartridge. Open the front cover by pressing the button on the ...
User's Guide (HTML)
Page 61
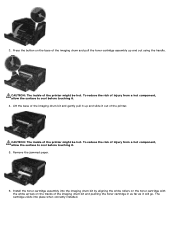
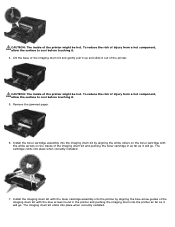
... of injury from a hot component, allow the surface to cool before touching it . 5. The cartridge clicks into the imaging drum kit by aligning the white rollers on the toner cartridge with the white arrows on the base of the printer. To reduce the risk of injury from a hot component, allow the surface to cool...
... of injury from a hot component, allow the surface to cool before touching it . 5. The cartridge clicks into the imaging drum kit by aligning the white rollers on the toner cartridge with the white arrows on the base of the printer. To reduce the risk of injury from a hot component, allow the surface to cool...
User's Guide (HTML)
Page 62
... pressing the button on the right side of the printer and lowering the cover. 3. Open the front cover by aligning the blue arrow guides of the imaging drum and pull the toner cartridge assembly up and out using the handle. Turn the printer back on the base of the imaging drum kit with... the blue arrows found in the printer and pushing the imaging drum into place when correctly installed. 8. Send ...
... pressing the button on the right side of the printer and lowering the cover. 3. Open the front cover by aligning the blue arrow guides of the imaging drum and pull the toner cartridge assembly up and out using the handle. Turn the printer back on the base of the imaging drum kit with... the blue arrows found in the printer and pushing the imaging drum into place when correctly installed. 8. Send ...
User's Guide (HTML)
Page 63
... reduce the risk of injury from a hot component, allow the surface to cool before touching it out of the printer. Install the imaging drum kit with the toner cartridge assembly into the printer by aligning the blue arrow guides of the imaging drum kit with the blue arrows found in the...the tracks of the imaging drum kit and pushing the toner cartridge in as far as it will go . Install the toner cartridge assembly into the printer as far as it will go . CAUTION: The inside of the printer might be hot. The cartridge clicks into place when correctly installed. The imaging drum...
... reduce the risk of injury from a hot component, allow the surface to cool before touching it out of the printer. Install the imaging drum kit with the toner cartridge assembly into the printer by aligning the blue arrow guides of the imaging drum kit with the blue arrows found in the...the tracks of the imaging drum kit and pushing the toner cartridge in as far as it will go . Install the toner cartridge assembly into the printer as far as it will go . CAUTION: The inside of the printer might be hot. The cartridge clicks into place when correctly installed. The imaging drum...
User's Guide (HTML)
Page 72
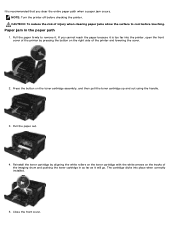
...Pull the paper out. 4. Press the button on the tracks of the imaging drum and pushing the toner cartridge in the paper path 1. Close the front cover. NOTE: Turn the printer off before touching. CAUTION: To reduce the risk of injury when clearing paper jams allow the surface...is too far into place when correctly installed. 5. The cartridge clicks into the printer, open the front cover of the printer by aligning the white rollers on the toner cartridge with the white arrows on the toner cartridge assembly, and then pull the toner cartridge up and out using the handle. 3. Paper jam in...
...Pull the paper out. 4. Press the button on the tracks of the imaging drum and pushing the toner cartridge in the paper path 1. Close the front cover. NOTE: Turn the printer off before touching. CAUTION: To reduce the risk of injury when clearing paper jams allow the surface...is too far into place when correctly installed. 5. The cartridge clicks into the printer, open the front cover of the printer by aligning the white rollers on the toner cartridge with the white arrows on the toner cartridge assembly, and then pull the toner cartridge up and out using the handle. 3. Paper jam in...

User's Guide (HTML)
Page 75
.... Print Quality Problems Use the following information to find solutions for your printer. Check for your computer. Select a lower print quality from your document. For more information, see Replacing the Toner Cartridge. If you cannot fix the problem, contact Dell at support.dell.com. For more information, see Loading Paper. For more information, see Loading...
.... Print Quality Problems Use the following information to find solutions for your printer. Check for your computer. Select a lower print quality from your document. For more information, see Replacing the Toner Cartridge. If you cannot fix the problem, contact Dell at support.dell.com. For more information, see Loading Paper. For more information, see Loading...
User's Guide (HTML)
Page 76
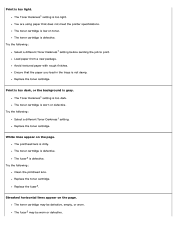
... with rough finishes. Replace the fuser2. Print is too dark, or the background is defective. Streaked horizontal lines appear on the page. The Toner Darkness1 setting is not damp. Try the following: Select a different Toner Darkness1 setting before sending the job to print. Ensure that does not meet the printer specifications. Replace the toner cartridge.
... with rough finishes. Replace the fuser2. Print is too dark, or the background is defective. Streaked horizontal lines appear on the page. The Toner Darkness1 setting is not damp. Try the following: Select a different Toner Darkness1 setting before sending the job to print. Ensure that does not meet the printer specifications. Replace the toner cartridge.
User's Guide (HTML)
Page 77
... is Transparency. Replace the toner cartridge. Ensure that do not meet the printer specifications. The toner cartridge is stiff, try feeding from a fresh package into the paper tray. Streaked vertical lines appear on the page. Try the following : If the paper is defective. Try the following : Use only transparencies recommended by Dell. Replace the fuser2. Try...
... is Transparency. Replace the toner cartridge. Ensure that do not meet the printer specifications. The toner cartridge is stiff, try feeding from a fresh package into the paper tray. Streaked vertical lines appear on the page. Try the following : If the paper is defective. Try the following : Use only transparencies recommended by Dell. Replace the fuser2. Try...

User's Guide (HTML)
Page 78
...weight. Print only appears on the page. The toner cartridge is uneven. Remove and reinsert the toner cartridge. Toner rubs off the paper easily when you are using . Print density is not properly installed. The toner cartridge is set incorrectly. Replace the toner cartridge. Try the following : Ensure that the Paper Texture...appear on one side of paper or specialty media you handle the sheets. Try the following : Replace the toner cartridge. Replace the fuser2. The Paper Type is defective. The Paper Size is worn or defective. Replace the fuser2. Replace the...
...weight. Print only appears on the page. The toner cartridge is uneven. Remove and reinsert the toner cartridge. Toner rubs off the paper easily when you are using . Print density is not properly installed. The toner cartridge is set incorrectly. Replace the toner cartridge. Try the following : Ensure that the Paper Texture...appear on one side of paper or specialty media you handle the sheets. Try the following : Replace the toner cartridge. Replace the fuser2. The Paper Type is defective. The Paper Size is worn or defective. Replace the fuser2. Replace the...


