
User's Guide (HTML)
Page 51
... communication. If failure persists, then changing the USB cable might help. Troubleshooting Your Printer Frequently Asked Questions (FAQ): Dell 2330d/2330dn Laser Printer Issues and Solutions Setup Problems Error Messages General Guidelines for Selecting or Loading Print Media Avoiding Jams and Misfeeds Clearing Paper Jams Paper Problems Printing Problems Print Quality Problems Frequently Asked Questions (FAQ): Mac OS®...
... communication. If failure persists, then changing the USB cable might help. Troubleshooting Your Printer Frequently Asked Questions (FAQ): Dell 2330d/2330dn Laser Printer Issues and Solutions Setup Problems Error Messages General Guidelines for Selecting or Loading Print Media Avoiding Jams and Misfeeds Clearing Paper Jams Paper Problems Printing Problems Print Quality Problems Frequently Asked Questions (FAQ): Mac OS®...
User's Guide (HTML)
Page 57
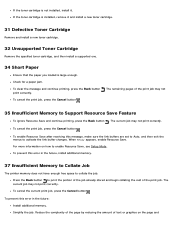
...Resource Save after receiving this error in the future, install additional memory. 37 Insufficient Memory to Collate Job The printer memory does not have enough free space to activate the link buffer changes. Reduce the complexity of the page...toner cartridge. 32 Unsupported Toner Cartridge Remove the specified toner cartridge, and then install a supported one. 34 Short Paper Ensure that the paper you loaded is not installed, install it. To cancel the print job, press the Cancel button . 35 Insufficient... the rest of the print job may not print correctly. Check for a paper jam.
...Resource Save after receiving this error in the future, install additional memory. 37 Insufficient Memory to Collate Job The printer memory does not have enough free space to activate the link buffer changes. Reduce the complexity of the page...toner cartridge. 32 Unsupported Toner Cartridge Remove the specified toner cartridge, and then install a supported one. 34 Short Paper Ensure that the paper you loaded is not installed, install it. To cancel the print job, press the Cancel button . 35 Insufficient... the rest of the print job may not print correctly. Check for a paper jam.
User's Guide (HTML)
Page 60
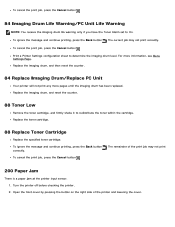
... firmly shake it to determine the imaging drum level. To cancel the print job, press the Cancel button . 200 Paper Jam There is a paper jam at the printer input sensor. 1. Turn the printer off before checking the printer. 2. The current job may not print correctly. Replace the imaging drum, and then reset the counter. 84 Replace Imaging...
... firmly shake it to determine the imaging drum level. To cancel the print job, press the Cancel button . 200 Paper Jam There is a paper jam at the printer input sensor. 1. Turn the printer off before checking the printer. 2. The current job may not print correctly. Replace the imaging drum, and then reset the counter. 84 Replace Imaging...
User's Guide (HTML)
Page 62
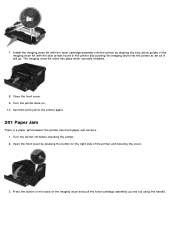
Close the front cover. 9. Turn the printer back on the base of the printer and lowering the cover. 3. Send the print job to the printer again. 201 Paper Jam There is a paper jam between the printer input and paper exit sensors. 1. Open the front cover by aligning the blue arrow guides of the ...imaging drum kit with the toner cartridge assembly into the printer by pressing the button on the right...
Close the front cover. 9. Turn the printer back on the base of the printer and lowering the cover. 3. Send the print job to the printer again. 201 Paper Jam There is a paper jam between the printer input and paper exit sensors. 1. Open the front cover by aligning the blue arrow guides of the ...imaging drum kit with the toner cartridge assembly into the printer by pressing the button on the right...
User's Guide (HTML)
Page 64
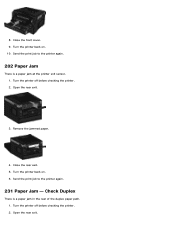
Open the rear exit. Turn the printer back on . 6. Open the rear exit. 3. Turn the printer off before checking the printer. 2. Close the rear exit. 5. Send the print job to the printer again. 202 Paper Jam There is a paper jam in the rear of the duplex paper path. 1. Turn the printer off before checking the printer. 2. Turn the printer back on . 10. Close the front cover. 9. 8. Check Duplex There is a paper jam at the printer exit sensor. 1. Send the print job to the printer again. 231 Paper Jam - Remove the jammed paper. 4.
Open the rear exit. Turn the printer back on . 6. Open the rear exit. 3. Turn the printer off before checking the printer. 2. Close the rear exit. 5. Send the print job to the printer again. 202 Paper Jam There is a paper jam in the rear of the duplex paper path. 1. Turn the printer off before checking the printer. 2. Turn the printer back on . 10. Close the front cover. 9. 8. Check Duplex There is a paper jam at the printer exit sensor. 1. Send the print job to the printer again. 231 Paper Jam - Remove the jammed paper. 4.
User's Guide (HTML)
Page 65
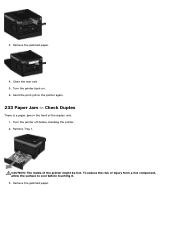
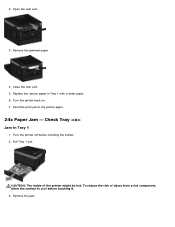
Turn the printer back on. 6. Turn the printer off before touching it. 3. Send the print job to cool before checking the printer. 2. Check Duplex There is a paper jam in the front of the printer might be hot. Remove Tray 1. CAUTION: The inside of the duplex unit. 1. Close the rear exit. 5. To reduce the risk of injury from a hot component, allow the surface to the printer again. 233 Paper Jam - 3. Remove the jammed paper. Remove the jammed paper. 4.
Turn the printer back on. 6. Turn the printer off before touching it. 3. Send the print job to cool before checking the printer. 2. Check Duplex There is a paper jam in the front of the printer might be hot. Remove Tray 1. CAUTION: The inside of the duplex unit. 1. Close the rear exit. 5. To reduce the risk of injury from a hot component, allow the surface to the printer again. 233 Paper Jam - 3. Remove the jammed paper. Remove the jammed paper. 4.
User's Guide (HTML)
Page 66
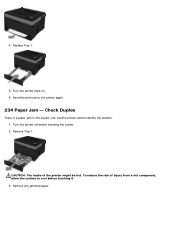
Remove any jammed paper. CAUTION: The inside of injury from a hot component, allow the surface to the printer again. 234 Paper Jam - To reduce the risk of the printer might be hot. Replace Tray 1. 5. Check Duplex There is a paper jam in the duplex unit, but the printer cannot identify the location. 1. Turn the printer back on. 6. Turn the printer off before touching it. 3. Send the print job to cool before checking the printer. 2. 4. Remove Tray 1.
Remove any jammed paper. CAUTION: The inside of injury from a hot component, allow the surface to the printer again. 234 Paper Jam - To reduce the risk of the printer might be hot. Replace Tray 1. 5. Check Duplex There is a paper jam in the duplex unit, but the printer cannot identify the location. 1. Turn the printer back on. 6. Turn the printer off before touching it. 3. Send the print job to cool before checking the printer. 2. 4. Remove Tray 1.
User's Guide (HTML)
Page 67
Close the rear exit. 8. Check Duplex There is a paper jam at the output bin because the paper used was too narrow for the duplex unit. 1. Turn the printer off before checking the printer. Send the print job to the printer again. 235 Paper Jam - Remove any jammed paper. 7. Open the rear exit. 6. Turn the printer back on. 9. 4. Replace Tray 1. 5.
Close the rear exit. 8. Check Duplex There is a paper jam at the output bin because the paper used was too narrow for the duplex unit. 1. Turn the printer off before checking the printer. Send the print job to the printer again. 235 Paper Jam - Remove any jammed paper. 7. Open the rear exit. 6. Turn the printer back on. 9. 4. Replace Tray 1. 5.
User's Guide (HTML)
Page 68
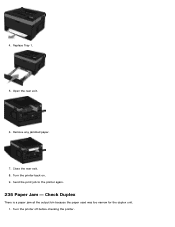
Remove the jammed paper. 4. Send the print job to cool before checking the printer. 2. Turn the printer off before touching it. 3. Close the rear exit. 5. Turn the printer back on. 7. Remove the jam. Pull Tray 1 out. To reduce the risk of the printer might be hot. 2. Replace the narrow paper in Tray 1 1. Open the rear exit. 3. Check Tray Jam in Tray 1 with a wider paper. 6. CAUTION: The inside of injury from a hot component, allow the surface to the printer again. 24x Paper Jam -
Remove the jammed paper. 4. Send the print job to cool before checking the printer. 2. Turn the printer off before touching it. 3. Close the rear exit. 5. Turn the printer back on. 7. Remove the jam. Pull Tray 1 out. To reduce the risk of the printer might be hot. 2. Replace the narrow paper in Tray 1 1. Open the rear exit. 3. Check Tray Jam in Tray 1 with a wider paper. 6. CAUTION: The inside of injury from a hot component, allow the surface to the printer again. 24x Paper Jam -

User's Guide (HTML)
Page 70
... them. Load the paper into the multipurpose feeder. 5. Turn the printer off before checking the printer. 2. Remove the paper from the multipurpose feeder. 3. Check Multipurpose Feeder 1. Straighten the edges on . 6. Slide the paper guide toward the inside of the tray until it lightly rests against the edge of paper back and forth to the printer again. 251 Paper Jam -
... them. Load the paper into the multipurpose feeder. 5. Turn the printer off before checking the printer. 2. Remove the paper from the multipurpose feeder. 3. Check Multipurpose Feeder 1. Straighten the edges on . 6. Slide the paper guide toward the inside of the tray until it lightly rests against the edge of paper back and forth to the printer again. 251 Paper Jam -
User's Guide (HTML)
Page 71
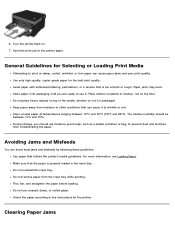
... the instructions for the best print quality. General Guidelines for Selecting or Loading Print Media Attempting to the printer again. Avoid paper with embossed lettering, perforations, or a texture that can cause paper jams and poor print quality. Paper jams may occur. Place cartons on pallets or shelves, not on top of the media, whether or not...
... the instructions for the best print quality. General Guidelines for Selecting or Loading Print Media Attempting to the printer again. Avoid paper with embossed lettering, perforations, or a texture that can cause paper jams and poor print quality. Paper jams may occur. Place cartons on pallets or shelves, not on top of the media, whether or not...
User's Guide (HTML)
Page 72
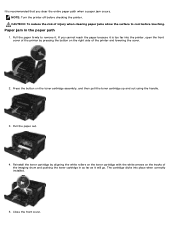
...reduce the risk of injury when clearing paper jams allow the surface to remove it is recommended that you clear the entire paper path when a paper jam occurs. Close the front cover. It is too far into place when correctly installed. 5. NOTE: Turn the printer off before touching. Press the button ...on the tracks of the imaging drum and pushing the toner cartridge in the paper path 1. Reinstall...
...reduce the risk of injury when clearing paper jams allow the surface to remove it is recommended that you clear the entire paper path when a paper jam occurs. Close the front cover. It is too far into place when correctly installed. 5. NOTE: Turn the printer off before touching. Press the button ...on the tracks of the imaging drum and pushing the toner cartridge in the paper path 1. Reinstall...

User's Guide (HTML)
Page 73
Near the paper input tray 1. Open the multipurpose feeder door. 2. Remove the paper input tray. 2. Firmly grasp the paper, and gently pull it from the printer. 3. Close the multipurpose feeder door. Replace the paper input tray. Paper jam not visible Near the multipurpose feeder 1. Firmly grasp the paper, and gently pull it from the printer. 3.
Near the paper input tray 1. Open the multipurpose feeder door. 2. Remove the paper input tray. 2. Firmly grasp the paper, and gently pull it from the printer. 3. Close the multipurpose feeder door. Replace the paper input tray. Paper jam not visible Near the multipurpose feeder 1. Firmly grasp the paper, and gently pull it from the printer. 3.

User's Guide (HTML)
Page 75
... dialog box. Check for your system. Paper Problems Make sure you cannot fix the problem, contact Dell at support.dell.com. For more Random Access Memory (RAM) for printing problems you loaded the paper correctly. You may have a printer part that you rarely use . Use only paper recommended for a paper jam. Remove fonts that requires cleaning or replacement...
... dialog box. Check for your system. Paper Problems Make sure you cannot fix the problem, contact Dell at support.dell.com. For more Random Access Memory (RAM) for printing problems you loaded the paper correctly. You may have a printer part that you rarely use . Use only paper recommended for a paper jam. Remove fonts that requires cleaning or replacement...

User's Guide (HTML)
Page 85
Load the paper in the tray with the print side facing down. Straighten the edges on the side paper guides. Ensure that the paper is below the maximum fill line on a level surface. 4. Flex a stack of the paper tray. 3. Move the rear paper guide to the back of paper back and forth. Overloading may cause paper jams. c.
Load the paper in the tray with the print side facing down. Straighten the edges on the side paper guides. Ensure that the paper is below the maximum fill line on a level surface. 4. Flex a stack of the paper tray. 3. Move the rear paper guide to the back of paper back and forth. Overloading may cause paper jams. c.
User's Guide (HTML)
Page 95
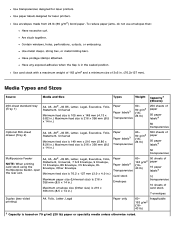
...Use paper labels designed for laser printers. To reduce paper jams, do not use envelopes that: Have excessive curl. Use card stock with a maximum weight of 163 g/m2 and a minimum size of 3x5 in .) Paper Paper labels3 Transparencies 60- 90 g/m2 (16- 24 lb) 550 sheets of paper 50 paper labels4... Other Envelope Minimum feed size is 76.2 x 127 mm (3.9 x 4.9 in.) Maximum paper size (Universal size) is 216 x 356 mm (8.5 x 14 in.) Maximum envelope size (Other size) is based on 75 g/m2 (20 lb) paper or specialty media unless otherwise noted. Use transparencies designed for laser printers.
...Use paper labels designed for laser printers. To reduce paper jams, do not use envelopes that: Have excessive curl. Use card stock with a maximum weight of 163 g/m2 and a minimum size of 3x5 in .) Paper Paper labels3 Transparencies 60- 90 g/m2 (16- 24 lb) 550 sheets of paper 50 paper labels4... Other Envelope Minimum feed size is 76.2 x 127 mm (3.9 x 4.9 in.) Maximum paper size (Universal size) is 216 x 356 mm (8.5 x 14 in.) Maximum envelope size (Other size) is based on 75 g/m2 (20 lb) paper or specialty media unless otherwise noted. Use transparencies designed for laser printers.

User's Guide (HTML)
Page 129
... reports, or the status of the printers in your area, the Dell Printer Configuration Web Tool has a Printer Information feature that other users don't inadvertently change printer settings and keep track of a paper jam or an empty paper tray? Copy Printer Settings-Quickly clone the printer's settings to order additional toner cartridges. Type your printer's IP address is, print a network setup...
... reports, or the status of the printers in your area, the Dell Printer Configuration Web Tool has a Printer Information feature that other users don't inadvertently change printer settings and keep track of a paper jam or an empty paper tray? Copy Printer Settings-Quickly clone the printer's settings to order additional toner cartridges. Type your printer's IP address is, print a network setup...

Service Manual
Page 3
... and supply capacity 1-5 Types of print media 1-6 Tips on preventing jams 1-7 Paper path 1-7 Tools 1-8 Acronyms 1-9 Diagnostics information 2-1 Start 2-1 Overview of the operator panel and menus 2-2 Indicator light 2-2 Buttons 2-3 Diagram of the printer menus 2-5 Messages and error codes 2-6 User attendance messages 2-6 Cartridge error messages 2-9 Paper jam error codes (200-series 2-9 Service error codes 2-15 Symptom tables...
... and supply capacity 1-5 Types of print media 1-6 Tips on preventing jams 1-7 Paper path 1-7 Tools 1-8 Acronyms 1-9 Diagnostics information 2-1 Start 2-1 Overview of the operator panel and menus 2-2 Indicator light 2-2 Buttons 2-3 Diagram of the printer menus 2-5 Messages and error codes 2-6 User attendance messages 2-6 Cartridge error messages 2-9 Paper jam error codes (200-series 2-9 Service error codes 2-15 Symptom tables...
Service Manual
Page 24
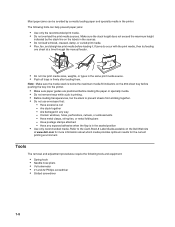
... sure the media stack is in any exposed adhesive when the flap is below the maximum media fill indicators on the Dell Web site at a time through the manual feeder. • Do not mix print media sizes, weights, or types...printer. • Make sure paper guides are positioned before loading it. The following tools and equipment: • Spring hook • Needle nose pliers • Volt-ohmmeter • #1 and #2 Phillips screwdriver • Slotted screwdriver 1-8 Are damaged in the sealed position • Use only recommended media. Most paper jams can help prevent paper jams...
... sure the media stack is in any exposed adhesive when the flap is below the maximum media fill indicators on the Dell Web site at a time through the manual feeder. • Do not mix print media sizes, weights, or types...printer. • Make sure paper guides are positioned before loading it. The following tools and equipment: • Spring hook • Needle nose pliers • Volt-ohmmeter • #1 and #2 Phillips screwdriver • Slotted screwdriver 1-8 Are damaged in the sealed position • Use only recommended media. Most paper jams can help prevent paper jams...
Service Manual
Page 35
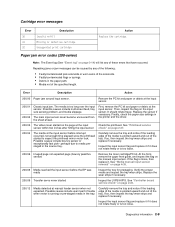
.... Diagnostics information 2-9 Cartridge error messages Error 30 31 32 Description Invalid refill Missing or defective cartridge Unsupported print cartridge Action Replace the cartridge. Paper jam error codes (200-series) Note: The Event log (See "Event log" on the input sensor. Replace the sensor if necessary. Inspect ...page not expected page (bouncy passthru sensor) Remove the toner cartridge/PC kit. The media is running or pre-staged media in the printer and the driver. 200.03 The video never started on page 2-37. 200.04 The media at the input Check the printhead....
.... Diagnostics information 2-9 Cartridge error messages Error 30 31 32 Description Invalid refill Missing or defective cartridge Unsupported print cartridge Action Replace the cartridge. Paper jam error codes (200-series) Note: The Event log (See "Event log" on the input sensor. Replace the sensor if necessary. Inspect ...page not expected page (bouncy passthru sensor) Remove the toner cartridge/PC kit. The media is running or pre-staged media in the printer and the driver. 200.03 The video never started on page 2-37. 200.04 The media at the input Check the printhead....


