
User's Guide (HTML)
Page 79
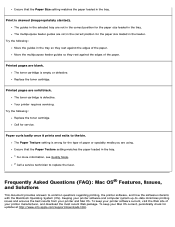
... the Web site of the paper. Print is empty or defective. Try the following : Replace the toner cartridge. To keep your printer software and computer system up-to replace the fuser. The toner cartridge is skewed (inappropriately slanted). The toner cartridge is wrong for the type of the paper. The guides in...
... the Web site of the paper. Print is empty or defective. Try the following : Replace the toner cartridge. To keep your printer software and computer system up-to replace the fuser. The toner cartridge is skewed (inappropriately slanted). The toner cartridge is wrong for the type of the paper. The guides in...
User's Guide (HTML)
Page 91
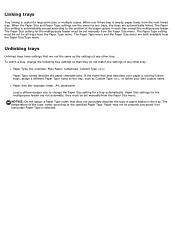
... settings that they must be properly processed if an inaccurate Paper Type is empty, paper feeds from the next linked tray. The temperature of the fuser varies according to the tray, such as the settings of any trays, the trays are not automatic; The Paper Size setting for example: letter, A4...
... settings that they must be properly processed if an inaccurate Paper Type is empty, paper feeds from the next linked tray. The temperature of the fuser varies according to the tray, such as the settings of any trays, the trays are not automatic; The Paper Size setting for example: letter, A4...

Service Manual
Page 3
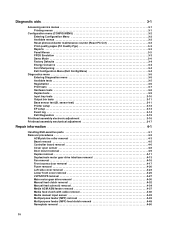
... Table of Contents iii Notices and safety information vii Laser notice vii Safety information xiii Preface xvi Conventions xvi...Diagnostics information 2-1 Start 2-1 Overview of the operator panel and menus 2-2 Indicator light 2-2 Buttons 2-3 Diagram of the printer menus 2-5 Messages and error codes 2-6 User attendance messages 2-6 Cartridge error messages 2-9 Paper jam error codes (200-series...service check 2-23 Cover interlock switch service check 2-23 Dead machine service check 2-24 Fuser service check 2-25 LVPS/HVPS service check 2-25 Main motor service check 2-26 Operator...
... Table of Contents iii Notices and safety information vii Laser notice vii Safety information xiii Preface xvi Conventions xvi...Diagnostics information 2-1 Start 2-1 Overview of the operator panel and menus 2-2 Indicator light 2-2 Buttons 2-3 Diagram of the printer menus 2-5 Messages and error codes 2-6 User attendance messages 2-6 Cartridge error messages 2-9 Paper jam error codes (200-series...service check 2-23 Cover interlock switch service check 2-23 Dead machine service check 2-24 Fuser service check 2-25 LVPS/HVPS service check 2-25 Main motor service check 2-26 Operator...
Service Manual
Page 4
sensor test 3-11 Printer setup 3-12 EP setup 3-13 Event log 3-14 Exit Diagnostics 3-15 Printhead assembly electronic adjustment 3-16 Printhead assembly mechanical adjustment 3-17 Repair information 4-1 Handling ESD-... 4-6 Cover open sensor 4-8 Door mount removal 4-9 Duplex removal 4-11 Duplex/main motor gear drive interface removal 4-13 Fan removal 4-16 Front access door removal 4-17 Fuser removal 4-20 Left side cover removal 4-23 Lower front cover removal 4-25 LVPS/HVPS removal 4-27 Main motor gear drive removal 4-30 Manual feed clutch...
sensor test 3-11 Printer setup 3-12 EP setup 3-13 Event log 3-14 Exit Diagnostics 3-15 Printhead assembly electronic adjustment 3-16 Printhead assembly mechanical adjustment 3-17 Repair information 4-1 Handling ESD-... 4-6 Cover open sensor 4-8 Door mount removal 4-9 Duplex removal 4-11 Duplex/main motor gear drive interface removal 4-13 Fan removal 4-16 Front access door removal 4-17 Fuser removal 4-20 Left side cover removal 4-23 Lower front cover removal 4-25 LVPS/HVPS removal 4-27 Main motor gear drive removal 4-30 Manual feed clutch...

Service Manual
Page 23
Tips on preventing jams Paper path I J F G E H K L C B D M A A Paper path B Manual feed sensor C Upper end feed rolls D Input sensor E Transfer roll F Fuser G Fuser exit rolls H Fuser exit sensor I Exit rolls J Exit sensor K Duplex unit L Duplex sensor M Auto compensator A-B 125.3 mm B-C 9.0 mm C-D 59.8 mm D-E 44.9 mm E-F 112.7 mm F-G 21.4 mm G-H 114.8 mm H-I 7.5 mm I-J 17.0 mm I-K 211.7 mm K-L 93.4 mm L-M 8.4 mm General information 1-7
Tips on preventing jams Paper path I J F G E H K L C B D M A A Paper path B Manual feed sensor C Upper end feed rolls D Input sensor E Transfer roll F Fuser G Fuser exit rolls H Fuser exit sensor I Exit rolls J Exit sensor K Duplex unit L Duplex sensor M Auto compensator A-B 125.3 mm B-C 9.0 mm C-D 59.8 mm D-E 44.9 mm E-F 112.7 mm F-G 21.4 mm G-H 114.8 mm H-I 7.5 mm I-J 17.0 mm I-K 211.7 mm K-L 93.4 mm L-M 8.4 mm General information 1-7
Service Manual
Page 34
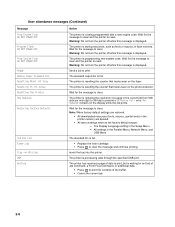
...for the message to clear and the printer to clear the message and continue printing. Warning: Do not turn the printer off while this message is resetting the counter that tracks wear on the fuser. The printer is displayed. The printer is programming new system code. Wait for... the message to the factory default except: - The printer is full. Warning: Do not turn the printer off while this message is full. • Replace...
...for the message to clear and the printer to clear the message and continue printing. Warning: Do not turn the printer off while this message is resetting the counter that tracks wear on the fuser. The printer is displayed. The printer is programming new system code. Wait for... the message to the factory default except: - The printer is full. Warning: Do not turn the printer off while this message is full. • Replace...
Service Manual
Page 37
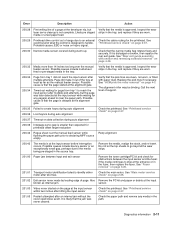
... 4-48. 200.32 Media more than expected for printhead offset target evaluation 200.42 Rogue sheet is designed to handle. Inspect the wear laser servo cleanup is approved. Retry alignment. 200.43 The media is that the page stalled at the alignment gate. Verify that the narrow ... 201.00 Paper jam between input and exit sensor Remove the toner cartridge/PC kit and check for obstructions between the input sensor and the fuser. "Printhead service check" on page 4-3. Check that the media is delayed at the alignment gate. See "Rear exit guide assembly with paper...
... 4-48. 200.32 Media more than expected for printhead offset target evaluation 200.42 Rogue sheet is designed to handle. Inspect the wear laser servo cleanup is approved. Retry alignment. 200.43 The media is that the page stalled at the alignment gate. Verify that the narrow ... 201.00 Paper jam between input and exit sensor Remove the toner cartridge/PC kit and check for obstructions between the input sensor and the fuser. "Printhead service check" on page 4-3. Check that the media is delayed at the alignment gate. See "Rear exit guide assembly with paper...
Service Manual
Page 38
... of the page heading toward the exit sensor. If damage is located behind the fuser exit rollers, about mid printer. If the flag does not rotate freely or has no spring action, then replace the fuser. The flag is found, then replace the damaged part. Indicates code may be... inspect the flag on the exit sensor. If there is located behind the fuser exit rollers, about mid printer. If there are none, then inspect for damage at fuser nip before fuser started ramping toward desired temperature. See "Fuser removal" on page 4-20. 202.06 Exit sensor bounced 202.13 Exit ...
... of the page heading toward the exit sensor. If damage is located behind the fuser exit rollers, about mid printer. If the flag does not rotate freely or has no spring action, then replace the fuser. The flag is found, then replace the damaged part. Indicates code may be... inspect the flag on the exit sensor. If there is located behind the fuser exit rollers, about mid printer. If there are none, then inspect for damage at fuser nip before fuser started ramping toward desired temperature. See "Fuser removal" on page 4-20. 202.06 Exit sensor bounced 202.13 Exit ...

Service Manual
Page 39
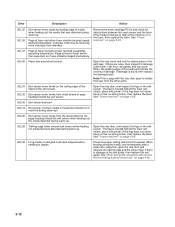
... GAP JAM. Duplex jam while picking from Tray 1 Remove the tray and inspect the media path for obstructions between the rear cover ribs, the fuser exit rollers, and below. Check the belt and drive of current reversing page never staged. Also check the wear strips, and replace if necessary....in duplex never picked. See "Paper input and duplex sensor assembly removal" on a wireless unit), and inspect the flag of the cables, tilt the printer onto its back (be sure to the output bin. Check the pick tires for obstructions. Check the pick rollers. Replace it on Tray 2.) If ...
... GAP JAM. Duplex jam while picking from Tray 1 Remove the tray and inspect the media path for obstructions between the rear cover ribs, the fuser exit rollers, and below. Check the belt and drive of current reversing page never staged. Also check the wear strips, and replace if necessary....in duplex never picked. See "Paper input and duplex sensor assembly removal" on a wireless unit), and inspect the flag of the cables, tilt the printer onto its back (be sure to the output bin. Check the pick tires for obstructions. Check the pick rollers. Replace it on Tray 2.) If ...

Service Manual
Page 41
... while checking for slope change . 920.05 Fuser under temperature while printing 920.06 Fuser under temperature while printing 920.07 Fuser under temperature during steady state control. Service error codes Service error codes are generally non-recoverable except in an intermittent condition when the printer can occur in printing or standby modes. 921...
... while checking for slope change . 920.05 Fuser under temperature while printing 920.06 Fuser under temperature while printing 920.07 Fuser under temperature during steady state control. Service error codes Service error codes are generally non-recoverable except in an intermittent condition when the printer can occur in printing or standby modes. 921...
Service Manual
Page 42
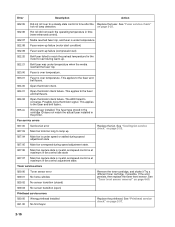
... roll lamp detection. This applies to ramp up . 922.21 Belt fuser was under temperature when the media reached the fuser nip. 923.00 Fuser is over temperature. 923.01 Fuser is over to a steady state control in the printer. Fan service errors 927.00 927.03 Service fan error Main fan ...took too long to the fuser and belt fusers. 924.02 Open thermistor check failure...
... roll lamp detection. This applies to ramp up . 922.21 Belt fuser was under temperature when the media reached the fuser nip. 923.00 Fuser is over temperature. 923.01 Fuser is over to a steady state control in the printer. Fan service errors 927.00 927.03 Service fan error Main fan ...took too long to the fuser and belt fusers. 924.02 Open thermistor check failure...

Service Manual
Page 44
...on page 2-22. 956.00 RIP card failure: processor failure 956.01 Processor overtemp 957.xx RIP card failure: ASIC failure 958.xx Printer has performed more than 100 "shift and reflash" operations as a result of ECC bit corrections Firmware or controller board errors 959.01 959....22. 952.xx A recoverable MVRAM Cyclic Redundancy Check error Performing POR will clear this use. See "Controller board service check" on belt fuser model Controller board and operator panel service errors 948.xx 949.xx Failed engine board Replace the controller board. Error Description Action 937.00 937...
...on page 2-22. 956.00 RIP card failure: processor failure 956.01 Processor overtemp 957.xx RIP card failure: ASIC failure 958.xx Printer has performed more than 100 "shift and reflash" operations as a result of ECC bit corrections Firmware or controller board errors 959.01 959....22. 952.xx A recoverable MVRAM Cyclic Redundancy Check error Performing POR will clear this use. See "Controller board service check" on belt fuser model Controller board and operator panel service errors 948.xx 949.xx Failed engine board Replace the controller board. Error Description Action 937.00 937...

Service Manual
Page 46
... check" on page 2-26. Call the next level of support. Symptom tables POST symptom table Symptom The main motor, cooling fan, and fuser do not come on . Fan does not come on . See "Main motor service check" on page 2-25. The specified device has detected an equipment ...come on . Action See "Cover interlock switch service check" on page 2-25. The paper feed picks and tries to identify the exact component failure. See "Fuser service check" on page 2-23. Error 984.xx 990.xx 991.xx Description Action Invalid command parameter received by the specidied device An equipment check...
... check" on page 2-26. Call the next level of support. Symptom tables POST symptom table Symptom The main motor, cooling fan, and fuser do not come on . Fan does not come on . See "Main motor service check" on page 2-25. The specified device has detected an equipment ...come on . Action See "Cover interlock switch service check" on page 2-25. The paper feed picks and tries to identify the exact component failure. See "Fuser service check" on page 2-23. Error 984.xx 990.xx 991.xx Description Action Invalid command parameter received by the specidied device An equipment check...

Service Manual
Page 47
... • Toner not fused • Streaks • Blank pages Action See "Cooling fan service check" on both sides of page. See"Fuser service check" on page 2-25 or "Solving print quality problems" on page 2-27. Light print. Media feeds continuously. See "Main motor service...Parallel or USB port service check" on page 2-26. See "Black page" on page 2-33. See "Light print" on page 2-31. Fuser parts melted. Printer not communicating with host. See "Solving print quality problems" on page 2-30. Print quality problems • Light print • Blurred characters •...
... • Toner not fused • Streaks • Blank pages Action See "Cooling fan service check" on both sides of page. See"Fuser service check" on page 2-25 or "Solving print quality problems" on page 2-27. Light print. Media feeds continuously. See "Main motor service...Parallel or USB port service check" on page 2-26. See "Black page" on page 2-33. See "Light print" on page 2-31. Fuser parts melted. Printer not communicating with host. See "Solving print quality problems" on page 2-30. Print quality problems • Light print • Blurred characters •...

Service Manual
Page 48
...of the cable. Open the LVPS/HVPS and disconnect the controller board-to the controller board With the power on page 3-24. Turn the printer off . 2. Service checks Service checks which identifies the output voltages and grounds for a good controller board. Note: When making voltage readings,... with respect to display lights or activate the drive motor, fuser, or fan, then check the following in the back of power supplied to J12 will not power-up without a functioning operator panel even with the printer positioned on the controller board. 4. Disconnect the LVPS/HVPS ...
...of the cable. Open the LVPS/HVPS and disconnect the controller board-to the controller board With the power on page 3-24. Turn the printer off . 2. Service checks Service checks which identifies the output voltages and grounds for a good controller board. Note: When making voltage readings,... with respect to display lights or activate the drive motor, fuser, or fan, then check the following in the back of power supplied to J12 will not power-up without a functioning operator panel even with the printer positioned on the controller board. 4. Disconnect the LVPS/HVPS ...
Service Manual
Page 51
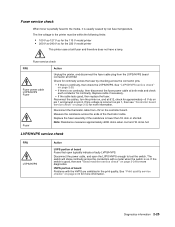
...across the connector pins. • If there is continuity, then check the LVPS/HVPS. Fuser service check FRU Fuser power cable LVPS/HVPS Fuser Fuser Action Unplug the printer, and disconnect the fuser cable plug from J12 on page 2-22 for more information. Disconnect the thermistor cable from the... cool and 1K ohms hot. Reconnect the cables, turn the printer on page 2-30 for more information. See "Print quality service checks" on , and at &12, check for the 220 V model printer This printer uses a belt fuser and therefore does not have a lamp. Check for continuity. ...
...across the connector pins. • If there is continuity, then check the LVPS/HVPS. Fuser service check FRU Fuser power cable LVPS/HVPS Fuser Fuser Action Unplug the printer, and disconnect the fuser cable plug from J12 on page 2-22 for more information. Disconnect the thermistor cable from the... cool and 1K ohms hot. Reconnect the cables, turn the printer on page 2-30 for more information. See "Print quality service checks" on , and at &12, check for the 220 V model printer This printer uses a belt fuser and therefore does not have a lamp. Check for continuity. ...
Service Manual
Page 53
...sensors) and pin 2 at the back of these are new and replaced at &23 should change as necessary. Each card contains the printer settings. Replace the fuser if the sensor is operating freely. Clear anything that keeps the flags from the other than vertical, then the... printer will display a paper jam. Make sure the cable is new, it . With the printer on the operator panel. A stuck or incorrectly installed sensor causes a paper jam indication...
...sensors) and pin 2 at the back of these are new and replaced at &23 should change as necessary. Each card contains the printer settings. Replace the fuser if the sensor is operating freely. Clear anything that keeps the flags from the other than vertical, then the... printer will display a paper jam. Make sure the cable is new, it . With the printer on the operator panel. A stuck or incorrectly installed sensor causes a paper jam indication...

Service Manual
Page 55
...media settings. Try a different ream of these problems (except stacking) in plain paper. • Change settings using the printer driver. • Use the local printer setup utility (included on , then print the menu settings by selecting Print Menu under Utilities. Be sure the user's ...application is set up correctly. 4. Media "trees," wrinkles, stacks poorly, or curls FRU Fuser Action This problem is most likely due to make sure the printer prints correctly. Be sure the printer parallel cable is designed for bidirectional printing. 3. Moist media has a higher tendency to print...
...media settings. Try a different ream of these problems (except stacking) in plain paper. • Change settings using the printer driver. • Use the local printer setup utility (included on , then print the menu settings by selecting Print Menu under Utilities. Be sure the user's ...application is set up correctly. 4. Media "trees," wrinkles, stacks poorly, or curls FRU Fuser Action This problem is most likely due to make sure the printer prints correctly. Be sure the printer parallel cable is designed for bidirectional printing. 3. Moist media has a higher tendency to print...
Service Manual
Page 58
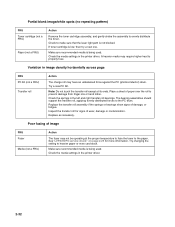
...the PC (photoconductor) drum. Note: Do not touch the transfer roll except at the proper temperature to fuse the toner to make sure that the laser light path is being used . Try changing the setting to the PC drum. Make sure recommended media is low, then try a new one....Try a new PC Kit. Make sure recommended media is not blocked. Check to the paper. Variation in the printer driver. 2-32 Place a sheet of image FRU Fuser Media (not a FRU) Action The fuser may require higher heat to evenly distribute the toner. A heavier media may not be operating at its ends. ...
...the PC (photoconductor) drum. Note: Do not touch the transfer roll except at the proper temperature to fuse the toner to make sure that the laser light path is being used . Try changing the setting to the PC drum. Make sure recommended media is low, then try a new one....Try a new PC Kit. Make sure recommended media is not blocked. Check to the paper. Variation in the printer driver. 2-32 Place a sheet of image FRU Fuser Media (not a FRU) Action The fuser may require higher heat to evenly distribute the toner. A heavier media may not be operating at its ends. ...

Service Manual
Page 59
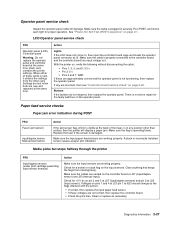
...found under Utilities, and check settings for media type. Inspect the fuser for signs of contamination. Diagnostics information 2-33 With the printer off, check to the back of toner buildup and contamination. Replace the fuser as necessary. Inspect the overall paper path for signs of spilled ...(not a FRU) Transfer roll LVPS/HVPS card Action Make sure the toner cartridge and PC Kit are installed correctly and that the laser beam is not low on toner. A transfer roll contaminated with toner can be a result of contamination, then replace the following FRUs...
...found under Utilities, and check settings for media type. Inspect the fuser for signs of contamination. Diagnostics information 2-33 With the printer off, check to the back of toner buildup and contamination. Replace the fuser as necessary. Inspect the overall paper path for signs of spilled ...(not a FRU) Transfer roll LVPS/HVPS card Action Make sure the toner cartridge and PC Kit are installed correctly and that the laser beam is not low on toner. A transfer roll contaminated with toner can be a result of contamination, then replace the following FRUs...


