
User's Guide (HTML)
Page 51
... USB cable might help. See Installing the 550-Sheet Optional Drawer. Troubleshooting Your Printer Frequently Asked Questions (FAQ): Dell 2330d/2330dn Laser Printer Issues and Solutions Setup Problems Error Messages General Guidelines for Selecting or Loading Print Media Avoiding Jams and Misfeeds Clearing Paper Jams Paper Problems Printing Problems Print Quality Problems Frequently Asked Questions (FAQ): Mac OS®...
... USB cable might help. See Installing the 550-Sheet Optional Drawer. Troubleshooting Your Printer Frequently Asked Questions (FAQ): Dell 2330d/2330dn Laser Printer Issues and Solutions Setup Problems Error Messages General Guidelines for Selecting or Loading Print Media Avoiding Jams and Misfeeds Clearing Paper Jams Paper Problems Printing Problems Print Quality Problems Frequently Asked Questions (FAQ): Mac OS®...
User's Guide (HTML)
Page 57
...not print correctly. To enable Resource Save after receiving this error in the future, install additional memory. 37 Insufficient Memory to Collate Job The printer memory does not have enough free space to enable Resource Save, see Setup Mode. To cancel the current print job, press the Cancel ...and begin collating the rest of text or graphics on how to collate the job. The current job may not print correctly. Check for a paper jam. If the toner cartridge is large enough. If the toner cartridge is installed, remove it and install a new toner cartridge. 31 Defective ...
...not print correctly. To enable Resource Save after receiving this error in the future, install additional memory. 37 Insufficient Memory to Collate Job The printer memory does not have enough free space to enable Resource Save, see Setup Mode. To cancel the current print job, press the Cancel ...and begin collating the rest of text or graphics on how to collate the job. The current job may not print correctly. Check for a paper jam. If the toner cartridge is large enough. If the toner cartridge is installed, remove it and install a new toner cartridge. 31 Defective ...
User's Guide (HTML)
Page 60
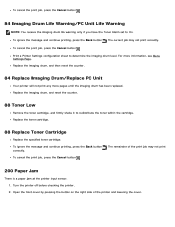
...toner cartridge. 88 Replace Toner Cartridge Replace the specified toner cartridge. To cancel the print job, press the Cancel button . 200 Paper Jam There is a paper jam at the printer input sensor. 1. To ignore the message and continue printing, press the Back button . Open the front cover by pressing the button...print job, press the Cancel button . Replace the imaging drum, and then reset the counter. 84 Replace Imaging Drum/Replace PC Unit Your printer will not print any more information, see Menu Settings Page. To cancel the print job, press the Cancel button . 84 Imaging Drum Life...
...toner cartridge. 88 Replace Toner Cartridge Replace the specified toner cartridge. To cancel the print job, press the Cancel button . 200 Paper Jam There is a paper jam at the printer input sensor. 1. To ignore the message and continue printing, press the Back button . Open the front cover by pressing the button...print job, press the Cancel button . Replace the imaging drum, and then reset the counter. 84 Replace Imaging Drum/Replace PC Unit Your printer will not print any more information, see Menu Settings Page. To cancel the print job, press the Cancel button . 84 Imaging Drum Life...
User's Guide (HTML)
Page 62
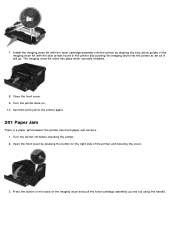
... place when correctly installed. 8. 7. Close the front cover. 9. Turn the printer off before checking the printer. 2. Press the button on the base of the printer and lowering the cover. 3. Send the print job to the printer again. 201 Paper Jam There is a paper jam between the printer input and paper exit sensors. 1. Install the imaging drum kit with the blue...
... place when correctly installed. 8. 7. Close the front cover. 9. Turn the printer off before checking the printer. 2. Press the button on the base of the printer and lowering the cover. 3. Send the print job to the printer again. 201 Paper Jam There is a paper jam between the printer input and paper exit sensors. 1. Install the imaging drum kit with the blue...
User's Guide (HTML)
Page 64
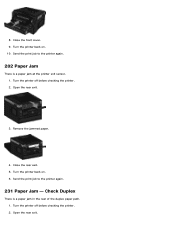
Send the print job to the printer again. 231 Paper Jam - Turn the printer off before checking the printer. 2. Turn the printer back on . 10. Turn the printer back on . 6. Close the rear exit. 5. Check Duplex There is a paper jam at the printer exit sensor. 1. Close the front cover. 9. Open the rear exit. 3. Turn the printer off before checking the printer. 2. Remove the jammed paper. 4. Open the rear exit. 8. Send the print job to the printer again. 202 Paper Jam There is a paper jam in the rear of the duplex paper path. 1.
Send the print job to the printer again. 231 Paper Jam - Turn the printer off before checking the printer. 2. Turn the printer back on . 10. Turn the printer back on . 6. Close the rear exit. 5. Check Duplex There is a paper jam at the printer exit sensor. 1. Close the front cover. 9. Open the rear exit. 3. Turn the printer off before checking the printer. 2. Remove the jammed paper. 4. Open the rear exit. 8. Send the print job to the printer again. 202 Paper Jam There is a paper jam in the rear of the duplex paper path. 1.
User's Guide (HTML)
Page 65
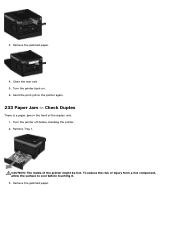
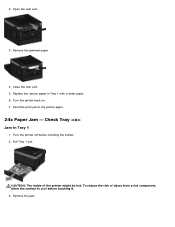
Turn the printer off before touching it. 3. Remove Tray 1. Remove the jammed paper. 3. Turn the printer back on. 6. Send the print job to cool before checking the printer. 2. To reduce the risk of injury from a hot component, allow the surface to the printer again. 233 Paper Jam - Check Duplex There is a paper jam in the front of the printer might be hot. Remove the jammed paper. 4. CAUTION: The inside of the duplex unit. 1. Close the rear exit. 5.
Turn the printer off before touching it. 3. Remove Tray 1. Remove the jammed paper. 3. Turn the printer back on. 6. Send the print job to cool before checking the printer. 2. To reduce the risk of injury from a hot component, allow the surface to the printer again. 233 Paper Jam - Check Duplex There is a paper jam in the front of the printer might be hot. Remove the jammed paper. 4. CAUTION: The inside of the duplex unit. 1. Close the rear exit. 5.
User's Guide (HTML)
Page 66
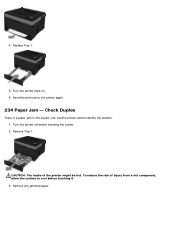
Replace Tray 1. 5. To reduce the risk of the printer might be hot. Turn the printer back on. 6. Send the print job to cool before checking the printer. 2. Check Duplex There is a paper jam in the duplex unit, but the printer cannot identify the location. 1. 4. CAUTION: The inside of injury from a hot component, allow the surface to the printer again. 234 Paper Jam - Remove any jammed paper. Remove Tray 1. Turn the printer off before touching it. 3.
Replace Tray 1. 5. To reduce the risk of the printer might be hot. Turn the printer back on. 6. Send the print job to cool before checking the printer. 2. Check Duplex There is a paper jam in the duplex unit, but the printer cannot identify the location. 1. 4. CAUTION: The inside of injury from a hot component, allow the surface to the printer again. 234 Paper Jam - Remove any jammed paper. Remove Tray 1. Turn the printer off before touching it. 3.
User's Guide (HTML)
Page 67
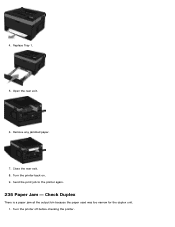
Replace Tray 1. 5. Remove any jammed paper. 7. Close the rear exit. 8. Send the print job to the printer again. 235 Paper Jam - Check Duplex There is a paper jam at the output bin because the paper used was too narrow for the duplex unit. 1. 4. Open the rear exit. 6. Turn the printer back on. 9. Turn the printer off before checking the printer.
Replace Tray 1. 5. Remove any jammed paper. 7. Close the rear exit. 8. Send the print job to the printer again. 235 Paper Jam - Check Duplex There is a paper jam at the output bin because the paper used was too narrow for the duplex unit. 1. 4. Open the rear exit. 6. Turn the printer back on. 9. Turn the printer off before checking the printer.
User's Guide (HTML)
Page 68
To reduce the risk of the printer might be hot. Replace the narrow paper in Tray 1 1. CAUTION: The inside of injury from a hot component, allow the surface to the printer again. 24x Paper Jam - Close the rear exit. 5. Check Tray Jam in Tray 1 with a wider paper. 6. Turn the printer off before touching it. 3. Remove the jam. Remove the jammed paper. 4. Open the rear exit. 3. Turn the printer back on. 7. 2. Send the print job to cool before checking the printer. 2. Pull Tray 1 out.
To reduce the risk of the printer might be hot. Replace the narrow paper in Tray 1 1. CAUTION: The inside of injury from a hot component, allow the surface to the printer again. 24x Paper Jam - Close the rear exit. 5. Check Tray Jam in Tray 1 with a wider paper. 6. Turn the printer off before touching it. 3. Remove the jam. Remove the jammed paper. 4. Open the rear exit. 3. Turn the printer back on. 7. 2. Send the print job to cool before checking the printer. 2. Pull Tray 1 out.

User's Guide (HTML)
Page 70
...fold or crease the paper. Send your print job to loosen them, and then fan them. Slide the paper guide toward the inside of the tray until it lightly rests against the edge of paper back and forth to the printer again. 251 Paper Jam - Remove the paper from the multipurpose ...feeder. 3. Insert the tray. 5. CAUTION: Make sure all paper fragments are removed. 4. Turn the printer back on ...
...fold or crease the paper. Send your print job to loosen them, and then fan them. Slide the paper guide toward the inside of the tray until it lightly rests against the edge of paper back and forth to the printer again. 251 Paper Jam - Remove the paper from the multipurpose ...feeder. 3. Insert the tray. 5. CAUTION: Make sure all paper fragments are removed. 4. Turn the printer back on ...
User's Guide (HTML)
Page 71
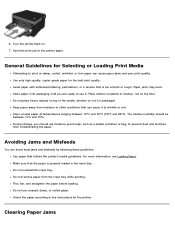
... objects on damp, curled, wrinkled, or torn paper can avoid most jams and misfeeds by following these guidelines: Use paper that the paper is too smooth or rough. Make sure that follows the printer's media guidelines. Clearing Paper Jams 6. Keep paper away from the input tray while printing. Turn the printer back on the floor. Send the print job...
... objects on damp, curled, wrinkled, or torn paper can avoid most jams and misfeeds by following these guidelines: Use paper that the paper is too smooth or rough. Make sure that follows the printer's media guidelines. Clearing Paper Jams 6. Keep paper away from the input tray while printing. Turn the printer back on the floor. Send the print job...
User's Guide (HTML)
Page 72
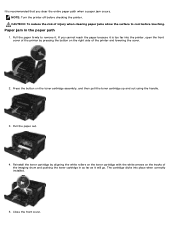
It is too far into place when correctly installed. 5. Pull the paper out. 4. Paper jam in as far as it will go. The cartridge clicks into the printer, open the front cover of the printer by aligning the white rollers on the toner cartridge with the white arrows on the... drum and pushing the toner cartridge in the paper path 1. CAUTION: To reduce the risk of the printer and lowering the cover. 2. If you clear the entire paper path when a paper jam occurs. Pull the paper firmly to cool before checking the printer. Reinstall the toner cartridge by pressing the button...
It is too far into place when correctly installed. 5. Pull the paper out. 4. Paper jam in as far as it will go. The cartridge clicks into the printer, open the front cover of the printer by aligning the white rollers on the toner cartridge with the white arrows on the... drum and pushing the toner cartridge in the paper path 1. CAUTION: To reduce the risk of the printer and lowering the cover. 2. If you clear the entire paper path when a paper jam occurs. Pull the paper firmly to cool before checking the printer. Reinstall the toner cartridge by pressing the button...

User's Guide (HTML)
Page 73
Firmly grasp the paper, and gently pull it from the printer. 3. Near the paper input tray 1. Firmly grasp the paper, and gently pull it from the printer. 3. Remove the paper input tray. 2. Replace the paper input tray. Paper jam not visible Near the multipurpose feeder 1. Close the multipurpose feeder door. Open the multipurpose feeder door. 2.
Firmly grasp the paper, and gently pull it from the printer. 3. Near the paper input tray 1. Firmly grasp the paper, and gently pull it from the printer. 3. Remove the paper input tray. 2. Replace the paper input tray. Paper jam not visible Near the multipurpose feeder 1. Close the multipurpose feeder door. Open the multipurpose feeder door. 2.

User's Guide (HTML)
Page 75
... Paper Jams. Printing Problems Check the toner level, and install a new toner cartridge if necessary. Remove fonts that requires cleaning or replacement by a service technician. Print Quality Problems Use the following information to find solutions for your document. Paper Problems Make sure you cannot fix the problem, contact Dell at support.dell.com. Uninstall the printer...
... Paper Jams. Printing Problems Check the toner level, and install a new toner cartridge if necessary. Remove fonts that requires cleaning or replacement by a service technician. Print Quality Problems Use the following information to find solutions for your document. Paper Problems Make sure you cannot fix the problem, contact Dell at support.dell.com. Uninstall the printer...

User's Guide (HTML)
Page 85
Load the paper in the tray with the print side facing down. Ensure that the paper is below the maximum fill line on a level surface. 4. c. Overloading may cause paper jams. Flex a stack of the paper tray. 3. Straighten the edges on the side paper guides. Move the rear paper guide to the back of paper back and forth.
Load the paper in the tray with the print side facing down. Ensure that the paper is below the maximum fill line on a level surface. 4. c. Overloading may cause paper jams. Flex a stack of the paper tray. 3. Straighten the edges on the side paper guides. Move the rear paper guide to the back of paper back and forth.
User's Guide (HTML)
Page 95
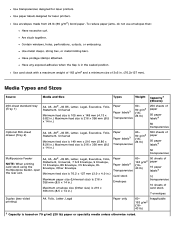
Have postage stamps attached. Use transparencies designed for laser printers. Use envelopes made from 24 lb (90 g/m2) bond paper. To reduce paper jams, do not use envelopes that: Have excessive curl. Are stuck together. Have any exposed adhesive when the flap is 216 x... Envelope Minimum feed size is 76.2 x 127 mm (3.9 x 4.9 in.) Maximum paper size (Universal size) is 216 x 356 mm (8.5 x 14 in.) Maximum envelope size (Other size) is 216 x 356 mm (8.5 x 14 in . (76.2x127 mm). Use paper labels designed for laser printers. Contain windows, holes, perforations, cutouts, or embossing.
Have postage stamps attached. Use transparencies designed for laser printers. Use envelopes made from 24 lb (90 g/m2) bond paper. To reduce paper jams, do not use envelopes that: Have excessive curl. Are stuck together. Have any exposed adhesive when the flap is 216 x... Envelope Minimum feed size is 76.2 x 127 mm (3.9 x 4.9 in.) Maximum paper size (Universal size) is 216 x 356 mm (8.5 x 14 in.) Maximum envelope size (Other size) is 216 x 356 mm (8.5 x 14 in . (76.2x127 mm). Use paper labels designed for laser printers. Contain windows, holes, perforations, cutouts, or embossing.

User's Guide (HTML)
Page 129
Type the IP address of each printer's IP address. Set Password-Lock the operator panel with a password so that makes it didn't print because of a paper jam or an empty paper tray? One of the features of the Dell Printer Configuration Web Tool is the E-mail Alert Setup, which lists the IP address.... If you can easily copy the printer's settings to one or all of the printers in the e-mail list box ...
Type the IP address of each printer's IP address. Set Password-Lock the operator panel with a password so that makes it didn't print because of a paper jam or an empty paper tray? One of the features of the Dell Printer Configuration Web Tool is the E-mail Alert Setup, which lists the IP address.... If you can easily copy the printer's settings to one or all of the printers in the e-mail list box ...

Service Manual
Page 3
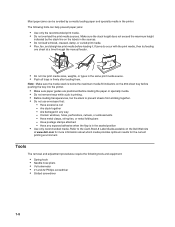
... and supply capacity 1-5 Types of print media 1-6 Tips on preventing jams 1-7 Paper path 1-7 Tools 1-8 Acronyms 1-9 Diagnostics information 2-1 Start 2-1 Overview of the operator panel and menus 2-2 Indicator light 2-2 Buttons 2-3 Diagram of the printer menus 2-5 Messages and error codes 2-6 User attendance messages 2-6 Cartridge error messages 2-9 Paper jam error codes (200-series 2-9 Service error codes 2-15 Symptom tables...
... and supply capacity 1-5 Types of print media 1-6 Tips on preventing jams 1-7 Paper path 1-7 Tools 1-8 Acronyms 1-9 Diagnostics information 2-1 Start 2-1 Overview of the operator panel and menus 2-2 Indicator light 2-2 Buttons 2-3 Diagram of the printer menus 2-5 Messages and error codes 2-6 User attendance messages 2-6 Cartridge error messages 2-9 Paper jam error codes (200-series 2-9 Service error codes 2-15 Symptom tables...
Service Manual
Page 24
... help prevent paper jams: • Use only the recommended print media. • Do not overload the print media sources. Note: Make sure the media stack is below the maximum media fill indicators on the Dell Web site at www.dell.com for more information about which media provides optimum ... not load wrinkled, creased, damp, or curled print media. • Flex, fan, and straighten print media before loading the paper or specialty media. • Do not remove trays while a job is in the printer. Make sure the stack height does not exceed the maximum height indicated by correctly loading...
... help prevent paper jams: • Use only the recommended print media. • Do not overload the print media sources. Note: Make sure the media stack is below the maximum media fill indicators on the Dell Web site at www.dell.com for more information about which media provides optimum ... not load wrinkled, creased, damp, or curled print media. • Flex, fan, and straighten print media before loading the paper or specialty media. • Do not remove trays while a job is in the printer. Make sure the stack height does not exceed the maximum height indicated by correctly loading...
Service Manual
Page 35
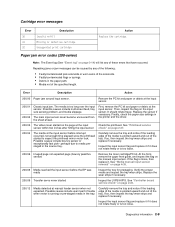
...strips if necessary. 200.09 Transfer servo never started on page 2-22. 200.12 Media detected at the input sensor. Replace the sensor if necessary. Paper jam error codes (200-series) Note: The Event log (See "Event log" on the input sensor. Then, inspect the flag on page 3-14) ...expected. Diagnostics information 2-9 Finally, check the paper size settings in the tray. Error Description Action 200.00 Paper jam around input sensor. If the flag is loose, then replace it does not rotate freely or is running or pre-staged media in the printer and the driver. 200.03 The video ...
...strips if necessary. 200.09 Transfer servo never started on page 2-22. 200.12 Media detected at the input sensor. Replace the sensor if necessary. Paper jam error codes (200-series) Note: The Event log (See "Event log" on the input sensor. Then, inspect the flag on page 3-14) ...expected. Diagnostics information 2-9 Finally, check the paper size settings in the tray. Error Description Action 200.00 Paper jam around input sensor. If the flag is loose, then replace it does not rotate freely or is running or pre-staged media in the printer and the driver. 200.03 The video ...


