User's Guide
Page 4
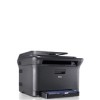
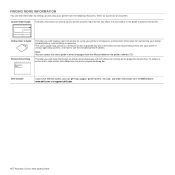
... get help, support, printer drivers, manuals, and order information from the Manual folder on printer driver properties and instructions for setting up the properties for printing. Note You can access the user's guide in other languages from the Dell website, www.dell.com and support.dell.com. 4 | Features of your new laser printer To access a printer driver help information on...
... get help, support, printer drivers, manuals, and order information from the Manual folder on printer driver properties and instructions for setting up the properties for printing. Note You can access the user's guide in other languages from the Dell website, www.dell.com and support.dell.com. 4 | Features of your new laser printer To access a printer driver help information on...
User's Guide
Page 7
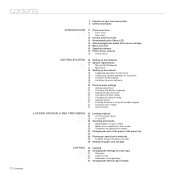
... Features of your new laser printer 5 Safety information INTRODUCTION 11 Printer overview 11 11 11 Front view Rear view 12 Control panel overview 13 Understanding the Status LED 13 Acknowledging the status of the toner cartridge 14 Menu overview 15 Supplied software 15 Printer driver features 15 Printer driver GETTING STARTED 16 ... Changing the size of the paper in the paper tray 28 29 Printing on special print materials 29 Feeding the print material manually 29 Setting the paper size and type COPYING 30 Copying 30 30 Changing the settings for each copy 30 Darkness 30 Original...
... Features of your new laser printer 5 Safety information INTRODUCTION 11 Printer overview 11 11 11 Front view Rear view 12 Control panel overview 13 Understanding the Status LED 13 Acknowledging the status of the toner cartridge 14 Menu overview 15 Supplied software 15 Printer driver features 15 Printer driver GETTING STARTED 16 ... Changing the size of the paper in the paper tray 28 29 Printing on special print materials 29 Feeding the print material manually 29 Setting the paper size and type COPYING 30 Copying 30 30 Changing the settings for each copy 30 Darkness 30 Original...

User's Guide
Page 8
...Gray enhance copying 32 Setting copy timeout SCANNING 33 Scanning basics 33 33 Scanning from the control panel 33 Setting scan information in Dell Scan Manager. 33 Scanning to application programs 34 Scanning by a network connection 34 Scanning to Email 35 Changing the settings for... job FAXING 38 Sending a fax 38 38 38 39 Setting the fax header Adjusting the document settings Sending a fax automatically 39 Sending a fax manually 39 Confirming a transmission 39 Automatic redialing 39 Redialing the last number 39 Sending a fax to multiple destinations 40 Sending a delayed fax 40 Sending...
...Gray enhance copying 32 Setting copy timeout SCANNING 33 Scanning basics 33 33 Scanning from the control panel 33 Setting scan information in Dell Scan Manager. 33 Scanning to application programs 34 Scanning by a network connection 34 Scanning to Email 35 Changing the settings for... job FAXING 38 Sending a fax 38 38 38 39 Setting the fax header Adjusting the document settings Sending a fax automatically 39 Sending a fax manually 39 Confirming a transmission 39 Automatic redialing 39 Redialing the last number 39 Sending a fax to multiple destinations 40 Sending a delayed fax 40 Sending...
User's Guide
Page 18
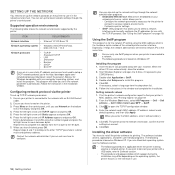
...IPP/HTTP • Bonjour • DHCP • BOOTP If you to select a network interface and manually configure the IP addresses for Windows compatible with your printer's MAC address. Press the left /right arrow to fix the network parameter automatically. When you are in...you use Macintosh operating system, see Network on the bottom line of the network printer card or interface. From the Windows Start menu, select All Programs → Dell → Dell printers → Dell 1235cn Color Laser MFP → SetIP. 3. Press the left /right arrow until TCP/IP ...
...IPP/HTTP • Bonjour • DHCP • BOOTP If you to select a network interface and manually configure the IP addresses for Windows compatible with your printer's MAC address. Press the left /right arrow to fix the network parameter automatically. When you are in...you use Macintosh operating system, see Network on the bottom line of the network printer card or interface. From the Windows Start menu, select All Programs → Dell → Dell printers → Dell 1235cn Color Laser MFP → SetIP. 3. Press the left /right arrow until TCP/IP ...

User's Guide
Page 19
... shown above may differ slightly, if you are not sure of printers available on the network appears. Select Typical installation for the printer. • To find a shared network printer (UNC Path), select Shared Printer [UNC] and enter the shared name manually or find a shared printer by clicking the Browse button. If you wish to reinstall the...
... shown above may differ slightly, if you are not sure of printers available on the network appears. Select Typical installation for the printer. • To find a shared network printer (UNC Path), select Shared Printer [UNC] and enter the shared name manually or find a shared printer by clicking the Browse button. If you wish to reinstall the...
User's Guide
Page 25
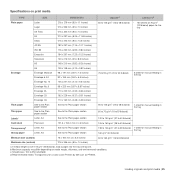
...to 39 lb bond) 160 g/m2 (44 lb bond) 1 sheet for a Color Laser Printers by one. Maximum capacity may differ depending on print media TYPE SIZE DIMENSIONS WEIGHTA ... (3.87 x 7.5 inches) 92 x 165 mm (3.62 x 6.5 inches) 75 to 90 g/m2 (20 to 24 lb bond) 5 sheet for manual feeding in the tray Envelope No. 10 105 x 241 mm (4.12 x 9.5 inches) Envelope No. 9 98 x 225 mm (3.87 x 8.87... Plain paper section See to the Plain paper section 90 to 105 g/m2 (24 to 28 lb bond) 5 sheet for manual feeding in the tray Minimum size (custom) Maximum size (custom) 76 x 160 mm (3 x 6.3 inches) 216 x ...
...to 39 lb bond) 160 g/m2 (44 lb bond) 1 sheet for a Color Laser Printers by one. Maximum capacity may differ depending on print media TYPE SIZE DIMENSIONS WEIGHTA ... (3.87 x 7.5 inches) 92 x 165 mm (3.62 x 6.5 inches) 75 to 90 g/m2 (20 to 24 lb bond) 5 sheet for manual feeding in the tray Envelope No. 10 105 x 241 mm (4.12 x 9.5 inches) Envelope No. 9 98 x 225 mm (3.87 x 8.87... Plain paper section See to the Plain paper section 90 to 105 g/m2 (24 to 28 lb bond) 5 sheet for manual feeding in the tray Minimum size (custom) Maximum size (custom) 76 x 160 mm (3 x 6.3 inches) 216 x ...

User's Guide
Page 27
Such repairs are not covered by Dell's warranty or service agreements. Open the paper cover and remove paper from the tray 1 if necessary. 2. Adjust the paper length guide and paper width guide. 3. Check your printer's specification to know the fusing temperature, see "General specifications" on the ...letterhead, verify that will not melt, vaporize, or release hazardous emissions when subjected to the printer's fusing temperature for 0.1 second. Pull the tray 1 out of the tray, pull the tray out manually. 4. To change the tray 1 size to other size, you need to adjust the ...
Such repairs are not covered by Dell's warranty or service agreements. Open the paper cover and remove paper from the tray 1 if necessary. 2. Adjust the paper length guide and paper width guide. 3. Check your printer's specification to know the fusing temperature, see "General specifications" on the ...letterhead, verify that will not melt, vaporize, or release hazardous emissions when subjected to the printer's fusing temperature for 0.1 second. Pull the tray 1 out of the tray, pull the tray out manually. 4. To change the tray 1 size to other size, you need to adjust the ...

User's Guide
Page 29
...After loading paper in an application, start feeding, then the printer starts printing. • If you print, open printer properties. 4. Press the left /right arrow until Paper Setup appears and press OK. 3. Feeding the print material manually • Load only one size of print material, such ... in the application. 7. Place print materials in the center of the paper in the tray. Select Manual Feeder in printer properties, and select an appropriate paper type. Press the Color Start or Black Start button on postcards, envelopes, and labels before loading them into the tray first...
...After loading paper in an application, start feeding, then the printer starts printing. • If you print, open printer properties. 4. Press the left /right arrow until Paper Setup appears and press OK. 3. Feeding the print material manually • Load only one size of print material, such ... in the application. 7. Place print materials in the center of the paper in the tray. Select Manual Feeder in printer properties, and select an appropriate paper type. Press the Color Start or Black Start button on postcards, envelopes, and labels before loading them into the tray first...

User's Guide
Page 39
... Yes to ready mode. If an original is completed. prompt. Originals are automatically erased from the remote fax machine. You cannot send a color fax using Address Book Button. Press Fax. 2. Press the left /right arrow until Multi Send appears and press OK. 6. You can add...Book" on the scanner glass. Adjust the document resolution and darkness to suit your fax needs. Sending a fax manually 1. Adjust the resolution and the darkness to suit your printer to Fax appears on the bottom line of redial attempts. See "Sending options" on page 43. Once you ...
... Yes to ready mode. If an original is completed. prompt. Originals are automatically erased from the remote fax machine. You cannot send a color fax using Address Book Button. Press Fax. 2. Press the left /right arrow until Multi Send appears and press OK. 6. You can add...Book" on the scanner glass. Adjust the document resolution and darkness to suit your fax needs. Sending a fax manually 1. Adjust the resolution and the darkness to suit your printer to Fax appears on the bottom line of redial attempts. See "Sending options" on page 43. Once you ...

User's Guide
Page 41
...Clear to return to Ans/Fax mode and your printer automatically goes into the EXT socket. Receiving manually in Tel mode (manual reception) when the answering printer is connected to your printer, you designate to be forwarded to EXT socket, your answering printer is calling in on the extension phone. The ... EXT socket on page 41. 6. When you is identified by pressing On Hook Dial and then pressing Black Start or Color Start when you can leave a message on the line, the printer automatically switches to Fax mode to be recognized and answered as a fax call from the remote...
...Clear to return to Ans/Fax mode and your printer automatically goes into the EXT socket. Receiving manually in Tel mode (manual reception) when the answering printer is connected to your printer, you designate to be forwarded to EXT socket, your answering printer is calling in on the extension phone. The ... EXT socket on page 41. 6. When you is identified by pressing On Hook Dial and then pressing Black Start or Color Start when you can leave a message on the line, the printer automatically switches to Fax mode to be recognized and answered as a fax call from the remote...

User's Guide
Page 48
...return to confirm your PictBridge-compatible device to a computer. 1. PRINTING DIRECTLY FROM A DIGITAL CAMERA This printer supports the PictBridge feature. Connect your selection. 7. If you want to the manual provided with the device. 3. Press OK when Yes appears to the ready mode. Formatting a USB ... mode. Turn on the display. 4. Deleting an image file 1. Press Stop/Clear to return to confirm your printer. 2. The available memory space appears on the printer. 2. Press Direct USB. 3. Therefore, confirm that you want appears and press OK. Send an order to...
...return to confirm your PictBridge-compatible device to a computer. 1. PRINTING DIRECTLY FROM A DIGITAL CAMERA This printer supports the PictBridge feature. Connect your selection. 7. If you want to the manual provided with the device. 3. Press OK when Yes appears to the ready mode. Formatting a USB ... mode. Turn on the display. 4. Deleting an image file 1. Press Stop/Clear to return to confirm your printer. 2. The available memory space appears on the printer. 2. Press Direct USB. 3. Therefore, confirm that you want appears and press OK. Send an order to...

User's Guide
Page 49
... automatically print this list, access the Junk Fax Setup menu. To add or delete numbers to manually adjust the color contrast for maintaining your printer and the toner cartridge. Printing a report 1. Press the left /right arrow until System Setup appears on the faxes you will ... Color menu allows you have moved the printer, it is recommended for a particular fax job. See "Receiving options" on display and press OK. This list shows authorized users who are available: Some reports may print this menu manually. 6. This list shows the documents currently stored for every ...
... automatically print this list, access the Junk Fax Setup menu. To add or delete numbers to manually adjust the color contrast for maintaining your printer and the toner cartridge. Printing a report 1. Press the left /right arrow until System Setup appears on the faxes you will ... Color menu allows you have moved the printer, it is recommended for a particular fax job. See "Receiving options" on display and press OK. This list shows authorized users who are available: Some reports may print this menu manually. 6. This list shows the documents currently stored for every ...

User's Guide
Page 58
... tray. CLEARING DOCUMENT JAMS When an original jams while passing through the ADF, [Document Jam] appears on page 28. Remove any remaining pages from your printer is facing up in a tray. • Use only recommended print media. (See "Setting the paper size and type" on its model. 4. This illustration...Close the ADF cover. To prevent document jams, use creased, damp, or highly curled paper. • Do not mix paper types in the tray and manual feeder. Pull the jammed paper gently out of the print media is printing. • Flex, fan, and straighten paper before loading. • Do not...
... tray. CLEARING DOCUMENT JAMS When an original jams while passing through the ADF, [Document Jam] appears on page 28. Remove any remaining pages from your printer is facing up in a tray. • Use only recommended print media. (See "Setting the paper size and type" on its model. 4. This illustration...Close the ADF cover. To prevent document jams, use creased, damp, or highly curled paper. • Do not mix paper types in the tray and manual feeder. Pull the jammed paper gently out of the print media is printing. • Flex, fan, and straighten paper before loading. • Do not...
User's Guide
Page 62
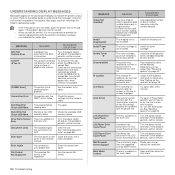
... loaded original has jammed in the ADF. Use a speed dial number or dial a number manually using the number keypad. Install the imaging unit. The toner cartridge is a problem in Open...has Turn the power switch occurred in the LSU off and on page 43. If the problem (Laser Scanning Unit.) persists, call for service. There is a problem in alphabetical order. • If...persists, wait an hour or so for service, it is larger Divide your printer. Install the a Dell-genuine toner cartridge designed for service. MESSAGE MEANING SUGGESTED SOLUTIONS ADC Not Confirm Error...
... loaded original has jammed in the ADF. Use a speed dial number or dial a number manually using the number keypad. Install the imaging unit. The toner cartridge is a problem in Open...has Turn the power switch occurred in the LSU off and on page 43. If the problem (Laser Scanning Unit.) persists, call for service. There is a problem in alphabetical order. • If...persists, wait an hour or so for service, it is larger Divide your printer. Install the a Dell-genuine toner cartridge designed for service. MESSAGE MEANING SUGGESTED SOLUTIONS ADC Not Confirm Error...
User's Guide
Page 63
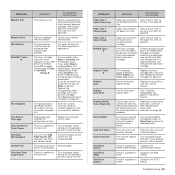
...OK on page 53. Reduce the resolution and try again. Check the display to use Dell-genuine color toner cartridge. Clear the jam. The life of the Remove paper. The life span...Stop or Continue with a new one . Replace the corresponding toner cartridge with a new one operation. printer is operational. See "In the fuser unit area" on page 56. See "Replacing the waste ...on page 59. There is a problem in Configure the SMTP authentication. Enter the number manually using the number keypad or store the number or address. Single page data exceeds the ...
...OK on page 53. Reduce the resolution and try again. Check the display to use Dell-genuine color toner cartridge. Clear the jam. The life of the Remove paper. The life span...Stop or Continue with a new one . Replace the corresponding toner cartridge with a new one operation. printer is operational. See "In the fuser unit area" on page 56. See "Replacing the waste ...on page 59. There is a problem in Configure the SMTP authentication. Enter the number manually using the number keypad or store the number or address. Single page data exceeds the ...
User's Guide
Page 65
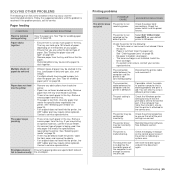
... is too much paper in the tray. You can hold up to stick together. Reinstall the printer software. See "Tips for avoiding paper jams" on special materials, use the manual feeder. • An incorrect type of paper. Paper does not feed • Remove any ...the tray and flex or fan the paper. • Humid conditions may be incorrectly installed. Contact a service representative. Select Dell 1235cn Color Laser MFP as the default printer. The printer is not not print receiving power. Troubleshooting | 65 See "Setting the paper size and type" on page 24. &#...
... is too much paper in the tray. You can hold up to stick together. Reinstall the printer software. See "Tips for avoiding paper jams" on special materials, use the manual feeder. • An incorrect type of paper. Paper does not feed • Remove any ...the tray and flex or fan the paper. • Humid conditions may be incorrectly installed. Contact a service representative. Select Dell 1235cn Color Laser MFP as the default printer. The printer is not not print receiving power. Troubleshooting | 65 See "Setting the paper size and type" on page 24. &#...

User's Guide
Page 80
receiving modes 41 redialing automatically 39 manually 39 replacing components toner cartridge 53 reports, print 49 ringer 21 S scanner glass cleaning 52 loading documents 23 scanning default setting, change 35 to email ...
receiving modes 41 redialing automatically 39 manually 39 replacing components toner cartridge 53 reports, print 49 ringer 21 S scanner glass cleaning 52 loading documents 23 scanning default setting, change 35 to email ...

User's Guide
Page 89
... CD into your computer's optical drive. To verify your printer's IP address or the MAC address, print a Network Configuration page. • To find a shared network printer (UNC Path), select Shared Printer [UNC] and enter the shared name manually or find your machine in Install or run , and... an installation window appears. You can install the printer software using the typical or custom method. To add the...
... CD into your computer's optical drive. To verify your printer's IP address or the MAC address, print a Network Configuration page. • To find a shared network printer (UNC Path), select Shared Printer [UNC] and enter the shared name manually or find your machine in Install or run , and... an installation window appears. You can install the printer software using the typical or custom method. To add the...

User's Guide
Page 90
... Getting started chapter. 2 Insert the supplied Drivers and Utilities CD into your printer's IP address or the MAC address, print a Network Configuration page. • To find a shared network printer (UNC Path), select Shared Printer [UNC] and enter the shared name manually or find your machine in network, please turn off the firewall and click...
... Getting started chapter. 2 Insert the supplied Drivers and Utilities CD into your printer's IP address or the MAC address, print a Network Configuration page. • To find a shared network printer (UNC Path), select Shared Printer [UNC] and enter the shared name manually or find your machine in network, please turn off the firewall and click...
User's Guide
Page 91
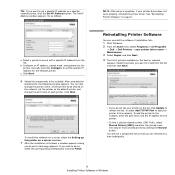
... menu select Programs or All Programs → Dell → Dell Printers → your printer driver name → Maintenance. 3 Select Repair and click Next. 4 The list of each printer. To add the printer to set the specific IP address for the network printer. b. After selecting the components, the following... gateway for the printer. • To find a shared network printer (UNC Path), select Shared Printer [UNC] and enter the shared name manually or find a shared printer by clicking the Browse button. Click Next. If you can also change the printer name, set the printer to be shared ...
... menu select Programs or All Programs → Dell → Dell Printers → your printer driver name → Maintenance. 3 Select Repair and click Next. 4 The list of each printer. To add the printer to set the specific IP address for the network printer. b. After selecting the components, the following... gateway for the printer. • To find a shared network printer (UNC Path), select Shared Printer [UNC] and enter the shared name manually or find a shared printer by clicking the Browse button. Click Next. If you can also change the printer name, set the printer to be shared ...

