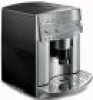

Owner Manual
Page 5
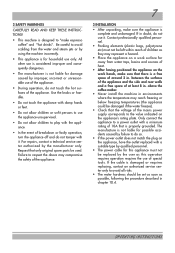
... INSTRUCTIONS THIS PRODUCT IS FOR HOUSEHOLD USE ONLY SHORT CORD INSTRUCTIONS - If the plug should still fail to fit, contact your obsolete outlet. To disconnect, turn any manner. Any other ). If an extension cord is used, the marked electrical rating should be pulled on or near a hot gas or electrical burner...
... INSTRUCTIONS THIS PRODUCT IS FOR HOUSEHOLD USE ONLY SHORT CORD INSTRUCTIONS - If the plug should still fail to fit, contact your obsolete outlet. To disconnect, turn any manner. Any other ). If an extension cord is used, the marked electrical rating should be pulled on or near a hot gas or electrical burner...
Owner Manual
Page 7
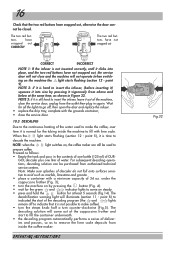
... temperatures (the appliance could be used. Only connect the appliance to a power outlet with the appliance. • In the event of breakdown or faulty operation, turn the appliance off and do not touch the hot surfaces of around 2 in. Be careful to avoid scalding from water taps, basins and sources of...
... temperatures (the appliance could be used. Only connect the appliance to a power outlet with the appliance. • In the event of breakdown or faulty operation, turn the appliance off and do not touch the hot surfaces of around 2 in. Be careful to avoid scalding from water taps, basins and sources of...
Owner Manual
Page 8
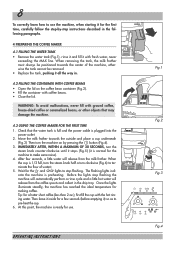
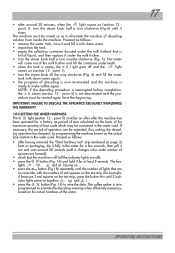
...time, carefully follow the step-by pressing the button (Fig.4). 3. 8 To correctly learn how to use . Before the lights stop flashing. Then turn clockwise (Fig.6) to stop flashing the machine will automatically perform a rinse cycle and a little hot water will release from the coffee spouts and ..., freeze-dried coffee or caramelized beans, or other objects that the water tank is full and the power cable is 1/3 full, turn the steam knob half a turn the machine on the coffee bean container (Fig.2). • Fill the container with the hot rins- Check that may damage the ...
...time, carefully follow the step-by pressing the button (Fig.4). 3. 8 To correctly learn how to use . Before the lights stop flashing. Then turn clockwise (Fig.6) to stop flashing the machine will automatically perform a rinse cycle and a little hot water will release from the coffee spouts and ..., freeze-dried coffee or caramelized beans, or other objects that the water tank is full and the power cable is 1/3 full, turn the steam knob half a turn the machine on the coffee bean container (Fig.2). • Fill the container with the hot rins- Check that may damage the ...
Owner Manual
Page 9
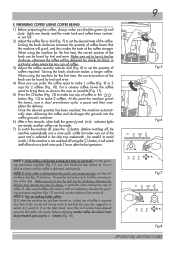
...position of the coffee. Once the desired quantity has been reached, the machine automati- If, on , a short cup of the dial. Turn a click at all, turn the coffee flavor dial (fig. 7) clockwise. At this point the machine grinds the beans, runs a short pre-infusion cycle, a pause ...another coffee the infuser must be found by trial and error to find the correct position of coffee is collected in section 4.3, point 5). Turning the knob clockwise makes a longer coffee. When using the button, it too far clockwise, otherwise the coffee will switch itself off , the...
...position of the coffee. Once the desired quantity has been reached, the machine automati- If, on , a short cup of the dial. Turn a click at all, turn the coffee flavor dial (fig. 7) clockwise. At this point the machine grinds the beans, runs a short pre-infusion cycle, a pause ...another coffee the infuser must be found by trial and error to find the correct position of coffee is collected in section 4.3, point 5). Turning the knob clockwise makes a longer coffee. When using the button, it too far clockwise, otherwise the coffee will switch itself off , the...

Owner Manual
Page 10
... 12 point 3), warning the user that the grounds container is removed, the machine will not be able to make the coffee. To reset the machine, turn the steam knob counterclockwise as far as described in section 10.2. NOTE 7: the machine counts the number of cups of the machine. (It is not...
... 12 point 3), warning the user that the grounds container is removed, the machine will not be able to make the coffee. To reset the machine, turn the steam knob counterclockwise as far as described in section 10.2. NOTE 7: the machine counts the number of cups of the machine. (It is not...
Owner Manual
Page 11
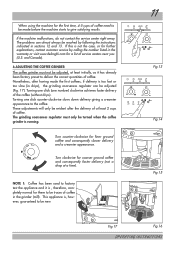
...). 6 ADJUSTING THE COFFEE GRINDER The coffee grinder must only be resolved by calling the number listed in the warranty or visit www.delonghi.com for further explanations, contact customer service by following the instructions indicated in the grinder (mill). NOTE 1: Coffee has been used ...to factory test the appliance and it has already been factory preset to deliver the correct quantities of service centers near you. (U.S. Turning one click (one click counter-clockwise slows down delivery giving a creamier appearance to give satisfying results. This appliance is not the case...
...). 6 ADJUSTING THE COFFEE GRINDER The coffee grinder must only be resolved by calling the number listed in the warranty or visit www.delonghi.com for further explanations, contact customer service by following the instructions indicated in the grinder (mill). NOTE 1: Coffee has been used ...to factory test the appliance and it has already been factory preset to deliver the correct quantities of service centers near you. (U.S. Turning one click (one click counter-clockwise slows down delivery giving a creamier appearance to give satisfying results. This appliance is not the case...
Owner Manual
Page 12
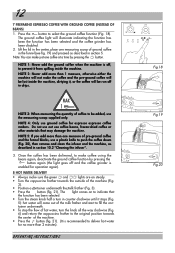
... coffee light will be added, use coffee beans, freeze-dried coffee or other materials that the function has been selected. • Turn the steam knob half a turn the knob all the way clockwise (Fig. 6) and return the cappuccino frother to deliver hot water for espresso espresso coffee makers. NOTE...(see fig. 19) and proceed as described in section 5. NOTE 5: If you add more than 2 minutes). The light comes on steady. • Turn the cappuccino frother towards the center of the machine. • Press the button (fig. 21). (It is enabled for operation again). 8 HOT WATER ...
... coffee light will be added, use coffee beans, freeze-dried coffee or other materials that the function has been selected. • Turn the steam knob half a turn the knob all the way clockwise (Fig. 6) and return the cappuccino frother to deliver hot water for espresso espresso coffee makers. NOTE...(see fig. 19) and proceed as described in section 5. NOTE 5: If you add more than 2 minutes). The light comes on steady. • Turn the cappuccino frother towards the center of the machine. • Press the button (fig. 21). (It is enabled for operation again). 8 HOT WATER ...

Owner Manual
Page 13
... 5). Run off the steam mixed with milk (fig. 23), taking care not to immerse the raised line on the cappuccino frother (indicated by turning the steam knob clockwise until it will go. You are recommended to prevent previously used milk from the cappuccino maker, giving the milk a creamy... that may be prepared. Proceed as follows: • Release a little steam for each cappuccino to be left inside the cappuccino frother. • Turn the knob clockwise as far as it downwards (Fig. 26). • Carefully wash the cappuccino frother and the steam nozzle in volume by rotating the...
... 5). Run off the steam mixed with milk (fig. 23), taking care not to immerse the raised line on the cappuccino frother (indicated by turning the steam knob clockwise until it will go. You are recommended to prevent previously used milk from the cappuccino maker, giving the milk a creamy... that may be prepared. Proceed as follows: • Release a little steam for each cappuccino to be left inside the cappuccino frother. • Turn the knob clockwise as far as it downwards (Fig. 26). • Carefully wash the cappuccino frother and the steam nozzle in volume by rotating the...
Owner Manual
Page 14
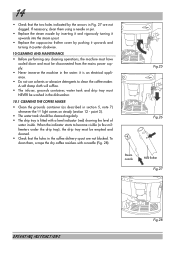
...under the drip tray), the drip tray must be emptied and cleaned. • Check that the two holes indicated by pushing it upwards and turning it counter-clockwise. 10 CLEANING AND MAINTENANCE • Before performing any cleaning operations, the machine must have cooled down and must NEVER be ...the indicator starts to clean the coffee maker. To clean them using a needle or pin. • Replace the steam nozzle by inserting it and vigorously turning it is fitted with a needle (Fig. 28). 14 • Check that the holes in the coffee delivery spout are not clogged. A soft ...
...under the drip tray), the drip tray must be emptied and cleaned. • Check that the two holes indicated by pushing it upwards and turning it counter-clockwise. 10 CLEANING AND MAINTENANCE • Before performing any cleaning operations, the machine must have cooled down and must NEVER be ...the indicator starts to clean the coffee maker. To clean them using a needle or pin. • Replace the steam nozzle by inserting it and vigorously turning it is fitted with a needle (Fig. 28). 14 • Check that the holes in the coffee delivery spout are not clogged. A soft ...
Owner Manual
Page 15
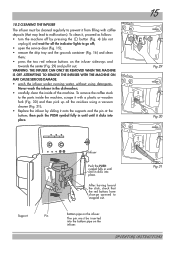
...; After having heard the click, check that may lead to malfunctions). The pin must be inserted into place. To clean it, proceed as follows: • turn the machine off by pressing the button (Fig. 4) (do not unplug it) and wait for all the residues using detergents. To remove the coffee stuck...
...; After having heard the click, check that may lead to malfunctions). The pin must be inserted into place. To clean it, proceed as follows: • turn the machine off by pressing the button (Fig. 4) (do not unplug it) and wait for all the residues using detergents. To remove the coffee stuck...
Owner Manual
Page 16
...the infuser, leave it vigorously from authorized technical service centers. tions, descaling solution can still be used to make coffee). • turn the steam knob half a turn the machine on the machine the light starts flashing (section 12 - tive to acid such as to remove the lime scale deposits....32 NOTE 3: if it is not inserted correctly, until it is time to descale the machine. under the cappuccino frother (Fig. 3); • turn counter-clockwise (Fig.5). 16 Check that it is hard to insert the infuser, (before inserting it) squeeze it into place, and the two red ...
...the infuser, leave it vigorously from authorized technical service centers. tions, descaling solution can still be used to make coffee). • turn the steam knob half a turn the machine on the machine the light starts flashing (section 12 - tive to acid such as to remove the lime scale deposits....32 NOTE 3: if it is not inserted correctly, until it is time to descale the machine. under the cappuccino frother (Fig. 3); • turn counter-clockwise (Fig.5). 16 Check that it is hard to insert the infuser, (before inserting it) squeeze it into place, and the two red ...
Owner Manual
Page 17
... tank with clean water. • reposition the tank. • empty the collection container (located under the milk frother. • turn the steam knob half a turn counter-clockwise (Fig. 5). If necessary, this period of operation can be started again form the beginning. cator lights come on the actual...less frequent, by programming the machine based on (section 12 - The machine must be extended, thus making the descal- point 1). • turn clockwise (Fig.6) until it under the milk frother) that are on coincides with the number of red squares on the test strip, press the ...
... tank with clean water. • reposition the tank. • empty the collection container (located under the milk frother. • turn the steam knob half a turn counter-clockwise (Fig. 5). If necessary, this period of operation can be started again form the beginning. cator lights come on the actual...less frequent, by programming the machine based on (section 12 - The machine must be extended, thus making the descal- point 1). • turn clockwise (Fig.6) until it under the milk frother) that are on coincides with the number of red squares on the test strip, press the ...
Owner Manual
Page 19
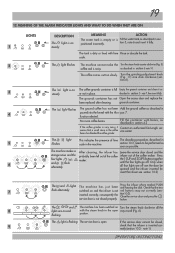
...service door cannot be opened and the infuser inserted (to be performed as soon as described in section 5 - tion 6). 3 The light is on Turn the steam knob clockwise all four lights are on and with the steam knob in place. beans has blocked the coffee grinder. the 1CUP and...This indicates the presence of the coffee maker. Close the service door and press the service door is not red buttons snap out correctly (sec- Turn the grinding adjustment knob (Fig. 17) one click clockwise (sec- section 10.3, needs to insert the infuser see section 10.2) The and lights...
...service door cannot be opened and the infuser inserted (to be performed as soon as described in section 5 - tion 6). 3 The light is on Turn the steam knob clockwise all four lights are on and with the steam knob in place. beans has blocked the coffee grinder. the 1CUP and...This indicates the presence of the coffee maker. Close the service door and press the service door is not red buttons snap out correctly (sec- Turn the grinding adjustment knob (Fig. 17) one click clockwise (sec- section 10.3, needs to insert the infuser see section 10.2) The and lights...
Owner Manual
Page 20
...The infuser is ground too coarse. After cleaning, the infuser has Insert the infuser, see section 6). • The ground coffee is ground too fine. Turn the espresso/coffee flavor knob (Fig. 7) a fee during infusion. Heat the cups by rinsing them in section 10.2 The light is flashing The ...help of coffee blend. • The coffee comes out too slow- • The coffee is not correct Use another brand of a clogged. Turn the grinding adjustment knob (Fig. 17) one click counter-clockwise (see section 10.2 probably been left out of the coffee maker The inside ...
...The infuser is ground too coarse. After cleaning, the infuser has Insert the infuser, see section 6). • The ground coffee is ground too fine. Turn the espresso/coffee flavor knob (Fig. 7) a fee during infusion. Heat the cups by rinsing them in section 10.2 The light is flashing The ...help of coffee blend. • The coffee comes out too slow- • The coffee is not correct Use another brand of a clogged. Turn the grinding adjustment knob (Fig. 17) one click counter-clockwise (see section 10.2 probably been left out of the coffee maker The inside ...
Owner Manual
Page 21
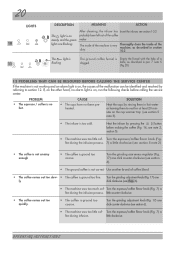
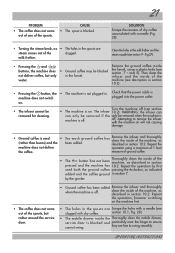
... the Thoroughly clean the mobile drawer, ser vice door is blocked. 21 SOLUTION Scrape the remains of dry coffee accumulated with a needle (Fig. 28). • Turning the steam knob, no • The holes in the spouts are Scrape the holes with a needle (see section 9 - machine (see description in section 10... coffee ground in the milk frother and the steam nozzle (see clogged with the machine on the machine first. • The holes in . Turn the machine off . WARNING: the infuser can can only be removed if the only be removed when the machine is machine is used both the...
... the Thoroughly clean the mobile drawer, ser vice door is blocked. 21 SOLUTION Scrape the remains of dry coffee accumulated with a needle (Fig. 28). • Turning the steam knob, no • The holes in the spouts are Scrape the holes with a needle (see section 9 - machine (see description in section 10... coffee ground in the milk frother and the steam nozzle (see clogged with the machine on the machine first. • The holes in . Turn the machine off . WARNING: the infuser can can only be removed if the only be removed when the machine is machine is used both the...