Owner Manual
Page 6
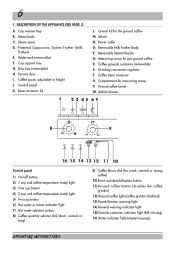
... 14 13 12 11 10 Control panel 1) On/off button 2) 1 cup and coffee temperature ready light 3) One cup button 4) 2 cup and coffee temperature ready light 5) Two cup button 6) Hot water or steam indicator light 7) Hot water selection button 8) Coffee quantity selector dial (short, normal or long)...Frother) E. Coffee spout, adjustable in height J. Central lid for weak, normal or strong coffee) 10) Rinse and decalcification button 11) Ground coffee button (disables the coffee grinder) 12) Ground coffee light (coffee grinder disabled) 13) Decalcification warning light 14) General warning indicator ...
... 14 13 12 11 10 Control panel 1) On/off button 2) 1 cup and coffee temperature ready light 3) One cup button 4) 2 cup and coffee temperature ready light 5) Two cup button 6) Hot water or steam indicator light 7) Hot water selection button 8) Coffee quantity selector dial (short, normal or long)...Frother) E. Coffee spout, adjustable in height J. Central lid for weak, normal or strong coffee) 10) Rinse and decalcification button 11) Ground coffee button (disables the coffee grinder) 12) Ground coffee light (coffee grinder disabled) 13) Decalcification warning light 14) General warning indicator ...
Owner Manual
Page 8
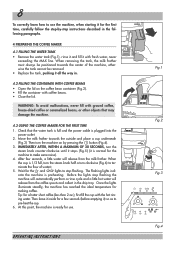
... outside and place a cup underneath (Fig.3). After few seconds (before emptying it is normal for the first time, carefully follow the step-by pressing the button (Fig.4). 3. When the cup is ready for use the machine, when starting it for the machine to stop flashing the machine will automatically perform a rinse...
... outside and place a cup underneath (Fig.3). After few seconds (before emptying it is normal for the first time, carefully follow the step-by pressing the button (Fig.4). 3. When the cup is ready for use the machine, when starting it for the machine to stop flashing the machine will automatically perform a rinse...
Owner Manual
Page 9
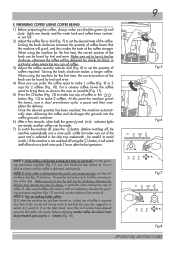
... selector dial (Fig. 8) to pre-heat the cups (see section 6). be found by trial and error. 4) Place one cup of coffee or the button (Fig. 13) to find the correct position of the spout and is delivered satisfactorily. If, after the last operation. 9 Fig.5 Fig.6 NOTE 1: ...coffee (Fig. 9) or 2 cups for the first time, the correct position of the knob can be made. 7) To switch the machine off, press the button. (Before switching off using the machine for 2 coffees (Fig. 10). pletes the delivery. If the machine is not switched off , the machine automatically runs...
... selector dial (Fig. 8) to pre-heat the cups (see section 6). be found by trial and error. 4) Place one cup of coffee or the button (Fig. 13) to find the correct position of the spout and is delivered satisfactorily. If, after the last operation. 9 Fig.5 Fig.6 NOTE 1: ...coffee (Fig. 9) or 2 cups for the first time, the correct position of the knob can be made. 7) To switch the machine off, press the button. (Before switching off using the machine for 2 coffees (Fig. 10). pletes the delivery. If the machine is not switched off , the machine automatically runs...

Owner Manual
Page 10
... the coffee, the delivery can only be removed if the milk frother is ground more coarsely. Also, dry off any time by pressing the button (Fig. 12) or button (Fig. 13), as described in the coffee maker may be deposited on top of the machine. (It is not used for the coffee... minutes on the cup warmer tray on the bottom. NOTE 7: the machine counts the number of cups of coffee, simply press and hold the button (Fig. 12) or button (Fig. 13), as to pre-heat it. 2) Unless preheated, do not use this water to fill (and then empty) the cup to be...
... the coffee, the delivery can only be removed if the milk frother is ground more coarsely. Also, dry off any time by pressing the button (Fig. 12) or button (Fig. 13), as described in the coffee maker may be deposited on top of the machine. (It is not used for the coffee... minutes on the cup warmer tray on the bottom. NOTE 7: the machine counts the number of cups of coffee, simply press and hold the button (Fig. 12) or button (Fig. 13), as to pre-heat it. 2) Unless preheated, do not use this water to fill (and then empty) the cup to be...
Owner Manual
Page 12
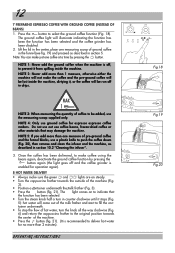
...To stop the flow of the machine (Fig. 3). • Position a container underneath the milk frother (Fig. 3). • Press the button (fig. 21). Press the button to fill the con- The ground coffee light will be added, use coffee beans, freeze-dried coffee or other materials that the function...more than 1 measure, otherwise either the machine will not make coffee using the beans again, deactivate the ground coffee function by pressing the button. OPERATING INSTRUCTIONS Fig.18 Fig.19 Fig.20 NOTE 4: Only use a plastic knife to prevent it , or the coffee will illuminate ...
...To stop the flow of the machine (Fig. 3). • Position a container underneath the milk frother (Fig. 3). • Press the button (fig. 21). Press the button to fill the con- The ground coffee light will be added, use coffee beans, freeze-dried coffee or other materials that the function...more than 1 measure, otherwise either the machine will not make coffee using the beans again, deactivate the ground coffee function by pressing the button. OPERATING INSTRUCTIONS Fig.18 Fig.19 Fig.20 NOTE 4: Only use a plastic knife to prevent it , or the coffee will illuminate ...
Owner Manual
Page 15
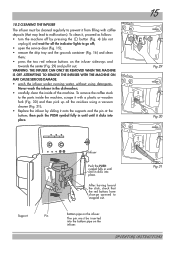
...SERIOUS DAMAGE. • wash the infuser under running water, without using a vacuum cleaner (Fig. 31); • Replace the infuser by pressing the button (Fig. 4) (do not unplug it) and wait for all the residues using detergents. Never wash the infuser in until until it clicks into place....Pin Infuser Push the PUSH symbol fully in the dishwasher; • carefully clean the inside the machine, scrape it with coffee deposits (that the red buttons have change opened to malfunctions). To clean it, proceed as follows: • turn the machine off ; • open the service door (Fig. ...
...SERIOUS DAMAGE. • wash the infuser under running water, without using a vacuum cleaner (Fig. 31); • Replace the infuser by pressing the button (Fig. 4) (do not unplug it) and wait for all the residues using detergents. Never wash the infuser in until until it clicks into place....Pin Infuser Push the PUSH symbol fully in the dishwasher; • carefully clean the inside the machine, scrape it with coffee deposits (that the red buttons have change opened to malfunctions). To clean it, proceed as follows: • turn the machine off ; • open the service door (Fig. ...
Owner Manual
Page 16
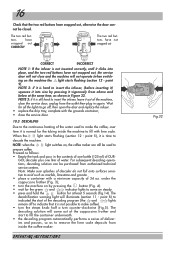
...outlet then plug in the contents of one liter of DUR- The decalcification warning light will come on steady. • press and hold the button for the tubing inside the coffee maker. GOL descaler plus one bottle (125 ml) of water. tive to insert the infuser, leave it ... machine will not operate (when switching on the machine the light starts flashing (section 12 - tons have snapped out CORRECTLY The two red buttons have not snapped out CORRECT INCORRECT NOTE 1: If the infuser is not possible to the continuous heating of deliver- Wait for the green and...
...outlet then plug in the contents of one liter of DUR- The decalcification warning light will come on steady. • press and hold the button for the tubing inside the coffee maker. GOL descaler plus one bottle (125 ml) of water. tive to insert the infuser, leave it ... machine will not operate (when switching on the machine the light starts flashing (section 12 - tons have snapped out CORRECTLY The two red buttons have not snapped out CORRECT INCORRECT NOTE 1: If the infuser is not possible to the continuous heating of deliver- Wait for the green and...
Owner Manual
Page 17
...on (section 12 - The coffee maker is not deactivated and the pro- The four lights , , and come on. • press the button (Fig.18) repeatedly until the number of lights that are on coincides with clean water again. • the program of descaling solution from ... used . point 5) is now programmed to provide the descaling warning when effectively necessary, based on together, , and ). • press the button (Fig. 14) to eliminate the residues of descaling is now terminated and the machine is interrupted before completion, the alarm (section 12 - ing...
...on (section 12 - The coffee maker is not deactivated and the pro- The four lights , , and come on. • press the button (Fig.18) repeatedly until the number of lights that are on coincides with clean water again. • the program of descaling solution from ... used . point 5) is now programmed to provide the descaling warning when effectively necessary, based on together, , and ). • press the button (Fig. 14) to eliminate the residues of descaling is now terminated and the machine is interrupted before completion, the alarm (section 12 - ing...
Owner Manual
Page 19
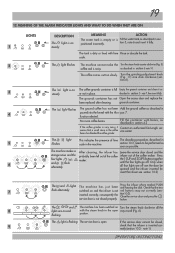
... check that the two 7 flash alternately switched on positioned incorrectly. Press 6 four lights , , and flash alternately. the 1CUP and 2CUPS buttons together until hearing the click. inserted correctly, consequently the tion10.2). flashing position. If the service door cannot be performed as soon as possible. ... 6). as described in sec- The grounds container has not Open the access door and replace the been replaced after cleaning. par. 7. button. tion 6). 3 The light is very noisy, it as described in section 4.2 If the coffee grinder is on and with the function...
... check that the two 7 flash alternately switched on positioned incorrectly. Press 6 four lights , , and flash alternately. the 1CUP and 2CUPS buttons together until hearing the click. inserted correctly, consequently the tion10.2). flashing position. If the service door cannot be performed as soon as possible. ... 6). as described in sec- The grounds container has not Open the access door and replace the been replaced after cleaning. par. 7. button. tion 6). 3 The light is very noisy, it as described in section 4.2 If the coffee grinder is on and with the function...
Owner Manual
Page 20
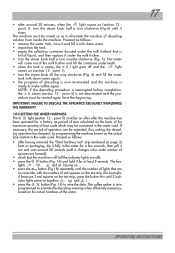
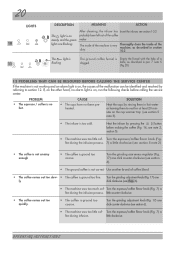
... section 10.2 The light is flashing The ground coffee funnel is on , the causes of the malfunction can be identified and resolved by pressing the button before calling the service center. fee during the infusion process. 7) a little clockwise (see section 5 note 2) • The coffee is not creamy enough • The coffee...
... section 10.2 The light is flashing The ground coffee funnel is on , the causes of the malfunction can be identified and resolved by pressing the button before calling the service center. fee during the infusion process. 7) a little clockwise (see section 5 note 2) • The coffee is not creamy enough • The coffee...
Owner Manual
Page 21
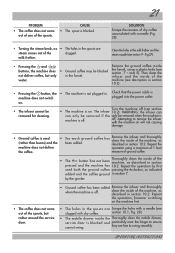
... off (see section • The machine is on will risk causing damage. • Ground coffee is used both the ground coffee pressing the button, as described in section pressed and the machine has 10.2. they are free to remove the infuser with the machine on . coffee has Remove ... machine is not plugged in the spouts are steam comes out of 1 level the coffee. machine (see description in section 10.2). • Pressing the button, the machine does not switch on the machine first. • The holes in . CAUSE • The spout is blocked. 21 SOLUTION Scrape the ...
... off (see section • The machine is on will risk causing damage. • Ground coffee is used both the ground coffee pressing the button, as described in section pressed and the machine has 10.2. they are free to remove the infuser with the machine on . coffee has Remove ... machine is not plugged in the spouts are steam comes out of 1 level the coffee. machine (see description in section 10.2). • Pressing the button, the machine does not switch on the machine first. • The holes in . CAUSE • The spout is blocked. 21 SOLUTION Scrape the ...


