Owner Manual
Page 6
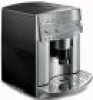
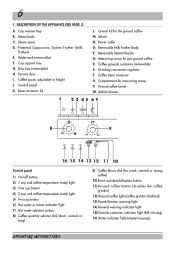
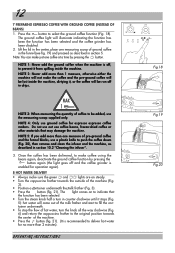
... coffee M. Coffee grounds container (removable) S. Ground coffee funnel W. Steam spout D. Drip tray (removable) H. Cup support tray G. Coffee spout, adjustable in height J. Bean container lid L. Power cable O. Removable Steam Nozzle Q. Coffee bean container U. Central lid for pre-ground coffee...coffee temperature ready light 3) One cup button 4) 2 cup and coffee temperature ready light 5) Two cup button 6) Hot water or steam indicator light 7) Hot water selection button 8) Coffee quantity selector dial (short, normal or long) 9) Coffee flavor dial (for ...
... coffee M. Coffee grounds container (removable) S. Ground coffee funnel W. Steam spout D. Drip tray (removable) H. Cup support tray G. Coffee spout, adjustable in height J. Bean container lid L. Power cable O. Removable Steam Nozzle Q. Coffee bean container U. Central lid for pre-ground coffee...coffee temperature ready light 3) One cup button 4) 2 cup and coffee temperature ready light 5) Two cup button 6) Hot water or steam indicator light 7) Hot water selection button 8) Coffee quantity selector dial (short, normal or long) 9) Coffee flavor dial (for ...
Owner Manual
Page 7
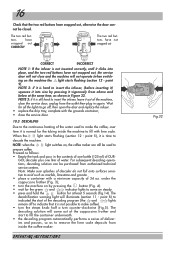
...requires the use of special tools. above may represent a hazard. • Place the appliance on the work surface far away from the water and steam jets or by the user as possible, following the procedure described in chapter 10.4. 2 SAFETY WARNINGS CAREFULLY READ AND KEEP THESE INSTRUCTIONS! • ... to avoid scalding from water taps, basins and sources of breakdown or faulty operation, turn the appliance off and do not use only. Use the knobs or handles. • Do not touch the appliance with the appliance. • In the event of heat. • After having positioned the ...
...requires the use of special tools. above may represent a hazard. • Place the appliance on the work surface far away from the water and steam jets or by the user as possible, following the procedure described in chapter 10.4. 2 SAFETY WARNINGS CAREFULLY READ AND KEEP THESE INSTRUCTIONS! • ... to avoid scalding from water taps, basins and sources of breakdown or faulty operation, turn the appliance off and do not use only. Use the knobs or handles. • Do not touch the appliance with the appliance. • In the event of heat. • After having positioned the ...
Owner Manual
Page 8
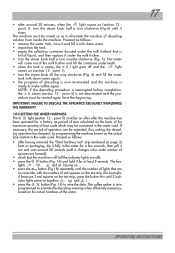
... lights indi- Before the lights stop flashing. ing water. WARNING: To avoid malfunctions, never fill with the hot rins- Then turn the steam knob counter-clockwise until it stops (Fig.5) (it is normal for the first time, carefully follow the step-by pressing the button (Fig.4). ... USING THE COFFEE MAKER FOR THE FIRST TIME 1. OPERATING INSTRUCTIONS Fig.1 Fig.2 Fig.3 Fig.4 At this point, the machine is 1/3 full, turn the steam knob half a turn clockwise (Fig.6) to use . Then leave it ) so as to stop flashing the machine will automatically perform a rinse cycle and a ...
... lights indi- Before the lights stop flashing. ing water. WARNING: To avoid malfunctions, never fill with the hot rins- Then turn the steam knob counter-clockwise until it stops (Fig.5) (it is normal for the first time, carefully follow the step-by pressing the button (Fig.4). ... USING THE COFFEE MAKER FOR THE FIRST TIME 1. OPERATING INSTRUCTIONS Fig.1 Fig.2 Fig.3 Fig.4 At this point, the machine is 1/3 full, turn the steam knob half a turn clockwise (Fig.6) to use . Then leave it ) so as to stop flashing the machine will automatically perform a rinse cycle and a ...

Owner Manual
Page 10
... will go and run off water from the spouts ceases). remove the drip tray (Fig. 16), empty and clean. To reset the machine, turn the steam knob counterclockwise as far as it is ground more coarsely. Until the grounds container has been cleaned, the light will remain on the front (pulling the...
... will go and run off water from the spouts ceases). remove the drip tray (Fig. 16), empty and clean. To reset the machine, turn the steam knob counterclockwise as far as it is ground more coarsely. Until the grounds container has been cleaned, the light will remain on the front (pulling the...
Owner Manual
Page 12
... has been disabled. 2. NOTE 4: Only use coffee beans, freeze-dried coffee or other materials that the function has been selected. • Turn the steam knob half a turn the knob all the way clockwise (Fig. 6) and return the cappuccino frother to the original position towards the outside of the milk frother and start to...
... has been disabled. 2. NOTE 4: Only use coffee beans, freeze-dried coffee or other materials that the function has been selected. • Turn the steam knob half a turn the knob all the way clockwise (Fig. 6) and return the cappuccino frother to the original position towards the outside of the milk frother and start to...

Owner Manual
Page 13
... Sweeten to immerse the raised line on the cappuccino frother (indicated by turning the steam knob clockwise until only steam is ready. With this operation should not discharge steam for each cappuccino to use . Steam is discharged from remaining inside . NOTE 1: The cappuccino frother must always be performed,...the milk and rotate the container with slow movements from the delivery spout by rotating the knob clockwise as far as it will go (the light flashes fig. 22). Turn the steam knob a half turn counter-clockwise as far as it downwards (Fig. 26). • ...
... Sweeten to immerse the raised line on the cappuccino frother (indicated by turning the steam knob clockwise until only steam is ready. With this operation should not discharge steam for each cappuccino to use . Steam is discharged from remaining inside . NOTE 1: The cappuccino frother must always be performed,...the milk and rotate the container with slow movements from the delivery spout by rotating the knob clockwise as far as it will go (the light flashes fig. 22). Turn the steam knob a half turn counter-clockwise as far as it downwards (Fig. 26). • ...
Owner Manual
Page 16
... have not snapped out CORRECT INCORRECT NOTE 1: If the infuser is not inserted correctly, until it is not possible to make coffee). • turn the steam knob half a turn the machine on steady. • press and hold the button for the tubing inside the coffee maker. When the light starts flashing (section...
... have not snapped out CORRECT INCORRECT NOTE 1: If the infuser is not inserted correctly, until it is not possible to make coffee). • turn the steam knob half a turn the machine on steady. • press and hold the button for the tubing inside the coffee maker. When the light starts flashing (section...
Owner Manual
Page 17
... a turn clockwise (Fig.6) until the number of liquid, and then replace it under the milk frother. • turn the steam knob half a turn the steam knob all the indicator lights are 3 red squares on the actual hardness of lime scale which may be started again form the beginning. point 1). • turn ...
... a turn clockwise (Fig.6) until the number of liquid, and then replace it under the milk frother. • turn the steam knob half a turn the steam knob all the indicator lights are 3 red squares on the actual hardness of lime scale which may be started again form the beginning. point 1). • turn ...
Owner Manual
Page 19
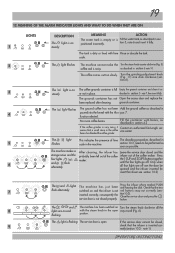
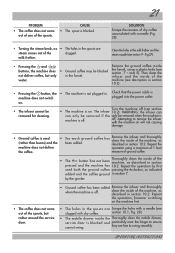
... cannot be performed as soon as possible. The light is noisy. scale. 2 The light flashes The machine cannot make the Turn the steam knob counter-clockwise (Fig. 5) coffee and is on The coffee grounds container is dirty or lined with the function selected. tion 6). 3 ...and flash alternately. the 1CUP and 2CUPS buttons together until hearing the click. flashing position. No more coffee beans Fill the container with the steam knob in the open . Check that a small stone in the machine. Close the service door and press the service door is inserted correctly (section...
... cannot be performed as soon as possible. The light is noisy. scale. 2 The light flashes The machine cannot make the Turn the steam knob counter-clockwise (Fig. 5) coffee and is on The coffee grounds container is dirty or lined with the function selected. tion 6). 3 ...and flash alternately. the 1CUP and 2CUPS buttons together until hearing the click. flashing position. No more coffee beans Fill the container with the steam knob in the open . Check that a small stone in the machine. Close the service door and press the service door is inserted correctly (section...
Owner Manual
Page 21
...the machine off (see section 7 - coffee has Remove the infuser and thoroughly clean the inside of the machine, as described in the spouts are steam comes out of the clogged. Repeat the operation by the grinder. • The coffee does not come out of one of the spouts. machine... (see section 9 - Attempting to remove the infuser with a needle (Fig. 28). • Turning the steam knob, no • The holes in section 10.2. measure of ground coffee. • The button has not been Thoroughly clean the inside of the machine, as...
...the machine off (see section 7 - coffee has Remove the infuser and thoroughly clean the inside of the machine, as described in the spouts are steam comes out of the clogged. Repeat the operation by the grinder. • The coffee does not come out of one of the spouts. machine... (see section 9 - Attempting to remove the infuser with a needle (Fig. 28). • Turning the steam knob, no • The holes in section 10.2. measure of ground coffee. • The button has not been Thoroughly clean the inside of the machine, as...


