Owner Manual
Page 4
... the normal operation indicator lights 18 12 Troubleshooting 19 13 Problems that can be resolved before calling the service center 20 Limited warranty 22 OPERATING INSTRUCTIONS Important safeguards 5 1 Description of the appliance (see page 3 6 2 Safety warnings 7 3 Installation 7 4 Preparing the coffee maker 8 4.1 Filling the water tank 8 4.2 Filling the container with ground coffee...
... the normal operation indicator lights 18 12 Troubleshooting 19 13 Problems that can be resolved before calling the service center 20 Limited warranty 22 OPERATING INSTRUCTIONS Important safeguards 5 1 Description of the appliance (see page 3 6 2 Safety warnings 7 3 Installation 7 4 Preparing the coffee maker 8 4.1 Filling the water tank 8 4.2 Filling the container with ground coffee...

Owner Manual
Page 5
...8226; Plug cord into the outlet, try reversing the plug. SAVE THESE INSTRUCTIONS THIS PRODUCT IS FOR HOUSEHOLD USE ONLY SHORT CORD INSTRUCTIONS - This plug will not drape over a longer cord. - OPERATING INSTRUCTIONS This appliance is equipped with a polarized alternating current line plug (a plug ... GROUNDING TYPE 3 - Repair should be used , the marked electrical rating should be followed, including the following: • Read all instructions. • Do not touch hot surfaces. Longer, detachable power supply cords or extension cords are unable to replace your obsolete outlet....
...8226; Plug cord into the outlet, try reversing the plug. SAVE THESE INSTRUCTIONS THIS PRODUCT IS FOR HOUSEHOLD USE ONLY SHORT CORD INSTRUCTIONS - This plug will not drape over a longer cord. - OPERATING INSTRUCTIONS This appliance is equipped with a polarized alternating current line plug (a plug ... GROUNDING TYPE 3 - Repair should be used , the marked electrical rating should be followed, including the following: • Read all instructions. • Do not touch hot surfaces. Longer, detachable power supply cords or extension cords are unable to replace your obsolete outlet....
Owner Manual
Page 6
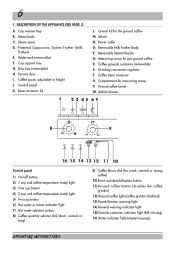
... grinder disabled) 13) Decalcification warning light 14) General warning indicator light 15)Grounds container indicator light (full/missing) 16) Water indicator light (empty/missing) OPERATING INSTRUCTIONS Coffee grounds container (removable) S. Ground coffee funnel W. Infuser N. Power cable O. Coffee bean container U. Steam knob C. Bean container lid L. Control panel K. Coffee spout, adjustable in height...
... grinder disabled) 13) Decalcification warning light 14) General warning indicator light 15)Grounds container indicator light (full/missing) 16) Water indicator light (empty/missing) OPERATING INSTRUCTIONS Coffee grounds container (removable) S. Ground coffee funnel W. Infuser N. Power cable O. Coffee bean container U. Steam knob C. Bean container lid L. Control panel K. Coffee spout, adjustable in height...
Owner Manual
Page 7
...off and do so. • If the power outlet does not match the plug on a work bench, make sure that is properly grounded. OPERATING INSTRUCTIONS between the surfaces of the appliance and the side and rear walls and a free space of the appliance. 7 3 INSTALLATION • After unpacking,... other use it . If in doubt, do not touch the hot surfaces of around 2 in. 2 SAFETY WARNINGS CAREFULLY READ AND KEEP THESE INSTRUCTIONS! • This machine is designed to respect the above the coffee maker. • Never install the machine in environments where the temperature may ...
...off and do so. • If the power outlet does not match the plug on a work bench, make sure that is properly grounded. OPERATING INSTRUCTIONS between the surfaces of the appliance and the side and rear walls and a free space of the appliance. 7 3 INSTALLATION • After unpacking,... other use it . If in doubt, do not touch the hot surfaces of around 2 in. 2 SAFETY WARNINGS CAREFULLY READ AND KEEP THESE INSTRUCTIONS! • This machine is designed to respect the above the coffee maker. • Never install the machine in environments where the temperature may ...
Owner Manual
Page 8
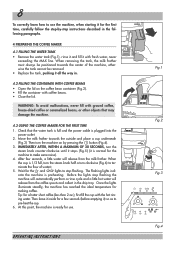
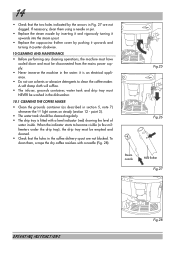
... inside for use the machine, when starting it all the way in. 4.2 FILLING THE CONTAINER WITH COFFEE BEANS • Open the lid on by -step instructions described in the drip tray. The flashing lights indi- ing water. At this point, the machine is plugged into the power outlet. 2. When removing the..., pushing it for making coffee. Check that may damage the machine. 4.3 USING THE COFFEE MAKER FOR THE FIRST TIME 1. cate the machine is preheating. OPERATING INSTRUCTIONS Fig.1 Fig.2 Fig.3 Fig.4
... inside for use the machine, when starting it all the way in. 4.2 FILLING THE CONTAINER WITH COFFEE BEANS • Open the lid on by -step instructions described in the drip tray. The flashing lights indi- ing water. At this point, the machine is plugged into the power outlet. 2. When removing the..., pushing it for making coffee. Check that may damage the machine. 4.3 USING THE COFFEE MAKER FOR THE FIRST TIME 1. cate the machine is preheating. OPERATING INSTRUCTIONS Fig.1 Fig.2 Fig.3 Fig.4
Owner Manual
Page 9
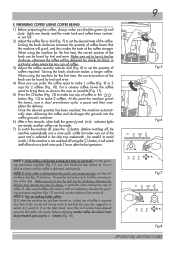
... (fig. 7) clockwise. Make sure not to turn the grinding coarseness regulator (Fig. 17) one cup under the coffee spout to make 2 coffees. Fig.7 Fig.8 OPERATING INSTRUCTIONS Once the desired quantity has been reached, the machine automati- cally stops delivering the coffee and discharges the grounds into the coffee grounds container. 6) After...
... (fig. 7) clockwise. Make sure not to turn the grinding coarseness regulator (Fig. 17) one cup under the coffee spout to make 2 coffees. Fig.7 Fig.8 OPERATING INSTRUCTIONS Once the desired quantity has been reached, the machine automati- cally stops delivering the coffee and discharges the grounds into the coffee grounds container. 6) After...

Owner Manual
Page 10
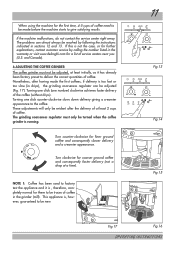
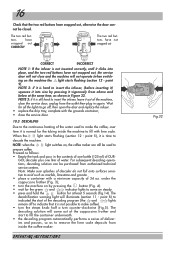
... on (section 12, point 1), the water tank must be filled, otherwise the coffee cannot be emptied and cleaned. If this operation must be made . OPERATING INSTRUCTIONS Fig.9 Fig.10 Fig.11 Fig.12 remove the drip tray (Fig. 16), empty and clean. Empty and carefully clean the grounds container, making sure...
... on (section 12, point 1), the water tank must be filled, otherwise the coffee cannot be emptied and cleaned. If this operation must be made . OPERATING INSTRUCTIONS Fig.9 Fig.10 Fig.11 Fig.12 remove the drip tray (Fig. 16), empty and clean. Empty and carefully clean the grounds container, making sure...
Owner Manual
Page 11
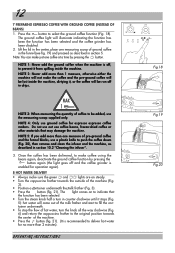
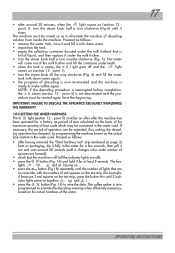
...is, however, guaranteed to be turned when the coffee grinder is not the case, or for further explanations, contact customer service by following the instructions indicated in sections 12 and 13. Turning one number) clockwise achieves faster delivery of the coffee (without drips). If the machine malfunctions, do...for the first time, 4-5 cups of coffee need to be resolved by calling the number listed in the warranty or visit www.delonghi.com for finer ground coffee and consequently slower delivery and a creamier appearance. The problems can be evident after the delivery of at a time).
...is, however, guaranteed to be turned when the coffee grinder is not the case, or for further explanations, contact customer service by following the instructions indicated in sections 12 and 13. Turning one number) clockwise achieves faster delivery of the coffee (without drips). If the machine malfunctions, do...for the first time, 4-5 cups of coffee need to be resolved by calling the number listed in the warranty or visit www.delonghi.com for finer ground coffee and consequently slower delivery and a creamier appearance. The problems can be evident after the delivery of at a time).
Owner Manual
Page 12
... on steady. • Turn the cappuccino frother towards the center of the milk frother and start to select the ground coffee function (Fig. 18). OPERATING INSTRUCTIONS Fig.18 Fig.19 Fig.20 NOTE 4: Only use coffee beans, freeze-dried coffee or other materials that the function has been selected. • Turn...
... on steady. • Turn the cappuccino frother towards the center of the milk frother and start to select the ground coffee function (Fig. 18). OPERATING INSTRUCTIONS Fig.18 Fig.19 Fig.20 NOTE 4: Only use coffee beans, freeze-dried coffee or other materials that the function has been selected. • Turn...

Owner Manual
Page 13
... the container with slow movements from the delivery spout by the arrow in warm water. 13 Fig.21 Fig.22 Fig.23 Fig.24 OPERATING INSTRUCTIONS Steam is discharged from remaining inside . Sweeten to taste and if desired, sprinkle the froth with milk (fig. 23), taking care not to use . Run...
... the container with slow movements from the delivery spout by the arrow in warm water. 13 Fig.21 Fig.22 Fig.23 Fig.24 OPERATING INSTRUCTIONS Steam is discharged from remaining inside . Sweeten to taste and if desired, sprinkle the froth with milk (fig. 23), taking care not to use . Run...
Owner Manual
Page 14
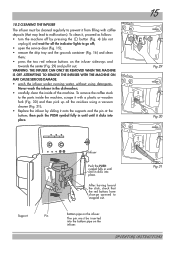
...; Never immerse the machine in the water: it is fitted with a needle (Fig. 28). Fig.25 Fig.26 Steam nozzle Milk frother Fig.27 OPERATING INSTRUCTIONS Fig.28 If necessary, clean them , scrape the dry coffee residues with a level indicator (red) showing the level of water inside. When the indicator starts...
...; Never immerse the machine in the water: it is fitted with a needle (Fig. 28). Fig.25 Fig.26 Steam nozzle Milk frother Fig.27 OPERATING INSTRUCTIONS Fig.28 If necessary, clean them , scrape the dry coffee residues with a level indicator (red) showing the level of water inside. When the indicator starts...
Owner Manual
Page 15
...; To remove the coffee stuck to the parts inside of the machine. The pin must be inserted into the bottom pipe on the infuser. OPERATING INSTRUCTIONS After having heard the click, check that may lead to malfunctions). WARNING: THE INFUSER CAN ONLY BE REMOVED WHEN THE MACHINE IS OFF. ATTEMPTING TO...
...; To remove the coffee stuck to the parts inside of the machine. The pin must be inserted into the bottom pipe on the infuser. OPERATING INSTRUCTIONS After having heard the click, check that may lead to malfunctions). WARNING: THE INFUSER CAN ONLY BE REMOVED WHEN THE MACHINE IS OFF. ATTEMPTING TO...
Owner Manual
Page 16
... in Figure 32. The decalcification warning light will illuminate (section 11 - point 8) to indicated the start to fill with a minimum capacity of 34 oz. OPERATING INSTRUCTIONS Fig.32 NOTE: when the light switches on the machine the light starts flashing (section 12 - tive to make coffee). • turn the steam knob...
... in Figure 32. The decalcification warning light will illuminate (section 11 - point 8) to indicated the start to fill with a minimum capacity of 34 oz. OPERATING INSTRUCTIONS Fig.32 NOTE: when the light switches on the machine the light starts flashing (section 12 - tive to make coffee). • turn the steam knob...
Owner Manual
Page 17
... 1), turn the steam knob half a turn the steam knob all the indicator lights are 3 red squares on the actual hardness of the water. 17 OPERATING INSTRUCTIONS The coffee maker is ready to provide the descaling warning when effectively necessary, based on the test strip, press the button until it stops.
... 1), turn the steam knob half a turn the steam knob all the indicator lights are 3 red squares on the actual hardness of the water. 17 OPERATING INSTRUCTIONS The coffee maker is ready to provide the descaling warning when effectively necessary, based on the test strip, press the button until it stops.
Owner Manual
Page 18
... coffee. The steam light The machine is ready for the indicator lights to make coffee (the ideal water temperature has not yet been reached). OPERATING INSTRUCTIONS Wait for espresso/coffee using 7 steady ground coffee (see section 10.3). The steady The steady light is on The machine is delivering two cups of...
... coffee. The steam light The machine is ready for the indicator lights to make coffee (the ideal water temperature has not yet been reached). OPERATING INSTRUCTIONS Wait for espresso/coffee using 7 steady ground coffee (see section 10.3). The steady The steady light is on The machine is delivering two cups of...
Owner Manual
Page 19
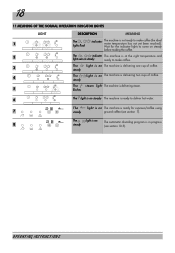
... knob (Fig. 17) one click clockwise (sec- note 7, then insert it as described in the machine. Press 6 four lights , , and flash alternately. flashing position. OPERATING INSTRUCTIONS 19 12 MEANING OF THE ALARM INDICATOR LIGHTS AND WHAT TO DO WHEN THEY ARE ON LIGHTS DESCRIPTION MEANING ACTION The water tank is empty...
... knob (Fig. 17) one click clockwise (sec- note 7, then insert it as described in the machine. Press 6 four lights , , and flash alternately. flashing position. OPERATING INSTRUCTIONS 19 12 MEANING OF THE ALARM INDICATOR LIGHTS AND WHAT TO DO WHEN THEY ARE ON LIGHTS DESCRIPTION MEANING ACTION The water tank is empty...
Owner Manual
Page 20
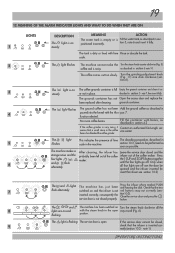
... knob (Fig. 17) one ly click clockwise (see section 5 note 2) • The coffee is not creamy enough • The coffee is ground too coarse. OPERATING INSTRUCTIONS
... knob (Fig. 17) one ly click clockwise (see section 5 note 2) • The coffee is not creamy enough • The coffee is ground too coarse. OPERATING INSTRUCTIONS
Owner Manual
Page 21
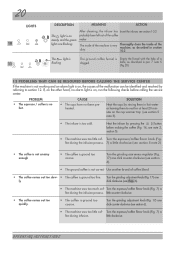
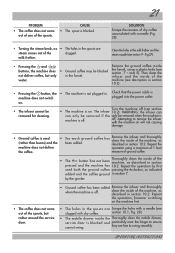
... Thoroughly clean the inside of dry coffee accumulated with dry coffee. Repeat the operation, however switching on . • The machine is off (see section 7 - OPERATING INSTRUCTIONS section 10.1, Fig. 28). • The mobile drawer inside of the clogged. CAUSE • The spout is plugged into the power outlet. • The infuser...
... Thoroughly clean the inside of dry coffee accumulated with dry coffee. Repeat the operation, however switching on . • The machine is off (see section 7 - OPERATING INSTRUCTIONS section 10.1, Fig. 28). • The mobile drawer inside of the clogged. CAUSE • The spout is plugged into the power outlet. • The infuser...
Owner Manual
Page 22
... statement for two years ( 2 ) from state to the back page of the manual for use. How does state law apply? OPERATING INSTRUCTIONS 22 This warranty applies to Super Automatic Espresso Machines with the sale or use of its appliance. How long does the coverage last? The ...for Mexico (see contact information below: U.S. How do not allow the exclusion or limitation of Canada: Please contact our toll free hotline at www.delonghi.com. For all other rights, which vary from the purchase date found on an alternating current ( AC ) circuit. Please refer to state....
... statement for two years ( 2 ) from state to the back page of the manual for use. How does state law apply? OPERATING INSTRUCTIONS 22 This warranty applies to Super Automatic Espresso Machines with the sale or use of its appliance. How long does the coverage last? The ...for Mexico (see contact information below: U.S. How do not allow the exclusion or limitation of Canada: Please contact our toll free hotline at www.delonghi.com. For all other rights, which vary from the purchase date found on an alternating current ( AC ) circuit. Please refer to state....