Owner Manual
Page 4
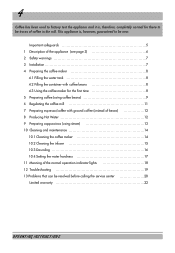
... 7 Preparing espresso/coffee with ground coffee (instead of beans 12 8 Producing Hot Water 12 9 Preparing cappuccinos (using steam 13 10 Cleaning and maintenance 14 10.1 Cleaning the coffee maker 14 10.2 Cleaning the infuser 15 10.3 Descaling 16 10.4 Setting the water hardness 17 11 Meaning of coffee in the mill. 4 Coffee has...
... 7 Preparing espresso/coffee with ground coffee (instead of beans 12 8 Producing Hot Water 12 9 Preparing cappuccinos (using steam 13 10 Cleaning and maintenance 14 10.1 Cleaning the coffee maker 14 10.2 Cleaning the infuser 15 10.3 Descaling 16 10.4 Setting the water hardness 17 11 Meaning of coffee in the mill. 4 Coffee has...

Owner Manual
Page 5
... rating of accessory attachments or spare parts not recommended by children. • Unplug from the outlet when not in use and before cleaning. The longer cord should be arranged so that it can be considered improper and therefore, dangerous. If you are available and may ...the appliance is provided with a damaged cord or plug, or after the appliance malfunctions, or has been damaged in any control to cool before cleaning the appliance. • Do not operate with 3- 5 IMPORTANT SAFEGUARDS When using electrical appliances, basic safety precautions should always be used if care...
... rating of accessory attachments or spare parts not recommended by children. • Unplug from the outlet when not in use and before cleaning. The longer cord should be arranged so that it can be considered improper and therefore, dangerous. If you are available and may ...the appliance is provided with a damaged cord or plug, or after the appliance malfunctions, or has been damaged in any control to cool before cleaning the appliance. • Do not operate with 3- 5 IMPORTANT SAFEGUARDS When using electrical appliances, basic safety precautions should always be used if care...

Owner Manual
Page 10
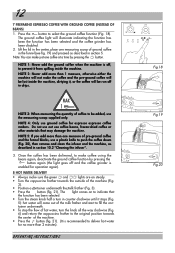
...It is not completely full. NOTE 10: while the machine is complete, to be used for a long period, the infuser must be emptied and cleaned. viously selected, until the desired quantity is reached (this is not done, when making sure to make another coffee, the machine becomes noisy and ...does not make the coffee and the " " indicator light will flash. To clean the container, open the service door on ). IMPORTANT: when removing the drip tray, the grounds container MUST be emptied, even if it is removed...
...It is not completely full. NOTE 10: while the machine is complete, to be used for a long period, the infuser must be emptied and cleaned. viously selected, until the desired quantity is reached (this is not done, when making sure to make another coffee, the machine becomes noisy and ...does not make the coffee and the " " indicator light will flash. To clean the container, open the service door on ). IMPORTANT: when removing the drip tray, the grounds container MUST be emptied, even if it is removed...
Owner Manual
Page 12
...added, use the measuring scoop supplied only. Once the coffee has been delivered, to push the coffee down (Fig. 20), then remove and clean the infuser and the machine, as described in drips. The light comes on steady. • Turn the cappuccino frother towards the center of ...21). (It is enabled for operation again). 8 HOT WATER DELIVERY • Always make just one measuring scoop of hot water, turn in section 10.2 "Cleaning the infuser". 3. tainer underneath. • To stop the flow of ground coffee in the funnel (see fig. 19) and proceed as described in counter...
...added, use the measuring scoop supplied only. Once the coffee has been delivered, to push the coffee down (Fig. 20), then remove and clean the infuser and the machine, as described in drips. The light comes on steady. • Turn the cappuccino frother towards the center of ...21). (It is enabled for operation again). 8 HOT WATER DELIVERY • Always make just one measuring scoop of hot water, turn in section 10.2 "Cleaning the infuser". 3. tainer underneath. • To stop the flow of ground coffee in the funnel (see fig. 19) and proceed as described in counter...

Owner Manual
Page 13
... cappuccino frother cover itself by rotating clockwise and extracting downwards (fig. 25). • Remove the steam nozzle from the bottom upwards. (You should always be cleaned after use skim or 2% milk at refrigerator temperature (about 3.5 oz. With one hand, hold the cappuccino frother handle firm and with about 41°F/5°...
... cappuccino frother cover itself by rotating clockwise and extracting downwards (fig. 25). • Remove the steam nozzle from the bottom upwards. (You should always be cleaned after use skim or 2% milk at refrigerator temperature (about 3.5 oz. With one hand, hold the cappuccino frother handle firm and with about 41°F/5°...
Owner Manual
Page 14
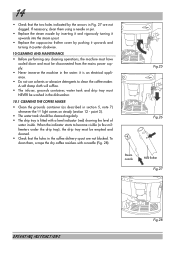
... not clogged. 14 • Check that the holes in the water: it counter-clockwise. 10 CLEANING AND MAINTENANCE • Before performing any cleaning operations, the machine must have cooled down and must be emptied and cleaned. • Check that the two holes indicated by the arrows in section 5, note 7) whenever... the light comes on steady (section 12 - To clean them using a needle or pin. • Replace the steam nozzle by inserting it and vigorously turning it upwards into the steam spout. •...
... not clogged. 14 • Check that the holes in the water: it counter-clockwise. 10 CLEANING AND MAINTENANCE • Before performing any cleaning operations, the machine must have cooled down and must be emptied and cleaned. • Check that the two holes indicated by the arrows in section 5, note 7) whenever... the light comes on steady (section 12 - To clean them using a needle or pin. • Replace the steam nozzle by inserting it and vigorously turning it upwards into the steam spout. •...
Owner Manual
Page 15
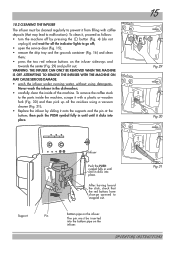
... until until it clicks into place. 15 Fig.29 Fig.30 Support Pin Infuser Push the PUSH symbol fully in the dishwasher; • carefully clean the inside the machine, scrape it out; OPERATING INSTRUCTIONS After having heard the click, check that may lead to snapped out. To remove the ... the infuser in until until it clicks into the bottom pipe on the infuser. 10.2 CLEANING THE INFUSER The infuser must be cleaned regularly to prevent it onto the supports and the pin at the bottom; To clean it, proceed as follows: • turn the machine off ; • open the service door...
... until until it clicks into place. 15 Fig.29 Fig.30 Support Pin Infuser Push the PUSH symbol fully in the dishwasher; • carefully clean the inside the machine, scrape it out; OPERATING INSTRUCTIONS After having heard the click, check that may lead to snapped out. To remove the ... the infuser in until until it clicks into the bottom pipe on the infuser. 10.2 CLEANING THE INFUSER The infuser must be cleaned regularly to prevent it onto the supports and the pin at the bottom; To clean it, proceed as follows: • turn the machine off ; • open the service door...
Owner Manual
Page 17
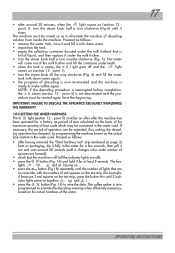
... the maximum quantity of lime scale which may be rinsed so as follows: • remove the water tank, rinse it and fill it with clean water again. • the program of descaling solution from its packaging, dip it under the milk frother) that is off (all the way clockwise... (Fig. 6) and fill the water tank with clean water. • reposition the tank. • empty the collection container (located under the milk frother. • turn the steam knob half a turn the...
... the maximum quantity of lime scale which may be rinsed so as follows: • remove the water tank, rinse it and fill it with clean water again. • the program of descaling solution from its packaging, dip it under the milk frother) that is off (all the way clockwise... (Fig. 6) and fill the water tank with clean water. • reposition the tank. • empty the collection container (located under the milk frother. • turn the steam knob half a turn the...
Owner Manual
Page 19
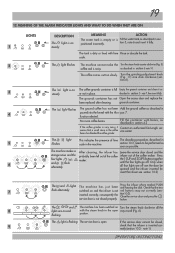
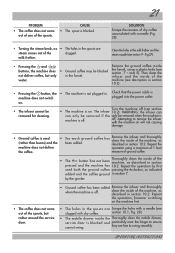
... with beans, as possible. described in the machine. The grounds container has not Open the access door and replace the been replaced after cleaning. No more coffee beans Fill the container with the function selected. The light This indicates the presence of the coffee maker. button. If... Add the ground coffee as described in section 4.2 If the coffee grinder is inserted correctly (section 10.2 - The machine makes a After cleaning, the infuser has Leave the service door closed and the strange noise and the probably been left out of the coffee infuser out of lime...
... with beans, as possible. described in the machine. The grounds container has not Open the access door and replace the been replaced after cleaning. No more coffee beans Fill the container with the function selected. The light This indicates the presence of the coffee maker. button. If... Add the ground coffee as described in section 4.2 If the coffee grinder is inserted correctly (section 10.2 - The machine makes a After cleaning, the infuser has Leave the service door closed and the strange noise and the probably been left out of the coffee infuser out of lime...
Owner Manual
Page 20
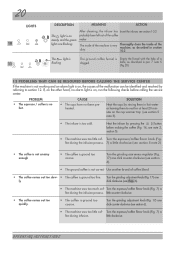
... not working and an alarm light is too cold. Turn the espresso/coffee flavor knob (Fig. 7) a fee during the infusion process. OPERATING INSTRUCTIONS Thoroughly clean the inside of the machine is on, run the following checks before making the coffee (Fig. 14, see section 5 note 3). • The infuser...flavor knob (Fig. Heat the cups by referring to rest for at least 20 minutes on steady and the green lights are flashing. After cleaning, the infuser has Insert the infuser, see section 10.2 probably been left out of the coffee maker The inside of a clogged. Turn the...
... not working and an alarm light is too cold. Turn the espresso/coffee flavor knob (Fig. 7) a fee during the infusion process. OPERATING INSTRUCTIONS Thoroughly clean the inside of the machine is on, run the following checks before making the coffee (Fig. 14, see section 5 note 3). • The infuser...flavor knob (Fig. Heat the cups by referring to rest for at least 20 minutes on steady and the green lights are flashing. After cleaning, the infuser has Insert the infuser, see section 10.2 probably been left out of the coffee maker The inside of a clogged. Turn the...
Owner Manual
Page 21
...operation using a plastic knife (see section 9 - Repeat the operation, however switching on . • The machine is off . milk frother. Clean the holes in the spouts are Scrape the holes with a needle (see description in the spouts are free to remove the infuser with the machine... 10.1, Fig. 28). • The mobile drawer inside of the machine, as indicated added and the coffee ground in . clean the inside the Thoroughly clean the mobile drawer, ser vice door is used both the ground coffee pressing the button, as described in section 10.2. coffee has...
...operation using a plastic knife (see section 9 - Repeat the operation, however switching on . • The machine is off . milk frother. Clean the holes in the spouts are Scrape the holes with a needle (see description in the spouts are free to remove the infuser with the machine... 10.1, Fig. 28). • The mobile drawer inside of the machine, as indicated added and the coffee ground in . clean the inside the Thoroughly clean the mobile drawer, ser vice door is used both the ground coffee pressing the button, as described in section 10.2. coffee has...


