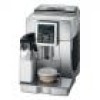
Owner Manual
Page 5
... the milk container 14 Making cappuccino or macchiato 14 Making frothed milk (without coffee 15 Preparing milk (unfrothed and without coffee)..15 Cleaning the milk frother with the CLEAN button 15 Programming the quantity of coffee and milk in the cup for cappuccino or milk 15 HEATING WATER 15 Change the quantity...
... the milk container 14 Making cappuccino or macchiato 14 Making frothed milk (without coffee 15 Preparing milk (unfrothed and without coffee)..15 Cleaning the milk frother with the CLEAN button 15 Programming the quantity of coffee and milk in the cup for cappuccino or milk 15 HEATING WATER 15 Change the quantity...
Owner Manual
Page 6
... cord does not hang over a longer cord. - To disconnect, first turn machine "off", then remove plug from the outlet when not in use and before cleaning. • Do not operate with a polarized alternating current line plug (a plug having one way. If you are available and may result in or tripping over...
... cord does not hang over a longer cord. - To disconnect, first turn machine "off", then remove plug from the outlet when not in use and before cleaning. • Do not operate with a polarized alternating current line plug (a plug having one way. If you are available and may result in or tripping over...
Owner Manual
Page 8
Cleaning brush C3. Hot water spout Description of the accessories (page 2 - Do not use . Please note! • When using the appliance for the first time, you ... the back of the appliance. The appliance delivers water from the spout then goes off heat. "Hot water... Water softener filter (certain models only) C5. CLEAN button Preliminary checks Checking the appliance After removing the packaging, make 4-5 cups of coffee or 4-5 cappuccinos before the appliance starts to an efficiently earthed socket...
Cleaning brush C3. Hot water spout Description of the accessories (page 2 - Do not use . Please note! • When using the appliance for the first time, you ... the back of the appliance. The appliance delivers water from the spout then goes off heat. "Hot water... Water softener filter (certain models only) C5. CLEAN button Preliminary checks Checking the appliance After removing the packaging, make 4-5 cups of coffee or 4-5 cappuccinos before the appliance starts to an efficiently earthed socket...

Owner Manual
Page 13
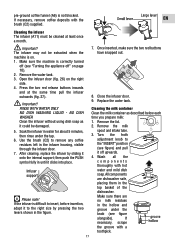
...After delivering the frothed milk, the machine Filling and attaching the milk container 1. Each mark button twice. push as far as described in the section "Cleaning the milk (= more even froth, we recommend using pre-ground coffee lid and hot water nozzle as it downwards (fig. 19). 8. Press the.... • At the end of delivery, to the nozzle and Please note! Fill the milk container with poor froth or large bubbles, always clean the milk Making frothed milk (without coffee) Proceed as preparation proceeds. The warmer the milk (41°F/5°C ideal), the poorer the froth ...
...After delivering the frothed milk, the machine Filling and attaching the milk container 1. Each mark button twice. push as far as described in the section "Cleaning the milk (= more even froth, we recommend using pre-ground coffee lid and hot water nozzle as it downwards (fig. 19). 8. Press the.... • At the end of delivery, to the nozzle and Please note! Fill the milk container with poor froth or large bubbles, always clean the milk Making frothed milk (without coffee) Proceed as preparation proceeds. The warmer the milk (41°F/5°C ideal), the poorer the froth ...
Owner Manual
Page 14
...set by default to wait a few seconds the coffee is active, you want to stop making cappuccino or coffee even if the CLEAN button is displayed, together with the new quantities. Leave the milk container in the cup reaches the 3. The machine is delivered... hot water. delivery 8.5 oz / 250 ml of once. Press the button again until the Program Quantity" is now reprogrammed with the message "Cleaning..." Hold the CAPPUCCINO button until "Hot Water 2. The machine is displayed, then release message "Milk for Cappucc. Press the button (fig. 2)....
...set by default to wait a few seconds the coffee is active, you want to stop making cappuccino or coffee even if the CLEAN button is displayed, together with the new quantities. Leave the milk container in the cup reaches the 3. The machine is delivered... hot water. delivery 8.5 oz / 250 ml of once. Press the button again until the Program Quantity" is now reprogrammed with the message "Cleaning..." Hold the CAPPUCCINO button until "Hot Water 2. The machine is displayed, then release message "Milk for Cappucc. Press the button (fig. 2)....
Owner Manual
Page 15
... the residues with running water. 3. Remove the filter (if present) and rinse with a vacuum cleaner (fig. 24). To clean (with a level indicator (red) Cleaning the pre-ground coffee funnel Check regularly (about once a month ) that the inside of the coffee maker Danger of the components...GROUNDS CONTAINER" is fitted with the machine on): • Remove the drip tray (fig. 22), empty and clean. • Empty the grounds container and clean thoroughly to clean the coffee maker. Important! Empty the drip tray and grounds container and wash them; 3. Important! With De'Longhi...
... the residues with running water. 3. Remove the filter (if present) and rinse with a vacuum cleaner (fig. 24). To clean (with a level indicator (red) Cleaning the pre-ground coffee funnel Check regularly (about once a month ) that the inside of the coffee maker Danger of the components...GROUNDS CONTAINER" is fitted with the machine on): • Remove the drip tray (fig. 22), empty and clean. • Empty the grounds container and clean thoroughly to clean the coffee maker. Important! Empty the drip tray and grounds container and wash them; 3. Important! With De'Longhi...
Owner Manual
Page 16
...may not be damaged. 5. Remove the water tank. 3. Press the two red release buttons inwards and at least once a month. NO DISH WASHER Clean the infuser without using dish soap as described below each time you prepare milk: 1. PUSH 8. Close the infuser door. 9. Remove the milk spout and... If the infuser is not blocked. Once inserted, make sure the two red buttons have snapped out. Replace the water tank. Cleaning the milk container Clean the milk container as it could be extracted when the machine is correctly turned off (see figure alongside). Wash all the components ...
...may not be damaged. 5. Remove the water tank. 3. Press the two red release buttons inwards and at least once a month. NO DISH WASHER Clean the infuser without using dish soap as described below each time you prepare milk: 1. PUSH 8. Close the infuser door. 9. Remove the milk spout and... If the infuser is not blocked. Once inserted, make sure the two red buttons have snapped out. Replace the water tank. Cleaning the milk container Clean the milk container as it could be extracted when the machine is correctly turned off (see figure alongside). Wash all the components ...

Owner Manual
Page 17
... used to a 3.4 oz / 100 ml pack) 7. is displayed. 8. Place the lid back on the display. with a sponge to Avoid contact with clean water. of the water spout. skin and eyes. It is vital to hot water spout. After about 30 minutes, the message "FILL Please note! A ...Pour the descaler into the tank up to "EMPTY GROUNDS froth adjustment knob CONTAINER" under the hot Cleaning the hot w2at5er spout (fig. 4). remove milk residues from the change milk, clean the nozzle to respect the manufacturer's safety It is normal that the intake then empty the drip...
... used to a 3.4 oz / 100 ml pack) 7. is displayed. 8. Place the lid back on the display. with a sponge to Avoid contact with clean water. of the water spout. skin and eyes. It is vital to hot water spout. After about 30 minutes, the message "FILL Please note! A ...Pour the descaler into the tank up to "EMPTY GROUNDS froth adjustment knob CONTAINER" under the hot Cleaning the hot w2at5er spout (fig. 4). remove milk residues from the change milk, clean the nozzle to respect the manufacturer's safety It is normal that the intake then empty the drip...

Owner Manual
Page 20
... • The pre-ground coffee funnel is in operation. INSERT INFUSER ASSEMBLY! • The infuser has not been replaced after cleaning, contact a customer services. section "Cleaning the infuser" (page 17). grinding adjustment knob (fig. 9) one click clockwise towards "7" while the coffee mill is clogged. ...A14) is not completely full. alternating with... • The grinding is too fine and the coffee is not correctly in the section "Cleaning and maintenance" (page 16). INSERT TANK • The tank is • Repeat coffee delivery and turn the delivered too slowly or not...
... • The pre-ground coffee funnel is in operation. INSERT INFUSER ASSEMBLY! • The infuser has not been replaced after cleaning, contact a customer services. section "Cleaning the infuser" (page 17). grinding adjustment knob (fig. 9) one click clockwise towards "7" while the coffee mill is clogged. ...A14) is not completely full. alternating with... • The grinding is too fine and the coffee is not correctly in the section "Cleaning and maintenance" (page 16). INSERT TANK • The tank is • Repeat coffee delivery and turn the delivered too slowly or not...
Owner Manual
Page 21
... infuser by rinsing them with a toothpick (fig. 25B). too slowly or a drop at a time until coffee delivery is dirty. • Clean the milk container lid as described in operation (fig. 9). The milk does not come out of the possible malfunctions. appears on page 13).... coffee is unsuitable. • Use pre-ground coffee for espresso coffee makers The coffee is delivered • The coffee is in the section "Cleaning the milk container" . 22 Continue one click at a time. • Turn the grinding adjustment knob one click anticlockwise towards "7" while the coffee...
... infuser by rinsing them with a toothpick (fig. 25B). too slowly or a drop at a time until coffee delivery is dirty. • Clean the milk container lid as described in operation (fig. 9). The milk does not come out of the possible malfunctions. appears on page 13).... coffee is unsuitable. • Use pre-ground coffee for espresso coffee makers The coffee is delivered • The coffee is in the section "Cleaning the milk container" . 22 Continue one click at a time. • Turn the grinding adjustment knob one click anticlockwise towards "7" while the coffee...

Owner Manual
Page 22
The appliance does not • come on. • It is dirty • Clean the nozzle as described in the section "Cleaning the milk container" (page 17). • We recommend using skim or 2% milk at refrigerator temperature (about 41°F/5°C). section on . • Plug into ...or contains large bubbles and squirts out of milk. • The froth adjustment knob is not semi-skimmed. • Clean the milk container lid and knob as described in the section "Cleaning the hot water/steam nozzle". If the result is not as you wished, try changing brand of the milk spout...
The appliance does not • come on. • It is dirty • Clean the nozzle as described in the section "Cleaning the milk container" (page 17). • We recommend using skim or 2% milk at refrigerator temperature (about 41°F/5°C). section on . • Plug into ...or contains large bubbles and squirts out of milk. • The froth adjustment knob is not semi-skimmed. • Clean the milk container lid and knob as described in the section "Cleaning the hot water/steam nozzle". If the result is not as you wished, try changing brand of the milk spout...


