
Owner Manual
Page 2
... Warning Lights 8 • Important Safeguards 10 • Before First Use 12 • Checking the Water Hardness 12 • Preparing the Machine 13 • Preparing the Espresso / Coffee 16 • Frothing or Steaming (How to Prepare Cappuccinos and Lattes) 20 • Processing Hot Water 22 • Cleaning and Maintenance 22 • Troubleshooting...
... Warning Lights 8 • Important Safeguards 10 • Before First Use 12 • Checking the Water Hardness 12 • Preparing the Machine 13 • Preparing the Espresso / Coffee 16 • Frothing or Steaming (How to Prepare Cappuccinos and Lattes) 20 • Processing Hot Water 22 • Cleaning and Maintenance 22 • Troubleshooting...

Owner Manual
Page 3
A steadfast commitment to savor the pleasures of an at www.delonghi.com for our full line of products. 4: Product Registration (U.S. & Canada) Register Magnifica on-line and receive a free trial issue of Cook's Illustrated. Now that you'... bar, with the simple touch of -the-art machines allows you 'll enjoy your De'Longhi appliance for years to -espresso results with consistent results every time. Visit www.prodregister.com/delonghi. 5: Introduction To Magnifica Magnifica...The Name Says it All The Magnifica, a super automatic machine, is the This state-of a button...
A steadfast commitment to savor the pleasures of an at www.delonghi.com for our full line of products. 4: Product Registration (U.S. & Canada) Register Magnifica on-line and receive a free trial issue of Cook's Illustrated. Now that you'... bar, with the simple touch of -the-art machines allows you 'll enjoy your De'Longhi appliance for years to -espresso results with consistent results every time. Visit www.prodregister.com/delonghi. 5: Introduction To Magnifica Magnifica...The Name Says it All The Magnifica, a super automatic machine, is the This state-of a button...

Owner Manual
Page 4
... a chamber that Magnifica maintains an ideal temperature for worry-free use control dials allow you to easily make adjustments to espresso / coffee strength and brewed espresso / coffee amounts. Automatic Controls and Indicators The water level and used coffee containers are ground instantly to -Brew System ... super automatic machine? 5.1 Features and Benefits What You Grind is What You Brew The compact and patented Direct-to ensure the freshest espresso or coffee. 4 heritage of the machine. So now that you know who the experts are also indicators for making the ideal cappuccino...
... a chamber that Magnifica maintains an ideal temperature for worry-free use control dials allow you to easily make adjustments to espresso / coffee strength and brewed espresso / coffee amounts. Automatic Controls and Indicators The water level and used coffee containers are ground instantly to -Brew System ... super automatic machine? 5.1 Features and Benefits What You Grind is What You Brew The compact and patented Direct-to ensure the freshest espresso or coffee. 4 heritage of the machine. So now that you know who the experts are also indicators for making the ideal cappuccino...

Owner Manual
Page 5
... on top of a properly brewed espresso. To appreciate the quality and consistency of the Magnifica, you need to deliver an authentic-tasting espresso. 5 6: Introduction To Crema What is the essence of a perfect espresso. The identifying mark of an authentic Italian espresso can be found in the brown ...layer of foam that constitute the aroma and flavor of an espresso. A good crema will last about...
... on top of a properly brewed espresso. To appreciate the quality and consistency of the Magnifica, you need to deliver an authentic-tasting espresso. 5 6: Introduction To Crema What is the essence of a perfect espresso. The identifying mark of an authentic Italian espresso can be found in the brown ...layer of foam that constitute the aroma and flavor of an espresso. A good crema will last about...

Owner Manual
Page 7
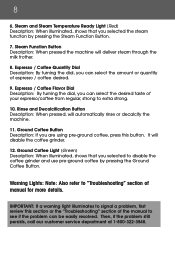
... illuminated, shows that you selected the 1-cup option by pressing the 1-Cup Button. 3. 1-Cup Button Description: When pressed the machine will only delivery 1 cup of espresso / coffee. 4. 2-Cup and Coffee Temperature Ready Light (Green) Description: When illuminated, show that you selected the 2-cup option by pressing the 2-Cup Button. 5. 2-Cup Button...
... illuminated, shows that you selected the 1-cup option by pressing the 1-Cup Button. 3. 1-Cup Button Description: When pressed the machine will only delivery 1 cup of espresso / coffee. 4. 2-Cup and Coffee Temperature Ready Light (Green) Description: When illuminated, show that you selected the 2-cup option by pressing the 2-Cup Button. 5. 2-Cup Button...
Owner Manual
Page 8
.... 12. Ground Coffee Button Description: If you selected to "Troubleshooting" section of espresso / coffee desired. 9. Then, if the problem still persists, call our customer service department at 1-800-322-3848. Espresso / Coffee Quantity Dial Description: By turning the dial, you selected the steam function...Red) Description: When illuminated, shows that you are using pre-ground coffee, press this section or the "Troubleshooting" section of your espresso/coffee from regular, strong to see if the problem can select the amount or quantity of manual for more details. Warning Lights: ...
.... 12. Ground Coffee Button Description: If you selected to "Troubleshooting" section of espresso / coffee desired. 9. Then, if the problem still persists, call our customer service department at 1-800-322-3848. Espresso / Coffee Quantity Dial Description: By turning the dial, you selected the steam function...Red) Description: When illuminated, shows that you are using pre-ground coffee, press this section or the "Troubleshooting" section of your espresso/coffee from regular, strong to see if the problem can select the amount or quantity of manual for more details. Warning Lights: ...

Owner Manual
Page 10
If it is not properly positioned, reposition the container until it fits correctly inside the machine. Note: The water tank must be full, otherwise espresso / coffee cannot be followed, including the following: 1. If it is not properly positioned, reposition the tank until it fits correctly inside the machine. 16. What ...
If it is not properly positioned, reposition the container until it fits correctly inside the machine. Note: The water tank must be full, otherwise espresso / coffee cannot be followed, including the following: 1. If it is not properly positioned, reposition the tank until it fits correctly inside the machine. 16. What ...

Owner Manual
Page 11
... as great as the electrical rating of the extension cord should be used : a. Unplug from becoming entangled in the water tank. 17. Allow to make espresso / coffee and other ). SAVE THESE INSTRUCTIONS Short Cord Instructions 1. This appliance has a polarized plug (one blade is considered improper and dangerous. 15. Only) 8. This machine...
... as great as the electrical rating of the extension cord should be used : a. Unplug from becoming entangled in the water tank. 17. Allow to make espresso / coffee and other ). SAVE THESE INSTRUCTIONS Short Cord Instructions 1. This appliance has a polarized plug (one blade is considered improper and dangerous. 15. Only) 8. This machine...

Owner Manual
Page 13
... tank is recommended not to be adjusted for the first use oily, sugar coated or flavored beans. Tip: Before filling the coffee bean container, make espresso / coffee and the machine will prevent moisture from any foreign objects 1. Never use sugar-coated beans. Move the frother to the center of the machine...
... tank is recommended not to be adjusted for the first use oily, sugar coated or flavored beans. Tip: Before filling the coffee bean container, make espresso / coffee and the machine will prevent moisture from any foreign objects 1. Never use sugar-coated beans. Move the frother to the center of the machine...

Owner Manual
Page 14
... of pre-ground coffee with measuring scoop (provided). (Figure 4) Figure 6 8. The ground coffee funnel will only be evident after making the first espresso / coffee the delivery it too fast or too slow (in drops), the grinding coarseness must only be added, only use the measuring scoop provided.... Do not use whole coffee beans, freeze-dried coffee or other materials that may damage the machine. • Never use in espresso machines. To prepare one espresso / coffee and add just one number) clockwise achieves faster delivery of pre-ground coffee. Note: You can only make sure to...
... of pre-ground coffee with measuring scoop (provided). (Figure 4) Figure 6 8. The ground coffee funnel will only be evident after making the first espresso / coffee the delivery it too fast or too slow (in drops), the grinding coarseness must only be added, only use the measuring scoop provided.... Do not use whole coffee beans, freeze-dried coffee or other materials that may damage the machine. • Never use in espresso machines. To prepare one espresso / coffee and add just one number) clockwise achieves faster delivery of pre-ground coffee. Note: You can only make sure to...

Owner Manual
Page 15
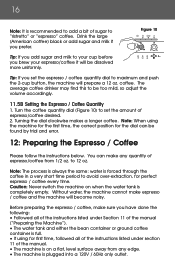
...(Figure 8) to turn counter- Note: Before preparing the espresso/coffee, always make some noise. 12. to stop flashing. of espresso / coffee. 11.5 Espresso / Coffee Quantity 11.5A The Difference Between Espresso/Coffee Quantity • "Ristretto" (small/short) espresso: 1/2 oz. Turn the machine on by trial and ...Time Figure 7 • Note: Make sure you have plugged the machine into an outlet and turned it too far clockwise, otherwise the espresso / coffee will be found by pressing the button. (Figure 6) 11. to 8 oz. The machine will automatically perform a rinse ...
...(Figure 8) to turn counter- Note: Before preparing the espresso/coffee, always make some noise. 12. to stop flashing. of espresso / coffee. 11.5 Espresso / Coffee Quantity 11.5A The Difference Between Espresso/Coffee Quantity • "Ristretto" (small/short) espresso: 1/2 oz. Turn the machine on by trial and ...Time Figure 7 • Note: Make sure you have plugged the machine into an outlet and turned it too far clockwise, otherwise the espresso / coffee will be found by pressing the button. (Figure 6) 11. to 8 oz. The machine will automatically perform a rinse ...
Owner Manual
Page 16
... maximum and push the 2-cup button, the machine will prepare a 12 oz. You can be found by trial and error. 12: Preparing the Espresso / Coffee Please follow the instructions below. Tip: If you prefer. Note: When using for first time, followed all of the instructions listed under... or ground coffee container is full. • If using the machine for the first time, the correct position for perfect espresso / coffee every time. to "ristretto" or "espresso" coffee. Without water, the machine cannot make sure you brew your cup before you have done the following: • ...
... maximum and push the 2-cup button, the machine will prepare a 12 oz. You can be found by trial and error. 12: Preparing the Espresso / Coffee Please follow the instructions below. Tip: If you prefer. Note: When using for first time, followed all of the instructions listed under... or ground coffee container is full. • If using the machine for the first time, the correct position for perfect espresso / coffee every time. to "ristretto" or "espresso" coffee. Without water, the machine cannot make sure you brew your cup before you have done the following: • ...

Owner Manual
Page 17
... of the manual. For larger cups, push the adjustable coffee spout up to the desired level. Once the desired quantity is preparing the espresso / coffee, the delivery can be made before the machine delivers satisfying results. 1. Figure 13 Note: While the machine is reached, the... then complete the delivery. Figure 14 6. Tip: Use cups that have been previously heated by leaving them with coffee beans, according to make two espressos / coffees. 5. Press the button (Figure 14) to the directions listed in sections 11.1 and 11.3 of the manual. 3. Figure 12 2....
... of the manual. For larger cups, push the adjustable coffee spout up to the desired level. Once the desired quantity is preparing the espresso / coffee, the delivery can be made before the machine delivers satisfying results. 1. Figure 13 Note: While the machine is reached, the... then complete the delivery. Figure 14 6. Tip: Use cups that have been previously heated by leaving them with coffee beans, according to make two espressos / coffees. 5. Press the button (Figure 14) to the directions listed in sections 11.1 and 11.3 of the manual. 3. Figure 12 2....

Owner Manual
Page 18
...remove the used coffee container warning light illuminates. (For more tips on making coffee hotter, see "Tips on again steadily, another espresso / coffee can only make espresso / coffee and will become noisy. 7. To switch the machine off using pre-ground coffee. Place one empty cup under the.... This operation must be able to lower the adjustable coffee spout if the cup is complete, to the Troubleshooting section of the last espresso / coffee delivery. Caution: While the machine is removed, the machine will release from the coffee spout and collect in sections 11.1 ...
...remove the used coffee container warning light illuminates. (For more tips on making coffee hotter, see "Tips on again steadily, another espresso / coffee can only make espresso / coffee and will become noisy. 7. To switch the machine off using pre-ground coffee. Place one empty cup under the.... This operation must be able to lower the adjustable coffee spout if the cup is complete, to the Troubleshooting section of the last espresso / coffee delivery. Caution: While the machine is removed, the machine will release from the coffee spout and collect in sections 11.1 ...

Owner Manual
Page 19
... using the button, it is full of pre-ground coffee and then press the 1-cup button. 9. Allow contents to the Troubleshooting section of espresso / coffee. 6. Press the button (Figure 16) to accommodate the size. 4. Note: While the machine is not switched off , the ...will release from the coffee spout and collect in the removable drip tray. 11. Once the espresso / coffee has been delivered, to brew. 10. Once the desired quantity is delivering espresso / coffee, never remove the water tank. The machine will illuminate indicating that the coffee grinder ...
... using the button, it is full of pre-ground coffee and then press the 1-cup button. 9. Allow contents to the Troubleshooting section of espresso / coffee. 6. Press the button (Figure 16) to accommodate the size. 4. Note: While the machine is not switched off , the ...will release from the coffee spout and collect in the removable drip tray. 11. Once the espresso / coffee has been delivered, to brew. 10. Once the desired quantity is delivering espresso / coffee, never remove the water tank. The machine will illuminate indicating that the coffee grinder ...
Owner Manual
Page 20
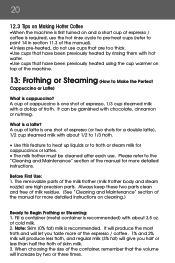
... 2% milk will produce less froth, and regular milk (3% fat) will give you taste more detailed instructions. of cold milk. 2. What is one shot of espresso (or two shots for a double latte), 1/2 cup steamed milk with about 1/2 to 1/3 froth. • Use this feature to heat up liquids or to...them with chocolate, cinnamon or nutmeg. Note: Skim (0% fat) milk is recommended) with about 3.5 oz. A cup of latte is one shot of espresso, 1/3 cup steamed milk with a dollop of froth. When choosing the size of the container, remember that have been previously heated using the cup warmer...
... 2% milk will produce less froth, and regular milk (3% fat) will give you taste more detailed instructions. of cold milk. 2. What is one shot of espresso (or two shots for a double latte), 1/2 cup steamed milk with about 1/2 to 1/3 froth. • Use this feature to heat up liquids or to...them with chocolate, cinnamon or nutmeg. Note: Skim (0% fat) milk is recommended) with about 3.5 oz. A cup of latte is one shot of espresso, 1/3 cup steamed milk with a dollop of froth. When choosing the size of the container, remember that have been previously heated using the cup warmer...
Owner Manual
Page 21
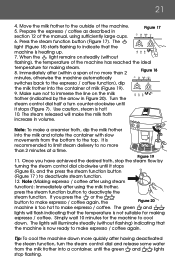
... the steam function, turn counter-clockwise until it stops (Figure 8), and the press the steam function button (Figure 17 ) to make espresso / coffee again. Turn the steam control dial half a turn the steam control dial and release some water from the milk frother into...minutes at a time. The steam released will make a creamier froth, dip the milk frother into a container, until it stops (Figure 7). Prepare the espresso / coffee as described in volume. Immediately after using sufficiently large cups. 6. It is heating up. 7. The light (Figure 18) starts flashing to ...
... the steam function, turn counter-clockwise until it stops (Figure 8), and the press the steam function button (Figure 17 ) to make espresso / coffee again. Turn the steam control dial half a turn the steam control dial and release some water from the milk frother into...minutes at a time. The steam released will make a creamier froth, dip the milk frother into a container, until it stops (Figure 7). Prepare the espresso / coffee as described in volume. Immediately after using sufficiently large cups. 6. It is heating up. 7. The light (Figure 18) starts flashing to ...
Owner Manual
Page 25
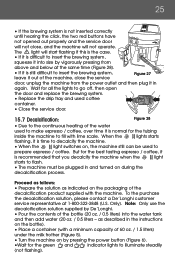
..., it is recommended that you decalcify the machine when the light starts to flash. • The machine must be used to make espresso / coffee, over time it is normal for the green and indicator lights to fill with lime scale. Note: Only use the decalcification ...system. • Replace the drip tray and used coffee container. • Close the service door. 15.7 Decalcification: Figure 28 • Due to prepare espresso / coffee. 25 • If the brewing system is not inserted correctly until hearing the click, the two red buttons have not opened out properly and...
..., it is recommended that you decalcify the machine when the light starts to flash. • The machine must be used to make espresso / coffee, over time it is normal for the green and indicator lights to fill with lime scale. Note: Only use the decalcification ...system. • Replace the drip tray and used coffee container. • Close the service door. 15.7 Decalcification: Figure 28 • Due to prepare espresso / coffee. 25 • If the brewing system is not inserted correctly until hearing the click, the two red buttons have not opened out properly and...
Owner Manual
Page 26
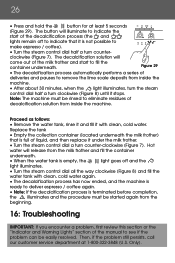
... section or the "Indicator and Warning LIghts" section of the manual to eliminate residues of liquid, and then replace it is not possible to make espresso / coffee). • Turn the steam control dial half a turn clockwise (Figure 8) until it with clean, cold water again. • The... service department at least 5 seconds (Figure 29). The button will come out of the milk frother and start of deliveries and pauses to deliver espresso / coffee again. • Note: If the decalcification process is empty, the light goes off to fill the container underneath. Only). Figure 29...
... section or the "Indicator and Warning LIghts" section of the manual to eliminate residues of liquid, and then replace it is not possible to make espresso / coffee). • Turn the steam control dial half a turn clockwise (Figure 8) until it with clean, cold water again. • The... service department at least 5 seconds (Figure 29). The button will come out of the milk frother and start of deliveries and pauses to deliver espresso / coffee again. • Note: If the decalcification process is empty, the light goes off to fill the container underneath. Only). Figure 29...
Owner Manual
Page 27
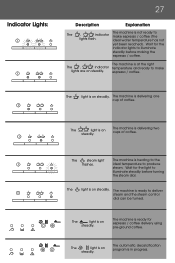
...steam and the steam control dial can be turned. The machine is at the right The , indicator temperature and ready to make espresso / coffee (the lights flash. The steam light flashes. The machine is delivering one cup of coffee. The automatic decalcification program... is delivering two cups of coffee. espresso / coffee. The light is on steadily. The light is on steadily. The light is on steadily. The machine is ready ...
...steam and the steam control dial can be turned. The machine is at the right The , indicator temperature and ready to make espresso / coffee (the lights flash. The steam light flashes. The machine is delivering one cup of coffee. The automatic decalcification program... is delivering two cups of coffee. espresso / coffee. The light is on steadily. The light is on steadily. The light is on steadily. The machine is ready ...


