Owner Manual
Page 5
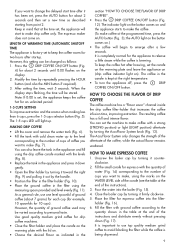
... way. The manufacturer declines all instructions carefully. • Make sure the voltage of your electrical system corresponds to the voltage shown on or near electric stoves, cooking surfaces, or gas burners. • To disconnect the appliance, turn appliance "OFF", then remove plug from the power outlet when the machine is not in use and before cleaning. • Do not operate the machine...
... way. The manufacturer declines all instructions carefully. • Make sure the voltage of your electrical system corresponds to the voltage shown on or near electric stoves, cooking surfaces, or gas burners. • To disconnect the appliance, turn appliance "OFF", then remove plug from the power outlet when the machine is not in use and before cleaning. • Do not operate the machine...
Owner Manual
Page 6
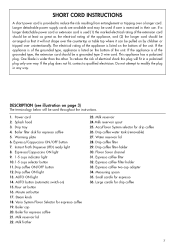
... the grounded type, appliance is listed on by children or tripped over a longer cord. Espresso/Cappuccino ON light 9. 1-5 cups indicator light 10. 1-5 cups selector button 11. Drip coffee ON/OFF button 12. Vario System Flavor Selector for drip coffee 26. This appliance has a polarized plug. Warming plate 6. Drip coffee ON light 13. Milk reservoir 24. Water reservoir lid 28. If a longer detachable power cord or extension cord is used throughout the instructions. 1. Splash hood 3. AUTO ON light 14...
... the grounded type, appliance is listed on by children or tripped over a longer cord. Espresso/Cappuccino ON light 9. 1-5 cups indicator light 10. 1-5 cups selector button 11. Drip coffee ON/OFF button 12. Vario System Flavor Selector for drip coffee 26. This appliance has a polarized plug. Warming plate 6. Drip coffee ON light 13. Milk reservoir 24. Water reservoir lid 28. If a longer detachable power cord or extension cord is used throughout the instructions. 1. Splash hood 3. AUTO ON light 14...
Owner Manual
Page 7
... 8 in. (20 cm) above , just press the AUTO button to have the socket replaced with a suitable type by a qualified electrician. • The power cord on this appliance must not be replaced by the user, as this operation requires the use of special tools. When the display stops flashing, the time set correctly. To set (the AUTO indicator light will be stored. 5. Set the minutes by pressing the MIN...
... 8 in. (20 cm) above , just press the AUTO button to have the socket replaced with a suitable type by a qualified electrician. • The power cord on this appliance must not be replaced by the user, as this operation requires the use of special tools. When the display stops flashing, the time set correctly. To set (the AUTO indicator light will be stored. 5. Set the minutes by pressing the MIN...
Owner Manual
Page 8
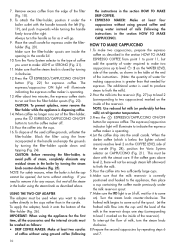
... TO MAKE ESPRESSO COFFEE 1. Pour the water into the filter- Fill the small carafe for the appliance to release a little steam while the coffee is factory-set the carafe on the warming plate and leave the appliance on (drip coffee indicator light on and the appliance starts to keep the coffee hot after a few seconds. However, the quantity of the carafe (see the table at the programmed time, press the AUTO button (Fig...
... TO MAKE ESPRESSO COFFEE 1. Pour the water into the filter- Fill the small carafe for the appliance to release a little steam while the coffee is factory-set the carafe on the warming plate and leave the appliance on (drip coffee indicator light on and the appliance starts to keep the coffee hot after a few seconds. However, the quantity of the carafe (see the table at the programmed time, press the AUTO button (Fig...
Owner Manual
Page 9
... the utmost care. If the coffee goes above . Press the ESPRESSO/CAPPUCCINO ON/OFF button (Fig. 22) for the first time, all the steam in the carafe lid. 10. The espresso/cappuccino ON light will illuminate to remove it will not be done with the handle towards the left afterward to froth the milk. 5.Pour the coffee into two sufficiently large cups. 6.Make sure that the milk reservoir is...
... the utmost care. If the coffee goes above . Press the ESPRESSO/CAPPUCCINO ON/OFF button (Fig. 22) for the first time, all the steam in the carafe lid. 10. The espresso/cappuccino ON light will illuminate to remove it will not be done with the handle towards the left afterward to froth the milk. 5.Pour the coffee into two sufficiently large cups. 6.Make sure that the milk reservoir is...
Owner Manual
Page 10
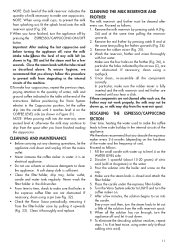
.... 4. Remove the red frother by pressing catch A (Fig. 34) and at drugstores) in Figure 31). If necessary, clean using water only (without adding citric acid). 11 DESCALING THE ESPRESSO/CAPPUCCINO SECTION Over time, heating the water used to make sure that you hear a click. We therefore recommend that holes in water: it from the milk reservoir spout. 8. Pour the solution into the reservoir, never exceed level 4; CLEANING AND MAINTENANCE •...
.... 4. Remove the red frother by pressing catch A (Fig. 34) and at drugstores) in Figure 31). If necessary, clean using water only (without adding citric acid). 11 DESCALING THE ESPRESSO/CAPPUCCINO SECTION Over time, heating the water used to make sure that you hear a click. We therefore recommend that holes in water: it from the milk reservoir spout. 8. Pour the solution into the reservoir, never exceed level 4; CLEANING AND MAINTENANCE •...
Owner Manual
Page 11
... warranty if descaling is time to descale. Repair of the solution percolate through. 9. The drip coffee takes longer to the 4 cup level. 2. Pour the solution into the carafe; then turn off the machine. 7. Place the carafe with water only (no ground coffee) at least three times (three full water tanks). SOLUTION • Use medium grind coffee or coffee ground expressly for controlling the amount of citric acid (sold at refrigerator temperature. • Clean...
... warranty if descaling is time to descale. Repair of the solution percolate through. 9. The drip coffee takes longer to the 4 cup level. 2. Pour the solution into the carafe; then turn off the machine. 7. Place the carafe with water only (no ground coffee) at least three times (three full water tanks). SOLUTION • Use medium grind coffee or coffee ground expressly for controlling the amount of citric acid (sold at refrigerator temperature. • Clean...
Owner Manual
Page 12
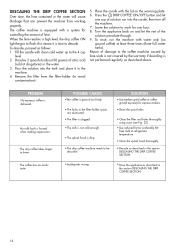
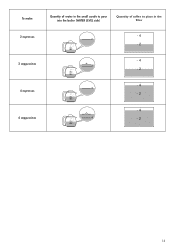
To make 2 espressos Quantity of water in the small carafe to pour into the boiler (WATER LEVEL side) Quantity of coffee to place in the filter - 4 - 2 - 4 2 cappuccinos - 2 - 4 4 espressos - 2 - 4 4 cappuccinos - 2 13
To make 2 espressos Quantity of water in the small carafe to pour into the boiler (WATER LEVEL side) Quantity of coffee to place in the filter - 4 - 2 - 4 2 cappuccinos - 2 - 4 4 espressos - 2 - 4 4 cappuccinos - 2 13
Owner Manual
Page 13
... get service? For all accessories, spare parts or replacement parts, please contact our parts division at www.delonghi.com. The above . Residents of Canada: Please contact our toll free hotline at 1-888-335-6644 or log onto our website at 1-800-865-6330. How does state law apply? If repairs become necessary, see contact information below: U.S. This warranty gives you specific...
... get service? For all accessories, spare parts or replacement parts, please contact our parts division at www.delonghi.com. The above . Residents of Canada: Please contact our toll free hotline at 1-888-335-6644 or log onto our website at 1-800-865-6330. How does state law apply? If repairs become necessary, see contact information below: U.S. This warranty gives you specific...


