Product Manual
Page 2
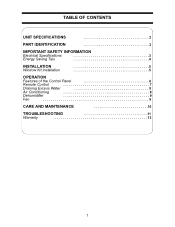
TABLE OF CONTENTS UNIT SPECIFICATIONS 2 PART IDENTIFICATION 3 IMPORTANT SAFETY INFORMATION Electrical Specifications 3 Energy Saving Tips 4 INSTALLATION Window Kit Installation 5 5 OPERATION Features of the Control Panel 6 Remote Control 7 Draining Excess Water 8 Air Conditioning 8 Dehumidifier 9 Fan 9 CARE AND MAINTENANCE 10 TROUBLESHOOTING 11 Warranty 12 1
TABLE OF CONTENTS UNIT SPECIFICATIONS 2 PART IDENTIFICATION 3 IMPORTANT SAFETY INFORMATION Electrical Specifications 3 Energy Saving Tips 4 INSTALLATION Window Kit Installation 5 5 OPERATION Features of the Control Panel 6 Remote Control 7 Draining Excess Water 8 Air Conditioning 8 Dehumidifier 9 Fan 9 CARE AND MAINTENANCE 10 TROUBLESHOOTING 11 Warranty 12 1
Product Manual
Page 4
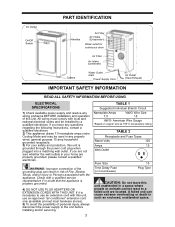
... CORDS WITH THIS UNIT. PART IDENTIFICATION Air Outlet On/Off Switch Handles Air Filter Air Intake (Evaporator) Water outlet for continuous drain Air Filter Air Intake (condenser) Castors Water Outlet drain Power Supply Cord Air Outlet (Heat Exhaust) IMPORTANT SAFETY INFORMATION READ ALL SAFETY INFORMATION BEFORE USING ELECTRICAL SPECIFICATIONS 1) Check available power...
... CORDS WITH THIS UNIT. PART IDENTIFICATION Air Outlet On/Off Switch Handles Air Filter Air Intake (Evaporator) Water outlet for continuous drain Air Filter Air Intake (condenser) Castors Water Outlet drain Power Supply Cord Air Outlet (Heat Exhaust) IMPORTANT SAFETY INFORMATION READ ALL SAFETY INFORMATION BEFORE USING ELECTRICAL SPECIFICATIONS 1) Check available power...
Product Manual
Page 9
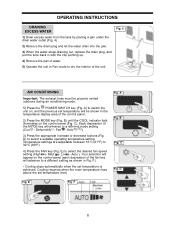
... stops automatically when the set temperature level. F 8 OPERATING INSTRUCTIONS DRAINING EXCESS WATER 1) Drain excess water from the tank by placing a pan under the drain water outlet (Fig. 4) 2) Remove the drain plug and let the water drain into the pan. 3) When the water stops draining out, replace the drain plug, and put the tube back in with the...
... stops automatically when the set temperature level. F 8 OPERATING INSTRUCTIONS DRAINING EXCESS WATER 1) Drain excess water from the tank by placing a pan under the drain water outlet (Fig. 4) 2) Remove the drain plug and let the water drain into the pan. 3) When the water stops draining out, replace the drain plug, and put the tube back in with the...
Product Manual
Page 10
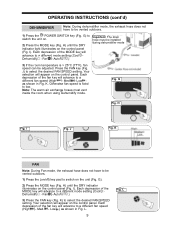
... (cont'd) DEHUMIDIFIER Note: During dehumidifier mode, the exhaust hose does not have to be vented outdoors. 1) Press the POWER SWITCH key (Fig. I). Auto ) Important: The drain hose must vent inside the room when using Dehumidify mode.
... (cont'd) DEHUMIDIFIER Note: During dehumidifier mode, the exhaust hose does not have to be vented outdoors. 1) Press the POWER SWITCH key (Fig. I). Auto ) Important: The drain hose must vent inside the room when using Dehumidify mode.

Product Manual
Page 12
...in properly • The full-tank indicator is minor, and a service call an authorized service depot or Danby's Toll Free Number for a possible solution. setting • Remove drain plug on LCDI plug SOLUTION • Wait for power to operate improperly, call may occur that is ON... Temperature setting is too high • The tank is nearly full • Reset the temperature level • Reset the timer • Remove drain water from room • Clean air intake grill • Replace the filter • Lower temp. TROUBLESHOOTING Occasionally, a problem may not be ...
...in properly • The full-tank indicator is minor, and a service call an authorized service depot or Danby's Toll Free Number for a possible solution. setting • Remove drain plug on LCDI plug SOLUTION • Wait for power to operate improperly, call may occur that is ON... Temperature setting is too high • The tank is nearly full • Reset the temperature level • Reset the timer • Remove drain water from room • Clean air intake grill • Replace the filter • Lower temp. TROUBLESHOOTING Occasionally, a problem may not be ...


