Product Manual
Page 3
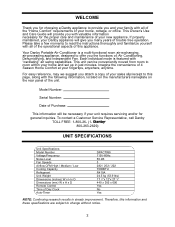
... slip/receipt to this page, along with all of the operational aspects of Day Clock Auto-Timer DPAC7099 115V-60Hz 50 dB 3 282 / 252 / 222 7000BTU R410A 24.5 kg (53.9 lbs)... familiarize yourself with "oscillating" air swing capabilities. WELCOME Thank you for choosing a Danby appliance to provide you and your family with the following information, located on the...2629) UNIT SPECIFICATIONS Unit Specifications Model Number Voltage/Frequency Noise Level Fan Speeds Airflow CFM High / Medium / Low Cooling Capacity Refrigerant Unit Weight Dimensions (inches) W x H x D Dimensions (mm) W x H x D ...
... slip/receipt to this page, along with all of the operational aspects of Day Clock Auto-Timer DPAC7099 115V-60Hz 50 dB 3 282 / 252 / 222 7000BTU R410A 24.5 kg (53.9 lbs)... familiarize yourself with "oscillating" air swing capabilities. WELCOME Thank you for choosing a Danby appliance to provide you and your family with the following information, located on the...2629) UNIT SPECIFICATIONS Unit Specifications Model Number Voltage/Frequency Noise Level Fan Speeds Airflow CFM High / Medium / Low Cooling Capacity Refrigerant Unit Weight Dimensions (inches) W x H x D Dimensions (mm) W x H x D ...
Product Manual
Page 4
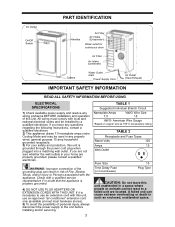
If you have any questions regarding the following instructions, contact a qualified electrician. 2) This appliance draws 7.0 nameplate amps under Cooling Mode and may be installed by a qualified electrician. Check with local and national electrical codes and be used in any wiring problems BEFORE installation and ...
If you have any questions regarding the following instructions, contact a qualified electrician. 2) This appliance draws 7.0 nameplate amps under Cooling Mode and may be installed by a qualified electrician. Check with local and national electrical codes and be used in any wiring problems BEFORE installation and ...
Product Manual
Page 5
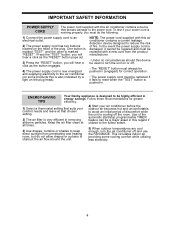
...of the automatic start/stop programmable TIMER feature can be a major asset in this regard if utilized to the fullest extent. 5) When outdoor temperatures are cool enough, turn the unit on or off. • The "RESET" button must be replaced with a new cord from penetrating and heating room, but...utilizing less electricity. 4 you will hear a click as the "RESET" button pops out. 3) Press the "RESET" button; ENERGY-SAVING TIPS Your Danby appliance is also indicated by a light on the plug head). One button is marked "TEST", and the other is pushed in removing airborne particles....
...of the automatic start/stop programmable TIMER feature can be a major asset in this regard if utilized to the fullest extent. 5) When outdoor temperatures are cool enough, turn the unit on or off. • The "RESET" button must be replaced with a new cord from penetrating and heating room, but...utilizing less electricity. 4 you will hear a click as the "RESET" button pops out. 3) Press the "RESET" button; ENERGY-SAVING TIPS Your Danby appliance is also indicated by a light on the plug head). One button is marked "TEST", and the other is pushed in removing airborne particles....
Product Manual
Page 7
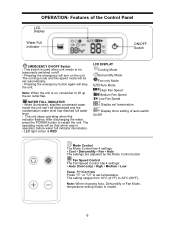
...176;F). The operating mode will be that which was in operation before water full indicator illumination. • LED light colour is RED LCD DISPLAY Cooling Mode Dehumidify Mode Fan only Mode Auto Mode High Fan Speed Medium Fan Speed Low Fan Speed Display set temperature Display timer setting of the...used when unit needs to lift up the air outlet flap. Features of auto switch On/Off Mode Control The Mode Control has 4 settings: • Cool • Dehumidify • Fan • Auto The settings are adjusted by the Mode Control button Fan Speed Control The Fan Speed Control has 4 ...
...176;F). The operating mode will be that which was in operation before water full indicator illumination. • LED light colour is RED LCD DISPLAY Cooling Mode Dehumidify Mode Fan only Mode Auto Mode High Fan Speed Medium Fan Speed Low Fan Speed Display set temperature Display timer setting of the...used when unit needs to lift up the air outlet flap. Features of auto switch On/Off Mode Control The Mode Control has 4 settings: • Cool • Dehumidify • Fan • Auto The settings are adjusted by the Mode Control button Fan Speed Control The Fan Speed Control has 4 ...
Product Manual
Page 8
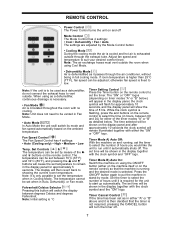
... or "B" above and it is required for either the "ON" or "OFF" logo. Fan Speed Control The Fan Speed Control has 4 settings: • Auto (Cooling only) • High • Medium • Low Temp. Timer Mode A) Auto Off: With the machine on the remote control to start up automatically. Timer Mode... B) Auto On: Switch the machine on using Cool Mode. • Dehumidify Mode Air is dehumidified as a dehumidifier, do not connect the exhaust hose to run until it is then decided that the...
... or "B" above and it is required for either the "ON" or "OFF" logo. Fan Speed Control The Fan Speed Control has 4 settings: • Auto (Cooling only) • High • Medium • Low Temp. Timer Mode A) Auto Off: With the machine on the remote control to start up automatically. Timer Mode... B) Auto On: Switch the machine on using Cool Mode. • Dehumidify Mode Air is dehumidified as a dehumidifier, do not connect the exhaust hose to run until it is then decided that the...
Product Manual
Page 9
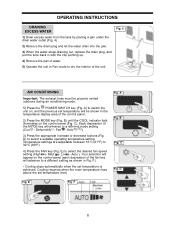
...during air conditioning mode. 1) Press the POWER SWITCH key (Fig. Auto ) 3) Press the appropriate increase or decrease buttons (Fig. Low - Cooling resumes when the room temperature rises above the set temperature is achieved. B Fig. E Fig. D) to 32°C (89°F) 4)... Press the FAN key (Fig. Med. - Your selection will appear on the control panel (each depression of the unit. F). • Cooling stops automatically when the set temperature level. A Fig. C). E) to switch the unit on the control panel (Fig. D Fig. OPERATING INSTRUCTIONS DRAINING...
...during air conditioning mode. 1) Press the POWER SWITCH key (Fig. Auto ) 3) Press the appropriate increase or decrease buttons (Fig. Low - Cooling resumes when the room temperature rises above the set temperature is achieved. B Fig. E Fig. D) to 32°C (89°F) 4)... Press the FAN key (Fig. Med. - Your selection will appear on the control panel (each depression of the unit. F). • Cooling stops automatically when the set temperature level. A Fig. C). E) to switch the unit on the control panel (Fig. D Fig. OPERATING INSTRUCTIONS DRAINING...
Product Manual
Page 10
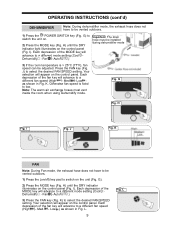
... will advance to low. G) to select the desired FAN SPEED setting. Each depression of the fan key will advance to a different mode setting (Cool - Note: The warm air exchange hoses must be adjusted. G Fig. H) until the DRY indicator light illuminates on the control panel. Fan -...Low ) as shown in Fig. H Fig. Each depression of the MODE key will appear on the control panel (Fig. K) to a different mode setting (Cool - L. 9 Fig. Your selection will advance to a different fan speed (High - Low ) as shown in Fig. L Each depression of the MODE key...
... will advance to low. G) to select the desired FAN SPEED setting. Each depression of the fan key will advance to a different mode setting (Cool - Note: The warm air exchange hoses must be adjusted. G Fig. H) until the DRY indicator light illuminates on the control panel. Fan -...Low ) as shown in Fig. H Fig. Each depression of the MODE key will appear on the control panel (Fig. K) to a different mode setting (Cool - L. 9 Fig. Your selection will advance to a different fan speed (High - Low ) as shown in Fig. L Each depression of the MODE key...
Product Manual
Page 11
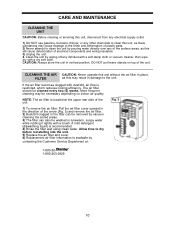
... air filter and cover. 6) Replacement air filter information is recommended. 4) Rinse the filter well using clean water. NOTE: The air filter is restricted, which reduces cooling efficiency. CARE AND MAINTENANCE CLEANING THE UNIT CAUTION: Before cleaning or servicing this unit, disconnect from any electrical supply outlet. 1) DO NOT use gasoline, benzene...
... air filter and cover. 6) Replacement air filter information is recommended. 4) Rinse the filter well using clean water. NOTE: The air filter is restricted, which reduces cooling efficiency. CARE AND MAINTENANCE CLEANING THE UNIT CAUTION: Before cleaning or servicing this unit, disconnect from any electrical supply outlet. 1) DO NOT use gasoline, benzene...

Product Manual
Page 12
...the reset button after resolving problem • Unit suddenly stops during operation • Unit runs intermittently • Unit functions but the room is not cooled • Condensed water spills out when moving the unit • Indoor set temperature has been reached • The preset time is up •...drain water from the drain tank • Contact your dealer • This is minor, and a service call an authorized service depot or Danby's Toll Free Number for a possible solution. If the unit continues to return • Plug in properly • The full-tank indicator is ON;
...the reset button after resolving problem • Unit suddenly stops during operation • Unit runs intermittently • Unit functions but the room is not cooled • Condensed water spills out when moving the unit • Indoor set temperature has been reached • The preset time is up •...drain water from the drain tank • Contact your dealer • This is minor, and a service call an authorized service depot or Danby's Toll Free Number for a possible solution. If the unit continues to return • Plug in properly • The full-tank indicator is ON;

