Product Manual
Page 2
TABLE OF CONTENTS UNIT SPECIFICATIONS 2 PART IDENTIFICATION 3 IMPORTANT SAFETY INFORMATION Electrical Specifications 3 Energy Saving Tips 4 INSTALLATION Window Kit Installation 5 5 OPERATION Features of the Control Panel 6 Remote Control 7 Draining Excess Water 8 Air Conditioning 8 Dehumidifier 9 Fan 9 CARE AND MAINTENANCE 10 TROUBLESHOOTING 11 Warranty 12 1
TABLE OF CONTENTS UNIT SPECIFICATIONS 2 PART IDENTIFICATION 3 IMPORTANT SAFETY INFORMATION Electrical Specifications 3 Energy Saving Tips 4 INSTALLATION Window Kit Installation 5 5 OPERATION Features of the Control Panel 6 Remote Control 7 Draining Excess Water 8 Air Conditioning 8 Dehumidifier 9 Fan 9 CARE AND MAINTENANCE 10 TROUBLESHOOTING 11 Warranty 12 1
Product Manual
Page 4
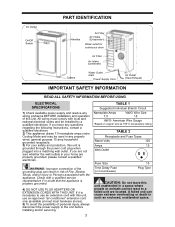
... IMPORTANT SAFETY INFORMATION READ ALL SAFETY INFORMATION BEFORE USING ELECTRICAL SPECIFICATIONS 1) Check available power supply and resolve any wiring problems BEFORE installation and operation of Fire, Electric Shock, and/or injury to Persons associated with the appliance. A failed unit can result in...connection of the grounding plug can cause extreme overheating or death in a space where people or animals cannot react to the unit before installing and/or servicing. 3 TABLE 1 Suggested Individual Branch Circuit Nameplate Amps 7.0 *AWG Wire Size 18 AWG- All wiring must comply ...
... IMPORTANT SAFETY INFORMATION READ ALL SAFETY INFORMATION BEFORE USING ELECTRICAL SPECIFICATIONS 1) Check available power supply and resolve any wiring problems BEFORE installation and operation of Fire, Electric Shock, and/or injury to Persons associated with the appliance. A failed unit can result in...connection of the grounding plug can cause extreme overheating or death in a space where people or animals cannot react to the unit before installing and/or servicing. 3 TABLE 1 Suggested Individual Branch Circuit Nameplate Amps 7.0 *AWG Wire Size 18 AWG- All wiring must comply ...
Product Manual
Page 6
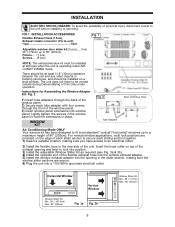
.... Fig. 2 1) Insert tube adapters through the back of the window panel. 2) Secure each slider section to the unit before installing or servicing. FIG 1. Lightly tighten the screws in the slider section, making sure you have to the rear side of the unit... vertical window applications, multi lock positions are secure. 6) Plug the unit into window panel. Instructions for Assembling the Window Adapter Kit- INSTALLATION ELECTRIC SHOCK HAZARD: To avoid the possibility of personal injury, disconnect power to secure each sliding section together. 1) Select a suitable location...
.... Fig. 2 1) Insert tube adapters through the back of the window panel. 2) Secure each slider section to the unit before installing or servicing. FIG 1. Lightly tighten the screws in the slider section, making sure you have to the rear side of the unit... vertical window applications, multi lock positions are secure. 6) Plug the unit into window panel. Instructions for Assembling the Window Adapter Kit- INSTALLATION ELECTRIC SHOCK HAZARD: To avoid the possibility of personal injury, disconnect power to secure each sliding section together. 1) Select a suitable location...
Product Manual
Page 10
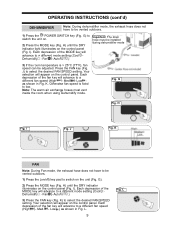
... will appear on the control panel. Your selection will advance to a different mode setting (Cool - Dehumidify - Med. - Note: The warm air exchange hoses must be installed during dehumidifier mode 3) If the room temperature is fixed to select the desired FAN SPEED setting.
... will appear on the control panel. Your selection will advance to a different mode setting (Cool - Dehumidify - Med. - Note: The warm air exchange hoses must be installed during dehumidifier mode 3) If the room temperature is fixed to select the desired FAN SPEED setting.


