Product Manual
Page 4
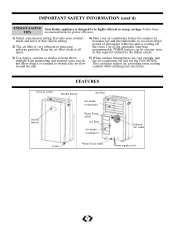
... air outlet On/Off Switch FEATURES Handle Recess Air filter Air intake (evaporator) Water Drain outlet Air filter Air intake (condenser) Exhaust Air outlet Castor Water Drain outlet Power supply cord 3 IMPORTANT SAFETY INFORMATION (cont'd) ENERGY-SAVING Your Danby appliance is designed to avoid an initial period of the automatic start/stop programmable...
... air outlet On/Off Switch FEATURES Handle Recess Air filter Air intake (evaporator) Water Drain outlet Air filter Air intake (condenser) Exhaust Air outlet Castor Water Drain outlet Power supply cord 3 IMPORTANT SAFETY INFORMATION (cont'd) ENERGY-SAVING Your Danby appliance is designed to avoid an initial period of the automatic start/stop programmable...
Product Manual
Page 5
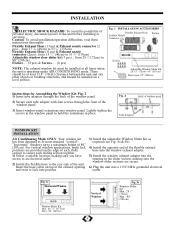
... the opposite end of 80" (203cm). Fig. 1 INSTALLATION ACCESSORIES Flexible Exhaust Hose Exhaust Nozzle Connector Fixture Screws Adjustable Window Slider Kit: 28 1/3" (72cm)- 80" (203cm) Water hose (79"/ 200cm) Instructions for Assembling the Window Kit- Caution: To avoid installation/operation difficulties, read these instructions thoroughly. Flexible Exhaust Hose (13cm) & Exhaust nozzle...
... the opposite end of 80" (203cm). Fig. 1 INSTALLATION ACCESSORIES Flexible Exhaust Hose Exhaust Nozzle Connector Fixture Screws Adjustable Window Slider Kit: 28 1/3" (72cm)- 80" (203cm) Water hose (79"/ 200cm) Instructions for Assembling the Window Kit- Caution: To avoid installation/operation difficulties, read these instructions thoroughly. Flexible Exhaust Hose (13cm) & Exhaust nozzle...
Product Manual
Page 9
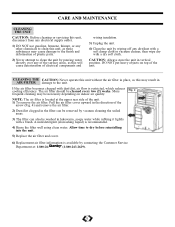
... insulation. 3) Unplug the unit. 4) Clean the unit by vacuum cleaning the soiled areas. 3) The filter can also be washed in lukewarm, soapy water while rubbing it lightly with a dry soft cloth. Allow time to dry before reinstalling into the unit. 5) Replace the air filter and cover. 6)... Replacement air filter information is recommended. 4) Rinse the filter well using clean water. CAUTION: Always store the unit in vertical position. CLEANING THE CAUTION: Never operate this unit without the air filter in place, as this ...
... insulation. 3) Unplug the unit. 4) Clean the unit by vacuum cleaning the soiled areas. 3) The filter can also be washed in lukewarm, soapy water while rubbing it lightly with a dry soft cloth. Allow time to dry before reinstalling into the unit. 5) Replace the air filter and cover. 6)... Replacement air filter information is recommended. 4) Rinse the filter well using clean water. CAUTION: Always store the unit in vertical position. CLEANING THE CAUTION: Never operate this unit without the air filter in place, as this ...
Product Manual
Page 10
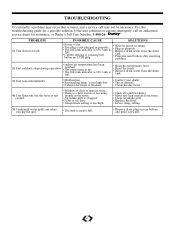
...8226; Remove drain plug on LCDI plug. • Wait for assistance, or Danby's Toll Free Number: 1-800-26- tank is full. • Current leaking or pressing test button on rear bottom and drain out water. 9 is too high/low. • This is normal. • Exhaust.... PROBLEM 1) Unit does not work POSSIBLE CAUSE SOLUTIONS • Power is out. • The plug is not plugged in properly. • Remove drain water from the drain tank. 3) Unit runs intermittently • Malfunction. • Contact your dealer. • Surrounding temp. Use this troubleshooting guide for a possible...
...8226; Remove drain plug on LCDI plug. • Wait for assistance, or Danby's Toll Free Number: 1-800-26- tank is full. • Current leaking or pressing test button on rear bottom and drain out water. 9 is too high/low. • This is normal. • Exhaust.... PROBLEM 1) Unit does not work POSSIBLE CAUSE SOLUTIONS • Power is out. • The plug is not plugged in properly. • Remove drain water from the drain tank. 3) Unit runs intermittently • Malfunction. • Contact your dealer. • Surrounding temp. Use this troubleshooting guide for a possible...


