Product Manual
Page 2
TABLE OF CONTENTS UNIT SPECIFICATIONS 2 PART IDENTIFICATION 3 IMPORTANT SAFETY INFORMATION Electrical Specifications 3 Energy Saving Tips 4 OPERATING INSTRUCTIONS Internal Safety Features 4 Draining Excess Water 5 INSTALLATION 5 Window Kit Installation 6 OPERATION Remote Control 7 LCD Display 7 Air Conditioning 8 Auto 8 Dehumidifier 9 Fan 9 Auto Timer 11 Clock Set 11 CARE AND MAINTENANCE 12 TROUBLESHOOTING 13 Warranty 14 1
TABLE OF CONTENTS UNIT SPECIFICATIONS 2 PART IDENTIFICATION 3 IMPORTANT SAFETY INFORMATION Electrical Specifications 3 Energy Saving Tips 4 OPERATING INSTRUCTIONS Internal Safety Features 4 Draining Excess Water 5 INSTALLATION 5 Window Kit Installation 6 OPERATION Remote Control 7 LCD Display 7 Air Conditioning 8 Auto 8 Dehumidifier 9 Fan 9 Auto Timer 11 Clock Set 11 CARE AND MAINTENANCE 12 TROUBLESHOOTING 13 Warranty 14 1
Product Manual
Page 3
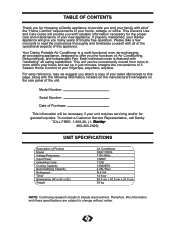
... information necessary for general inquiries. To contact a Customer Service Representative, call Danby TOLL FREE: 1-800-26- (1800-263-2629) UNIT SPECIFICATIONS Description of Product Model Voltage/Frequency Input Power Operating Cycle Cooling Capacity Dehumidifying Capacity Refrigerant Timer Dimensions (W) x (H) x (D) Weight Air Conditioner DPAC13009 115V-60Hz 1320W 11.5A 13000BTU 4.25L/Hour R-410A 12 hour...
... information necessary for general inquiries. To contact a Customer Service Representative, call Danby TOLL FREE: 1-800-26- (1800-263-2629) UNIT SPECIFICATIONS Description of Product Model Voltage/Frequency Input Power Operating Cycle Cooling Capacity Dehumidifying Capacity Refrigerant Timer Dimensions (W) x (H) x (D) Weight Air Conditioner DPAC13009 115V-60Hz 1320W 11.5A 13000BTU 4.25L/Hour R-410A 12 hour...
Product Manual
Page 5
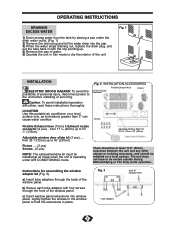
...is emptied. you must always be replaced if it cannot located on some cooling comfort while utilizing less electricity. ENERGY-SAVING Your Danby appliance is designed to obstruct the air flow around the unit. 5) When outdoor temperatures are cool enough, turn the unit on... cord to avoid an initial period of the 2) The air filter is very efficient in energy TIPS savings. CAUTION: During air conditioning and dehumidifier mode, if the compressor cycle is interrupted (water full condition, unplugged, power failure, etc.) and reinstated immediately thereafter (within 3-5 minutes), ...
...is emptied. you must always be replaced if it cannot located on some cooling comfort while utilizing less electricity. ENERGY-SAVING Your Danby appliance is designed to obstruct the air flow around the unit. 5) When outdoor temperatures are cool enough, turn the unit on... cord to avoid an initial period of the 2) The air filter is very efficient in energy TIPS savings. CAUTION: During air conditioning and dehumidifier mode, if the compressor cycle is interrupted (water full condition, unplugged, power failure, etc.) and reinstated immediately thereafter (within 3-5 minutes), ...
Product Manual
Page 6
... screws through the back of water. 5) Operate the unit in place. Adjustable Window Slider Kit: 28 1/3" (72cm)- 80" (203cm) There should be vented outside during Dehumidifying or Fan Only mode operation. The unit does not have to the unit before installing or servicing. Instructions for assembling the window adapter kit (Fig...
... screws through the back of water. 5) Operate the unit in place. Adjustable Window Slider Kit: 28 1/3" (72cm)- 80" (203cm) There should be vented outside during Dehumidifying or Fan Only mode operation. The unit does not have to the unit before installing or servicing. Instructions for assembling the window adapter kit (Fig...
Product Manual
Page 8
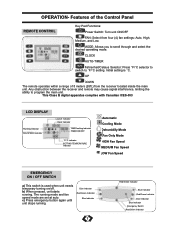
... DISPLAY Running Indicator FAN SPEED Indicator Launch Indicator Clock Indicator TIMER setting Indicator TIMER ON/OFF °F/°C Indicator SETTING TEMPERATURE Indicator Automatic Cooling Mode Dehumidify Mode Fan Only Mode HIGH Fan Speed MEDIUM Fan Speed LOW Fan Speed EMERGENCY ON / OFF SWITCH a) This switch is °C. c) Press emergency button again...
... DISPLAY Running Indicator FAN SPEED Indicator Launch Indicator Clock Indicator TIMER setting Indicator TIMER ON/OFF °F/°C Indicator SETTING TEMPERATURE Indicator Automatic Cooling Mode Dehumidify Mode Fan Only Mode HIGH Fan Speed MEDIUM Fan Speed LOW Fan Speed EMERGENCY ON / OFF SWITCH a) This switch is °C. c) Press emergency button again...
Product Manual
Page 9
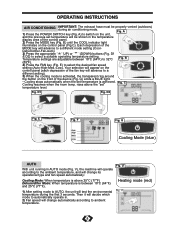
... during the first 3 seconds. D1 & D2) to 32°C Fig. E) to ambient temperature. 8 rises above 25°C (77°F) Dehumidifier Mode: When temperature is activated, the transparent ring around the button on the control panel (Fig.C). A 1) Press the POWER SWITCH key (Fig. ...Cooling resumes when the room temp. F Auto High Med. B (89°F). 4) Press the FAN key (Fig. C temperature level. Fig. D1 Fig. Dehumidifier-Fan-Auto) 3) Press the appropriate (UP) or (DOWN) buttons (Fig. V), the machine will operate according to a different setting). 5) When the cooling...
... during the first 3 seconds. D1 & D2) to 32°C Fig. E) to ambient temperature. 8 rises above 25°C (77°F) Dehumidifier Mode: When temperature is activated, the transparent ring around the button on the control panel (Fig.C). A 1) Press the POWER SWITCH key (Fig. ...Cooling resumes when the room temp. F Auto High Med. B (89°F). 4) Press the FAN key (Fig. C temperature level. Fig. D1 Fig. Dehumidifier-Fan-Auto) 3) Press the appropriate (UP) or (DOWN) buttons (Fig. V), the machine will operate according to a different setting). 5) When the cooling...
Product Manual
Page 10
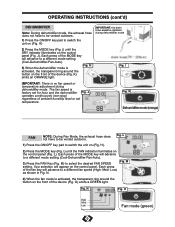
...Med. Low Fan mode (green) 9 J). J operates continuously (non-stop) regardless of the MODE key will advance to a different mode setting (Cool-Dehumidifier-Fan-Auto). 3) Press the FAN Key (Fig. I ) until the FAN indicator illuminates on the front of the device (Fig. Fig. Fig. ...Your selection will advance to a different fan speed (High- O) emits a GREEN light. H) IMPORTANT: the drain hose must be installed during dehumidifier mode. I ) until the DRY indicator illuminates on the control panel. K) emits an ORANGE light. L). Each press of the fan key will...
...Med. Low Fan mode (green) 9 J). J operates continuously (non-stop) regardless of the MODE key will advance to a different mode setting (Cool-Dehumidifier-Fan-Auto). 3) Press the FAN Key (Fig. I ) until the FAN indicator illuminates on the front of the device (Fig. Fig. Fig. ...Your selection will advance to a different fan speed (High- O) emits a GREEN light. H) IMPORTANT: the drain hose must be installed during dehumidifier mode. I ) until the DRY indicator illuminates on the control panel. K) emits an ORANGE light. L). Each press of the fan key will...
