Product Manual
Page 2
TABLE OF CONTENTS UNIT SPECIFICATIONS 2 PART IDENTIFICATION 3 IMPORTANT SAFETY INFORMATION Electrical Specifications 3 Energy Saving Tips 4 OPERATING INSTRUCTIONS Internal Safety Features 4 Draining Excess Water 5 INSTALLATION 5 Window Kit Installation 6 OPERATION Remote Control 7 LCD Display 7 Air Conditioning 8 Auto 8 Dehumidifier 9 Fan 9 Auto Timer 11 Clock Set 11 CARE AND MAINTENANCE 12 TROUBLESHOOTING 13 Warranty 14 1
TABLE OF CONTENTS UNIT SPECIFICATIONS 2 PART IDENTIFICATION 3 IMPORTANT SAFETY INFORMATION Electrical Specifications 3 Energy Saving Tips 4 OPERATING INSTRUCTIONS Internal Safety Features 4 Draining Excess Water 5 INSTALLATION 5 Window Kit Installation 6 OPERATION Remote Control 7 LCD Display 7 Air Conditioning 8 Auto 8 Dehumidifier 9 Fan 9 Auto Timer 11 Clock Set 11 CARE AND MAINTENANCE 12 TROUBLESHOOTING 13 Warranty 14 1
Product Manual
Page 3
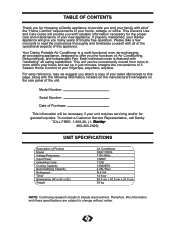
... of Product Model Voltage/Frequency Input Power Operating Cycle Cooling Capacity Dehumidifying Capacity Refrigerant Timer Dimensions (W) x (H) x (D) Weight Air Conditioner DPAC13009 115V-60Hz 1320W 11.5A 13000BTU 4.25L/Hour R-410A 12 hour 50.8 cm x 91.5 cm x 41.8 cm 38 kg NOTE.... To contact a Customer Service Representative, call Danby TOLL FREE: 1-800-26- (1800-263-2629) UNIT SPECIFICATIONS Description of this appliance. If properly maintained, your Danby appliance will be conveniently moved from room to read the instructions thoroughly and familiarize yourself with all of the...
... of Product Model Voltage/Frequency Input Power Operating Cycle Cooling Capacity Dehumidifying Capacity Refrigerant Timer Dimensions (W) x (H) x (D) Weight Air Conditioner DPAC13009 115V-60Hz 1320W 11.5A 13000BTU 4.25L/Hour R-410A 12 hour 50.8 cm x 91.5 cm x 41.8 cm 38 kg NOTE.... To contact a Customer Service Representative, call Danby TOLL FREE: 1-800-26- (1800-263-2629) UNIT SPECIFICATIONS Description of this appliance. If properly maintained, your Danby appliance will be conveniently moved from room to read the instructions thoroughly and familiarize yourself with all of the...
Product Manual
Page 4
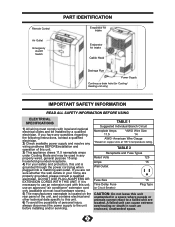
... possibility of personal injury, always disconnect the power supply to the unit before installing and/or servicing. If you have any questions regarding the following instructions, contact a qualified electrician. 2) Check available power supply and resolve any properly wired, general purpose 15 amp household grounded receptacle. 4) For your home are located. If...
... possibility of personal injury, always disconnect the power supply to the unit before installing and/or servicing. If you have any questions regarding the following instructions, contact a qualified electrician. 2) Check available power supply and resolve any properly wired, general purpose 15 amp household grounded receptacle. 4) For your home are located. If...
Product Manual
Page 6
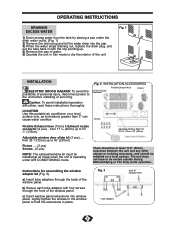
... 1/3"(72cm) up . 4) Remove the pan of personal injury, disconnect power to 53 1/6" (135cm) Adjustable window door slider kit (3 pcs)..... Instructions for assembling the window adapter kit (Fig. 3). Lightly tighten the screws in the window panel to hold the extensions in Fan mode to be at... is operating under the drain water outlet. (Fig. 1) 2) Remove the drain plug and let the water drain into window panel. OPERATING INSTRUCTIONS DRAINING EXCESS WATER 1) Drain excess water from the tank by placing a pan under AIR CONDITIONING mode. LOCATION Use this portable air conditioner on...
... 1/3"(72cm) up . 4) Remove the pan of personal injury, disconnect power to 53 1/6" (135cm) Adjustable window door slider kit (3 pcs)..... Instructions for assembling the window adapter kit (Fig. 3). Lightly tighten the screws in the window panel to hold the extensions in Fan mode to be at... is operating under the drain water outlet. (Fig. 1) 2) Remove the drain plug and let the water drain into window panel. OPERATING INSTRUCTIONS DRAINING EXCESS WATER 1) Drain excess water from the tank by placing a pan under AIR CONDITIONING mode. LOCATION Use this portable air conditioner on...
Product Manual
Page 9
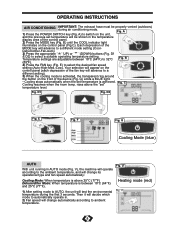
... mode (red) 1) After setting mode to AUTO, the unit will advance to a different mode setting (Cool- D2 Fig. Cooling resumes when the room temp. OPERATING INSTRUCTIONS AIR CONDITIONING IMPORTANT: The exhaust hose must be shown in the temperature display area of the control panel. 2) Press the MODE key (Fig. A 1) Press the...
... mode (red) 1) After setting mode to AUTO, the unit will advance to a different mode setting (Cool- D2 Fig. Cooling resumes when the room temp. OPERATING INSTRUCTIONS AIR CONDITIONING IMPORTANT: The exhaust hose must be shown in the temperature display area of the control panel. 2) Press the MODE key (Fig. A 1) Press the...
Product Manual
Page 10
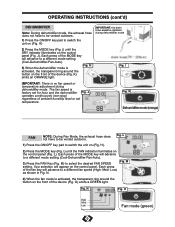
...) 9 L 1) Press the ON/OFF key pad to a different fan speed (High- Your selection will advance to select the desired FAN SPEED setting. O High Med. OPERATING INSTRUCTIONS (cont'd) DEHUMIDIFIER Note: During dehumidifier mode, the exhaust hose does not have to be vented outdoors. I ) until the DRY indicator illuminates on the front of...
...) 9 L 1) Press the ON/OFF key pad to a different fan speed (High- Your selection will advance to select the desired FAN SPEED setting. O High Med. OPERATING INSTRUCTIONS (cont'd) DEHUMIDIFIER Note: During dehumidifier mode, the exhaust hose does not have to be vented outdoors. I ) until the DRY indicator illuminates on the front of...
Product Manual
Page 11
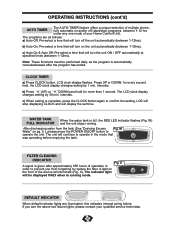
...) and hold for every second held, the LCD clock display changes setting by 30 min. After discharging water from forgetting to operate in running . OPERATING INSTRUCTIONS (cont'd) AUTO TIMER The AUTO-TIMER feature offers a unique selection of multiple choice, fully automatic on and/or off the unit automatically (between 1-12hrs). intervals...
...) and hold for every second held, the LCD clock display changes setting by 30 min. After discharging water from forgetting to operate in running . OPERATING INSTRUCTIONS (cont'd) AUTO TIMER The AUTO-TIMER feature offers a unique selection of multiple choice, fully automatic on and/or off the unit automatically (between 1-12hrs). intervals...