
Product Manual
Page 2
... • Caractéristiques • Installation • Consignes d'utilisation • Soins et Entretien • Dépannage • Garantie Model • Modèle DAC10010E / DAC10011E / DAC12010E Contents AIR CONDITIONER Owner's Use and Care Guide 2-17 • Welcome • Important Safety Information • Features • Installation • Operation Instructions • Care and Maintenance •...
... • Caractéristiques • Installation • Consignes d'utilisation • Soins et Entretien • Dépannage • Garantie Model • Modèle DAC10010E / DAC10011E / DAC12010E Contents AIR CONDITIONER Owner's Use and Care Guide 2-17 • Welcome • Important Safety Information • Features • Installation • Operation Instructions • Care and Maintenance •...

Product Manual
Page 4
... electrician. 2) Check available power supply and resolve any properly wired, general purpose household receptacle. DO NOT use an approved "air conditioner" extension cord only (available at 60°C temperature rating. If you are not sure whether your wall outlet is necessary ...Size 14 AWG- TABLE 1 Suggested Individual Branch Circuit Nameplate Amps 8.8 to connect your safety and protection, this unit. 3) This 115V air conditioner uses 10.2 or less nameplate amps and may be installed by a qualified electrician. ELECTRICAL SPECIFICATIONS 1) All wiring must comply with the...
... electrician. 2) Check available power supply and resolve any properly wired, general purpose household receptacle. DO NOT use an approved "air conditioner" extension cord only (available at 60°C temperature rating. If you are not sure whether your wall outlet is necessary ...Size 14 AWG- TABLE 1 Suggested Individual Branch Circuit Nameplate Amps 8.8 to connect your safety and protection, this unit. 3) This 115V air conditioner uses 10.2 or less nameplate amps and may be installed by a qualified electrician. ELECTRICAL SPECIFICATIONS 1) All wiring must comply with the...

Product Manual
Page 5
... shades to keep direct sunlight from penetrating and heating the room, but do not allow drapes or curtains to obstruct the air flow around the unit. 4) Start your air conditioner before the outdoor air becomes hot and uncomfortable, to avoid an initial period of discomfort while the unit is cooling off the room. 5) When...; Carpenters Level NOTE: Save the shipping carton and packing materials for vertical (slider type) windows and/or through-the-wall applications. ENERGY SAVING TIPS Your Danby appliance is NOT designed for future storage or transportation.
... shades to keep direct sunlight from penetrating and heating the room, but do not allow drapes or curtains to obstruct the air flow around the unit. 4) Start your air conditioner before the outdoor air becomes hot and uncomfortable, to avoid an initial period of discomfort while the unit is cooling off the room. 5) When...; Carpenters Level NOTE: Save the shipping carton and packing materials for vertical (slider type) windows and/or through-the-wall applications. ENERGY SAVING TIPS Your Danby appliance is NOT designed for future storage or transportation.
Product Manual
Page 6
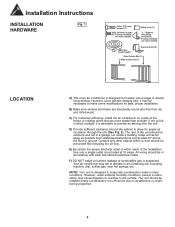
... the floor or ground. C) For maximum efficiency, install the air conditioner on some modifications for ample air circulation through the unit (See Fig. 2). The unit should be necessary to the outside. Your air conditioner may cause basepan to overflow to make some models Adhesive Foam... Seal(1) Sash bracket (2) Side Curtain RH (1) Side Curtain LH (1) LOCATION A) This room air conditioner is within a room should be prevented from dry and...
... the floor or ground. C) For maximum efficiency, install the air conditioner on some modifications for ample air circulation through the unit (See Fig. 2). The unit should be necessary to the outside. Your air conditioner may cause basepan to overflow to make some models Adhesive Foam... Seal(1) Sash bracket (2) Side Curtain RH (1) Side Curtain LH (1) LOCATION A) This room air conditioner is within a room should be prevented from dry and...
Product Manual
Page 7
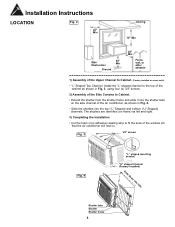
...) sealing strip to Cabinet. • Extend the shutter from the shutter frame and slide it into the shutter tabs on the side channel of the air conditioner, as shown in Fig. 3, using four (4) 3/8" screws. 2) Assembly of the Side Curtains to fit the area of the window sill that the...
...) sealing strip to Cabinet. • Extend the shutter from the shutter frame and slide it into the shutter tabs on the side channel of the air conditioner, as shown in Fig. 3, using four (4) 3/8" screws. 2) Assembly of the Side Curtains to fit the area of the window sill that the...
Product Manual
Page 8
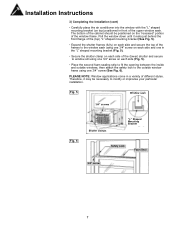
Installation Instructions 3) Completing the Installation (cont) • Carefully place the air conditioner into the window with the "L" shaped mounting bracket (on top) positioned in front of different styles. PLEASE NOTE: Window applications come in the "L" shaped mounting ...
Installation Instructions 3) Completing the Installation (cont) • Carefully place the air conditioner into the window with the "L" shaped mounting bracket (on top) positioned in front of different styles. PLEASE NOTE: Window applications come in the "L" shaped mounting ...

Product Manual
Page 9
... note: During 'Dry' mode the fan speed is gradually increased over a one (1) hour period then maintained for seven (7) hours. While the Air Conditioner is not in use. The Auto On and Auto Off timer can operate during Cool and Fan Only mode. Once the program is complete, the...increase or decrease the Temperature setting in 1°C / °F increments, and Auto-Timer On/Off settings in the LED display. While the Air Conditioner is running time and reduced energy consumption. ENERGY SAVER: Automatically cycles the fan on the set temperature is automatically defined . Cool , Dry ...
... note: During 'Dry' mode the fan speed is gradually increased over a one (1) hour period then maintained for seven (7) hours. While the Air Conditioner is not in use. The Auto On and Auto Off timer can operate during Cool and Fan Only mode. Once the program is complete, the...increase or decrease the Temperature setting in 1°C / °F increments, and Auto-Timer On/Off settings in the LED display. While the Air Conditioner is running time and reduced energy consumption. ENERGY SAVER: Automatically cycles the fan on the set temperature is automatically defined . Cool , Dry ...
Product Manual
Page 10
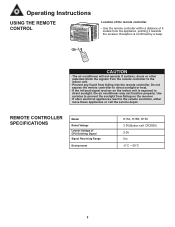
... is confirmed by a beep. 5m O N /O FF TUEMPP MO D E TDEOMWP N SW IN G TIMER FA N SLEEP CAUTION • The air conditioner will not operate if curtains, doors or other electrical appliances react to direct sunlight, the air conditioner may not function properly. Do not expose the remote controller to direct sunlight or heat. • If the...
... is confirmed by a beep. 5m O N /O FF TUEMPP MO D E TDEOMWP N SW IN G TIMER FA N SLEEP CAUTION • The air conditioner will not operate if curtains, doors or other electrical appliances react to direct sunlight, the air conditioner may not function properly. Do not expose the remote controller to direct sunlight or heat. • If the...

Product Manual
Page 12
... available. In this case, only step 1, 3 and 4 may be set within a range of CLEAN AIR SLEEP 17°C~ 30°C in 1°C increments. In the Auto mode, the air conditioner can not switch the fan speed. In the Auto mode, you can logically choose the mode of 17°...is 1 2 available. The temperature can be set the desired temperature. NOTE 1. ON/OFF MODE 3 3 1) Press the ON/OFF button to start the air 3 conditioner. 2) Press the mode button and select AUTO. 3) Press the TEMP UP / DOWN button to set within a range of Cooling, Fan, Heating and ...
... available. In this case, only step 1, 3 and 4 may be set within a range of CLEAN AIR SLEEP 17°C~ 30°C in 1°C increments. In the Auto mode, the air conditioner can not switch the fan speed. In the Auto mode, you can logically choose the mode of 17°...is 1 2 available. The temperature can be set the desired temperature. NOTE 1. ON/OFF MODE 3 3 1) Press the ON/OFF button to start the air 3 conditioner. 2) Press the mode button and select AUTO. 3) Press the TEMP UP / DOWN button to set within a range of Cooling, Fan, Heating and ...
Product Manual
Page 13
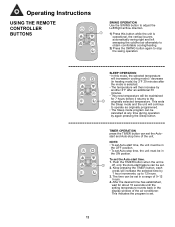
... temperature. This indicates the program is set in a range of 0~12 hours. 4. ON/OFF MODE TEMP UP FAN S TEMP DOWN ENERGY SAVER TIMER CLEAN AIR SLEEP TIMER OPERATION press the TIMER button can be set the Auto-start time, the unit must be in the ON postion. NOTE: • To...30 minutes. • This new temperature will be maintained for about 10 seconds until the setting temperature reverts back in the display window of the air conditioner. Push the TIMER button when the unit is operational, the vertical louvers automatically swing right and left sweeping the cold/hot...
... temperature. This indicates the program is set in a range of 0~12 hours. 4. ON/OFF MODE TEMP UP FAN S TEMP DOWN ENERGY SAVER TIMER CLEAN AIR SLEEP TIMER OPERATION press the TIMER button can be set the Auto-start time, the unit must be in the ON postion. NOTE: • To...30 minutes. • This new temperature will be maintained for about 10 seconds until the setting temperature reverts back in the display window of the air conditioner. Push the TIMER button when the unit is operational, the vertical louvers automatically swing right and left sweeping the cold/hot...

Product Manual
Page 14
... it again to 12 hours. 3) The time can be set in the display window of the air conditioner. ON/OFF MODE TEMP UP FAN S TEMP DOWN ENERGY SAVER TIMER 1 CLEAN AIR SLEEP CLEAN AIR OPERATION When this mode, the fan will increase the selected time by FAN TIMER 1 hour increments,... CONTROLLER BUTTONS TIMER OPERATION To set . The fan then cycles on the LCD window of the air conditioner. This indicates the program is energized and will help remove pollen and impurities from the air. NOTE: To cancel the TIMER setting, push the TIMER button until 0 hour is above the...
... it again to 12 hours. 3) The time can be set in the display window of the air conditioner. ON/OFF MODE TEMP UP FAN S TEMP DOWN ENERGY SAVER TIMER 1 CLEAN AIR SLEEP CLEAN AIR OPERATION When this mode, the fan will increase the selected time by FAN TIMER 1 hour increments,... CONTROLLER BUTTONS TIMER OPERATION To set . The fan then cycles on the LCD window of the air conditioner. This indicates the program is energized and will help remove pollen and impurities from the air. NOTE: To cancel the TIMER setting, push the TIMER button until 0 hour is above the...
Product Manual
Page 16
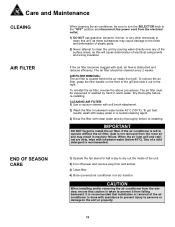
... attempt to the right. Use of electrical components and wiring insulation. It is recommended that caution is recommended. Care and Maintenance CLEAING When cleaning the air conditioner, be sure to turn the SELECTOR knob to the "OFF" position and disconnect the power cord from the electrical outlet. 1) DO NOT use gasoline, benzene...
... attempt to the right. Use of electrical components and wiring insulation. It is recommended that caution is recommended. Care and Maintenance CLEAING When cleaning the air conditioner, be sure to turn the SELECTOR knob to the "OFF" position and disconnect the power cord from the electrical outlet. 1) DO NOT use gasoline, benzene...
Product Manual
Page 17
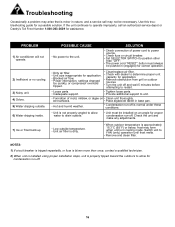
PPRROOBBLLEEMM 1) Air conditioner will not operate. 2) Inefficient or no cooling. 3) Noisy unit. 4) Odors. 5) Water dripping ... these conditions. • Unit is not properly angled to allow water to drain outside temperature. • Unit air filter is dirty. • When outdoor temperature is approximately 18.3°C (65°F) or below, frost may...to operate improperly, call may arise that is minor in nature, and a service call an authorized service depot or Danby's Toll Free Number 1-800-263-2629 for condensation run-off. 16 SSOOLLUUTTIIOONNS • Check connection of mold, ...
PPRROOBBLLEEMM 1) Air conditioner will not operate. 2) Inefficient or no cooling. 3) Noisy unit. 4) Odors. 5) Water dripping ... these conditions. • Unit is not properly angled to allow water to drain outside temperature. • Unit air filter is dirty. • When outdoor temperature is approximately 18.3°C (65°F) or below, frost may...to operate improperly, call may arise that is minor in nature, and a service call an authorized service depot or Danby's Toll Free Number 1-800-263-2629 for condensation run-off. 16 SSOOLLUUTTIIOONNS • Check connection of mold, ...


