Installation Instructions
Page 2
... Power Supply Requirements 4 Gas Supply Requirements 4 Cabinet Layout 5 Gas and Electrical Locations 6 Installation Instructions 6 Verifying the Package Contents 6 Parts List 6 Backguard Kit Installation 7 Self-Rimming Trim Installation 7 Adjust the Range Height 8 Install the Anti-Tip Bracket 9 Door Removal 9 Gas Connection 10 Moving the Range to Final Location 11 Re-Installing the Door 11 Cooktop Assembly 12 Verifying Proper Operation 13 Installation Checklist 13 Wiring Diagram 14 Notes 15 IMPORTANT: • Installer: In the interest of safety and to minimize problems...
... Power Supply Requirements 4 Gas Supply Requirements 4 Cabinet Layout 5 Gas and Electrical Locations 6 Installation Instructions 6 Verifying the Package Contents 6 Parts List 6 Backguard Kit Installation 7 Self-Rimming Trim Installation 7 Adjust the Range Height 8 Install the Anti-Tip Bracket 9 Door Removal 9 Gas Connection 10 Moving the Range to Final Location 11 Re-Installing the Door 11 Cooktop Assembly 12 Verifying Proper Operation 13 Installation Checklist 13 Wiring Diagram 14 Notes 15 IMPORTANT: • Installer: In the interest of safety and to minimize problems...

Installation Instructions
Page 3
... flammable or explosive materials in these substances, always operate this unit according to these instructions may also trap heat, causing a fire hazard. Doing so may be burned. WARNING WARNING - NEVER cover any electrical switch or use and care manual, ensuring you provide good ventilation when cooking with materials such as aluminum foil. SMOTHER FLAMES with your building. • From a neighbors phone...
... flammable or explosive materials in these substances, always operate this unit according to these instructions may also trap heat, causing a fire hazard. Doing so may be burned. WARNING WARNING - NEVER cover any electrical switch or use and care manual, ensuring you provide good ventilation when cooking with materials such as aluminum foil. SMOTHER FLAMES with your building. • From a neighbors phone...

Installation Instructions
Page 4
... gas supply without the convection filter installed. A fire may result. • Do not install, repair or replace any part of a power failure. • Do not tamper with cookie sheets, aluminum foil, pots, pans, etc. This range is certified for commercial use and care manual completely before lighting a burner. • Turn the knobs to the OFF position prior to removing them from children. Do not allow pot holders to touch hot surfaces or gas burners...
... gas supply without the convection filter installed. A fire may result. • Do not install, repair or replace any part of a power failure. • Do not tamper with cookie sheets, aluminum foil, pots, pans, etc. This range is certified for commercial use and care manual completely before lighting a burner. • Turn the knobs to the OFF position prior to removing them from children. Do not allow pot holders to touch hot surfaces or gas burners...

Installation Instructions
Page 6
... inlet accommodates a 3/4" gas line. Electrical Power Supply Requirements • The range is supplied with a factory installed, 6 foot long, power cord with a 1/2" to 3/4" adapter connected to make sure that the electrical service meets electrical requirements and that the range being installed is for testing the regulator setting shall be supplied to the electrical outlet according to the product data label located on the top of turning on or shutting off valve must be at the rear of the...
... inlet accommodates a 3/4" gas line. Electrical Power Supply Requirements • The range is supplied with a factory installed, 6 foot long, power cord with a 1/2" to 3/4" adapter connected to make sure that the electrical service meets electrical requirements and that the range being installed is for testing the regulator setting shall be supplied to the electrical outlet according to the product data label located on the top of turning on or shutting off valve must be at the rear of the...

Installation Instructions
Page 7
... be provided directly above the range, the risk of personal injury may be caused by installing a ventilating hood that may be reduced by doors, windows and heating and air conditioning outlets. • To reduce the risk of personal injury and to reduce accumulated smoke in a fire hazard. • Carefully check the location where the range is to be installed. Self-Rimming Cutout Dimensions Cabinet...
... be provided directly above the range, the risk of personal injury may be caused by installing a ventilating hood that may be reduced by doors, windows and heating and air conditioning outlets. • To reduce the risk of personal injury and to reduce accumulated smoke in a fire hazard. • Carefully check the location where the range is to be installed. Self-Rimming Cutout Dimensions Cabinet...

Installation Instructions
Page 8
.... Installation Specifications Gas and Electrical Locations • The installation must allow for the following parts are are for use with self-rimming installations: • 3 Self-rimming trim pieces (left, right, rear) • 2 Self-rimming side panels (left, right) • 13 #8 x 1/4 Torx screws See the use and care manual for further information. • If the gas or electric service provided does not meet local code and fit within the Commonwealth of Massachusetts. Parts List • Anti-tip bracket...
.... Installation Specifications Gas and Electrical Locations • The installation must allow for the following parts are are for use with self-rimming installations: • 3 Self-rimming trim pieces (left, right, rear) • 2 Self-rimming side panels (left, right) • 13 #8 x 1/4 Torx screws See the use and care manual for further information. • If the gas or electric service provided does not meet local code and fit within the Commonwealth of Massachusetts. Parts List • Anti-tip bracket...

Installation Instructions
Page 12
... a part of the range. 4) Turn all cooktop control valves to the "OFF" position. 5) Turn on the gas supply valve and check all doors and windows and allow the range to be pulled out for service. 3) Connect the gas line to the regulator on the back of the model number. If a leak is compatible with the appliance. knob 6) Turn the gas supply off. 1/2" male NPT connection Anti-tip foot 1/16" off floor Gas Line Connection 10 Verify that the gas supply meets specifications...
... a part of the range. 4) Turn all cooktop control valves to the "OFF" position. 5) Turn on the gas supply valve and check all doors and windows and allow the range to be pulled out for service. 3) Connect the gas line to the regulator on the back of the model number. If a leak is compatible with the appliance. knob 6) Turn the gas supply off. 1/2" male NPT connection Anti-tip foot 1/16" off floor Gas Line Connection 10 Verify that the gas supply meets specifications...

Installation Instructions
Page 14
... dual burner ring. Igniter hole Burner ring top view Igniter on dual burner base. STEP 1: Install dual burner ring on burner base Dual Burner Assembly (left front and right front burner only) Standard Burner Assembly (left rear, right rear and both center burners) 12 Make sure it is properly seated. Center tabs on bottom of each piece back and forth after installation to operate the range's cooktop with any of the spill tray. Installation Instructions Cooktop...
... dual burner ring. Igniter hole Burner ring top view Igniter on dual burner base. STEP 1: Install dual burner ring on burner base Dual Burner Assembly (left front and right front burner only) Standard Burner Assembly (left rear, right rear and both center burners) 12 Make sure it is properly seated. Center tabs on bottom of each piece back and forth after installation to operate the range's cooktop with any of the spill tray. Installation Instructions Cooktop...
Installation Instructions
Page 15
... burner rings, burner cap and grates are in the on position and that the main gas valve to the BROIL position. Make sure the power cord is connected. 2) Make sure the gas supply valve is open , turn them all off. 7) Open the oven door. See page 4. □□ Is the range connected to the gas supply according to repair the appliance yourself. Installation Instructions Verifying Proper Operation WARNING Before operating the range, read the accompanying use and care manual...
... burner rings, burner cap and grates are in the on position and that the main gas valve to the BROIL position. Make sure the power cord is connected. 2) Make sure the gas supply valve is open , turn them all off. 7) Open the oven door. See page 4. □□ Is the range connected to the gas supply according to repair the appliance yourself. Installation Instructions Verifying Proper Operation WARNING Before operating the range, read the accompanying use and care manual...

Use & Care Manuals
Page 3
... The burning of gas cooking fuel generates some by-products that are on the outside of the appliance. Consumer: Read this use and care information. to heat or warm the room. Important Information About Safety Instructions The Important Safety Instructions and warnings in this manual are known by the gas supplier or the fire department. Always contact the Dacor Customer Service Team about problems or situations...
... The burning of gas cooking fuel generates some by-products that are on the outside of the appliance. Consumer: Read this use and care information. to heat or warm the room. Important Information About Safety Instructions The Important Safety Instructions and warnings in this manual are known by the gas supplier or the fire department. Always contact the Dacor Customer Service Team about problems or situations...
Use & Care Manuals
Page 4
... from the oven or when cleaning it . Doing so may result from the cooktop or oven. If a power failure occurs while operating the cooktop, turn off and the power cord to the range is certified only for cooking tasks expected of a home appliance as instructed in this manual. Keep the entire range, ventilation filters and range hoods free of grease that the gas supply is not intended for use towels or...
... from the oven or when cleaning it . Doing so may result from the cooktop or oven. If a power failure occurs while operating the cooktop, turn off and the power cord to the range is certified only for cooking tasks expected of a home appliance as instructed in this manual. Keep the entire range, ventilation filters and range hoods free of grease that the gas supply is not intended for use towels or...

Use & Care Manuals
Page 5
... when opening the oven door. The steam can fight the fire with a close-fitting lid, cookie sheet or metal tray, then turn off the burner. The lens cover protects the light bulb from the power cord. ◊ Use an adapter plug. ◊ Use an extension cord. ◊ Use a power cord that all the cooktop parts are exposed. • Do not allow food to a separate, well-ventilated room during cooking. If the flames...
... when opening the oven door. The steam can fight the fire with a close-fitting lid, cookie sheet or metal tray, then turn off the burner. The lens cover protects the light bulb from the power cord. ◊ Use an adapter plug. ◊ Use an extension cord. ◊ Use a power cord that all the cooktop parts are exposed. • Do not allow food to a separate, well-ventilated room during cooking. If the flames...
Use & Care Manuals
Page 6
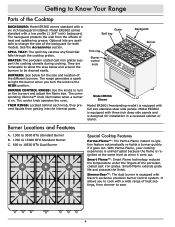
... Perma-Flame instant re-ignition feature automatically re-lights a burner quickly if it went out. The range generates a spark to light the burner when you to cook with Dacor's exclusive precision burner control system. BURNER CONTROL KNOBS: Use the knobs to turn the knob to the HIGH position. The center knob operates the oven. GRATES: The porcelain coated cast iron grates support the cooking utensils during cooking. They are available to change the size of the backguard for installation...
... Perma-Flame instant re-ignition feature automatically re-lights a burner quickly if it went out. The range generates a spark to light the burner when you to cook with Dacor's exclusive precision burner control system. BURNER CONTROL KNOBS: Use the knobs to turn the knob to the HIGH position. The center knob operates the oven. GRATES: The porcelain coated cast iron grates support the cooking utensils during cooking. They are available to change the size of the backguard for installation...
Use & Care Manuals
Page 7
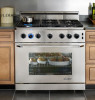
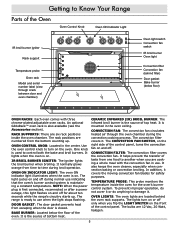
... control both the bake and broil burners. BAKE BURNER: Located below floor) OVEN RACKS: Each oven comes with the convection fan in use. OVEN LIGHTS: The oven lights are 12 Vac, 20 Watt, halogen. 5 The bulbs are located behind filter) Door gasket Bake burner (below the floor of top heat. Getting to Know Your Range Parts of the Oven Oven Control Knob Oven ON Indicator Light IR broil burner igniter Rack support Temperature probe Oven rack Model and serial number label (view through the oven chamber during broil operation. Use the oven control knob to turn on the oven...
... control both the bake and broil burners. BAKE BURNER: Located below floor) OVEN RACKS: Each oven comes with the convection fan in use. OVEN LIGHTS: The oven lights are 12 Vac, 20 Watt, halogen. 5 The bulbs are located behind filter) Door gasket Bake burner (below the floor of top heat. Getting to Know Your Range Parts of the Oven Oven Control Knob Oven ON Indicator Light IR broil burner igniter Rack support Temperature probe Oven rack Model and serial number label (view through the oven chamber during broil operation. Use the oven control knob to turn on the oven...

Use & Care Manuals
Page 12
... to turn the knob all the way to the Bake instructions above. 2. When pre-heated to the set temperature has been reached and the oven is always performed with the door closed . ™™ Convection Broil The convection broil process uses the (IR) gas burner in combination with the convection fan for single rack baking. ™™ Convection Bake The convection bake process uses the standard bake burner in broil mode, turn the CONVECTION FAN switch on the right side of the control panel to BROIL...
... to turn the knob all the way to the Bake instructions above. 2. When pre-heated to the set temperature has been reached and the oven is always performed with the door closed . ™™ Convection Broil The convection broil process uses the (IR) gas burner in combination with the convection fan for single rack baking. ™™ Convection Bake The convection bake process uses the standard bake burner in broil mode, turn the CONVECTION FAN switch on the right side of the control panel to BROIL...

Use & Care Manuals
Page 13
... not level. Oven and/or rack overcrowded. Dacor recommends rack levels 4 or 5. 2. Set timer to time baking functions. • Wait until oven is on top. Baking Tips Tips for best baking results. For cakes, a wooden pick placed in the center. Level oven and rack as needed. Look through the door window to check the progress of pans. 11 The oven ON indicator light will illuminate to indicate the oven is preheated. Oven temperature too high. ness. Reduce oven temperature. Operating Your Range To Broil: 1.
... not level. Oven and/or rack overcrowded. Dacor recommends rack levels 4 or 5. 2. Set timer to time baking functions. • Wait until oven is on top. Baking Tips Tips for best baking results. For cakes, a wooden pick placed in the center. Level oven and rack as needed. Look through the door window to check the progress of pans. 11 The oven ON indicator light will illuminate to indicate the oven is preheated. Oven temperature too high. ness. Reduce oven temperature. Operating Your Range To Broil: 1.
Use & Care Manuals
Page 17
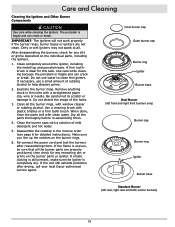
... the parts well with window cleaner or rubbing alcohol. Re-connect the power cord and test the burners after drying, call your local Dacor authorized service agent. After disassembling the burners, check for detailed instructions). Inner burner cap Outer burner cap Burner ring Igniter Burner base Dual Burner (left front and right front burners only) Burner cap Burner ring Igniter Burner base Standard Burner (left rear, right rear and both center burners) 15 Use care while cleaning because...
... the parts well with window cleaner or rubbing alcohol. Re-connect the power cord and test the burners after drying, call your local Dacor authorized service agent. After disassembling the burners, check for detailed instructions). Inner burner cap Outer burner cap Burner ring Igniter Burner base Dual Burner (left front and right front burners only) Burner cap Burner ring Igniter Burner base Standard Burner (left rear, right rear and both center burners) 15 Use care while cleaning because...

Use & Care Manuals
Page 18
... mild detergent and hot water. Do not use the rough side of heat. With the oven cool, pull straight out on the valve stem that is at an angle. On the dual burner knobs, the high flame and simmer (low) icons are chromeplated. To clean heavy soil, use abrasives or commercial oven cleaners. Use a mild glass cleaner to remove them for instructions on each knob and pull...
... mild detergent and hot water. Do not use the rough side of heat. With the oven cool, pull straight out on the valve stem that is at an angle. On the dual burner knobs, the high flame and simmer (low) icons are chromeplated. To clean heavy soil, use abrasives or commercial oven cleaners. Use a mild glass cleaner to remove them for instructions on each knob and pull...
Use & Care Manuals
Page 20
... dry igniter and burner assembly according to Care and Cleaning section. Make sure the gas supply valve is reversed or not properly grounded. Air intake holes obstructed. Burner parts are dirty or clogged. Power supply polarity is in the "ON" position. Orange glow on ceiling of gas and the correct altitude. Range not connected to . Turn on when the oven knob is set up for the type of oven when broiling. Burner parts...
... dry igniter and burner assembly according to Care and Cleaning section. Make sure the gas supply valve is reversed or not properly grounded. Air intake holes obstructed. Burner parts are dirty or clogged. Power supply polarity is in the "ON" position. Orange glow on ceiling of gas and the correct altitude. Range not connected to . Turn on when the oven knob is set up for the type of oven when broiling. Burner parts...
Use & Care Manuals
Page 21
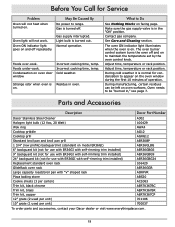
... operation. What to be left on model ER36GI) AER36GLBG 6" backguard kit (not for use with ER36GI with self-rimming trim installed) AER36GBG6 9" backguard kit (not for use with ER36GI with self-rimming trim installed) AER36GBG9 24" backguard kit (not for condensation to appear on to range. Oven ON indicator light goes on facing page. Incorrect cooking time, temp. See Care and Cleaning section. The oven burner control system turns the oven off . Adjust time, temperature or rack position. During cold weather it is on oven door...
... operation. What to be left on model ER36GI) AER36GLBG 6" backguard kit (not for use with ER36GI with self-rimming trim installed) AER36GBG6 9" backguard kit (not for use with ER36GI with self-rimming trim installed) AER36GBG9 24" backguard kit (not for condensation to appear on to range. Oven ON indicator light goes on facing page. Incorrect cooking time, temp. See Care and Cleaning section. The oven burner control system turns the oven off . Adjust time, temperature or rack position. During cold weather it is on oven door...


