User Guide
Page 3
... Network Security Guidelines 2 Additional Security Tips 2 Chapter 3: Advanced Configuration 3 Wireless > Basic Wireless Settings 3 Wireless > Wireless Network Site Survey 5 Wireless > WMM 7 Wireless > Advanced Wireless Settings 8 Network Setup > Basic Network Settings 9 Administration > Management 10 Administration > Factory Defaults 10 Administration > Upgrade Firmware 10 Status > Bridge 11 Status > Wireless 11 Status > About 11 Appendix A: Troubleshooting...
... Network Security Guidelines 2 Additional Security Tips 2 Chapter 3: Advanced Configuration 3 Wireless > Basic Wireless Settings 3 Wireless > Wireless Network Site Survey 5 Wireless > WMM 7 Wireless > Advanced Wireless Settings 8 Network Setup > Basic Network Settings 9 Administration > Management 10 Administration > Factory Defaults 10 Administration > Upgrade Firmware 10 Status > Bridge 11 Status > Wireless 11 Status > About 11 Appendix A: Troubleshooting...
User Guide
Page 4
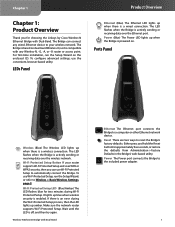
.... To use the convenient, browser-based utility. Make sure the network router supports Wi‑Fi Protected Setup. To configure advanced settings, use Wi-Fi Protected Setup, run the Setup Wizard on the enclosed CD. If there is a wireless connection. Power The Power port connects the Bridge... to reset the Bridge's factory defaults. Power (Blue) The Power LED lights up amber. Wi-Fi Protected Setup LED (Blue/Amber) The LED flashes blue for approximately five seconds, or restore the defaults from Administration > Factory Defaults in the Bridge's...
.... To use the convenient, browser-based utility. Make sure the network router supports Wi‑Fi Protected Setup. To configure advanced settings, use Wi-Fi Protected Setup, run the Setup Wizard on the enclosed CD. If there is a wireless connection. Power The Power port connects the Bridge... to reset the Bridge's factory defaults. Power (Blue) The Power LED lights up amber. Wi-Fi Protected Setup LED (Blue/Amber) The LED flashes blue for approximately five seconds, or restore the defaults from Administration > Factory Defaults in the Bridge's...
User Guide
Page 6
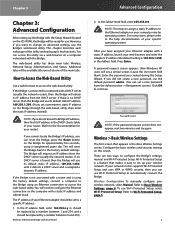
... again. Configure the basic wireless and security settings on your computer vary by a number between 0 and 255). Wi-Fi Protected Setup is assigned a dynamic IP address. Wireless Configuration To manually configure your specific operating system. Additional tabs will request an IP address from...in the DHCP clients table of your wireless network, select Manual. Refer to configure the Bridge's settings, manual and Wi-Fi Protected Setup. Chapter 3 Chapter 3: Advanced Configuration After setting up your wireless network. This chapter describes each web page of the main tabs. ...
... again. Configure the basic wireless and security settings on your computer vary by a number between 0 and 255). Wi-Fi Protected Setup is assigned a dynamic IP address. Wireless Configuration To manually configure your specific operating system. Additional tabs will request an IP address from...in the DHCP clients table of your wireless network, select Manual. Refer to configure the Bridge's settings, manual and Wi-Fi Protected Setup. Chapter 3 Chapter 3: Advanced Configuration After setting up your wireless network. This chapter describes each web page of the main tabs. ...

User Guide
Page 8
...Register or the appropriate button. (It is 40/64 bits (10 hex digits). After the Bridge has been configured, click Close. The Wi-Fi Protected Setup screen displays the Link Status, Network Name (SSID), and Security method. The Wireless Network Site Survey screen lists the wireless networks detected by the Bridge.... The default is also listed on the label on the Bridge's Wi-Fi Protected Setup screen. Key 1 Enter the WEP key of your router requests the PIN number of WEP encryption, 40/64 bits (10 hex digits) or 104...
...Register or the appropriate button. (It is 40/64 bits (10 hex digits). After the Bridge has been configured, click Close. The Wi-Fi Protected Setup screen displays the Link Status, Network Name (SSID), and Security method. The Wireless Network Site Survey screen lists the wireless networks detected by the Bridge.... The default is also listed on the label on the Bridge's Wi-Fi Protected Setup screen. Key 1 Enter the WEP key of your router requests the PIN number of WEP encryption, 40/64 bits (10 hex digits) or 104...
User Guide
Page 9
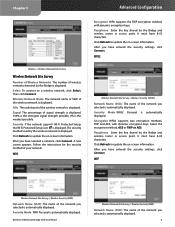
... network is displayed. GHz The radio band of the network you have 8-63 characters. Security If the network supports Wi‑Fi Protected Setup, the Wi-Fi Protected Setup icon is displayed. WEP Wireless Network Site Survey > Wireless Security (WPA) Network Name (SSID) The name of your network. It must have entered...
... network is displayed. GHz The radio band of the network you have 8-63 characters. Security If the network supports Wi‑Fi Protected Setup, the Wi-Fi Protected Setup icon is displayed. WEP Wireless Network Site Survey > Wireless Security (WPA) Network Name (SSID) The name of your network. It must have entered...

User Guide
Page 10
... > WMM® Configure the Wireless MultiMedia (WMM) settings. Select No to the four access modes available. Select Open to be accumulated in which the ADDBA setup is Auto, which allows either Open system or Shared key authentication to use shared key authentication; Min. Authentication The default is terminated, if there are...
... > WMM® Configure the Wireless MultiMedia (WMM) settings. Select No to the four access modes available. Select Open to be accumulated in which the ADDBA setup is Auto, which allows either Open system or Shared key authentication to use shared key authentication; Min. Authentication The default is terminated, if there are...

User Guide
Page 11
...10. Select No to cancel your changes. Max. The range is Yes. Timeout Internal This option defines the timeout period in which the ADDBA setup is terminated, if there are no frame exchanges within this duration by the timer. Min. Chapter 3 condition" before it is closed by ...to cancel your changes. Click Save Settings to apply your changes, or click Cancel Changes to 65535 ms. The default is 0, which the ADDBA setup is closed by the Block Acknowledgement (ACK) agreement. Size of Packet in Aggregation This option defines the minimum size (in bytes) of packets ...
...10. Select No to cancel your changes. Max. The range is Yes. Timeout Internal This option defines the timeout period in which the ADDBA setup is terminated, if there are no frame exchanges within this duration by the timer. Min. Chapter 3 condition" before it is closed by ...to cancel your changes. Click Save Settings to apply your changes, or click Cancel Changes to 65535 ms. The default is 0, which the ADDBA setup is closed by the Block Acknowledgement (ACK) agreement. Size of Packet in Aggregation This option defines the minimum size (in bytes) of packets ...
User Guide
Page 12
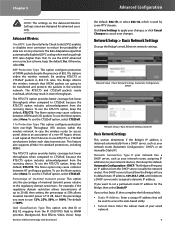
...static IP address, 169.254.1.250, until it will request an IP address from the receiving device. Network Setup > Basic Network Settings (Automatic Configuration DHCP) Network Setup > Basic Network Settings (Static IP) Basic Network Settings This section determines if the Bridge's IP address is ...protects the packets in noisy channels. QoS Classification Type This option sets 802.1D or 802.1Q mapping from the receiving device. Network Setup > Basic Network Settings Change the Bridge's wired, Ethernet network settings. DHCP), or set a permanent static IP address for advanced users...
...static IP address, 169.254.1.250, until it will request an IP address from the receiving device. Network Setup > Basic Network Settings (Automatic Configuration DHCP) Network Setup > Basic Network Settings (Static IP) Basic Network Settings This section determines if the Bridge's IP address is ...protects the packets in noisy channels. QoS Classification Type This option sets 802.1D or 802.1Q mapping from the receiving device. Network Setup > Basic Network Settings Change the Bridge's wired, Ethernet network settings. DHCP), or set a permanent static IP address for advanced users...
User Guide
Page 15
...;• Make sure the wireless-enabled device is case-sensitive. If you are not addressed here, refer to Chapter 3: Advanced Configuration, page 3). 2. Click the Network Setup tab. 3. Check the following : •• The password is on -screen. Wireless-N Ethernet Bridge with the wireless router. 1. Access the web-based utility of the...
...;• Make sure the wireless-enabled device is case-sensitive. If you are not addressed here, refer to Chapter 3: Advanced Configuration, page 3). 2. Click the Network Setup tab. 3. Check the following : •• The password is on -screen. Wireless-N Ethernet Bridge with the wireless router. 1. Access the web-based utility of the...
User Guide
Page 16
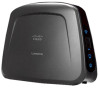
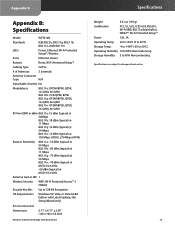
Appendix B Appendix B: Specifications Model WET610N Standards IEEE 802.3u, 802.11g, 802.11b, 802.11a, draft 802.11n LEDs Power, Ethernet, Wi-Fi Protected Setup™, Wireless Ports Ethernet, Power Buttons Reset, Wi-Fi Protected Setup™ Cabling Type CAT5e # of Antennas 3 (internal) Antenna ... 2 (WPA2) Security Key Bits Up to 128-Bit Encryption OS Requirements Windows XP, Vista, or Vista 64-Bit Edition with Latest Updates (for Setup Wizard only) Environmental Dimensions 5.71" x 4.17" x 2.05" (145 x 106 x 52 mm) Wireless-N Ethernet Bridge with Dual-Band Specifications...
Appendix B Appendix B: Specifications Model WET610N Standards IEEE 802.3u, 802.11g, 802.11b, 802.11a, draft 802.11n LEDs Power, Ethernet, Wi-Fi Protected Setup™, Wireless Ports Ethernet, Power Buttons Reset, Wi-Fi Protected Setup™ Cabling Type CAT5e # of Antennas 3 (internal) Antenna ... 2 (WPA2) Security Key Bits Up to 128-Bit Encryption OS Requirements Windows XP, Vista, or Vista 64-Bit Edition with Latest Updates (for Setup Wizard only) Environmental Dimensions 5.71" x 4.17" x 2.05" (145 x 106 x 52 mm) Wireless-N Ethernet Bridge with Dual-Band Specifications...