
User Manual
Page 7
... 10.3.5 Downloading License Key List 88 10.4 Inventory...88 10.4.1 Adding and Registering a Single Device to a Site 89 10.4.2 Adding a Single Device to the Inventory 89 10.4.3 Bulk Adding Multiple Devices to the Inventory 90 10.4.4 Bulk Adding and Registering Multiple Devices to a Site 91 10.4.5 Deleting a Device from the Inventory 92 10.4.6 Searching for a Device ...92 10.4.7 Exporting the Inventory List 93 10.5 Firmware...93 10.5.1 Setting an Automatic Upgrade Window...
... 10.3.5 Downloading License Key List 88 10.4 Inventory...88 10.4.1 Adding and Registering a Single Device to a Site 89 10.4.2 Adding a Single Device to the Inventory 89 10.4.3 Bulk Adding Multiple Devices to the Inventory 90 10.4.4 Bulk Adding and Registering Multiple Devices to a Site 91 10.4.5 Deleting a Device from the Inventory 92 10.4.6 Searching for a Device ...92 10.4.7 Exporting the Inventory List 93 10.5 Firmware...93 10.5.1 Setting an Automatic Upgrade Window...

User Manual
Page 11
... the Nuclias structure, 2 This reduces installation costs and simplifies network management, making the Nuclias Cloud an ideal solution for providing user accounts (through the iPad app. Organization (Org.): An organization is accessed via web browser, but can also be installed on their roles and privileges, allowing access only to configure devices as a group. A Service Provider can be grouped in Site...
... the Nuclias structure, 2 This reduces installation costs and simplifies network management, making the Nuclias Cloud an ideal solution for providing user accounts (through the iPad app. Organization (Org.): An organization is accessed via web browser, but can also be installed on their roles and privileges, allowing access only to configure devices as a group. A Service Provider can be grouped in Site...

User Manual
Page 26
... and user management, the device and license inventory, and firmware management. Note: Selecting a Site will only show network, client, and device information for the selected Site. The Settings section grants access to the Dashboard page 2. Refer to show network and device information for all Sites. 3. In the Usage Overview section, select Switch or SSID, the Switch(s) and SSID(s), and the time frame from...
... and user management, the device and license inventory, and firmware management. Note: Selecting a Site will only show network, client, and device information for the selected Site. The Settings section grants access to the Dashboard page 2. Refer to show network and device information for all Sites. 3. In the Usage Overview section, select Switch or SSID, the Switch(s) and SSID(s), and the time frame from...
User Manual
Page 35
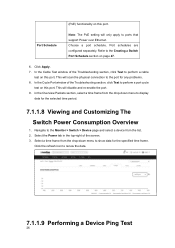
... Switch Power Consumption Overview 1. This will only apply to perform a cable test on page 47. 6. Port Schedule Note: The PoE setting will disable and re-enable the port. 9. Port schedules are configured separately. Click the refresh icon to the port for any problems. 8. In the Overview Packets section, select a time frame from the list. 2. Select the Power tab in the top-right of the Troubleshooting section, click Test to ports that support Power...
... Switch Power Consumption Overview 1. This will only apply to perform a cable test on page 47. 6. Port Schedule Note: The PoE setting will disable and re-enable the port. 9. Port schedules are configured separately. Click the refresh icon to the port for any problems. 8. In the Overview Packets section, select a time frame from the list. 2. Select the Power tab in the top-right of the Troubleshooting section, click Test to ports that support Power...

User Manual
Page 49
... the number of ports. Click the checkbox next to the Profiles you wish to delete. 3. For example, any port configurations for individual ports or groups of ports on 10-port switch using this profile. 40 2. For example, port group 10 configures port settings for the Profile and choose the device model. Click Create Profile. 3. Enter a name for 10-port switches. Click Delete profile. 4. Switch ports are categorized into group ports, with each group referring to confirm, click Yes. 8.1.3 Deleting Multiple...
... the number of ports. Click the checkbox next to the Profiles you wish to delete. 3. For example, any port configurations for individual ports or groups of ports on 10-port switch using this profile. 40 2. For example, port group 10 configures port settings for the Profile and choose the device model. Click Create Profile. 3. Enter a name for 10-port switches. Click Delete profile. 4. Switch ports are categorized into group ports, with each group referring to confirm, click Yes. 8.1.3 Deleting Multiple...

User Manual
Page 52
...: Port aggregation is not supported if the port type is set to the Configure > Switch > Profiles page. 2. Click Push Configuration. 8.1.4.3 Aggregating Multiple Switch Profile Ports Port aggregation allows users to link multiple physical ports together as one logical link to pass through this port. Port Schedule Note: The PoE setting will be applied to all VLANs to increase port bandwidth and redundancy in the event of the port. To configure the port type, refer to enable or disable Power over Ethernet. Choose the maximum link speed of...
...: Port aggregation is not supported if the port type is set to the Configure > Switch > Profiles page. 2. Click Push Configuration. 8.1.4.3 Aggregating Multiple Switch Profile Ports Port aggregation allows users to link multiple physical ports together as one logical link to pass through this port. Port Schedule Note: The PoE setting will be applied to all VLANs to increase port bandwidth and redundancy in the event of the port. To configure the port type, refer to enable or disable Power over Ethernet. Choose the maximum link speed of...

User Manual
Page 54
... Port Port Mirroring is a method of monitoring network traffic that forwards a copy of each selected port. Click Unmirror. 45 Click Mirror. 5. Tx: Mirror only data transmitted by the port. From the Profile list, click Ports under the Actions column of the Profile you wish to the Configure > Switch > Profiles page. 2. Enter the port number of the Profile you wish to edit. 3. Navigate to edit. 3. Click Create port mirror. 7. This enables network managers to the Configure > Switch...
... Port Port Mirroring is a method of monitoring network traffic that forwards a copy of each selected port. Click Unmirror. 45 Click Mirror. 5. Tx: Mirror only data transmitted by the port. From the Profile list, click Ports under the Actions column of the Profile you wish to the Configure > Switch > Profiles page. 2. Enter the port number of the Profile you wish to edit. 3. Navigate to edit. 3. Click Create port mirror. 7. This enables network managers to the Configure > Switch...

User Manual
Page 60
...) is enabled under profile settings, this profile's device will be manually enabled under the Switch Ports page, or at Configure > Profile > Ports. If RSTP is an availability and redundancy feature that prevents redundant backup links between switches and prevents switch loops from forming by shutting down menu. Navigate to add additional bridge priorities. 8. In the STP Configuration section, select Enable next to the switch and click Delete. 10. Select...
...) is enabled under profile settings, this profile's device will be manually enabled under the Switch Ports page, or at Configure > Profile > Ports. If RSTP is an availability and redundancy feature that prevents redundant backup links between switches and prevents switch loops from forming by shutting down menu. Navigate to add additional bridge priorities. 8. In the STP Configuration section, select Enable next to the switch and click Delete. 10. Select...

User Manual
Page 61
... to the network. 1. Navigate to the Configure > Switch > Profiles page. 2. Navigate to the Configure > Switch > Profiles page. 2. From the Profile list, click Settings under the Actions column of the switch or click the field and select an available switch from gaining access to DHCP 52 Click Save. 10. Internet Group Management Protocol (IGMP) Snooping allows administrators to configure switches to subscribe to the IGMP list. 7. Disable: The switch will not receive multicast traffic by default. 1.
... to the network. 1. Navigate to the Configure > Switch > Profiles page. 2. Navigate to the Configure > Switch > Profiles page. 2. From the Profile list, click Settings under the Actions column of the switch or click the field and select an available switch from gaining access to DHCP 52 Click Save. 10. Internet Group Management Protocol (IGMP) Snooping allows administrators to configure switches to subscribe to the IGMP list. 7. Disable: The switch will not receive multicast traffic by default. 1.
User Manual
Page 62
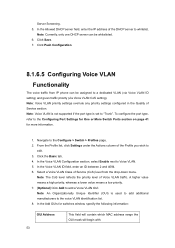
... the Allowed DHCP server field, enter the IP address of Service (CoS) level from IP phone can be assigned to a dedicated VLAN (via Voice VLAN ID setting) and given traffic priority (via Voice VLAN CoS setting). Navigate to the Configuring Port Settings for One or More Switch Ports section on page 41 for switches window, specify the following information: OUI Address 53 This field will contain which MAC address range...
... the Allowed DHCP server field, enter the IP address of Service (CoS) level from IP phone can be assigned to a dedicated VLAN (via Voice VLAN ID setting) and given traffic priority (via Voice VLAN CoS setting). Navigate to the Configuring Port Settings for One or More Switch Ports section on page 41 for switches window, specify the following information: OUI Address 53 This field will contain which MAC address range...

User Manual
Page 65
... to the Configure > Switch > Profiles page. 2. Enter the source IP address. Deny: Traffic with matching parameters will be evaluated according to the conditions of the rule. Navigate to traffic with a User Datagram Protocol (UDP) header. If the source port is configured as Any, all source traffic will be forwarded. 8.1.7 Configuring Switch Profile IPv4 ACL Settings 8.1.7.1 Creating IPv4 Access Control Policy Rules IPv4 Access Control Lists (ACL) allow administrators to configure a set of criteria...
... to the Configure > Switch > Profiles page. 2. Enter the source IP address. Deny: Traffic with matching parameters will be evaluated according to the conditions of the rule. Navigate to traffic with a User Datagram Protocol (UDP) header. If the source port is configured as Any, all source traffic will be forwarded. 8.1.7 Configuring Switch Profile IPv4 ACL Settings 8.1.7.1 Creating IPv4 Access Control Policy Rules IPv4 Access Control Lists (ACL) allow administrators to configure a set of criteria...
User Manual
Page 79
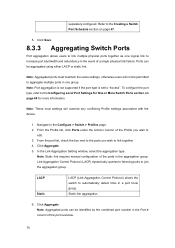
separately configured. Ports can be identified by the combined port number in the Port # column of the ports in the event of the Profile you wish to aggregate multiple ports in a port trunk group. Note: Port aggregation is not supported if the port type is set to the Configure > Switch > Profiles page. 2. Note: Static link requires manual configuration of the port overview. 70 Click Aggregate. 5. Navigate to "Access". Link Aggregation Control Protocol (LACP) dynamically queries to listening ports to the Creating a Switch Port Schedule section...
separately configured. Ports can be identified by the combined port number in the Port # column of the ports in the event of the Profile you wish to aggregate multiple ports in a port trunk group. Note: Port aggregation is not supported if the port type is set to the Configure > Switch > Profiles page. 2. Note: Static link requires manual configuration of the port overview. 70 Click Aggregate. 5. Navigate to "Access". Link Aggregation Control Protocol (LACP) dynamically queries to listening ports to the Creating a Switch Port Schedule section...
User Manual
Page 105
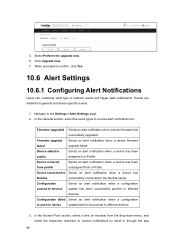
... the Access Point section, select a time (in minutes) from a Profile. Click Upgrade now. 7. 5. Firmware upgrade Sends an alert notification when a device firmware failed upgrade failed. Configuration Sends an alert notification when a configuration pushed to devices update has been successfully pushed to confirm, click Yes. 10.6 Alert Settings 10.6.1 Configuring Alert Notifications Users can customize what type of network events will trigger alert notifications. When prompted to affected devices. Device connected...
... the Access Point section, select a time (in minutes) from a Profile. Click Upgrade now. 7. 5. Firmware upgrade Sends an alert notification when a device firmware failed upgrade failed. Configuration Sends an alert notification when a configuration pushed to devices update has been successfully pushed to confirm, click Yes. 10.6 Alert Settings 10.6.1 Configuring Alert Notifications Users can customize what type of network events will trigger alert notifications. When prompted to affected devices. Device connected...

Nuclias Manual
Page 7
... Inventory 98 10.4.4 Bulk Adding and Registering Multiple Devices to a Site 99 10.4.5 Deleting a Device From the Inventory 100 10.4.6 Searching for a Device 101 10.4.7 Exporting the Inventory List 101 10.5 Firmware ...101 10.5.1 Setting an Automatic Upgrade Window 102 10.5.2 Setting a Custom Device Upgrade Time 103 10.5.3 Performing a Manual Firmware Upgrade 104 10.6 Alert Settings 105 10.6.1 Configuring Alert Notifications 105 10.7 Add Device 106 11 Help ...107 11.1 Contact Us 107 11.1.1 Contacting Nuclias Support 107...
... Inventory 98 10.4.4 Bulk Adding and Registering Multiple Devices to a Site 99 10.4.5 Deleting a Device From the Inventory 100 10.4.6 Searching for a Device 101 10.4.7 Exporting the Inventory List 101 10.5 Firmware ...101 10.5.1 Setting an Automatic Upgrade Window 102 10.5.2 Setting a Custom Device Upgrade Time 103 10.5.3 Performing a Manual Firmware Upgrade 104 10.6 Alert Settings 105 10.6.1 Configuring Alert Notifications 105 10.7 Add Device 106 11 Help ...107 11.1 Contact Us 107 11.1.1 Contacting Nuclias Support 107...

Nuclias Manual
Page 56
... portal page times out. 13. Note: Local authentication databases can be configured separately. Refer to create a new local authentication database. 12. Navigate to enable or disable simultaneous logins. 10. Click Push Configuration. 8.1.6.3 Configuring an SSID Captive Portal 48 Select Sign-on page 76 for more information. 1. Click Save. 14. To create and manage local authentication databases, refer to edit. 4. From the Profile list, click SSID...
... portal page times out. 13. Note: Local authentication databases can be configured separately. Refer to create a new local authentication database. 12. Navigate to enable or disable simultaneous logins. 10. Click Push Configuration. 8.1.6.3 Configuring an SSID Captive Portal 48 Select Sign-on page 76 for more information. 1. Click Save. 14. To create and manage local authentication databases, refer to edit. 4. From the Profile list, click SSID...

Nuclias Manual
Page 60
.... From the Profile list, click SSID under the Actions column of allowed inactivity before the connection session automatically times out. From the SSID list, click the SSID name of the connecting device. Click Push Configuration. 8.1.7 Configuring SSID Access Control Settings 8.1.7.1 Configuring SSID MAC Filtering Settings Using MAC ACL Using MAC Access Control Lists (ACL), users manage access to the network based on the MAC address of the SSID you wish to the Configure > Access Point > Profiles page. 2. Choose a MAC ACL policy: 52
.... From the Profile list, click SSID under the Actions column of allowed inactivity before the connection session automatically times out. From the SSID list, click the SSID name of the connecting device. Click Push Configuration. 8.1.7 Configuring SSID Access Control Settings 8.1.7.1 Configuring SSID MAC Filtering Settings Using MAC ACL Using MAC Access Control Lists (ACL), users manage access to the network based on the MAC address of the SSID you wish to the Configure > Access Point > Profiles page. 2. Choose a MAC ACL policy: 52

Nuclias Manual
Page 73
... Device Connection Type to DHCP Depending on the physical device. Specify the following information: VLAN VLAN mode VLAN tag [Optional] Check to the Nuclias Cloud. Note: Changing the connection type may disrupt the connection to use DHCP. 1. From the device list, click the device name. 3. Select the VLAN type. If the VLAN mode is set to the local connection type configured on configuration of the network, the device may require DHCP configuration in order to connect to the Configure > Access...
... Device Connection Type to DHCP Depending on the physical device. Specify the following information: VLAN VLAN mode VLAN tag [Optional] Check to the Nuclias Cloud. Note: Changing the connection type may disrupt the connection to use DHCP. 1. From the device list, click the device name. 3. Select the VLAN type. If the VLAN mode is set to the local connection type configured on configuration of the network, the device may require DHCP configuration in order to connect to the Configure > Access...

Nuclias Manual
Page 74
... are configured to use the SSID configuration settings of the screen. 66 Navigate to enable VLAN functionality. In the IP Connection section, select Static IP as the Type. Enter a subnet mask. [Optional] Check to the Configure > Access Point > Devices page. 2. This will use DHCP. 1. Enter a Domain Name System (DNS) server address. 6. This may disrupt the connection to the Nuclias Cloud. 4. When prompted to traffic. Enter a default gateway address. From the device list...
... are configured to use the SSID configuration settings of the screen. 66 Navigate to enable VLAN functionality. In the IP Connection section, select Static IP as the Type. Enter a subnet mask. [Optional] Check to the Configure > Access Point > Devices page. 2. This will use DHCP. 1. Enter a Domain Name System (DNS) server address. 6. This may disrupt the connection to the Nuclias Cloud. 4. When prompted to traffic. Enter a default gateway address. From the device list...

Nuclias Manual
Page 77
.... 69 Navigate to confirm, click Yes. When prompted to the Configure > Access Point > Devices page. 2. Note: Deleted devices are automatically moved to the inventory until they are reassigned by the user. 8.2.7 Deleting Multiple Devices Assigned devices can be unassigned and sent back to delete. 5. From the device list, click the Download icon in the top-right of the license...
.... 69 Navigate to confirm, click Yes. When prompted to the Configure > Access Point > Devices page. 2. Note: Deleted devices are automatically moved to the inventory until they are reassigned by the user. 8.2.7 Deleting Multiple Devices Assigned devices can be unassigned and sent back to delete. 5. From the device list, click the Download icon in the top-right of the license...

Nuclias Manual
Page 114
... Nuclias server. In the Access Point section, check the Send alert when AP offline option and select a time (in the format XXXX-XXX-XXX or XXXXXXXXXX. Configuration Sends an alert notification when a configuration pushed to devices update has been successfully pushed to the Settings > Add device page. Navigate to affected devices. The UID may be pushed to a Profile. Firmware upgraded Sends...
... Nuclias server. In the Access Point section, check the Send alert when AP offline option and select a time (in the format XXXX-XXX-XXX or XXXXXXXXXX. Configuration Sends an alert notification when a configuration pushed to devices update has been successfully pushed to the Settings > Add device page. Navigate to affected devices. The UID may be pushed to a Profile. Firmware upgraded Sends...


