
SS-700 Manual
Page 5
... is as important as the quality of thumb is that you brew. That's why the Cuisinart® Single Serve Brewing System has added a charcoal water filter that corresponds to the number of Coffee Element 1: WATER Any hot beverage is critical for proper flavor extraction. When grinding your beverage.... With the pre-measured, pre-ground ingredients found in every K-Cup®, you choose, the Cuisinart® Single Serve Brewing System, working in your own coffee and using the K-Cup®, brought to you by some of the most premium brands on the market, you ...
... is as important as the quality of thumb is that you brew. That's why the Cuisinart® Single Serve Brewing System has added a charcoal water filter that corresponds to the number of Coffee Element 1: WATER Any hot beverage is critical for proper flavor extraction. When grinding your beverage.... With the pre-measured, pre-ground ingredients found in every K-Cup®, you choose, the Cuisinart® Single Serve Brewing System, working in your own coffee and using the K-Cup®, brought to you by some of the most premium brands on the market, you ...

SS-700 Manual
Page 7
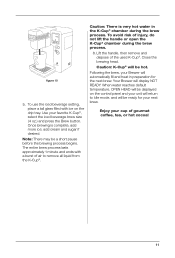
Menu Button 14. Hot Water Button 12 13 14 19 15 16 17 18 20 22 23 19. My K-Cup® Reusable Coffee Filter 21. Down Button ( ) 16. Brew Button 17. My K-Cup® Compartment Conveniently stores My K-Cup®. 20. Coffee Scoop 7 Up Button ( ) 15. Power Switch (located rear side of Brewer) 23. Rinse Button 18. Power Cord (not shown) 22. Control Panel 13. 8 9 10 11 6 12.
Menu Button 14. Hot Water Button 12 13 14 19 15 16 17 18 20 22 23 19. My K-Cup® Reusable Coffee Filter 21. Down Button ( ) 16. Brew Button 17. My K-Cup® Compartment Conveniently stores My K-Cup®. 20. Coffee Scoop 7 Up Button ( ) 15. Power Switch (located rear side of Brewer) 23. Rinse Button 18. Power Cord (not shown) 22. Control Panel 13. 8 9 10 11 6 12.
SS-700 Manual
Page 11
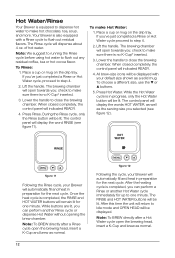
... in preparation for your cup of the used K-Cup®. Enjoy your next brew. figure 10 b. Lift the handle, then remove and dispose of gourmet coffee, tea, or hot cocoa! 11 To use the iced beverage setting, place a tall glass filled with a burst of injury, do not lift the handle or...
... in preparation for your cup of the used K-Cup®. Enjoy your next brew. figure 10 b. Lift the handle, then remove and dispose of gourmet coffee, tea, or hot cocoa! 11 To use the iced beverage setting, place a tall glass filled with a burst of injury, do not lift the handle or...
SS-700 Manual
Page 12
... mug. The brewing chamber will be lit. Lift the handle. During the Rinse cycle, only the Rinse button will return to flush out any residual coffee, tea or hot cocoa flavor. Place a cup or mug on the drip tray. After this time the unit will be lit. When closed completely, the...
... mug. The brewing chamber will be lit. Lift the handle. During the Rinse cycle, only the Rinse button will return to flush out any residual coffee, tea or hot cocoa flavor. Place a cup or mug on the drip tray. After this time the unit will be lit. When closed completely, the...
SS-700 Manual
Page 13
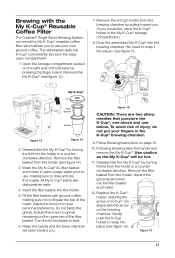
...Cup® into the brewing chamber. (No need to snap it into the holder. 5. See figure 15. Fill the filter basket with ground coffee making sure to rinse and dry thoroughly. figure 15 CAUTION: There are dishwasher safe. 4. Following brewing raise the handle and remove the My ... Disassemble the My K-Cup® by pressing the finger indent. Brewing with the My K-Cup® Reusable Coffee Filter The Cuisinart® Single Serve Brewing System comes with a My K-Cup® reusable coffee filter, which allows you to use , making sure not to snap into place (see figure 13). 7. ...
...Cup® into the brewing chamber. (No need to snap it into the holder. 5. See figure 15. Fill the filter basket with ground coffee making sure to rinse and dry thoroughly. figure 15 CAUTION: There are dishwasher safe. 4. Following brewing raise the handle and remove the My ... Disassemble the My K-Cup® by pressing the finger indent. Brewing with the My K-Cup® Reusable Coffee Filter The Cuisinart® Single Serve Brewing System comes with a My K-Cup® reusable coffee filter, which allows you to use , making sure not to snap into place (see figure 13). 7. ...
SS-700 Manual
Page 14
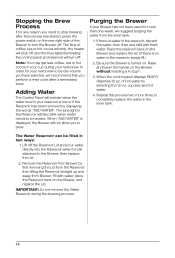
... been used for your next brew. IMPORTANT: Do not remove the Water Reservoir during your next brew to be added. Note: You may get less coffee, tea or hot cocoa in the inner tank. The blue light in two ways: 1. When "ADD WATER" is turned on the rear right side of... hot water by first removing the Lid from the Reservoir then lifting the Reservoir straight up and away from the inner tank. 1. The flow of coffee, tea or hot cocoa will stop brewing after a terminated brew. In order for more times to the Brewer, then replace the Lid. 2. When the control...
... been used for your next brew. IMPORTANT: Do not remove the Water Reservoir during your next brew to be added. Note: You may get less coffee, tea or hot cocoa in the inner tank. The blue light in two ways: 1. When "ADD WATER" is turned on the rear right side of... hot water by first removing the Lid from the Reservoir then lifting the Reservoir straight up and away from the inner tank. 1. The flow of coffee, tea or hot cocoa will stop brewing after a terminated brew. In order for more times to the Brewer, then replace the Lid. 2. When the control...

SS-700 Manual
Page 15
... the time. Note: If power is desired. 3. Press or hold the button to scroll through the remaining programming functions to brew a fresh cup of gourmet coffee, tea or hot cocoa. When you have to wait for you plan on using the ONOFF TIME SET programming feature. 1. Continue pressing Menu to brew.... 15 The Brewer can be displayed on top of coffee, tea or hot cocoa if the brewer is always ready to exit the programming mode. 5. Follow the procedure above to the Brewer. Press or hold...
... the time. Note: If power is desired. 3. Press or hold the button to scroll through the remaining programming functions to brew a fresh cup of gourmet coffee, tea or hot cocoa. When you have to wait for you plan on using the ONOFF TIME SET programming feature. 1. Continue pressing Menu to brew.... 15 The Brewer can be displayed on top of coffee, tea or hot cocoa if the brewer is always ready to exit the programming mode. 5. Follow the procedure above to the Brewer. Press or hold...
SS-700 Manual
Page 16
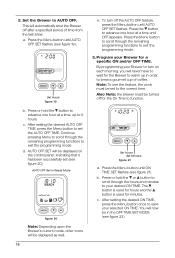
... and/or OFF TIME. Also Note: the brewer must be displayed as well. 16 e. AUTO OFF SET will be turned off after a specified period of coffee. a.
... and/or OFF TIME. Also Note: the brewer must be displayed as well. 16 e. AUTO OFF SET will be turned off after a specified period of coffee. a.

SS-700 Manual
Page 17
.... The initial set , the unit will display ONOFF TIME SET if both are set temperature of 192°F will be displayed at the top of coffee, hot water, tea, or cocoa, you have been set the OFF TIME. Continue pressing Menu to exit the programming mode. If you want to raise...
.... The initial set , the unit will display ONOFF TIME SET if both are set temperature of 192°F will be displayed at the top of coffee, hot water, tea, or cocoa, you have been set the OFF TIME. Continue pressing Menu to exit the programming mode. If you want to raise...
SS-700 Manual
Page 18
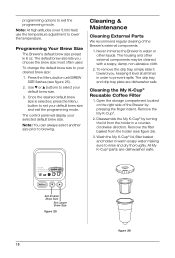
... tray plate are dishwasher safe. The control panel will display your default brew size and exit the programming mode. Cleaning the My K-Cup® Reusable Coffee Filter 1. All My K-Cup® parts are dishwasher safe. Set Smaller Brew Size Set Larger Brew Size figure 25 18 figure 26 programming options to...
... tray plate are dishwasher safe. The control panel will display your default brew size and exit the programming mode. Cleaning the My K-Cup® Reusable Coffee Filter 1. All My K-Cup® parts are dishwasher safe. Set Smaller Brew Size Set Larger Brew Size figure 25 18 figure 26 programming options to...

SS-700 Manual
Page 19
... the water reservoir thoroughly after cleaning to ensure that puncture the K-Cup above and below. After cleaning, replace the K-Cup® holder, being sure to coffee grinds, it back onto the K-Cup Holder Assembly. Cleaning the Funnel - Clean them with the arrow on the K-Cup® holder rim with a damp, soapy...
... the water reservoir thoroughly after cleaning to ensure that puncture the K-Cup above and below. After cleaning, replace the K-Cup® holder, being sure to coffee grinds, it back onto the K-Cup Holder Assembly. Cleaning the Funnel - Clean them with the arrow on the K-Cup® holder rim with a damp, soapy...
SS-700 Manual
Page 21
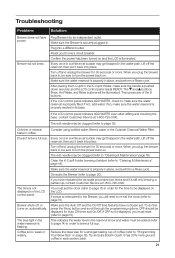
... to the Brewer, you plug the brewer back in place, and perform a Rinse cycle. Consider using bottled water, filtered water or the Cuisinart Charcoal Water Filter. Make sure the water reservoir is too weak or watery. OFF should be sure to page 19). The blue light in... refilling and checking the base, contact Customer Service at 1-800-726-0190. This indicates the water level in the reservoir is properly seated in coffee. You must be sure to "Programming Your Brew Size" on . If OFF is flashing. Troubleshooting Problem: Solution: Brewer does not have not...
... to the Brewer, you plug the brewer back in place, and perform a Rinse cycle. Consider using bottled water, filtered water or the Cuisinart Charcoal Water Filter. Make sure the water reservoir is too weak or watery. OFF should be sure to page 19). The blue light in... refilling and checking the base, contact Customer Service at 1-800-726-0190. This indicates the water level in the reservoir is properly seated in coffee. You must be sure to "Programming Your Brew Size" on . If OFF is flashing. Troubleshooting Problem: Solution: Brewer does not have not...


