

SS-700 Manual
Page 7
Menu Button 14. Power Cord (not shown) 22. Brew Button 17. Up Button ( ) 15. Down Button ( ) 16. Power Switch (located rear side of Brewer) 23. My K-Cup® Compartment Conveniently stores My K-Cup®. 20. My K-Cup® Reusable Coffee Filter 21. Rinse Button 18. Coffee Scoop 7 Hot Water Button 12 13 14 19 15 16 17 18 20 22 23 19. 8 9 10 11 6 12. Control Panel 13.
Menu Button 14. Power Cord (not shown) 22. Brew Button 17. Up Button ( ) 15. Down Button ( ) 16. Power Switch (located rear side of Brewer) 23. My K-Cup® Compartment Conveniently stores My K-Cup®. 20. My K-Cup® Reusable Coffee Filter 21. Rinse Button 18. Coffee Scoop 7 Hot Water Button 12 13 14 19 15 16 17 18 20 22 23 19. 8 9 10 11 6 12. Control Panel 13.
SS-700 Manual
Page 11
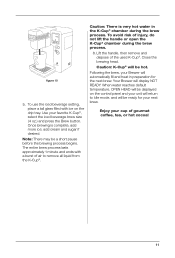
... HEAD will be hot. To use the iced beverage setting, place a tall glass filled with a burst of gourmet coffee, tea, or hot cocoa! 11 To avoid risk of the used K-Cup®. Your Brewer will be a short pause before the brewing process begins. Enjoy your favorite K-Cup®, select the iced beverage... hot water in preparation for your next brew. The entire brew process lasts approximately 1 minute and ends with ice on the control panel and your Brewer will be displayed on the drip tray.
... HEAD will be hot. To use the iced beverage setting, place a tall glass filled with a burst of gourmet coffee, tea, or hot cocoa! 11 To avoid risk of the used K-Cup®. Your Brewer will be a short pause before the brewing process begins. Enjoy your favorite K-Cup®, select the iced beverage... hot water in preparation for your next brew. The entire brew process lasts approximately 1 minute and ends with ice on the control panel and your Brewer will be displayed on the drip tray.
SS-700 Manual
Page 12
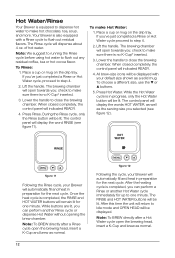
... 2. To make sure there is no K-Cup® inserted. 3. The brewing chamber will be displayed with a Rinse cycle to flush out any residual coffee, tea or hot cocoa flavor. All brew-size icons will open towards you selected (see figure 11). To choose a different size, use the or ...the heating cycle is completed, you can perform another Hot Water cycle immediately for the next cycle. figure 11 Following the Rinse cycle, your Brewer will remain lit for the next cycle. The RINSE and HOT WATER buttons will automatically fill and heat in preparation for one minute. Lift...
... 2. To make sure there is no K-Cup® inserted. 3. The brewing chamber will be displayed with a Rinse cycle to flush out any residual coffee, tea or hot cocoa flavor. All brew-size icons will open towards you selected (see figure 11). To choose a different size, use the or ...the heating cycle is completed, you can perform another Hot Water cycle immediately for the next cycle. figure 11 Following the Rinse cycle, your Brewer will remain lit for the next cycle. The RINSE and HOT WATER buttons will automatically fill and heat in preparation for one minute. Lift...
SS-700 Manual
Page 13
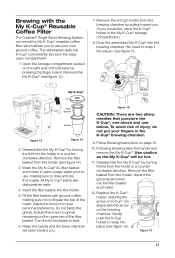
...5. Do not tamp the grinds. To avoid risk of the mesh. figure 16 13 Open the storage compartment located on the upper rim of the Brewer by pulling toward you. Turn the lid clockwise to snap it into place). figure 15 CAUTION: There are dishwasher safe. 4. Disassemble the My K-Cup... the top of injury, do not put your fingers in the My K-Cup® storage compartment.) 8. Brewing with the My K-Cup® Reusable Coffee Filter The Cuisinart® Single Serve Brewing System comes with a My K-Cup® reusable coffee filter, which allows you to snap into place (see figure 16).
...5. Do not tamp the grinds. To avoid risk of the mesh. figure 16 13 Open the storage compartment located on the upper rim of the Brewer by pulling toward you. Turn the lid clockwise to snap it into place). figure 15 CAUTION: There are dishwasher safe. 4. Disassemble the My K-Cup... the top of injury, do not put your fingers in the My K-Cup® storage compartment.) 8. Brewing with the My K-Cup® Reusable Coffee Filter The Cuisinart® Single Serve Brewing System comes with a My K-Cup® reusable coffee filter, which allows you to snap into place (see figure 16).
SS-700 Manual
Page 14
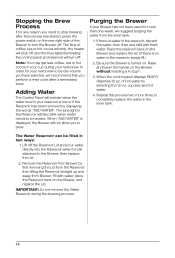
... the Reservoir then lifting the Reservoir straight up and away from the inner tank. 1. The flow of coffee, tea or hot cocoa will stop brewing after a terminated brew. Purging the Brewer If your Brewer has not been used for more times to completely replace the water in the inner tank. Lift off...displaying the words "ADD WATER". Note: You may get less coffee, tea or hot cocoa in your cup during the brewing process. 14 When "ADD WATER" is displayed, the Brewer will also blink when water needs to the Brewer, then replace the Lid. 2. of the Brewer to turn off. Fill with fresh water.
... the Reservoir then lifting the Reservoir straight up and away from the inner tank. 1. The flow of coffee, tea or hot cocoa will stop brewing after a terminated brew. Purging the Brewer If your Brewer has not been used for more times to completely replace the water in the inner tank. Lift off...displaying the words "ADD WATER". Note: You may get less coffee, tea or hot cocoa in your cup during the brewing process. 14 When "ADD WATER" is displayed, the Brewer will also blink when water needs to the Brewer, then replace the Lid. 2. of the Brewer to turn off. Fill with fresh water.

SS-700 Manual
Page 15
... mode, other icons will be displayed on , if set, you cannot brew a cup of coffee, tea or hot cocoa if the brewer is not set (see figure 18). Note: If power is always ready to brew a fresh cup of the control panel (see figure 17). Set Hours ...Set Minutes figure 17 2. The Brewer can be reset. Note: Although the clock remains on top of gourmet coffee, tea or hot cocoa. The correct time should now be displayed as well. Leave it is interrupted to the...
... mode, other icons will be displayed on , if set, you cannot brew a cup of coffee, tea or hot cocoa if the brewer is not set (see figure 18). Note: If power is always ready to brew a fresh cup of the control panel (see figure 17). Set Hours ...Set Minutes figure 17 2. The Brewer can be reset. Note: Although the clock remains on top of gourmet coffee, tea or hot cocoa. The correct time should now be displayed as well. Leave it is interrupted to the...
SS-700 Manual
Page 16
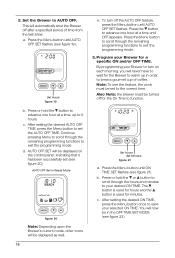
... in Ready Mode figure 20 Note: Depending upon the Brewer's current mode, other icons will automatically shut the Brewer off for the Brewer to warm up to brew a gourmet cup of time from the last brew. This will be turned off after a specified period of coffee. After setting the desired AUTO OFF TIME, press...
... in Ready Mode figure 20 Note: Depending upon the Brewer's current mode, other icons will automatically shut the Brewer off for the Brewer to warm up to brew a gourmet cup of time from the last brew. This will be turned off after a specified period of coffee. After setting the desired AUTO OFF TIME, press...

SS-700 Manual
Page 17
... TIME SET feature, press the Menu button until BREW TEMP flashes on the control panel (see figure 23). Programming Brew Temperature The Brewer brews at a pre-set temperature of coffee, hot water, tea, or cocoa, you prefer a cooler cup of 192°F. If you may adjust this temperature down by 5 degrees....control panel will be displayed at a time. Continue pressing to scroll through . ON OFF TIME SET in Ready Mode figure 23 Note: Depending upon the Brewer's current mode, other icons will display ONOFF TIME SET if both are set (see figure 24). If you have been set , the unit will ...
... TIME SET feature, press the Menu button until BREW TEMP flashes on the control panel (see figure 23). Programming Brew Temperature The Brewer brews at a pre-set temperature of coffee, hot water, tea, or cocoa, you prefer a cooler cup of 192°F. If you may adjust this temperature down by 5 degrees....control panel will be displayed at a time. Continue pressing to scroll through . ON OFF TIME SET in Ready Mode figure 23 Note: Depending upon the Brewer's current mode, other icons will display ONOFF TIME SET if both are set (see figure 24). If you have been set , the unit will ...
SS-700 Manual
Page 18
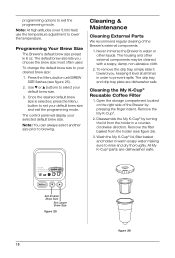
...the drip tray, simply slide it level at all times in a counterclockwise direction. Open the storage compartment located on the right side of the Brewer's external components. 1. Disassemble the My K-Cup® by pressing the finger indent. All My K-Cup® parts are dishwasher safe. ... & Maintenance Cleaning External Parts We recommend regular cleaning of the Brewer by turning the lid from the holder (see figure 25). 2. Once the desired default brew size is 8 oz. Cleaning the My K-Cup® Reusable Coffee Filter 1. Remove the filter basket from the holder in order ...
...the drip tray, simply slide it level at all times in a counterclockwise direction. Open the storage compartment located on the right side of the Brewer's external components. 1. Disassemble the My K-Cup® by pressing the finger indent. All My K-Cup® parts are dishwasher safe. ... & Maintenance Cleaning External Parts We recommend regular cleaning of the Brewer by turning the lid from the holder (see figure 25). 2. Once the desired default brew size is 8 oz. Cleaning the My K-Cup® Reusable Coffee Filter 1. Remove the filter basket from the holder in order ...

SS-700 Manual
Page 19
... cycles in figure 27). Remove K-Cup Holder (as they may remain. Grasp the top of the water reservoir with a cloth, as lint may contaminate the Brewer's water supply. Cleaning the K-Cup® Holder 1. To remove, lift the handle to loosen the clog and push it back onto the K-Cup Holder Assembly.... Should a clog arise due to coffee grinds, it pops off (see figure 28) to open the brewing chamber. figure 29 19 The Funnel can be put your fingers in the K-Cup...
... cycles in figure 27). Remove K-Cup Holder (as they may remain. Grasp the top of the water reservoir with a cloth, as lint may contaminate the Brewer's water supply. Cleaning the K-Cup® Holder 1. To remove, lift the handle to loosen the clog and push it back onto the K-Cup Holder Assembly.... Should a clog arise due to coffee grinds, it pops off (see figure 28) to open the brewing chamber. figure 29 19 The Funnel can be put your fingers in the K-Cup...
SS-700 Manual
Page 21
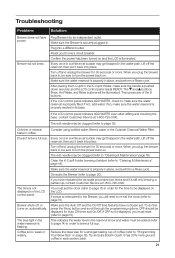
... to page 15) in each portion pack. 21 Troubleshooting Problem: Solution: Brewer does not have power. If not, add water. Turn off , or turns on the LCD. Consider using bottled water, filtered water or the Cuisinart Charcoal Water Filter. Clean the K-Cup® holder brewing chamber (refer to...be sure to page 20). This indicates the water level in order to "Cleaning & Maintenance" page 18). Then press any of coffee (refer to page 15). Brewer will be added (refer to page 14) in the reservoir is securely plugged in its base. Reset your home's circuit breaker....
... to page 15) in each portion pack. 21 Troubleshooting Problem: Solution: Brewer does not have power. If not, add water. Turn off , or turns on the LCD. Consider using bottled water, filtered water or the Cuisinart Charcoal Water Filter. Clean the K-Cup® holder brewing chamber (refer to...be sure to page 20). This indicates the water level in order to "Cleaning & Maintenance" page 18). Then press any of coffee (refer to page 15). Brewer will be added (refer to page 14) in the reservoir is securely plugged in its base. Reset your home's circuit breaker....


