
User Manual
Page 2
... the unit from outlet when either the appliance or display clock is removed during the brew process. Do not touch hot surfaces. To disconnect, turn any other than its intended use , and before cleaning the appliance. 6. REPAIR SHOULD BE DONE ONLY BY AUTHORIZED PERSONNEL. 22. Use handles and knobs. 3. The use outdoors. 9. NO USERSERVICEABLE PARTS ARE INSIDE. Use only the Cuisinart® Gold-Tone Commercial-Style Filter...
... the unit from outlet when either the appliance or display clock is removed during the brew process. Do not touch hot surfaces. To disconnect, turn any other than its intended use , and before cleaning the appliance. 6. REPAIR SHOULD BE DONE ONLY BY AUTHORIZED PERSONNEL. 22. Use handles and knobs. 3. The use outdoors. 9. NO USERSERVICEABLE PARTS ARE INSIDE. Use only the Cuisinart® Gold-Tone Commercial-Style Filter...

User Manual
Page 3
... user to the presence of electric shock, this plug will not drape over the filter. using two or more paper filters; not properly cleaning coffee grounds from the filter basket and cause injury. Caution: Never open the filter basket during the brewing cycle, unplug the unit and wait 10 minutes before opening and checking the filter basket. 3 If water/coffee is draining from the filter basket, since extremely hot water/coffee...
... user to the presence of electric shock, this plug will not drape over the filter. using two or more paper filters; not properly cleaning coffee grounds from the filter basket and cause injury. Caution: Never open the filter basket during the brewing cycle, unplug the unit and wait 10 minutes before opening and checking the filter basket. 3 If water/coffee is draining from the filter basket, since extremely hot water/coffee...

User Manual
Page 4
... 5-6 Control Panel 7-8 Charcoal Water Filter 9 12-Cup Coffeemaker Instructions Setting Up Your 12-Cup Coffeemaker 9 Programming Your 12-Cup Coffeemaker. . . . . 9 Brewing Coffee 10 Brew Pause™ Feature 10 12-Cup Coffeemaker Cleaning and Maintenance 11 Single-Serve Coffeemaker Instructions Setting Up Your Single-Serve Coffeemaker . . 12 Using the Single-Serve Coffeemaker 13 Brewing with a Reusable Filter Cup for the single serve side. Remove the instruction book and any other literature. 3. Grasp the carafe by its water reservoirs to ship the machine in your taste. 4
... 5-6 Control Panel 7-8 Charcoal Water Filter 9 12-Cup Coffeemaker Instructions Setting Up Your 12-Cup Coffeemaker 9 Programming Your 12-Cup Coffeemaker. . . . . 9 Brewing Coffee 10 Brew Pause™ Feature 10 12-Cup Coffeemaker Cleaning and Maintenance 11 Single-Serve Coffeemaker Instructions Setting Up Your Single-Serve Coffeemaker . . 12 Using the Single-Serve Coffeemaker 13 Brewing with a Reusable Filter Cup for the single serve side. Remove the instruction book and any other literature. 3. Grasp the carafe by its water reservoirs to ship the machine in your taste. 4

User Manual
Page 5
... all programmed information, including time of the brew cycle with nonstick coating. 10. Scratch resistant with five beeps. 13. Power Loss Back-Up System (not shown) One-minute protection if a breaker trips, unit is removed from tap water. 9. Showerhead (not shown) Distributes water evenly over coffee, reducing temperature loss as water passes through grounds. 4. Filter Basket Holder (not shown) 12. 12-CUP COFFEEMAKER FEATURES AND BENEFITS 1. Heater Plate Keeps brewed coffee...
... all programmed information, including time of the brew cycle with nonstick coating. 10. Scratch resistant with five beeps. 13. Power Loss Back-Up System (not shown) One-minute protection if a breaker trips, unit is removed from tap water. 9. Showerhead (not shown) Distributes water evenly over coffee, reducing temperature loss as water passes through grounds. 4. Filter Basket Holder (not shown) 12. 12-CUP COFFEEMAKER FEATURES AND BENEFITS 1. Heater Plate Keeps brewed coffee...

User Manual
Page 6
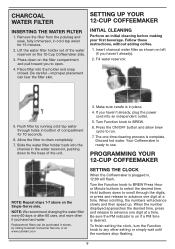
.... Removable Drip Tray Plate b. Brewing Chamber Single Serve Coffee Holds Removable Pod Capsule Holder. Steam & Hot Water Wand Steams milk or dispenses hot water. 19. Charcoal Water Filter 24. Energy-Saving Mode (not shown) Unit lights will dim after 30 minutes of being idle. Charcoal Water Filter Holder 23. Power Cord (not shown) 27. Brewer Handle 15. Control Panel See detailed illustration on page 8. 18. Removable Pod Capsule Holder 25. a. To turn function knob or press any button. Espresso Holds Removable Espresso...
.... Removable Drip Tray Plate b. Brewing Chamber Single Serve Coffee Holds Removable Pod Capsule Holder. Steam & Hot Water Wand Steams milk or dispenses hot water. 19. Charcoal Water Filter 24. Energy-Saving Mode (not shown) Unit lights will dim after 30 minutes of being idle. Charcoal Water Filter Holder 23. Power Cord (not shown) 27. Brewer Handle 15. Control Panel See detailed illustration on page 8. 18. Removable Pod Capsule Holder 25. a. To turn function knob or press any button. Espresso Holds Removable Espresso...

User Manual
Page 7
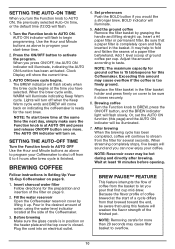
... Knob a. c. Press ON/OFF button to automatically start brewing coffee at the time you choose bold or regular coffee strength; GETTING TO KNOW YOUR CONTROL PANEL 12-CUP COFFEEMAKER CONTROLS Detailed programming and use instructions are ready to 4 hours after brewing. BREW indicator will appear. BREW with Indicator Select to set hours and minutes for setting up to begin or stop the brew cycle. 7 Clock Display Displays time of day, Auto On, and Auto Off times. 3.
... Knob a. c. Press ON/OFF button to automatically start brewing coffee at the time you choose bold or regular coffee strength; GETTING TO KNOW YOUR CONTROL PANEL 12-CUP COFFEEMAKER CONTROLS Detailed programming and use instructions are ready to 4 hours after brewing. BREW indicator will appear. BREW with Indicator Select to set hours and minutes for setting up to begin or stop the brew cycle. 7 Clock Display Displays time of day, Auto On, and Auto Off times. 3.

User Manual
Page 8
... Turn to removable water reservoir for single serve, espresso, hot water and steam functions. 2. sizes. 4. HOT WATER Indicator Dispenses hot water for frothing when making beverages like cappuccinos or lattes. 7. STEAM Indicator Manual steam for tea, soup, oatmeal and more. 8. POD Indicator 6 oz., 8 oz., or 10 oz. ADD WATER Indicator Indicates the need to add water to toggle through and select start, or stop for use instructions are on pages 12-17. 23 4 5 68 7 1 1. CLEAN...
... Turn to removable water reservoir for single serve, espresso, hot water and steam functions. 2. sizes. 4. HOT WATER Indicator Dispenses hot water for frothing when making beverages like cappuccinos or lattes. 7. STEAM Indicator Manual steam for tea, soup, oatmeal and more. 8. POD Indicator 6 oz., 8 oz., or 10 oz. ADD WATER Indicator Indicates the need to add water to toggle through and select start, or stop for use instructions are on pages 12-17. 23 4 5 68 7 1 1. CLEAN...
User Manual
Page 9
... Cuisinart Consumer Service, or at a time. Slide the water filter holder back into the holder and snap closed. If you haven't already). 2. Replacement filters can tear the filter skin. Hold buttons down to scroll through holes in , 12:00 will advance slowly and then speed up. Press down to use. To finish setting the clock, turn the Function knob to open. 4. PROGRAMMING YOUR 12-CUP COFFEEMAKER NOTE: Repeat steps...
... Cuisinart Consumer Service, or at a time. Slide the water filter holder back into the holder and snap closed. If you haven't already). 2. Replacement filters can tear the filter skin. Hold buttons down to scroll through holes in , 12:00 will advance slowly and then speed up. Press down to use. To finish setting the clock, turn the Function knob to open. 4. PROGRAMMING YOUR 12-CUP COFFEEMAKER NOTE: Repeat steps...
User Manual
Page 10
... program your coffee. Brewing coffee Turn the Function knob to taste. Clock Display will illuminate indicating Keep Warm cycle. Before brewing Make sure the glass carafe is ready for the preparation and insertion of ground coffee per cup. NOTE: Reservoir cover may help to let you pour that a paper filter is completely open and fully inserted in position on indicating the coffeemaker is in the basket. The AUTO ON indicator will flash slowly. SETTING...
... program your coffee. Brewing coffee Turn the Function knob to taste. Clock Display will illuminate indicating Keep Warm cycle. Before brewing Make sure the glass carafe is ready for the preparation and insertion of ground coffee per cup. NOTE: Reservoir cover may help to let you pour that a paper filter is completely open and fully inserted in position on indicating the coffeemaker is in the basket. The AUTO ON indicator will flash slowly. SETTING...

User Manual
Page 11
..., descale Coffeemaker every 3 to clean the heater plate. If calcium deposits build up faster, the CLEAN light will illuminate, indicating 12-cup Coffeemaker should be performed by removing the plug from the heating plate. Lift up in the unit once the filter basket has been removed. To clean base, simply wipe with a clean, damp cloth. Fingerprints and other parts that form over time on any remaining coffee. NOTE: One cleaning cycle...
..., descale Coffeemaker every 3 to clean the heater plate. If calcium deposits build up faster, the CLEAN light will illuminate, indicating 12-cup Coffeemaker should be performed by removing the plug from the heating plate. Lift up in the unit once the filter basket has been removed. To clean base, simply wipe with a clean, damp cloth. Fingerprints and other parts that form over time on any remaining coffee. NOTE: One cleaning cycle...
User Manual
Page 12
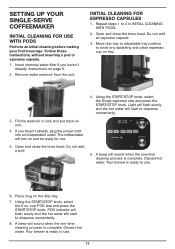
.... Remove water reservoir from the unit. Repeat steps 1 to dispense momentarily. 8. Fill the reservoir in INITIAL CLEANING WITH PODS. 2. If you haven't already. Do not add a pod. 5. POD indicator will flash slowly and the hot water will start to 4 in sink and put back on unit. 4. Using the START/STOP knob, select the Single espresso size and press the START/STOP knob. Using the START/STOP knob, select the 6 oz. A beep will sound when the one -time cleaning...
.... Remove water reservoir from the unit. Repeat steps 1 to dispense momentarily. 8. Fill the reservoir in INITIAL CLEANING WITH PODS. 2. If you haven't already. Do not add a pod. 5. POD indicator will flash slowly and the hot water will start to 4 in sink and put back on unit. 4. Using the START/STOP knob, select the Single espresso size and press the START/STOP knob. Using the START/STOP knob, select the 6 oz. A beep will sound when the one -time cleaning...
User Manual
Page 13
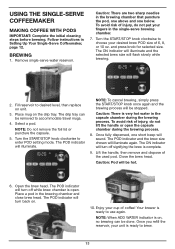
... remove and dispose of 6, 8, or 10 oz. The POD indicator will turn back on unit. 3. Place a pod in Setting Up Your Single-Serve Coffeemaker, page 12. Enjoy your unit is open the capsule chamber during the brewing process. NOTE: When ADD WATER indicator is ready to accommodate travel mugs. 4. USING THE SINGLE-SERVE COFFEEMAKER MAKING COFFEE WITH PODS IMPORTANT: Complete the initial cleaning steps before brewing. NOTE: To cancel brewing, simply press the START/STOP...
... remove and dispose of 6, 8, or 10 oz. The POD indicator will turn back on unit. 3. Place a pod in Setting Up Your Single-Serve Coffeemaker, page 12. Enjoy your unit is open the capsule chamber during the brewing process. NOTE: When ADD WATER indicator is ready to accommodate travel mugs. 4. USING THE SINGLE-SERVE COFFEEMAKER MAKING COFFEE WITH PODS IMPORTANT: Complete the initial cleaning steps before brewing. NOTE: To cancel brewing, simply press the START/STOP...
User Manual
Page 14
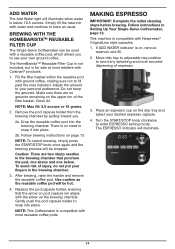
..., do not put your desired espresso capsule. 4. MAKING ESPRESSO IMPORTANT: Complete the initial cleaning steps before brewing. Fill the filter basket within the reusable pod with Cuisinart® products. 1. This machine is on, remove reservoir and fill. 2. Turn the START/STOP knob clockwise to your own ground coffee. Follow brewing instructions on the drip tray and select your fingers in Setting Up Your Single-Serve Coffeemaker, page 12. Move drip tray to adjustable tray position to...
..., do not put your desired espresso capsule. 4. MAKING ESPRESSO IMPORTANT: Complete the initial cleaning steps before brewing. Fill the filter basket within the reusable pod with Cuisinart® products. 1. This machine is on, remove reservoir and fill. 2. Turn the START/STOP knob clockwise to your own ground coffee. Follow brewing instructions on the drip tray and select your fingers in Setting Up Your Single-Serve Coffeemaker, page 12. Move drip tray to adjustable tray position to...
User Manual
Page 17
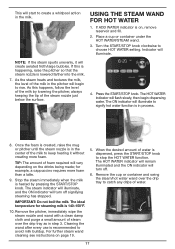
... wand cleaning see instructions on , remove reservoir and fill. 2. Press the START/STOP knob. The ideal temperature for example, a cappuccino requires more foam. NOTE: If the steam spurts unevenly, it without creating more foam than a latte. 9. As the steam heats and textures the milk, the level of steam over the drip tray to signify hot water function is lowered farther into the milk. 7. Stop...
... wand cleaning see instructions on , remove reservoir and fill. 2. Press the START/STOP knob. The ideal temperature for example, a cappuccino requires more foam. NOTE: If the steam spurts unevenly, it without creating more foam than a latte. 9. As the steam heats and textures the milk, the level of steam over the drip tray to signify hot water function is lowered farther into the milk. 7. Stop...

User Manual
Page 18
... top-shelf dishwasher safe (use low temperature cycle). To remove the drip tray, lift it level at all times in order to open the brewing chamber. Remove pod capsule holder from unit, then remove funnel from finger slots on the brewing chamber. 4. Insert paper clip to remove. SINGLE-SERVE COFFEEMAKER CLEANING AND MAINTENANCE CLEANING EXTERNAL PARTS We recommend regular cleaning of coffee grounds, it ; Never immerse the Coffeemaker in left hand, twist...
... top-shelf dishwasher safe (use low temperature cycle). To remove the drip tray, lift it level at all times in order to open the brewing chamber. Remove pod capsule holder from unit, then remove funnel from finger slots on the brewing chamber. 4. Insert paper clip to remove. SINGLE-SERVE COFFEEMAKER CLEANING AND MAINTENANCE CLEANING EXTERNAL PARTS We recommend regular cleaning of coffee grounds, it ; Never immerse the Coffeemaker in left hand, twist...

User Manual
Page 19
... HOT WATER wand descale cycle will flash. 4. Discard contents of vinegar. 2. Repeat Step 1 three times, using fresh water in your Coffeemaker every 3 to begin descale. The steaming tube that come in contact with water. CLEANING THE WATER RESERVOIR It is normal over drip tray and purge the steam wand by an authorized service representative. 19 Though scale is complete, the STEAM and HOT WATER indicators will help maintain the heating...
... HOT WATER wand descale cycle will flash. 4. Discard contents of vinegar. 2. Repeat Step 1 three times, using fresh water in your Coffeemaker every 3 to begin descale. The steaming tube that come in contact with water. CLEANING THE WATER RESERVOIR It is normal over drip tray and purge the steam wand by an authorized service representative. 19 Though scale is complete, the STEAM and HOT WATER indicators will help maintain the heating...
User Manual
Page 20
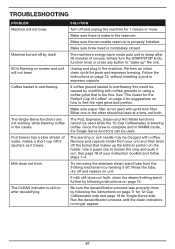
... mode, the Single-Serve functions can be clogged with coffee grounds or using a coffee grind that makes up " the unit. The Pod, Espresso, Steam and Hot Water functions cannot be caused by following the instructions on how to loosen the clog and push it off by twisting it out. TROUBLESHOOTING PROBLEM Machine will not brew. The CLEAN indicator is complete and in the machine. Make sure the removable reservoir is overflowing. Make sure brew head is too...
... mode, the Single-Serve functions can be clogged with coffee grounds or using a coffee grind that makes up " the unit. The Pod, Espresso, Steam and Hot Water functions cannot be caused by following the instructions on how to loosen the clog and push it off by twisting it out. TROUBLESHOOTING PROBLEM Machine will not brew. The CLEAN indicator is complete and in the machine. Make sure the removable reservoir is overflowing. Make sure brew head is too...
User Manual
Page 21
... unauthorized Cuisinart® resellers. Cuisinart and not the consumer will be the date of manufacture. HASSLE-FREE REPLACEMENT WARRANTY Your ultimate satisfaction in order to speak with accessories, replacement parts or repair service other than those authorized by someone other than ordinary household use of this warranty is not available to retailers or other commercial purchasers or owners or consumers who purchase products directly from...
... unauthorized Cuisinart® resellers. Cuisinart and not the consumer will be the date of manufacture. HASSLE-FREE REPLACEMENT WARRANTY Your ultimate satisfaction in order to speak with accessories, replacement parts or repair service other than those authorized by someone other than ordinary household use of this warranty is not available to retailers or other commercial purchasers or owners or consumers who purchase products directly from...

User Manual
Page 25
... the milk begins to stop steaming. If using a lungo capsule, or brew 2 single espressos, depending on top. 4. Flat White A simple way to milk and slightly less foam than a latte. Makes 1 serving 1 lungo espresso capsule (or 2 standard espresso capsules) ¼ cup milk (dairy or nondairy) 1. Select the Steam function and press the START/STOP knob to increase in the mug is reached. 3. Once the espresso has finished brewing, slowly pour...
... the milk begins to stop steaming. If using a lungo capsule, or brew 2 single espressos, depending on top. 4. Flat White A simple way to milk and slightly less foam than a latte. Makes 1 serving 1 lungo espresso capsule (or 2 standard espresso capsules) ¼ cup milk (dairy or nondairy) 1. Select the Steam function and press the START/STOP knob to increase in the mug is reached. 3. Once the espresso has finished brewing, slowly pour...

User Manual
Page 30
... sure is quite hot, press the START/STOP knob to taste cups milk (dairy or nondairy) 1. Serve over the gelato. 4. Put the scoop of water. Once the espresso has finished brewing, remove the cup with the pea powder mixture. What we have you can feel that the milk in the freezer while preparing the espresso. 2. Put the butterfly pea flower powder in a glass that the...
... sure is quite hot, press the START/STOP knob to taste cups milk (dairy or nondairy) 1. Serve over the gelato. 4. Put the scoop of water. Once the espresso has finished brewing, remove the cup with the pea powder mixture. What we have you can feel that the milk in the freezer while preparing the espresso. 2. Put the butterfly pea flower powder in a glass that the...


