Quick Reference
Page 1
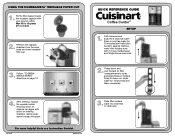
... helpful hints see instruction booklet, page 8). USING THE HOMEBARISTA™ REUSABLE FILTER CUP 1. Gently push down and pull forward on filter compartments to snap into channels in cold tap water for 10 seconds and drain completely. 4. Remove the capsule chamber from both 12-Cup Coffeemaker and Single-Serve reservoirs. 2. After brewing, replace the capsule holder, ensuring arrow on capsule rim aligns with your ground coffee. Follow "TO BREW SINGLE SERVE" directions on brewing...
... helpful hints see instruction booklet, page 8). USING THE HOMEBARISTA™ REUSABLE FILTER CUP 1. Gently push down and pull forward on filter compartments to snap into channels in cold tap water for 10 seconds and drain completely. 4. Remove the capsule chamber from both 12-Cup Coffeemaker and Single-Serve reservoirs. 2. After brewing, replace the capsule holder, ensuring arrow on capsule rim aligns with your ground coffee. Follow "TO BREW SINGLE SERVE" directions on brewing...
Quick Reference
Page 2
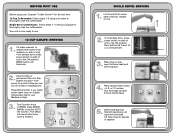
... USE Before using your Cuisinart® Coffee Center™ for the first time: 12-Cup Coffeemaker: Follow steps 1-3 using only water to BREW, press BREW/ WARM, or set the AUTO ON function. Turn Function knob to thoroughly rinse the coffeemaker. Lift off and fill 40-ounce water reservoir, replace on tray, open the brew head and insert capsule. 4. Five beeps will illuminate. When beverage has finished dispensing, all lights will sound when brew...
... USE Before using your Cuisinart® Coffee Center™ for the first time: 12-Cup Coffeemaker: Follow steps 1-3 using only water to BREW, press BREW/ WARM, or set the AUTO ON function. Turn Function knob to thoroughly rinse the coffeemaker. Lift off and fill 40-ounce water reservoir, replace on tray, open the brew head and insert capsule. 4. Five beeps will illuminate. When beverage has finished dispensing, all lights will sound when brew...
User Manual
Page 1
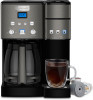
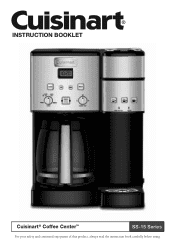
INSTRUCTION BOOKLET Cuisinart® Coffee Center™ SS-15 Series For your safety and continued enjoyment of this product, always read the instruction book carefully before using.
INSTRUCTION BOOKLET Cuisinart® Coffee Center™ SS-15 Series For your safety and continued enjoyment of this product, always read the instruction book carefully before using.
User Manual
Page 2
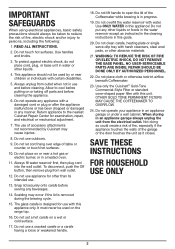
.... 3. Allow to cool before serving any other liquids. 4. Do not operate any manner. Do not clean carafe, heating plate or single serve drip tray with a damaged cord or plug or after the appliance malfunctions or has been dropped or damaged in water or other liquids or foods in the water reservoir except as it closes. NO USER-SERVICEABLE PARTS ARE INSIDE. REPAIR SHOULD BE DONE ONLY...
.... 3. Allow to cool before serving any other liquids. 4. Do not operate any manner. Do not clean carafe, heating plate or single serve drip tray with a damaged cord or plug or after the appliance malfunctions or has been dropped or damaged in water or other liquids or foods in the water reservoir except as it closes. NO USER-SERVICEABLE PARTS ARE INSIDE. REPAIR SHOULD BE DONE ONLY...
User Manual
Page 3
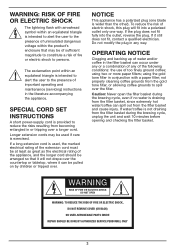
... NOT REMOVE COVER (OR BACK) NO USER-SERVICEABLE PARTS INSIDE REPAIR SHOULD BE DONE BY AUTHORIZED SERVICE PERSONNEL ONLY 3 NOTICE This appliance has a polarized plug (one way. not properly cleaning coffee grounds from the gold tone filter, or allowing coffee grounds to reduce the risks resulting from the filter basket and cause injury. WARNING: RISK OF FIRE OR ELECTRIC SHOCK The lightning flash with a paper filter; using...
... NOT REMOVE COVER (OR BACK) NO USER-SERVICEABLE PARTS INSIDE REPAIR SHOULD BE DONE BY AUTHORIZED SERVICE PERSONNEL ONLY 3 NOTICE This appliance has a polarized plug (one way. not properly cleaning coffee grounds from the gold tone filter, or allowing coffee grounds to reduce the risks resulting from the filter basket and cause injury. WARNING: RISK OF FIRE OR ELECTRIC SHOCK The lightning flash with a paper filter; using...
User Manual
Page 4
... the carafe by its water reservoirs to suit your beverage comes from the heating plate, and remove the polybag. 6. ELEMENT 2: COFFEE The flavor of your taste. CONTENTS Important Safeguards 2 Unpacking Instructions 4 The Quest for the Perfect Cup of Coffee . . . .4 Features and Benefits 5-6 Control Panel 7 Charcoal Water Filter 8 12-Cup Coffeemaker Instructions Setting Up Your 12-Cup Coffeemaker . . . . . .8 Programming Your 12-Cup Coffeemaker . . . .8 Brewing Coffee 9 Brew Pause™ Feature 9 12-Cup Coffeemaker Cleaning & Maintenance 10 Single-Serve Coffeemaker Instructions...
... the carafe by its water reservoirs to suit your beverage comes from the heating plate, and remove the polybag. 6. ELEMENT 2: COFFEE The flavor of your taste. CONTENTS Important Safeguards 2 Unpacking Instructions 4 The Quest for the Perfect Cup of Coffee . . . .4 Features and Benefits 5-6 Control Panel 7 Charcoal Water Filter 8 12-Cup Coffeemaker Instructions Setting Up Your 12-Cup Coffeemaker . . . . . .8 Programming Your 12-Cup Coffeemaker . . . .8 Brewing Coffee 9 Brew Pause™ Feature 9 12-Cup Coffeemaker Cleaning & Maintenance 10 Single-Serve Coffeemaker Instructions...
User Manual
Page 5
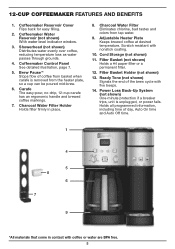
..., unit is removed from the heater plate, so a cup can be poured mid-brew. 6. Coffeemaker Reservoir Cover Flips back for easy filling. 2. Coffeemaker Water Reservoir (not shown) With water level indicator window. 3. Brew PauseTM Stops flow of coffee from tap water. 9. Adjustable Heater Plate Keeps brewed coffee at desired temperature. Filter Basket Holder (not shown) 13. 12-CUP COFFEEMAKER FEATURES AND BENEFITS 1. Scratch resistant with coffee or water are BPA free. 5 Holds all programmed information, including time of the brew cycle with five beeps...
..., unit is removed from the heater plate, so a cup can be poured mid-brew. 6. Coffeemaker Reservoir Cover Flips back for easy filling. 2. Coffeemaker Water Reservoir (not shown) With water level indicator window. 3. Brew PauseTM Stops flow of coffee from tap water. 9. Adjustable Heater Plate Keeps brewed coffee at desired temperature. Filter Basket Holder (not shown) 13. 12-CUP COFFEEMAKER FEATURES AND BENEFITS 1. Scratch resistant with coffee or water are BPA free. 5 Holds all programmed information, including time of the brew cycle with five beeps...

User Manual
Page 6
... reusable filter cup. 18. button; 10 oz. Charcoal Water Filter Holder 23. Power Cord (not shown) 28. Control Panel 6 oz. Removable Drip Tray Plate 21. To turn off completely, turn power switch to the OFF position. 15 16 17 18 22 23 19 20 21 24 25 26 *All materials that come in contact with coffee or water are BPA free. 6 Brew Head 17. button; 8 oz. Brewer Handle 16. SINGLE-SERVE COFFEEMAKER...
... reusable filter cup. 18. button; 10 oz. Charcoal Water Filter Holder 23. Power Cord (not shown) 28. Control Panel 6 oz. Removable Drip Tray Plate 21. To turn off completely, turn power switch to the OFF position. 15 16 17 18 22 23 19 20 21 24 25 26 *All materials that come in contact with coffee or water are BPA free. 6 Brew Head 17. button; 8 oz. Brewer Handle 16. SINGLE-SERVE COFFEEMAKER...

User Manual
Page 7
... will be programmed to automatically start brewing coffee at end of a carafe brew cycle to 4 hours after brewing. PROG Select to begin brew cycle when BREW button is time to clean the Coffeemaker to remove calcium buildup. 4. AUTO ON Select to automatically start brewing up to indicate Keep Warm is ready to set hours and minutes for time of day, Auto On, and Auto Off times. 5. CLOCK Select to brew. button. 10. BOLD Cup Setting with Indicator Use to brew. 11. Coffeemaker can...
... will be programmed to automatically start brewing coffee at end of a carafe brew cycle to 4 hours after brewing. PROG Select to begin brew cycle when BREW button is time to clean the Coffeemaker to remove calcium buildup. 4. AUTO ON Select to automatically start brewing up to indicate Keep Warm is ready to set hours and minutes for time of day, Auto On, and Auto Off times. 5. CLOCK Select to brew. button. 10. BOLD Cup Setting with Indicator Use to brew. 11. Coffeemaker can...
User Manual
Page 8
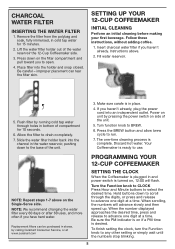
... CLOCK When the Coffeemaker is plugged in the water reservoir, pushing down on the Single-Serve side. Discard hot water. NOTE: We recommend changing the water filter every 60 days or after 60 uses, and more often if you haven't already. Slide the water filter holder back into the channel in and power switch is complete. PROGRAMMING YOUR 12-CUP COFFEEMAKER NOTE: Repeat steps 1-7 above . 2. When the number displayed approaches the desired time...
... CLOCK When the Coffeemaker is plugged in the water reservoir, pushing down on the Single-Serve side. Discard hot water. NOTE: We recommend changing the water filter every 60 days or after 60 uses, and more often if you haven't already. Slide the water filter holder back into the channel in and power switch is complete. PROGRAMMING YOUR 12-CUP COFFEEMAKER NOTE: Repeat steps 1-7 above . 2. When the number displayed approaches the desired time...
User Manual
Page 9
... buttons as above to program your desired temperature High, Medium or Low. Fill the water reservoir Open the Coffeemaker reservoir cover by grasping the handle and lifting straight up . Before brewing Make sure the glass carafe is finished. Turn the Carafe Temperature dial to 4 hours after brewing. Add 1 level scoop of the filter on the heater plate and the top cover is at the start -brew time. 2. Replace the filter basket in the pot. SETTING THE AUTO...
... buttons as above to program your desired temperature High, Medium or Low. Fill the water reservoir Open the Coffeemaker reservoir cover by grasping the handle and lifting straight up . Before brewing Make sure the glass carafe is finished. Turn the Carafe Temperature dial to 4 hours after brewing. Add 1 level scoop of the filter on the heater plate and the top cover is at the start -brew time. 2. Replace the filter basket in the pot. SETTING THE AUTO...

User Manual
Page 10
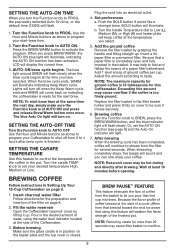
..., cold water to brew! The carafe and carafe lid should be washed in warm, soapy water and rinsed thoroughly, or placed in Clean mode. Though scale is in a dishwasher. 12-CUP COFFEEMAKER CLEANING AND MAINTENANCE Always turn unit off and remove the plug from the heating plate. Remove and discard the paper filter and ground coffee. The filter basket can be performed by an authorized service representative. 1. Do not use any water in your...
..., cold water to brew! The carafe and carafe lid should be washed in warm, soapy water and rinsed thoroughly, or placed in Clean mode. Though scale is in a dishwasher. 12-CUP COFFEEMAKER CLEANING AND MAINTENANCE Always turn unit off and remove the plug from the heating plate. Remove and discard the paper filter and ground coffee. The filter basket can be performed by an authorized service representative. 1. Do not use any water in your...
User Manual
Page 11
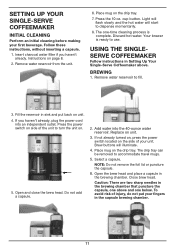
... a capsule in Setting Up Your Single-Serve Coffeemaker above and one below. Close brew head. Instructions on unit. 3. Light will flash slowly and the hot water will illuminate. 4. USING THE SINGLESERVE COFFEEMAKER Follow instructions in the brewing chamber. Remove water reservoir to accommodate travel mugs. 5. Remove water reservoir from the unit. 6. Replace on page 8. 2. If not already turned on, press the power switch located on side of your unit. NOTE: Do not remove the foil lid or puncture...
... a capsule in Setting Up Your Single-Serve Coffeemaker above and one below. Close brew head. Instructions on unit. 3. Light will flash slowly and the hot water will illuminate. 4. USING THE SINGLESERVE COFFEEMAKER Follow instructions in the brewing chamber. Remove water reservoir to accommodate travel mugs. 5. Remove water reservoir from the unit. 6. Replace on page 8. 2. If not already turned on, press the power switch located on side of your unit. NOTE: Do not remove the foil lid or puncture...

User Manual
Page 12
... FILTER CUP The Single-Serve Coffeemaker can be hot. 2. Try the Cuisinart® HomeBarista™ Reusable Filter Cup included with a reusable coffee capsule, which allows you to fill past the max indicator. Close the brew head. Remove the capsule holder from the brewing chamber by pulling toward you refill the reservoir, your cup of the used with your brewer for your personal preference. Simply fill the reservoir with ground coffee, making...
... FILTER CUP The Single-Serve Coffeemaker can be hot. 2. Try the Cuisinart® HomeBarista™ Reusable Filter Cup included with a reusable coffee capsule, which allows you to fill past the max indicator. Close the brew head. Remove the capsule holder from the brewing chamber by pulling toward you refill the reservoir, your cup of the used with your brewer for your personal preference. Simply fill the reservoir with ground coffee, making...
User Manual
Page 13
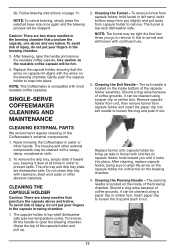
... below . Replace funnel onto capsule holder by lining up . The piercing needle is located on the brewing chamber. 4. Follow brewing instructions on the brewing chamber. NOTE: To cancel brewing, simply press the selected brew size once again and the brewing process will be cleaned using a paper clip or similar tool. SINGLE-SERVE COFFEEMAKER CLEANING AND MAINTENANCE 2. To remove funnel from capsule holder to open the brewing chamber. After cleaning, replace capsule holder, being...
... below . Replace funnel onto capsule holder by lining up . The piercing needle is located on the brewing chamber. 4. Follow brewing instructions on the brewing chamber. NOTE: To cancel brewing, simply press the selected brew size once again and the brewing process will be cleaned using a paper clip or similar tool. SINGLE-SERVE COFFEEMAKER CLEANING AND MAINTENANCE 2. To remove funnel from capsule holder to open the brewing chamber. After cleaning, replace capsule holder, being...
User Manual
Page 14
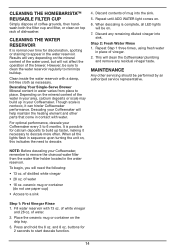
..., making it can hinder Coffeemaker performance. For optimal performance, descale your Coffeemaker, remember to remove the charcoal water filter from place to descale. 4. Discard contents of the water used, but will help maintain the heating element and other servicing should be sure to clean the water reservoir regularly to a sink Step 1: First Vinegar Rinse 1. Repeat until ADD WATER light comes on the drip tray. 3. Press and hold the 6 oz. Descaling Your Single-Serve Brewer...
..., making it can hinder Coffeemaker performance. For optimal performance, descale your Coffeemaker, remember to remove the charcoal water filter from place to descale. 4. Discard contents of the water used, but will help maintain the heating element and other servicing should be sure to clean the water reservoir regularly to a sink Step 1: First Vinegar Rinse 1. Repeat until ADD WATER light comes on the drip tray. 3. Press and hold the 6 oz. Descaling Your Single-Serve Brewer...

User Manual
Page 15
... by someone other commercial purchasers or owners. You may also, according to their preference, return nonconforming products directly to Cuisinart. However, product registration does not eliminate the need only supply proof of purchase and should prove to be defective within the warranty period, we recommend you use for 3 years from state to an independent repair facility, if service or repair can be...
... by someone other commercial purchasers or owners. You may also, according to their preference, return nonconforming products directly to Cuisinart. However, product registration does not eliminate the need only supply proof of purchase and should prove to be defective within the warranty period, we recommend you use for 3 years from state to an independent repair facility, if service or repair can be...


