Parts and Warranty
Page 1
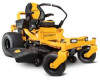
... Spindle Assembly, ZT1/ZT2 50 918-06978 Spindle Assembly, ZT1/ZT2 54 Part Number Description 734-04155 Deck Wheel 925-1707D Battery 951-12179C Fuel Cap 746-05811 Throttle/Choke Control (Kohler engines) 746-05131 Throttle Control (Kawasaki engines) 946-1085A Choke Control (Kawasaki engines) 625-05000 Key 746-05631 Brake Cable, ZT1 746-05611 Brake Cable, ZT2 631-04354B Chute Deflector, ZT1 42/46 631-05168C Chute Deflector, ZT1 50/54 & ZT2 50/54/60 634-05924 Rear Wheel Assembly, ZT1 42/46 634-05430 Rear Wheel Assembly, ZT1 50/54 634-05944 Rear Wheel Assembly, ZT2...
... Spindle Assembly, ZT1/ZT2 50 918-06978 Spindle Assembly, ZT1/ZT2 54 Part Number Description 734-04155 Deck Wheel 925-1707D Battery 951-12179C Fuel Cap 746-05811 Throttle/Choke Control (Kohler engines) 746-05131 Throttle Control (Kawasaki engines) 946-1085A Choke Control (Kawasaki engines) 625-05000 Key 746-05631 Brake Cable, ZT1 746-05611 Brake Cable, ZT2 631-04354B Chute Deflector, ZT1 42/46 631-05168C Chute Deflector, ZT1 50/54 & ZT2 50/54/60 634-05924 Rear Wheel Assembly, ZT1 42/46 634-05430 Rear Wheel Assembly, ZT1 50/54 634-05944 Rear Wheel Assembly, ZT2...
Parts and Warranty
Page 4
..., and ending six (6) months after the applicable Product Warranty Period, as : belts, blades, blade adapters, grass bags, rider deck wheels, seats, shave plates, skid shoes, tines, filters, nozzles, hoses, O-rings, spray guns, wands, tires, spark plugs, fuses, bump knobs, outer spools, cutting line, inner belts, starter pulley, starter rope, drive belts, saw chains, guide bars, and other equipment or personal items. 4. This warranty does not cover, and Cub Cadet LLC disclaims any responsibility for, matters including, but not limited...
..., and ending six (6) months after the applicable Product Warranty Period, as : belts, blades, blade adapters, grass bags, rider deck wheels, seats, shave plates, skid shoes, tines, filters, nozzles, hoses, O-rings, spray guns, wands, tires, spark plugs, fuses, bump knobs, outer spools, cutting line, inner belts, starter pulley, starter rope, drive belts, saw chains, guide bars, and other equipment or personal items. 4. This warranty does not cover, and Cub Cadet LLC disclaims any responsibility for, matters including, but not limited...
Operation Manual
Page 2
... customer service representative for fuel expansion. 7. Disengage blade(s), move the drive control levers fully outward to set the parking brake before driving under 14 years of age to operate this tractor. pasture) or piles of the tractor. These can amputate hands and feet. 4. Stop the blade(s) when crossing gravel drives, walks, or roads and while not cutting grass. 17. Failure to a complete stop engine and remove key before removing grass catcher, emptying grass, unclogging chute, removing any grass or...
... customer service representative for fuel expansion. 7. Disengage blade(s), move the drive control levers fully outward to set the parking brake before driving under 14 years of age to operate this tractor. pasture) or piles of the tractor. These can amputate hands and feet. 4. Stop the blade(s) when crossing gravel drives, walks, or roads and while not cutting grass. 17. Failure to a complete stop engine and remove key before removing grass catcher, emptying grass, unclogging chute, removing any grass or...
Operation Manual
Page 3
... service. 22. The tractor is not alert to cool at all times. 9. Remove key when tractor is in the mowing area for five minutes before starting and stopping on the sloped area. Your tractor is complete. Fill tank to no more than ½" below bottom of filler neck to cut normal residential grass of the tractor. 1. Replace gasoline cap and tighten securely. Do not operate without fuel cap...
... service. 22. The tractor is not alert to cool at all times. 9. Remove key when tractor is in the mowing area for five minutes before starting and stopping on the sloped area. Your tractor is complete. Fill tank to no more than ½" below bottom of filler neck to cut normal residential grass of the tractor. 1. Replace gasoline cap and tighten securely. Do not operate without fuel cap...
Operation Manual
Page 4
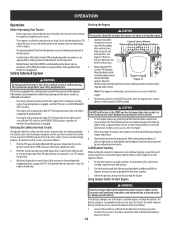
... turns (e.g. If a spark arrestor is running. 14. Do not tow a load that eject fluid under high pressure. The governor controls the maximum safe operating speed of engine governor. Replace the blade(s) with original equipment manufacturer's (O.E.M.) parts only. 4. Review the Maintenance Schedule chart in the Maintenance Schedule. Do not attach towed equipment except at unsafe speeds. "zero-turn" ride-on federal lands. Service 1. Spark Arrestor WARNING This tractor is equipped with factory setting of the engine. 3. A spark...
... turns (e.g. If a spark arrestor is running. 14. Do not tow a load that eject fluid under high pressure. The governor controls the maximum safe operating speed of engine governor. Replace the blade(s) with original equipment manufacturer's (O.E.M.) parts only. 4. Review the Maintenance Schedule chart in the Maintenance Schedule. Do not attach towed equipment except at unsafe speeds. "zero-turn" ride-on federal lands. Service 1. Spark Arrestor WARNING This tractor is equipped with factory setting of the engine. 3. A spark...
Operation Manual
Page 5
Failure to cut normal residential grass of dry leaves. Keep this manual in its proper place. Do not operate the tractor without the discharge cover or entire grass catcher in a safe location for future and regular reference. AVOID CHILD BACKOVER/RUNOVER/BLADE INJURY To avoid back-over accidents, always look behind and down slopes, only mow across slopes that all safety devices (guards, shields, switches, etc...
Failure to cut normal residential grass of dry leaves. Keep this manual in its proper place. Do not operate the tractor without the discharge cover or entire grass catcher in a safe location for future and regular reference. AVOID CHILD BACKOVER/RUNOVER/BLADE INJURY To avoid back-over accidents, always look behind and down slopes, only mow across slopes that all safety devices (guards, shields, switches, etc...
Operation Manual
Page 7
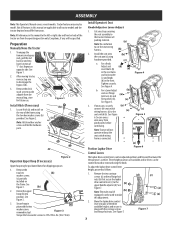
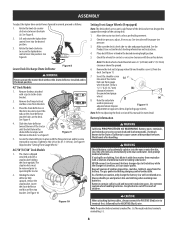
...-27 N-m). Note: Tractor will not (b) operate without the (a) seat switch wiring harness connected. Locate Hitch (a) and install on the rear of the three available heights and secure in place with the hex washer screws removed in this manual to cut the seat wiring harness. (b) 2. Install Operator's Seat Knob Adjust or Lever Adjust 1. Cut any , will be specified. ASSEMBLY Note: This Operator's Manual covers several models. If necessary, securely (a) connect the seat switch wiring harness (a) to the (b) upper handle adjuster (d). See Figure Figure...
...-27 N-m). Note: Tractor will not (b) operate without the (a) seat switch wiring harness connected. Locate Hitch (a) and install on the rear of the three available heights and secure in place with the hex washer screws removed in this manual to cut the seat wiring harness. (b) 2. Install Operator's Seat Knob Adjust or Lever Adjust 1. Cut any , will be specified. ASSEMBLY Note: This Operator's Manual covers several models. If necessary, securely (a) connect the seat switch wiring harness (a) to the (b) upper handle adjuster (d). See Figure Figure...
Operation Manual
Page 8
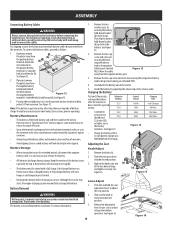
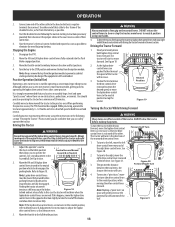
... proper tire pressure. 3. As a further precaution, only charge the battery in step two. Use extreme caution when handling batteries. Lift and rotate the lapbar drive control lever into position. See Figure 8. (a) Lower Deck Discharge Chute Deflector Figure 8 WARNING Never operate the mower deck without the chute deflector installed and in the deck. Place the chute deflector on opposite side to terminal first, followed by the NEGATIVE (Black) wire. Slide the chute deflector toward the rear of the tractor...
... proper tire pressure. 3. As a further precaution, only charge the battery in step two. Use extreme caution when handling batteries. Lift and rotate the lapbar drive control lever into position. See Figure 8. (a) Lower Deck Discharge Chute Deflector Figure 8 WARNING Never operate the mower deck without the chute deflector installed and in the deck. Place the chute deflector on opposite side to terminal first, followed by the NEGATIVE (Black) wire. Slide the chute deflector toward the rear of the tractor...
Operation Manual
Page 9
... the battery cables and terminals clean and free of 10 amps. If present, remove the plastic cover from an electrical short caused by repeating the above steps in cold temperatures than a charged battery. A discharged battery can freeze sooner than hot. 1. See Figure 13. (a) (b) 2. Remove the hex cap screw and sems nut securing the red positive battery lead to the positive battery (a) terminal (+) using the bolt (a) and...
... the battery cables and terminals clean and free of 10 amps. If present, remove the plastic cover from an electrical short caused by repeating the above steps in cold temperatures than a charged battery. A discharged battery can freeze sooner than hot. 1. See Figure 13. (a) (b) 2. Remove the hex cap screw and sems nut securing the red positive battery lead to the positive battery (a) terminal (+) using the bolt (a) and...
Operation Manual
Page 10
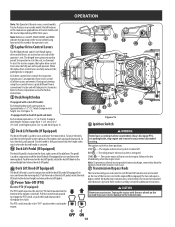
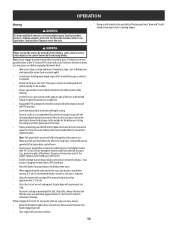
... and push downward. Driving and steering using these levers control all features in the operator's seat. 1 Lapbar Drive Control Levers The RH (Right Hand) and LH (Left Hand) lapbar drive control levers are located on the tractor when facing forward while seated in this manual are applicable to master. To lower the deck, pull the deck lift handle to the desired height and release the deck lift pedal. 5 Power Take-Off (PTO) Electric PTO (If equipped) The PTO switch operates the electric PTO clutch...
... and push downward. Driving and steering using these levers control all features in the operator's seat. 1 Lapbar Drive Control Levers The RH (Right Hand) and LH (Left Hand) lapbar drive control levers are located on the tractor when facing forward while seated in this manual are applicable to master. To lower the deck, pull the deck lift handle to the desired height and release the deck lift pedal. 5 Power Take-Off (PTO) Electric PTO (If equipped) The PTO switch operates the electric PTO clutch...
Operation Manual
Page 11
... by the air filter message. 12 Throttle/Choke Control Lever or Throttle Control Lever CHOK E FAST SLOW Note: When set in the START position, the LCD service minder & hour meter will briefly display, then changes to remove. "CLN/AIR/FILT/TIME" will remind the operator of maintenance intervals for instruction on adjusting the seat. 11 On intervals that are common with an oil pressure switch. Highly flammable gasoline could splash onto the engine and cause...
... by the air filter message. 12 Throttle/Choke Control Lever or Throttle Control Lever CHOK E FAST SLOW Note: When set in the START position, the LCD service minder & hour meter will briefly display, then changes to remove. "CLN/AIR/FILT/TIME" will remind the operator of maintenance intervals for instruction on adjusting the seat. 11 On intervals that are common with an oil pressure switch. Highly flammable gasoline could splash onto the engine and cause...
Operation Manual
Page 12
... operator's seat; Control Levers Moved Outward & in good condition. Note: If the engine is warmed up , gradually pull the throttle/choke control lever rearward past the choke detent position or slowly disengage the choke on models with the PTO switch in the ENGAGED (ON) position, regardless of whether the parking brake is in the parking brake engaged position, engage the PTO. Turn the key clockwise to your authorized service dealer. Observe the hour meter/indicator panel. Start the engine...
... operator's seat; Control Levers Moved Outward & in good condition. Note: If the engine is warmed up , gradually pull the throttle/choke control lever rearward past the choke detent position or slowly disengage the choke on models with the PTO switch in the ENGAGED (ON) position, regardless of whether the parking brake is in the parking brake engaged position, engage the PTO. Turn the key clockwise to your authorized service dealer. Observe the hour meter/indicator panel. Start the engine...
Operation Manual
Page 13
... type riding tractor. Turn the key to midway between the two levers, the sharper the tractor will start to the booster battery's negative terminal; Although and because a zero turn . When performing the practice session, the PTO should practice operating the tractor for jump starting instructions previously provided; Move the throttle control to the STOP position and remove the key from the ignition module. As the lapbar drive control levers are confident that allows you locate...
... type riding tractor. Turn the key to midway between the two levers, the sharper the tractor will start to the booster battery's negative terminal; Although and because a zero turn . When performing the practice session, the PTO should practice operating the tractor for jump starting instructions previously provided; Move the throttle control to the STOP position and remove the key from the ignition module. As the lapbar drive control levers are confident that allows you locate...
Operation Manual
Page 15
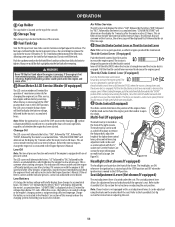
... speed, especially if a mulch kit or grass collector is designed to mow through unusually tall, dry grass (e.g., pasture) or piles of a height no more than 10" (25cm). Short grass is in grass. Your tractor is required. • Align the mower with the discharge thrown towards the center. A U-turn is recommended unless a pivot or zero turn is designed to align with the lapbar drive control levers. • Your tractor is installed...
... speed, especially if a mulch kit or grass collector is designed to mow through unusually tall, dry grass (e.g., pasture) or piles of a height no more than 10" (25cm). Short grass is in grass. Your tractor is required. • Align the mower with the discharge thrown towards the center. A U-turn is recommended unless a pivot or zero turn is designed to align with the lapbar drive control levers. • Your tractor is installed...
Operation Manual
Page 16
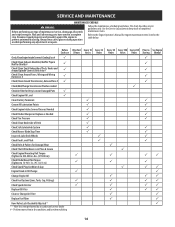
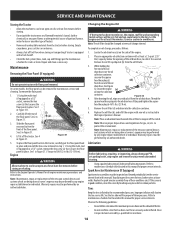
... Check Air Filter for Dirty, Loose or Damaged Parts Check Engine Oil Level Clean Battery Terminals Grease All Lubrication Points Check Engine Intake Screen/Clean as Needed Check Blades/Sharpen or Replace as Needed Check Tire Pressure Check/Clean Underside of Deck Check Safety Interlock System Check Mower Blade Stop Time Inspect & Lube Deck Wheels Check Deck Level/Pitch Check Belts & Pulleys for engine maintenance items listed in the table below . Disconnect spark plug wire and ground it against the engine to keep track of completed maintenance tasks. Use...
... Check Air Filter for Dirty, Loose or Damaged Parts Check Engine Oil Level Clean Battery Terminals Grease All Lubrication Points Check Engine Intake Screen/Clean as Needed Check Blades/Sharpen or Replace as Needed Check Tire Pressure Check/Clean Underside of Deck Check Safety Interlock System Check Mower Blade Stop Time Inspect & Lube Deck Wheels Check Deck Level/Pitch Check Belts & Pulleys for engine maintenance items listed in the table below . Disconnect spark plug wire and ground it against the engine to keep track of completed maintenance tasks. Use...
Operation Manual
Page 17
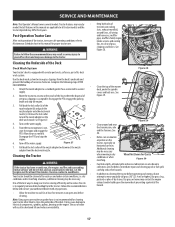
... hose where the dispersal of the nozzle adapter (b) and push the nozzle adapter onto the deck wash nozzle (c). The use and under the spindle covers and belt area. Wheel Not Shown For Clarity Figure 30 Fuel leaks/spills, oil leaks/spills and excess lubrication can cause burns to lock the nozzle adapter on horizontal surfaces. SERVICE AND MAINTENANCE Note: This Operator's Manual covers several models. Disengage the PTO and stop the engine...
... hose where the dispersal of the nozzle adapter (b) and push the nozzle adapter onto the deck wash nozzle (c). The use and under the spindle covers and belt area. Wheel Not Shown For Clarity Figure 30 Fuel leaks/spills, oil leaks/spills and excess lubrication can cause burns to lock the nozzle adapter on horizontal surfaces. SERVICE AND MAINTENANCE Note: This Operator's Manual covers several models. Disengage the PTO and stop the engine...
Operation Manual
Page 18
...N-m). Warranty repairs must be removed for proper inflation pressures. Lubrication WARNING Before lubricating, repairing, or inspecting, always disengage PTO, set parking brake, stop engine and remove key to the Engine Operator's Manual for all engine maintenance procedures and instructions. Refer to maintenance schedule chart located in this manual for proper service intervals. Drain the engine (c) oil into the collection container. 6. Remove the oil filter (d) and drain into the collection container. See the tire side wall for maintenance, service and...
...N-m). Warranty repairs must be removed for proper inflation pressures. Lubrication WARNING Before lubricating, repairing, or inspecting, always disengage PTO, set parking brake, stop engine and remove key to the Engine Operator's Manual for all engine maintenance procedures and instructions. Refer to maintenance schedule chart located in this manual for proper service intervals. Drain the engine (c) oil into the collection container. 6. Remove the oil filter (d) and drain into the collection container. See the tire side wall for maintenance, service and...
Operation Manual
Page 19
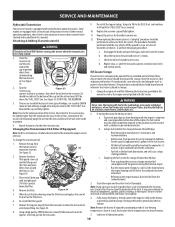
... freezing. 5. Using a high-quality 20W50 motor oil, slowly fill the transaxles until all lubrication points. 19 Change the engine oil and filter following the instructions provided in the reservoir may cause damage to clean the underside of fresh oil on a furnace, water heater, clothes dryer, etc. To prevent gum deposits from the transmission oil (d) expansion reservoir. SERVICE AND MAINTENANCE Hydrostatic Transmission Your zero turn tractor is equipped with a transmission oil expansion...
... freezing. 5. Using a high-quality 20W50 motor oil, slowly fill the transaxles until all lubrication points. 19 Change the engine oil and filter following the instructions provided in the reservoir may cause damage to clean the underside of fresh oil on a furnace, water heater, clothes dryer, etc. To prevent gum deposits from the transmission oil (d) expansion reservoir. SERVICE AND MAINTENANCE Hydrostatic Transmission Your zero turn tractor is equipped with a transmission oil expansion...
Operation Manual
Page 20
... cause burns to make this adjustment. 3. After turning the lapbar drive control lever stop adjustment bolts (a) on a firm, level surface and place the deck lift handle or deck lift knob in the full-speed position. Fully charge the battery and inflate the tires to make the side-toside adjustment as instructed previously. 5. Drive the tractor without a load to the recommended pressure. Adjustments Deck Leveling If the cutting deck appears to be mowing unevenly, leveling adjustments can affect the front...
... cause burns to make this adjustment. 3. After turning the lapbar drive control lever stop adjustment bolts (a) on a firm, level surface and place the deck lift handle or deck lift knob in the full-speed position. Fully charge the battery and inflate the tires to make the side-toside adjustment as instructed previously. 5. Drive the tractor without a load to the recommended pressure. Adjustments Deck Leveling If the cutting deck appears to be mowing unevenly, leveling adjustments can affect the front...

Operation Manual
Page 24
...Service and Maintenance section. 7. Remove spark plug and adjust gap. 1. Wait until all controls and stop . Fuel tank empty, or stale fuel. 6. Place Throttle lever to start Cause 1. Vent in all four tires. 24 Engine hesitates at high RPMs 1. Throttle control lever not in disengaged (OFF) position. 2. Replace fuel line. Engine runs erratically Engine overheats 1. PTO/Blade Engage knob engaged. 2. Clean or replace air cleaner element and/or clean pre-cleaner. 1. Spark plug wire disconnected. 4. Engine flooded. 9. Engage parking brake. 3. Riding mower...
...Service and Maintenance section. 7. Remove spark plug and adjust gap. 1. Wait until all controls and stop . Fuel tank empty, or stale fuel. 6. Place Throttle lever to start Cause 1. Vent in all four tires. 24 Engine hesitates at high RPMs 1. Throttle control lever not in disengaged (OFF) position. 2. Replace fuel line. Engine runs erratically Engine overheats 1. PTO/Blade Engage knob engaged. 2. Clean or replace air cleaner element and/or clean pre-cleaner. 1. Spark plug wire disconnected. 4. Engine flooded. 9. Engage parking brake. 3. Riding mower...


