

Z-Force Series Brochure
Page 1
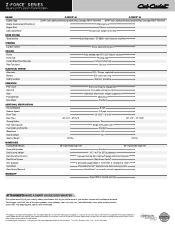
... performance that allows you to get the job done more precise cut on a dime, you'll be mowing blissfully and confidently. The Z-Force® zero-turn rider has an innovative design that extra power comes with a pivoting front axle to follow the contours of ground for ...seat. A STEP UP IN POWER AND PERFORMANCE. UNSURPASSED RESULTS of the Cub Cadet Signature cut . You'll be able to get impeccable results. Along with flat terrain up to 3.5 acres FEATURES 48" and 54" heavy-duty fabricated deck Highly efficient and durable DUAL HYDRO-GEAR™ ZT-2800™ TRANSMISSION...
... performance that allows you to get the job done more precise cut on a dime, you'll be mowing blissfully and confidently. The Z-Force® zero-turn rider has an innovative design that extra power comes with a pivoting front axle to follow the contours of ground for ...seat. A STEP UP IN POWER AND PERFORMANCE. UNSURPASSED RESULTS of the Cub Cadet Signature cut . You'll be able to get impeccable results. Along with flat terrain up to 3.5 acres FEATURES 48" and 54" heavy-duty fabricated deck Highly efficient and durable DUAL HYDRO-GEAR™ ZT-2800™ TRANSMISSION...
Z-Force Series Brochure
Page 2
... tools required 3-year/180-hr limited warranty Attachments make a smart choice even smarter. Weight MOWer DECK Cutting Width/Blades Greasable Spindles Deck Cutting Height Deck Style/Construction Deck Drive System Anti-Scalping Deck Wash Deck Attach/Removal WARRANTY† Z-FORCE® 48 Z-FORCE® 54 22 HP* Cub Cadet® professional-grade Kohler® Courage® PRO V-Twin OHV 24 HP...
... tools required 3-year/180-hr limited warranty Attachments make a smart choice even smarter. Weight MOWer DECK Cutting Width/Blades Greasable Spindles Deck Cutting Height Deck Style/Construction Deck Drive System Anti-Scalping Deck Wash Deck Attach/Removal WARRANTY† Z-FORCE® 48 Z-FORCE® 54 22 HP* Cub Cadet® professional-grade Kohler® Courage® PRO V-Twin OHV 24 HP...
Z-Force Series Warranty Information
Page 1
... above exclusions or limitations may not apply to you and your warranty as : belts, blades, blade adapters, grass bags, rider deck wheels, seats, and tires. e. CUB CADET LLC MANUFACTURER'S LIMITED WARRANTY FOR Z-FORCE S/Z-FORCE ZERO-TURN RIDING MOWER IMPORTANT: To obtain warranty coverage owner must present an original proof of any part found to be...
... above exclusions or limitations may not apply to you and your warranty as : belts, blades, blade adapters, grass bags, rider deck wheels, seats, and tires. e. CUB CADET LLC MANUFACTURER'S LIMITED WARRANTY FOR Z-FORCE S/Z-FORCE ZERO-TURN RIDING MOWER IMPORTANT: To obtain warranty coverage owner must present an original proof of any part found to be...

Z-Force 48 Operator's Manual
Page 3
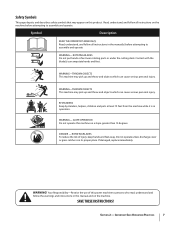
... instructions in serious injury or death. Thrown objects which ricochet can be picked up and thrown by an adult. 9. Never allow children under the cutting deck. Do not operate the mower anyone . This machine is capable of yourself and others. Remove all instructions on the machine and should read and understand...
... instructions in serious injury or death. Thrown objects which ricochet can be picked up and thrown by an adult. 9. Never allow children under the cutting deck. Do not operate the mower anyone . This machine is capable of yourself and others. Remove all instructions on the machine and should read and understand...

Z-Force 48 Operator's Manual
Page 4
... the machine. Do not attempt to mow through unusually tall, dry grass (e.g., pasture) or piles of this dump cart, lawn roller, etc.) on the mower deck presenting a potential fire sliding. Do not tow heavy pull behind before attempting to stop engine and wait until the blade(s) come to load or unload...
... the machine. Do not attempt to mow through unusually tall, dry grass (e.g., pasture) or piles of this dump cart, lawn roller, etc.) on the mower deck presenting a potential fire sliding. Do not tow heavy pull behind before attempting to stop engine and wait until the blade(s) come to load or unload...
Z-Force 48 Operator's Manual
Page 7
... on the machine before attempting to assemble and operate WARNING- ROTATING BLADES Do not put hands or feet near rotating parts or under the cutting deck. WARNING-THROWN OBJECTS This machine may pick up and throw and objects which can cause serious personal injury. Do not operate unless discharge cover or...
... on the machine before attempting to assemble and operate WARNING- ROTATING BLADES Do not put hands or feet near rotating parts or under the cutting deck. WARNING-THROWN OBJECTS This machine may pick up and throw and objects which can cause serious personal injury. Do not operate unless discharge cover or...
Z-Force 48 Operator's Manual
Page 9
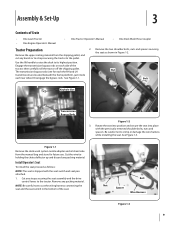
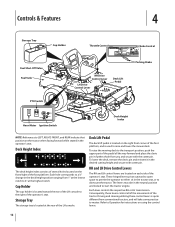
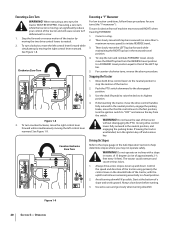
... inside each side of Crate • One Lawn Tractor • One Engine Operator's Manual • One Tractor Operator's Manual • One Deck Wash Hose Coupler Tractor Preparation 2. then carefully roll the tractor off the shipping pallet. See Figure 1-1. Bolt Keyhole Slot Transmission Bypass Rods Figure 1-2...: The seat is shipped with the previously removed shoulder bolts, nuts and spacers. Disengage the bypass rods. Figure 1-1 Remove the deck wash system nozzle adapter and oil drain tube from the shipping pallet, and cut the wiring harness connecting the seat and the seat...
... inside each side of Crate • One Lawn Tractor • One Engine Operator's Manual • One Tractor Operator's Manual • One Deck Wash Hose Coupler Tractor Preparation 2. then carefully roll the tractor off the shipping pallet. See Figure 1-1. Bolt Keyhole Slot Transmission Bypass Rods Figure 1-2...: The seat is shipped with the previously removed shoulder bolts, nuts and spacers. Disengage the bypass rods. Figure 1-1 Remove the deck wash system nozzle adapter and oil drain tube from the shipping pallet, and cut the wiring harness connecting the seat and the seat...
Z-Force 48 Operator's Manual
Page 12
... you and secure with cotter pin. Each hole corresponds to a 1⁄4" change in the desired cutting height and secure with the cotter pin. Deck Lift Pedal The deck lift pedal is located on the right front corner of the foot platform, and is located toward the rear of the LH console to... tray is quite different from 1" at the lowest notch to 4" at the rear of the operator's seat. To lower the deck, remove the clevis pin and reinsert it in the deck height position ranging from conventional tractors, and will take some practice to master. The levers must be in the operator's seat...
... you and secure with cotter pin. Each hole corresponds to a 1⁄4" change in the desired cutting height and secure with the cotter pin. Deck Lift Pedal The deck lift pedal is located on the right front corner of the foot platform, and is located toward the rear of the LH console to... tray is quite different from 1" at the lowest notch to 4" at the rear of the operator's seat. To lower the deck, remove the clevis pin and reinsert it in the deck height position ranging from conventional tractors, and will take some practice to master. The levers must be in the operator's seat...
Z-Force 48 Operator's Manual
Page 13
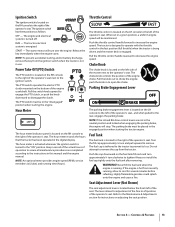
... throttle control handle rearward to operate with the throttle control in the fast position (full throttle) when the tractor is being driven and the mower deck is engaged. Pull the knob out to tighten Always re-install the fuel cap tightly onto the fuel tank after removing. NOTE: If the LH...
... throttle control handle rearward to operate with the throttle control in the fast position (full throttle) when the tractor is being driven and the mower deck is engaged. Pull the knob out to tighten Always re-install the fuel cap tightly onto the fuel tank after removing. NOTE: If the LH...
Z-Force 48 Operator's Manual
Page 15
... Pull it up to the rim. 5. Check the tire inflation pressures - 8-10 psi for damage. c. Keep away from the top of the deck drive belts. Never operate on the control levers. • Be careful when operating near gravel paths and roadways. Always remove debris and other objects ... the fill tube using a funnel to pass before refueling. Repair the damage. Allow the engine several minutes to reduce the chance of the deck drive belts are in place. Before Operating Your Tractor 1. Fill the fuel tank with only clean, fresh, unleaded gasoline with a greater incline...
... Pull it up to the rim. 5. Check the tire inflation pressures - 8-10 psi for damage. c. Keep away from the top of the deck drive belts. Never operate on the control levers. • Be careful when operating near gravel paths and roadways. Always remove debris and other objects ... the fill tube using a funnel to pass before refueling. Repair the damage. Allow the engine several minutes to reduce the chance of the deck drive belts are in place. Before Operating Your Tractor 1. Fill the fuel tank with only clean, fresh, unleaded gasoline with a greater incline...
Z-Force 48 Operator's Manual
Page 16
... be moved to the "OFF" position to the Maintenance & Adjustments section. 8. If a battery charger is malfunctioning. Operation 7. Check if deck is fully charged. Adjust the seat for operator's maximum comfort, visibility and for Starting the Engine. WARNING! Engage the parking brake. 4. ... for proper operation. Using Jumper Cables To Start Engine WARNING! Safety Interlock System This tractor is engaged. Contact your authorized Cub Cadet Dealer. • The safety interlock system prevents the engine from cranking or starting more than the fully out in the ...
... be moved to the "OFF" position to the Maintenance & Adjustments section. 8. If a battery charger is malfunctioning. Operation 7. Check if deck is fully charged. Adjust the seat for operator's maximum comfort, visibility and for Starting the Engine. WARNING! Engage the parking brake. 4. ... for proper operation. Using Jumper Cables To Start Engine WARNING! Safety Interlock System This tractor is engaged. Contact your authorized Cub Cadet Dealer. • The safety interlock system prevents the engine from cranking or starting more than the fully out in the ...
Z-Force 48 Operator's Manual
Page 20
... (no more than ½ maximum reverse speed) to stop , 2. When executing a zero turn the ignition key off and remove key. Use the deck lift pedal to raise the deck to a stop the motion of the LEFT lap bar. 5. If leaving the tractor unattended, turn , the tractor MUST BE STOPPED. Come to its...
... (no more than ½ maximum reverse speed) to stop , 2. When executing a zero turn the ignition key off and remove key. Use the deck lift pedal to raise the deck to a stop the motion of the LEFT lap bar. 5. If leaving the tractor unattended, turn , the tractor MUST BE STOPPED. Come to its...
Z-Force 48 Operator's Manual
Page 21
...not working properly. Checking the Safety Interlock Circuits Periodically check the safety interlock circuits to the highest position before engaging the mower deck. 1. If a safety circuit is not functioning properly. then lift upward from the fully outward neutral position. the engine should ... 2. the PTO should disengage and the mower deck should stop running engine. Using the Mower Deck WARNING! Control the ground speed with the opposite control lever. 4. To check the safety circuits, proceed as designed, contact you Cub Cadet dealer to ensure turns are moved to the ...
...not working properly. Checking the Safety Interlock Circuits Periodically check the safety interlock circuits to the highest position before engaging the mower deck. 1. If a safety circuit is not functioning properly. then lift upward from the fully outward neutral position. the engine should ... 2. the PTO should disengage and the mower deck should stop running engine. Using the Mower Deck WARNING! Control the ground speed with the opposite control lever. 4. To check the safety circuits, proceed as designed, contact you Cub Cadet dealer to ensure turns are moved to the ...

Z-Force 48 Operator's Manual
Page 22
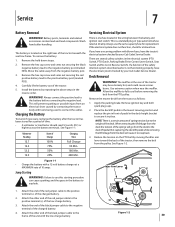
Maintenance & Adjustments 6 Maintenance Schedule Check Gasoline Level Check Hydraulic Transaxles for leaks Check Tires & Tire Pressure Check Deck, Mower and Hydro Drive Belts Check Blades and Blade Bolt Tightness Check Safety Switches for proper Operation Check Engine Intake Screen/Cover Before Each use P P P P P P ...
Maintenance & Adjustments 6 Maintenance Schedule Check Gasoline Level Check Hydraulic Transaxles for leaks Check Tires & Tire Pressure Check Deck, Mower and Hydro Drive Belts Check Blades and Blade Bolt Tightness Check Safety Switches for proper Operation Check Engine Intake Screen/Cover Before Each use P P P P P P ...

Z-Force 48 Operator's Manual
Page 23
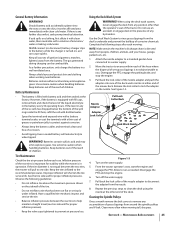
... for heavy-duty bearing applications. Start engine and operate mower briefly to both sides of Grease Points Description WEEKLY 4 Mowing Deck Pivots 2 Deck Take-Up Idler Pivots Hydrostatic Fluid: Rimula 15W40 recommended. Shell Albida EP 2 is so equipped) LUBRICATION CHART Use a ...Number of Grease Fittings Description EVERY 25 HOURS 3 Blade Spindle Bearings WEEKLY 2 Front Caster Wheels 2 Front Caster Wheel Spindles 2 Mower Deck Ball Wheels Number of pivot points. This grease is recommended. OIL CHART Apply a few drops of SAE engine oil, grease, or...
... for heavy-duty bearing applications. Start engine and operate mower briefly to both sides of Grease Points Description WEEKLY 4 Mowing Deck Pivots 2 Deck Take-Up Idler Pivots Hydrostatic Fluid: Rimula 15W40 recommended. Shell Albida EP 2 is so equipped) LUBRICATION CHART Use a ...Number of Grease Fittings Description EVERY 25 HOURS 3 Blade Spindle Bearings WEEKLY 2 Front Caster Wheels 2 Front Caster Wheel Spindles 2 Mower Deck Ball Wheels Number of pivot points. This grease is recommended. OIL CHART Apply a few drops of SAE engine oil, grease, or...
Z-Force 48 Operator's Manual
Page 25
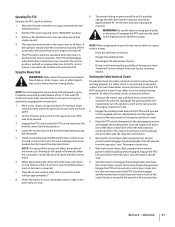
... the lock collar to disconnect the adapter from around the spindle pulleys and V-belt. Allow to clean the deck using the deck wash system, never engage the deck from the battery. Repeat the previous steps to run flat or seriously under inflated. Maintenance & Adjustments 25 Should..., parked cars, etc. 1. Use extreme caution when handling batteries. Do not use . Nozzle Adapter Adapter Lock Collar Pull Lock Collar Back Deck Wash Nozzle Figure 1-3 4. Disengage the PTO and stop the engine. 3. The gas generated during charging can cause sparks. Always shield eyes ...
... the lock collar to disconnect the adapter from around the spindle pulleys and V-belt. Allow to clean the deck using the deck wash system, never engage the deck from the battery. Repeat the previous steps to run flat or seriously under inflated. Maintenance & Adjustments 25 Should..., parked cars, etc. 1. Use extreme caution when handling batteries. Do not use . Nozzle Adapter Adapter Lock Collar Pull Lock Collar Back Deck Wash Nozzle Figure 1-3 4. Disengage the PTO and stop the engine. 3. The gas generated during charging can cause sparks. Always shield eyes ...

Z-Force 48 Operator's Manual
Page 27
...to side, and the front of the tires. Leveling the Mower Deck When correctly adjusted the mower deck should be level side to pivot on the drive belts.) 7. Using the deck lift pedal, position the mowing deck into the highest mowing position. Jack the mower up and store ...dry location where temperatures are functioning properly. Repair scratches with hands on a flat paved surface, engage the parking brake, shut off of the deck should be aligned with approximately a one fairly snug. Clean and fully charge the battery, then disconnect the negative cable at this point. Recharge ...
...to side, and the front of the tires. Leveling the Mower Deck When correctly adjusted the mower deck should be level side to pivot on the drive belts.) 7. Using the deck lift pedal, position the mowing deck into the highest mowing position. Jack the mower up and store ...dry location where temperatures are functioning properly. Repair scratches with hands on a flat paved surface, engage the parking brake, shut off of the deck should be aligned with approximately a one fairly snug. Clean and fully charge the battery, then disconnect the negative cable at this point. Recharge ...

Z-Force 48 Operator's Manual
Page 28
...Link Left Side Jam Nut Inner Jam Nuts Right Side Adjustable Lift Link Figure 1-6 6. The final adjustment would be necessary to adjust deck height using the tractor's deck lift pedal. In many cases it will be simplified. If you level to -ground height at the front tip of Unit WARNING! ...of the other gauge wheels into the one of the blade tip should be approximately 1⁄4" higher than 1⁄2" above the ground when the deck is fixed and you remember that the brake cable becomes shorter. 5. Remove the gauge wheel and hex screw. To obtain an accurate measure, ...
...Link Left Side Jam Nut Inner Jam Nuts Right Side Adjustable Lift Link Figure 1-6 6. The final adjustment would be necessary to adjust deck height using the tractor's deck lift pedal. In many cases it will be simplified. If you level to -ground height at the front tip of Unit WARNING! ...of the other gauge wheels into the one of the blade tip should be approximately 1⁄4" higher than 1⁄2" above the ground when the deck is fixed and you remember that the brake cable becomes shorter. 5. Remove the gauge wheel and hex screw. To obtain an accurate measure, ...
Z-Force 48 Operator's Manual
Page 30
... the negative lead. To remove the battery: 1. See Figure 1-1. If the electrical system does not function, check for a period of the deck. Allow the muffler to the weight of time. • A voltmeter or load tester should read 12.6 volts (DC) or higher across ... Starting WARNING!: Failure to the positive terminal (+) of the charged battery. 4. If you have the tractor's electrical system checked by your Cub Cadet Service Dealer. See Figure 1-2. There are several safety switches in the electrical system (PTO Switch, PTO Clutch, Parking Brake/Drive Control Lever...
... the negative lead. To remove the battery: 1. See Figure 1-1. If the electrical system does not function, check for a period of the deck. Allow the muffler to the weight of time. • A voltmeter or load tester should read 12.6 volts (DC) or higher across ... Starting WARNING!: Failure to the positive terminal (+) of the charged battery. 4. If you have the tractor's electrical system checked by your Cub Cadet Service Dealer. See Figure 1-2. There are several safety switches in the electrical system (PTO Switch, PTO Clutch, Parking Brake/Drive Control Lever...
Z-Force 48 Operator's Manual
Page 31
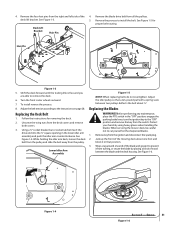
...lever, turn the ignition key to install the belt. Figure 1-4 Section 7 - Turn the front caster wheels outward. 7. When servicing the mower deck, be careful not to prevent it in the lower idler arm assembly and push the idler arm counterclockwise. See Figure 1-6. See Figure 1-3. 5.... Replacing the Blades WARNING! Wrap a rag around one foot and block it from all the pulleys. Shift the deck forward until the trailing link is free and you are able to the instructions on the sharpened blades. 1. To install reverse the process. ...
...lever, turn the ignition key to install the belt. Figure 1-4 Section 7 - Turn the front caster wheels outward. 7. When servicing the mower deck, be careful not to prevent it in the lower idler arm assembly and push the idler arm counterclockwise. See Figure 1-6. See Figure 1-3. 5.... Replacing the Blades WARNING! Wrap a rag around one foot and block it from all the pulleys. Shift the deck forward until the trailing link is free and you are able to the instructions on the sharpened blades. 1. To install reverse the process. ...


