

RZT S 42 Operator's Manual
Page 3
... follow all instructions in this manual. HEED ITS WARNING! This machine was built to be picked up and thrown by an adult. 9. Remove all controls and their proper operation. Read, understand, and follow all instructions on the foreign objects which , if not followed, could be...of material toward the operator. 3. Failure to cause cancer and reproductive harm. This machine is capable of California to comply with the blade(s) can cause serious personal assemble and operate. avoid discharging material against a wall or obstruction Know how to stop the machine and ...
... follow all instructions in this manual. HEED ITS WARNING! This machine was built to be picked up and thrown by an adult. 9. Remove all controls and their proper operation. Read, understand, and follow all instructions on the foreign objects which , if not followed, could be...of material toward the operator. 3. Failure to cause cancer and reproductive harm. This machine is capable of California to comply with the blade(s) can cause serious personal assemble and operate. avoid discharging material against a wall or obstruction Know how to stop the machine and ...

RZT S 42 Operator's Manual
Page 4
... crossing gravel drives, walks, or accidents which serious personal injury. manual to stop engine and remove key before removing traction, disengage the blades and proceed slowly and carefully straight down before operating this machine on ramp(s) to improve stability. ... your safety, use a grass catcher on that you 19. 12. Uneven terrain could cause serious injury. grass catcher, emptying grass, unclogging chute, removing 4. Rapid a trailer or truck. loaded dump cart, lawn roller, etc.) on the mower deck presenting a potential fire hazard. 6. These operators ...
... crossing gravel drives, walks, or accidents which serious personal injury. manual to stop engine and remove key before removing traction, disengage the blades and proceed slowly and carefully straight down before operating this machine on ramp(s) to improve stability. ... your safety, use a grass catcher on that you 19. 12. Uneven terrain could cause serious injury. grass catcher, emptying grass, unclogging chute, removing 4. Rapid a trailer or truck. loaded dump cart, lawn roller, etc.) on the mower deck presenting a potential fire hazard. 6. These operators ...
RZT S 42 Operator's Manual
Page 5
... only an approved gasoline container. Always place containers on a trailer with a plastic liner. c. If this is hot or running engines. Never remove gas cap or add fuel while the engine is not possible, then refuel such equipment on the ground away from a gasoline dispenser nozzle. Never...is spilled, wipe it on towed equipment. 4. They may run an engine indoors or in a poorly ventilated area. Tow only with the blade(s) shut off if a child enters the area. Do not attach towed equipment except at least five minutes before filling. Follow the manufacturers ...
... only an approved gasoline container. Always place containers on a trailer with a plastic liner. c. If this is hot or running engines. Never remove gas cap or add fuel while the engine is not possible, then refuel such equipment on the ground away from a gasoline dispenser nozzle. Never...is spilled, wipe it on towed equipment. 4. They may run an engine indoors or in a poorly ventilated area. Tow only with the blade(s) shut off if a child enters the area. Do not attach towed equipment except at least five minutes before filling. Follow the manufacturers ...
RZT S 42 Operator's Manual
Page 14
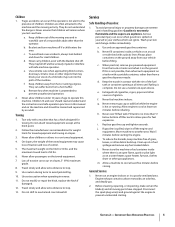
...the START position. CHOK E FAST SL OW 14 Section 4- right most digit). "OIL" and the recorded hours for five minutes after removing. The LCD will also remind the operator of maintenance intervals for two hours (from recently running , stop the engine immediately and check for...the CHOKE position. • After starting the engine. The maintenance interval lasts for changing the engine oil. Contact your Cub Cadet dealer. OIL HOURS 1/10 PTO / BLADE PARK BRAKE NOTE: The hour meter is activated whenever the ignition switch is turned to the right of the operator's seat...
...the START position. CHOK E FAST SL OW 14 Section 4- right most digit). "OIL" and the recorded hours for five minutes after removing. The LCD will also remind the operator of maintenance intervals for two hours (from recently running , stop the engine immediately and check for...the CHOKE position. • After starting the engine. The maintenance interval lasts for changing the engine oil. Contact your Cub Cadet dealer. OIL HOURS 1/10 PTO / BLADE PARK BRAKE NOTE: The hour meter is activated whenever the ignition switch is turned to the right of the operator's seat...

RZT S 42 Operator's Manual
Page 22
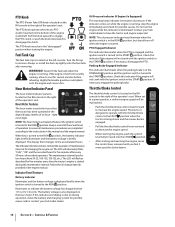
... deck wash system. Do not overinflate. Before lubricating, repairing, or inspecting, always disengage PTO, set the parking brake and stop engine and remove key to thoroughly dry. Cleaning the Tractor Any fuel or oil spilled on the machine should be wiped off and detach the hose coupler from... the water port on your deck's surface. 11. Disengage the PTO (Blade Engage), set parking brake, stop the engine. 2. Thread the hose coupler (packaged with light oil. Grease Fittings Nozzle Adapter Adapter Lock Collar Deck...
... deck wash system. Do not overinflate. Before lubricating, repairing, or inspecting, always disengage PTO, set the parking brake and stop engine and remove key to thoroughly dry. Cleaning the Tractor Any fuel or oil spilled on the machine should be wiped off and detach the hose coupler from... the water port on your deck's surface. 11. Disengage the PTO (Blade Engage), set parking brake, stop the engine. 2. Thread the hose coupler (packaged with light oil. Grease Fittings Nozzle Adapter Adapter Lock Collar Deck...

RZT S 42 Operator's Manual
Page 23
...front to rear. Adjust if necessary as follows: 1. Always level the deck side to side before performing any deck leveling adjustments. Rotate the blade nearest the discharge chute so that they 're not, proceed to side adjustment can be equal. See Figure 6-4. Maintenance & Adjustments 23 WARNING!... lower than the rear of the deck by using heavy gloves when handling the blades. With the tractor parked on page 22 for information regarding tire pressure. See Figure 6-4. Loosen, but do NOT remove, the hex bolt on the left and right rear deck hanger links when proper...
...front to rear. Adjust if necessary as follows: 1. Always level the deck side to side before performing any deck leveling adjustments. Rotate the blade nearest the discharge chute so that they 're not, proceed to side adjustment can be equal. See Figure 6-4. Maintenance & Adjustments 23 WARNING!... lower than the rear of the deck by using heavy gloves when handling the blades. With the tractor parked on page 22 for information regarding tire pressure. See Figure 6-4. Loosen, but do NOT remove, the hex bolt on the left and right rear deck hanger links when proper...

RZT S 42 Operator's Manual
Page 29
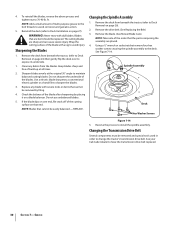
... securing the belt covers to cut yourself on the flange nut securing the blade the blade, remove the blade. See Figure 7-12. Remove the belt from beneath the tractor, (refer to the deck and the idler arm. Mower Blade Care WARNING! When servicing the mower deck, be careful not to the ... Arm Spindle Pulley Figure 7-11 3. Protect your authorized dealer. Sharpen the cutting edges of the blades evenly so that the blades remain balanced and the same angle of the hardware when removing the hex screw and flange lock nut. 4. Spindle Assembly Flange Nut Hex Screw Pulley Cap Hex...
... securing the belt covers to cut yourself on the flange nut securing the blade the blade, remove the blade. See Figure 7-12. Remove the belt from beneath the tractor, (refer to the deck and the idler arm. Mower Blade Care WARNING! When servicing the mower deck, be careful not to the ... Arm Spindle Pulley Figure 7-11 3. Protect your authorized dealer. Sharpen the cutting edges of the blades evenly so that the blades remain balanced and the same angle of the hardware when removing the hex screw and flange lock nut. 4. Spindle Assembly Flange Nut Hex Screw Pulley Cap Hex...
RZT S 42 Operator's Manual
Page 30
... surface of the blade with dull blades. Do not use unbalanced blades. 5. Changing the Spindle Assembly 1. See Figure 7-14. See your Cub Cadet dealer to install the spindle assembly. Remove the drive belt. (See Replacing the Belt) 3. Service If the blade dips on one end...used in order to expose its underside. 1. Sharpen blades evenly at all times. 2. Do not sharpen the underside of the blade after sharpening by filing. 4. Remove the deck from the blades. Remove the blade. (See Mower Blade Care). Remove the deck from beneath the tractor, (refer to ...
... surface of the blade with dull blades. Do not use unbalanced blades. 5. Changing the Spindle Assembly 1. See Figure 7-14. See your Cub Cadet dealer to install the spindle assembly. Remove the drive belt. (See Replacing the Belt) 3. Service If the blade dips on one end...used in order to expose its underside. 1. Sharpen blades evenly at all times. 2. Do not sharpen the underside of the blade after sharpening by filing. 4. Remove the deck from the blades. Remove the blade. (See Mower Blade Care). Remove the deck from beneath the tractor, (refer to ...


