User Guide
Page 2
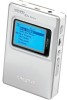
.... Version 1.0 September 2003 Sound Blaster, Sound Blaster Live!, EAX, the Sound Blaster logo, and the Creative logo are trademarks of Toshiba Corp. NOMAD is a registered trademark of Aonix and is a trademark of MP3.com, Inc. All rights reserved. ...Creative Technology Ltd. User's Guide Creative NOMAD Jukebox Zen Xtra Information in the United States and/or other countries. in this document is furnished under license. CDDB is against the law to change without the written permission of their respective owners. Microsoft, MS-DOS, and Windows are trademarks of Creative...
.... Version 1.0 September 2003 Sound Blaster, Sound Blaster Live!, EAX, the Sound Blaster logo, and the Creative logo are trademarks of Toshiba Corp. NOMAD is a registered trademark of Aonix and is a trademark of MP3.com, Inc. All rights reserved. ...Creative Technology Ltd. User's Guide Creative NOMAD Jukebox Zen Xtra Information in the United States and/or other countries. in this document is furnished under license. CDDB is against the law to change without the written permission of their respective owners. Microsoft, MS-DOS, and Windows are trademarks of Creative...

User Guide
Page 17
... files between different NOMAD Jukeboxes, using familiar Windows methods, such as Drag-andDrop and Cut-and-Paste. As Creative NOMAD Explorer has been integrated with Creative NOMAD Explorer. For more audio track management options for your NOMAD Jukebox, or between your computer and your player, it is a software that you use Creative MediaSource instead. Creative NOMAD Explorer Adobe Acrobat Reader Creative NOMAD Explorer helps...
... files between different NOMAD Jukeboxes, using familiar Windows methods, such as Drag-andDrop and Cut-and-Paste. As Creative NOMAD Explorer has been integrated with Creative NOMAD Explorer. For more audio track management options for your NOMAD Jukebox, or between your computer and your player, it is a software that you use Creative MediaSource instead. Creative NOMAD Explorer Adobe Acrobat Reader Creative NOMAD Explorer helps...
User Guide
Page 18
Refer to each application's documentation for details ❍ Microsoft® Windows® 98 Second Edition (SE), Windows 2000, Windows Millennium Edition (Me) or Windows XP ❍ Intel® Pentium® II 233 MHz, AMD®-K6-2® 266 MHz or better processor (Pentium III 450 MHz or higher recommended ...
Refer to each application's documentation for details ❍ Microsoft® Windows® 98 Second Edition (SE), Windows 2000, Windows Millennium Edition (Me) or Windows XP ❍ Intel® Pentium® II 233 MHz, AMD®-K6-2® 266 MHz or better processor (Pentium III 450 MHz or higher recommended ...

User Guide
Page 27
... current track, or to the previous track ❍ skips to play a track from the Music Library screens, press and hold this button. The Lock player? window appears. Button POWER MENU What It Does ❍ turns the player on and off ❍ disables all buttons except for the scroller ❍ activates LCD...
... current track, or to the previous track ❍ skips to play a track from the Music Library screens, press and hold this button. The Lock player? window appears. Button POWER MENU What It Does ❍ turns the player on and off ❍ disables all buttons except for the scroller ❍ activates LCD...
User Guide
Page 34
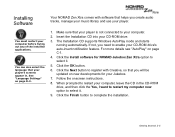
... leave the CD in . For more details see "AutoPlay" on page D-3. 1. Follow the onscreen instructions. 8. The Installation CD supports Windows AutoPlay mode and starts running automatically. Make sure that your player is not connected to complete the installation. You can also select the language... now option to enable your CD-ROM drive's auto-insert notification feature. Click the OK button. 6. Installing Software Your NOMAD Zen Xtra comes with Creative, so that you will be updated on new developments for your Jukebox. 7. Click the Finish button to your computer. 2.
... leave the CD in . For more details see "AutoPlay" on page D-3. 1. Follow the onscreen instructions. 8. The Installation CD supports Windows AutoPlay mode and starts running automatically. Make sure that your player is not connected to complete the installation. You can also select the language... now option to enable your CD-ROM drive's auto-insert notification feature. Click the OK button. 6. Installing Software Your NOMAD Zen Xtra comes with Creative, so that you will be updated on new developments for your Jukebox. 7. Click the Finish button to your computer. 2.
User Guide
Page 69
This chapter includes basic instructions on using NOMAD Explorer to create and edit playlists. Creative NOMAD Explorer helps you manage your player. Software Applications 4-1 Creative MediaSorce is the best way to organize and transfer audio to and from your NOMAD Jukebox's data files within Windows Explorer. This chapter includes basic instructions on using MediaSource to rip audio CDs...
This chapter includes basic instructions on using NOMAD Explorer to create and edit playlists. Creative NOMAD Explorer helps you manage your player. Software Applications 4-1 Creative MediaSorce is the best way to organize and transfer audio to and from your NOMAD Jukebox's data files within Windows Explorer. This chapter includes basic instructions on using MediaSource to rip audio CDs...

User Guide
Page 70
...audio CD into your CD-ROM drive). 4. In the Sources window, select [e:] Audio CD (replace e: with your CD-ROM drive. 2. Drag the selected tracks to rip. Software Applications 4-2 Using Creative MediaSource Ripping Audio CD Tracks Rather than manually entering track information, ... rip a CD 1. extensive instructions are not already in Creative MediaSource Organizer, click the Player/Organizer View button. 3. If you are provided in Creative MediaSource Organizer, click the Player/Organizer View button. 3. In the Sources window, select [e:] Audio CD (replace e: with your CD-...
...audio CD into your CD-ROM drive). 4. In the Sources window, select [e:] Audio CD (replace e: with your CD-ROM drive. 2. Drag the selected tracks to rip. Software Applications 4-2 Using Creative MediaSource Ripping Audio CD Tracks Rather than manually entering track information, ... rip a CD 1. extensive instructions are not already in Creative MediaSource Organizer, click the Player/Organizer View button. 3. If you are provided in Creative MediaSource Organizer, click the Player/Organizer View button. 3. In the Sources window, select [e:] Audio CD (replace e: with your CD-...

User Guide
Page 71
...and from PC Music Library to know which you are using Creative MediaSource Organizer for newly added music files. Software Applications 4-3 If you are transferring files from your player. In the Right Panel window, click the Source bar and select the destination. 6. The.... 3. If you can be displayed in Creative MediaSource Organizer, click the Player/Organizer View button. 2. With Creative MediaSource, you are not already in the Content window. Transferring tracks If you store all your music. 4. In the Content window, select the tracks to another 1. Use...
...and from PC Music Library to know which you are using Creative MediaSource Organizer for newly added music files. Software Applications 4-3 If you are transferring files from your player. In the Right Panel window, click the Source bar and select the destination. 6. The.... 3. If you can be displayed in Creative MediaSource Organizer, click the Player/Organizer View button. 2. With Creative MediaSource, you are not already in the Content window. Transferring tracks If you store all your music. 4. In the Content window, select the tracks to another 1. Use...

User Guide
Page 72
... the Album, Artist or Genre. 4. If you want to edit, and right-click it. 3. In the Content window, locate the tracks you are not already in Creative MediaSource Organizer, click the Player/Organizer View button. 2. Click the OK button. To edit information about multiple tracks 1.... In the Content window, locate the track you are not already in Creative MediaSource Organizer, click the Player/Organizer View button. 2. Select the Edit Track Properties option. 4. Click the OK ...
... the Album, Artist or Genre. 4. If you want to edit, and right-click it. 3. In the Content window, locate the tracks you are not already in Creative MediaSource Organizer, click the Player/Organizer View button. 2. Click the OK button. To edit information about multiple tracks 1.... In the Content window, locate the track you are not already in Creative MediaSource Organizer, click the Player/Organizer View button. 2. Select the Edit Track Properties option. 4. Click the OK ...

User Guide
Page 73
... PC Music Library To create a playlist by saving tracks from the Content window To create a playlist 1. If you are not already in Creative MediaSource Organizer, click the Player/Organizer View button. 2. Right-click the track, and select the Add to create playlists from the ... bar, click the New Playlist icon. 4. Click the OK button. When you have the tracks in the order that you are not already in Creative MediaSource Organizer, click the Player/Organizer View button. 2. If you want. 3. Type in your player cannot be transferred to your computer. Software Applications...
... PC Music Library To create a playlist by saving tracks from the Content window To create a playlist 1. If you are not already in Creative MediaSource Organizer, click the Player/Organizer View button. 2. Right-click the track, and select the Add to create playlists from the ... bar, click the New Playlist icon. 4. Click the OK button. When you have the tracks in the order that you are not already in Creative MediaSource Organizer, click the Player/Organizer View button. 2. If you want. 3. Type in your player cannot be transferred to your computer. Software Applications...

User Guide
Page 74
... are not already in the playlist. 4. Adding audio tracks to . 5. In the Sources window, click the plus sign next to Playlists and rightclick the playlist to their new positions in Creative MediaSource Organizer, click the Player/Organizer View button. 2. Select PC Music Library. 4. Software ...playlist 1. Click and drag tracks to be changed. 3. Select the Delete option. In the Sources window, click the plus sign next to add. 5. If you are not already in Creative MediaSource Organizer, click the Player/Organizer View button. 2. Deleting a playlist 1. If you want ...
... are not already in the playlist. 4. Adding audio tracks to . 5. In the Sources window, click the plus sign next to Playlists and rightclick the playlist to their new positions in Creative MediaSource Organizer, click the Player/Organizer View button. 2. Select PC Music Library. 4. Software ...playlist 1. Click and drag tracks to be changed. 3. Select the Delete option. In the Sources window, click the plus sign next to add. 5. If you are not already in Creative MediaSource Organizer, click the Player/Organizer View button. 2. Deleting a playlist 1. If you want ...

User Guide
Page 75
... menu, point to Active Device and click NOMAD Jukebox. 3. A new folder appears with a temporary name. 6. In Windows Explorer, locate and click the Nomad Explorer icon . 1. Only one NOMAD Jukebox can be active at any one NOMAD Jukebox connected to your computer, click the NOMAD Jukebox that you want to Active Device and click NOMAD Jukebox. 2. Or, click the New Folder icon on...
... menu, point to Active Device and click NOMAD Jukebox. 3. A new folder appears with a temporary name. 6. In Windows Explorer, locate and click the Nomad Explorer icon . 1. Only one NOMAD Jukebox can be active at any one NOMAD Jukebox connected to your computer, click the NOMAD Jukebox that you want to Active Device and click NOMAD Jukebox. 2. Or, click the New Folder icon on...

User Guide
Page 76
...Windows Explorer. Type the new name, and then press . Only one NOMAD Jukebox can be active at any one NOMAD Jukebox connected to your computer, click the NOMAD Jukebox that you want to set as active. Only one NOMAD Jukebox can be active at any one NOMAD Jukebox connected to your computer, click the NOMAD Jukebox...want to Active Device and click NOMAD Jukebox. 3. Or, click the Delete icon on the toolbar of a file or folder 1. In Windows Explorer, locate and click the NOMAD Explorer icon . 2. In Windows Explorer, locate and click the NOMAD Explorer icon . 2. On the...
...Windows Explorer. Type the new name, and then press . Only one NOMAD Jukebox can be active at any one NOMAD Jukebox connected to your computer, click the NOMAD Jukebox that you want to set as active. Only one NOMAD Jukebox can be active at any one NOMAD Jukebox connected to your computer, click the NOMAD Jukebox...want to Active Device and click NOMAD Jukebox. 3. Or, click the Delete icon on the toolbar of a file or folder 1. In Windows Explorer, locate and click the NOMAD Explorer icon . 2. In Windows Explorer, locate and click the NOMAD Explorer icon . 2. On the...
User Guide
Page 91
... installation does not start the installation program through Auto Insert Notification 4. The AutoPlay feature in your Windows desktop, double-click the My Computer icon. 2. On your Windows system may wish to www.creative.com and select your NOMAD Jukebox Zen Xtra. To enable AutoPlay through the My Computer shortcut menu 1. FAQs and Troubleshooting AutoPlay This section covers...
... installation does not start the installation program through Auto Insert Notification 4. The AutoPlay feature in your Windows desktop, double-click the My Computer icon. 2. On your Windows system may wish to www.creative.com and select your NOMAD Jukebox Zen Xtra. To enable AutoPlay through the My Computer shortcut menu 1. FAQs and Troubleshooting AutoPlay This section covers...
User Guide
Page 94
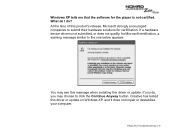
...the Continue Anyway button. FAQs and Troubleshooting C-4 What do I do , you may see this message when installing this driver or update on Windows XP, and it does not impair or destabilize your computer. At the time of this product's release, Microsoft strongly encouraged companies to the... one below appears. If you do ? Windows XP tells me that the software for the player is not submitted, or does not qualify, for Microsoft certification, a warning message similar to...
...the Continue Anyway button. FAQs and Troubleshooting C-4 What do I do , you may see this message when installing this driver or update on Windows XP, and it does not impair or destabilize your computer. At the time of this product's release, Microsoft strongly encouraged companies to the... one below appears. If you do ? Windows XP tells me that the software for the player is not submitted, or does not qualify, for Microsoft certification, a warning message similar to...

User Guide
Page 104
...: Insert the end of playlists stored in your player To see this screen, from the Settings screen, Scroll Select About. Press the Menu button. 2. A confirmation window appears. 4. This should not cause you to lose any data or audio tracks, unless you wish to reset your player's settings to the default settings...
...: Insert the end of playlists stored in your player To see this screen, from the Settings screen, Scroll Select About. Press the Menu button. 2. A confirmation window appears. 4. This should not cause you to lose any data or audio tracks, unless you wish to reset your player's settings to the default settings...
User Guide
Page 105
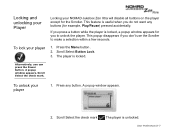
This feature is locked, a popup window appears for example, Play/Pause) pressed accidentally. To lock your player 1. Alternatively, you don't use the Scroller to unlock the player. Press any buttons (for ... popup disappears if you can press the Power button. The player is locked. The player is unlocked. Scroll Select the check mark. A popup window appears. Press the Menu button . 2. Scroll Select Button Lock. 3. Locking and unlocking your Player Locking your NOMAD Jukebox Zen Xtra will disable all buttons on the player except for the Scroller.
This feature is locked, a popup window appears for example, Play/Pause) pressed accidentally. To lock your player 1. Alternatively, you don't use the Scroller to unlock the player. Press any buttons (for ... popup disappears if you can press the Power button. The player is locked. The player is unlocked. Scroll Select the check mark. A popup window appears. Press the Menu button . 2. Scroll Select Button Lock. 3. Locking and unlocking your Player Locking your NOMAD Jukebox Zen Xtra will disable all buttons on the player except for the Scroller.


