
Owners Manual
Page 3
... Recording 24 3 - Recording Audio into Ableton Live 41 4 - Playing Audio Clips 40 3 - Setting up Cubase LE 22 2 - Setting up Sonar LE 29 2 - Setting up the Preferences 38 2 - TABLE OF CONTENTS Introduction 5 Package Includes 6 Computer Requirements 7 Windows ...7 OS X ...7 Software Installation 8 Windows XP ...8 Note About Windows Logo Testing 8 Uninstalling all Audio Drivers and Applications 8 Macintosh OS X 9 Uninstalling the Audio Drivers and Applications 11 Connection Diagrams 12 Main Panel Controls 14 Input/Output 16 E-MU USB Audio Control Panel...
... Recording 24 3 - Recording Audio into Ableton Live 41 4 - Playing Audio Clips 40 3 - Setting up Cubase LE 22 2 - Setting up Sonar LE 29 2 - Setting up the Preferences 38 2 - TABLE OF CONTENTS Introduction 5 Package Includes 6 Computer Requirements 7 Windows ...7 OS X ...7 Software Installation 8 Windows XP ...8 Note About Windows Logo Testing 8 Uninstalling all Audio Drivers and Applications 8 Macintosh OS X 9 Uninstalling the Audio Drivers and Applications 11 Connection Diagrams 12 Main Panel Controls 14 Input/Output 16 E-MU USB Audio Control Panel...
Owners Manual
Page 5
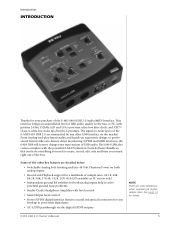
... clock, and XTC™ Class-A, ultra-low noise mic/line/hi-Z preamps. The signal-to-noise specs of the E-MU 0404 USB 2.0 are unmatched by any other digital gear • AC-3/DTS passthrough via the digital S/PDIF outputs NOTE There are detailed below: • Switchable Analog Soft-Limiting and true 48 Volt Phantom Power on both analog inputs. • Record and Playback support for a multitude of sample rates: 44.1k, 48k, 88.2k...
... clock, and XTC™ Class-A, ultra-low noise mic/line/hi-Z preamps. The signal-to-noise specs of the E-MU 0404 USB 2.0 are unmatched by any other digital gear • AC-3/DTS passthrough via the digital S/PDIF outputs NOTE There are detailed below: • Switchable Analog Soft-Limiting and true 48 Volt Phantom Power on both analog inputs. • Record and Playback support for a multitude of sample rates: 44.1k, 48k, 88.2k...
Owners Manual
Page 8
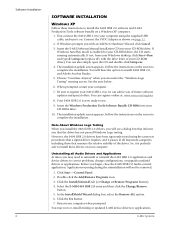
... advise you may now re-install existing or updated E-MU device drivers or applications. If not, from your Windows desktop, click Start->Run and type d:\setup.exe (replace d:\ with an Add New Hardware Wizard, click Cancel. 3. Be sure to correct problems, change configurations, or upgrade outdated drivers or applications. Double-click the Add/Remove Programs icon. 3. First connect the 0404 USB 2.0 to use. 9. You will not be removed...
... advise you may now re-install existing or updated E-MU device drivers or applications. If not, from your Windows desktop, click Start->Run and type d:\setup.exe (replace d:\ with an Add New Hardware Wizard, click Cancel. 3. Be sure to correct problems, change configurations, or upgrade outdated drivers or applications. Double-click the Add/Remove Programs icon. 3. First connect the 0404 USB 2.0 to use. 9. You will not be removed...
Owners Manual
Page 9
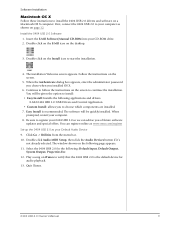
... future software updates and special offers. Software Installation Macintosh OS X Follow these instructions to register your 0404 USB 2.0 so we can register online at: www.emu.com/register Set-up the 0404 USB 2.0 as shown on page 12. Install the 0404 USB 2.0 Software 1. When prompted, restart your CD-ROM drive. 2. Be sure to install the 0404 USB 2.0 drivers and software on the following : Default Input, Default Output, System Output, Properties For. 12. Select the 0404 USB 2.0 for audio playback. 13...
... future software updates and special offers. Software Installation Macintosh OS X Follow these instructions to register your 0404 USB 2.0 so we can register online at: www.emu.com/register Set-up the 0404 USB 2.0 as shown on page 12. Install the 0404 USB 2.0 Software 1. When prompted, restart your CD-ROM drive. 2. Be sure to install the 0404 USB 2.0 drivers and software on the following : Default Input, Default Output, System Output, Properties For. 12. Select the 0404 USB 2.0 for audio playback. 13...

Owners Manual
Page 11
... Creative Professional folder. 3. The installation splash screen appears. Software Installation 18. Install the Production Tools Software Bundle 20. Open the E-MU USB Audio folder. 4. Click the E-MU USB Audio Uninstaller and follow the instructions. 0404 USB 2.0 Owner's Manual 11 The window below shows a properly connected MIDI device. 19. Double-click on the screen. 23. Before you may need to uninstall or reinstall the 0404 USB 2.0 application and device drivers to close the E-MU USB 2.0 Control Panel application. Follow the instructions on the installer...
... Creative Professional folder. 3. The installation splash screen appears. Software Installation 18. Install the Production Tools Software Bundle 20. Open the E-MU USB Audio folder. 4. Click the E-MU USB Audio Uninstaller and follow the instructions. 0404 USB 2.0 Owner's Manual 11 The window below shows a properly connected MIDI device. 19. Double-click on the screen. 23. Before you may need to uninstall or reinstall the 0404 USB 2.0 application and device drivers to close the E-MU USB 2.0 Control Panel application. Follow the instructions on the installer...

Owners Manual
Page 13
The coaxial/optical S/PDIF inputs and outputs allow you to interface with S/PDIF In The Mic/Hi-Z/Line Inputs accept any balanced or unbalanced instrument, line level signal or microphone. Connection Diagrams Analog Inputs/Outputs & S/PDIF Stereo Headphones Instrument Microphone Mic / Hi-Z / Line A B S/PDIF In Out Headphone Volume CD Player Any Digital Audio Device with S/PDIF Out Audio/Video Receiver Any Digital Audio Device with external digital audio equipment. 0404 USB 2.0 Owner's Manual 13
The coaxial/optical S/PDIF inputs and outputs allow you to interface with S/PDIF In The Mic/Hi-Z/Line Inputs accept any balanced or unbalanced instrument, line level signal or microphone. Connection Diagrams Analog Inputs/Outputs & S/PDIF Stereo Headphones Instrument Microphone Mic / Hi-Z / Line A B S/PDIF In Out Headphone Volume CD Player Any Digital Audio Device with S/PDIF Out Audio/Video Receiver Any Digital Audio Device with external digital audio equipment. 0404 USB 2.0 Owner's Manual 13
Owners Manual
Page 14
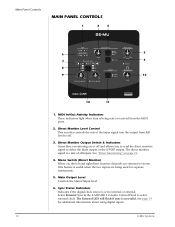
... Output Level Controls the Main Output level. 6. See "Direct Monitoring" on , the left and right direct monitor channels are being sent or received from full level to either the Main output or the S/PDIF output. See page 19 for separate instruments. 5. Select External Sync in the E-MU USB 2.0 Audio Control Panel to mono. Sync Status Indicators Indicates if the digital clock source is set to internal or external. Main Panel Controls MAIN PANEL CONTROLS 1 2 3 MIDI Direct Monitor Main Output Out...
... Output Level Controls the Main Output level. 6. See "Direct Monitoring" on , the left and right direct monitor channels are being sent or received from full level to either the Main output or the S/PDIF output. See page 19 for separate instruments. 5. Select External Sync in the E-MU USB 2.0 Audio Control Panel to mono. Sync Status Indicators Indicates if the digital clock source is set to internal or external. Main Panel Controls MAIN PANEL CONTROLS 1 2 3 MIDI Direct Monitor Main Output Out...
Owners Manual
Page 15
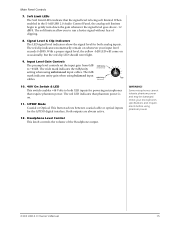
... the signal level for powering microphones that require phantom power. The 0dB mark indicates unity gain when using balanced input 0 cables. 0dB/Unity +65 (Balanced) 10. 48V On Switch & LED This switch enables +48 Volts to run a hotter signal without fear of the Headphone output. Both outputs are always active. 12. Check your input level exceeds 0 dBFS. When enabled in the E-MU USB 2.0 Audio Control Panel, the analog soft limiters begin to +65dB. Input Level Gain Controls The preamp level controls set the input gain...
... the signal level for powering microphones that require phantom power. The 0dB mark indicates unity gain when using balanced input 0 cables. 0dB/Unity +65 (Balanced) 10. 48V On Switch & LED This switch enables +48 Volts to run a hotter signal without fear of the Headphone output. Both outputs are always active. 12. Check your input level exceeds 0 dBFS. When enabled in the E-MU USB 2.0 Audio Control Panel, the analog soft limiters begin to +65dB. Input Level Gain Controls The preamp level controls set the input gain...

Owners Manual
Page 16
.... 1. XLR Connectors - guitar, bass, etc.), or line-level signals. See page 48 for more information. Both the coaxial (RCA) jacks and the optical ports carry identical data. Adjust the level using the input gain control. The inputs are "ground lift" switches for line-level signals (tip=hot, ring=cold, sleeve=gnd). 2. S/PDIF In/Out Each jack carries two channels of the unit. Use for electric musical instruments (i.e. These switches can use a commonly available plug adapter. Input/Output INPUT/OUTPUT Mic / Hi-Z / Line S/PDIF Headphone...
.... 1. XLR Connectors - guitar, bass, etc.), or line-level signals. See page 48 for more information. Both the coaxial (RCA) jacks and the optical ports carry identical data. Adjust the level using the input gain control. The inputs are "ground lift" switches for line-level signals (tip=hot, ring=cold, sleeve=gnd). 2. S/PDIF In/Out Each jack carries two channels of the unit. Use for electric musical instruments (i.e. These switches can use a commonly available plug adapter. Input/Output INPUT/OUTPUT Mic / Hi-Z / Line S/PDIF Headphone...
Owners Manual
Page 17
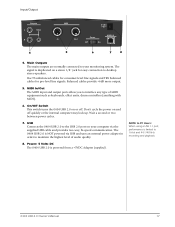
... 0404 USB 2.0 to the USB 2.0 port on a stereo 1/8¨ jack for pro-level line signals. Main Outputs The main outputs are normally connected to desktop stereo speakers. The signal is powered from a +5VDC Adapter (supplied). Power: 5 Volts DC The 0404 USB 2.0 is duplicated on your monitoring system. Wait a second or two between power cycles. 7. Input/Output Outputs L 1 Main R MIDI 5 VDC USB 2.0 Power In Out Off On 4 5 6 7 8 4. MIDI In/Out The MIDI input and output ports allow you to 16-bit and 44.1/48 kHz recording and playback. 0404 USB 2.0 Owner's Manual...
... 0404 USB 2.0 to the USB 2.0 port on a stereo 1/8¨ jack for pro-level line signals. Main Outputs The main outputs are normally connected to desktop stereo speakers. The signal is powered from a +5VDC Adapter (supplied). Power: 5 Volts DC The 0404 USB 2.0 is duplicated on your monitoring system. Wait a second or two between power cycles. 7. Input/Output Outputs L 1 Main R MIDI 5 VDC USB 2.0 Power In Out Off On 4 5 6 7 8 4. MIDI In/Out The MIDI input and output ports allow you to 16-bit and 44.1/48 kHz recording and playback. 0404 USB 2.0 Owner's Manual...

Owners Manual
Page 18
The E-MU USB Audio control panel is shown below. • Windows:The E-MU USB Audio control icon will be launched from the Start Menu (All Programs, Creative Professional, E-MU USB Audio Application). • OS X The E-MU USB Audio control application is normally located in the Applica- Sync Source Selects internal or external sync. 18 E-MU Systems Help About E-MU 0404 USB 2.0, Audio control, Launch Manual, Check Updates 4. It can also be visible in the Taskbar, which unit is currently...
The E-MU USB Audio control panel is shown below. • Windows:The E-MU USB Audio control icon will be launched from the Start Menu (All Programs, Creative Professional, E-MU USB Audio Application). • OS X The E-MU USB Audio control application is normally located in the Applica- Sync Source Selects internal or external sync. 18 E-MU Systems Help About E-MU 0404 USB 2.0, Audio control, Launch Manual, Check Updates 4. It can also be visible in the Taskbar, which unit is currently...

Owners Manual
Page 19
... about S/PDIF synchronization. However, high-quality cable should automatically sync. 0404 USB 2.0 Owner's Manual 19 For best performance use the 0404 USB Control Panel to set the sample rate to match the external device, then switch to an "External" S/PDIF sync source, you are unaffected. 10. Using External Synchronization to S/PDIF To synchronize to external sync. S/PDIF to Analog / Analog to S/PDIF). enable direct monitoring (set direct monitor to specify Coaxial or Optical input. Signal levels below -12 dBFS are having a difficult...
... about S/PDIF synchronization. However, high-quality cable should automatically sync. 0404 USB 2.0 Owner's Manual 19 For best performance use the 0404 USB Control Panel to set the sample rate to match the external device, then switch to an "External" S/PDIF sync source, you are unaffected. 10. Using External Synchronization to S/PDIF To synchronize to external sync. S/PDIF to Analog / Analog to S/PDIF). enable direct monitoring (set direct monitor to specify Coaxial or Optical input. Signal levels below -12 dBFS are having a difficult...
Owners Manual
Page 20
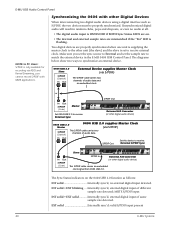
... sample rate detected. valid S/PDIF input present 20 E-MU Systems The diagrams below show two ways to synchronize an external device. 0404 USB 2.0 Slave S/PDIF (Optical) In Out External Device supplies Master Clock (via ASIO and Kernal Streaming, you set the sync source to External and set to receive external clock. or In Out S/PDIF (Coax) Master Set 0404 USB 2.0 to receive: External Sync S/PDIF Out External A-D Converter (or other digital audio device) This S/PDIF cable carries an embedded clock signal...
... sample rate detected. valid S/PDIF input present 20 E-MU Systems The diagrams below show two ways to synchronize an external device. 0404 USB 2.0 Slave S/PDIF (Optical) In Out External Device supplies Master Clock (via ASIO and Kernal Streaming, you set the sync source to External and set to receive external clock. or In Out S/PDIF (Coax) Master Set 0404 USB 2.0 to receive: External Sync S/PDIF Out External A-D Converter (or other digital audio device) This S/PDIF cable carries an embedded clock signal...
Owners Manual
Page 21
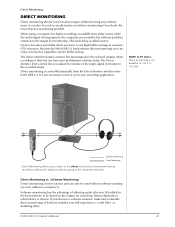
... doubling effect. 0404 USB 2.0 Owner's Manual 21 The Direct Monitor feature connects the input signals to disable direct monitoring. Software monitoring has the advantage of allowing audio effects or EQ added in the host software to be used as an alternative to software monitoring if you adjust the volume of the input signal in your recording application. If both are enabled, you can hear your performance without having any software open. Because the 0404 USB 2.0 has hardware direct monitoring...
... doubling effect. 0404 USB 2.0 Owner's Manual 21 The Direct Monitor feature connects the input signals to disable direct monitoring. Software monitoring has the advantage of allowing audio effects or EQ added in the host software to be used as an alternative to software monitoring if you adjust the volume of the input signal in your recording application. If both are enabled, you can hear your performance without having any software open. Because the 0404 USB 2.0 has hardware direct monitoring...
Owners Manual
Page 22
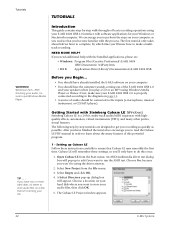
... about half an hour to complete, by -step tutorials are designed to get you 'll know how to make sure your E-MU 0404 USB 2.0 is a 24-bit, multi-track audio/MIDI sequencer with the bundled applications, please see • Windows: Program Files\Creative Professional\E-MU 0404 USB\Documents\ 3rdParty.htm. • OS X: Applications Drive\Library\Documentation\E-MU 0404 USB WARNING! Select New Project from the Start menu. Select Empty and...
... about half an hour to complete, by -step tutorials are designed to get you 'll know how to make sure your E-MU 0404 USB 2.0 is a 24-bit, multi-track audio/MIDI sequencer with the bundled applications, please see • Windows: Program Files\Creative Professional\E-MU 0404 USB\Documents\ 3rdParty.htm. • OS X: Applications Drive\Library\Documentation\E-MU 0404 USB WARNING! Select New Project from the Start menu. Select Empty and...
Owners Manual
Page 27
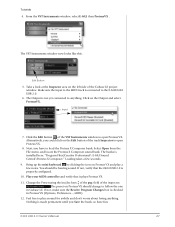
.... 0404 USB 2.0 Owner's Manual 27 The banks is connected to open Proteus VX. 8. From the VST Instruments window, select E-MU, then ProteusVX . Make sure the input to the MIDI track is installed here: "Program Files/Creative Professional\ E-MU Sound Central\Proteus X Composer." Click the Edit button of the inspector. Next, you could click on the Edit button of the Cubase LE project window. Tutorials 4. Change the Preset using...
.... 0404 USB 2.0 Owner's Manual 27 The banks is connected to open Proteus VX. 8. From the VST Instruments window, select E-MU, then ProteusVX . Make sure the input to the MIDI track is installed here: "Program Files/Creative Professional\ E-MU Sound Central\Proteus X Composer." Click the Edit button of the inspector. Next, you could click on the Edit button of the Cubase LE project window. Tutorials 4. Change the Preset using...
Owners Manual
Page 47
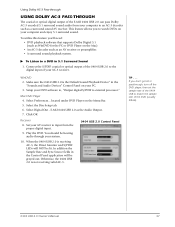
... pass Dolby AC-3 encoded 5.1 surround sound audio from the proper digital input. 9. Make sure the 0404 USB 2.0 is the Default Sound Playback Device" in the "Sounds and Audio Devices" Control Panel on your computer and enjoy 5.1 surround sound. E-MU 0404 USB 2.0 as an AV receiver or preamplifier. • A surround sound playback system. Set your DVD software to, "Output digital S/PDIF to external processor." To Listen to a DVD in the Control Panel application will NOT be hearing audio through USING DOLBY AC-3 PASS-THROUGH The coaxial or optical digital output...
... pass Dolby AC-3 encoded 5.1 surround sound audio from the proper digital input. 9. Make sure the 0404 USB 2.0 is the Default Sound Playback Device" in the "Sounds and Audio Devices" Control Panel on your computer and enjoy 5.1 surround sound. E-MU 0404 USB 2.0 as an AV receiver or preamplifier. • A surround sound playback system. Set your DVD software to, "Output digital S/PDIF to external processor." To Listen to a DVD in the Control Panel application will NOT be hearing audio through USING DOLBY AC-3 PASS-THROUGH The coaxial or optical digital output...

Owners Manual
Page 48
... E-MU 0404 USB 2.0 and an audio application (Ableton Live, Cubase, Sonar, etc.), the E-MU 0404 USB 2.0 drivers may need to be re-selected in your application. 1. In effect, increasing the ASIO buffer gives your computer "more time" to increase the ASIO Buffer setting without the associated latency problems during recording and overdubbing. The input ground is lifted when the A or B slide switch is closest to the GND LIFT label. Troubleshooting 48 TROUBLESHOOTING...
... E-MU 0404 USB 2.0 and an audio application (Ableton Live, Cubase, Sonar, etc.), the E-MU 0404 USB 2.0 drivers may need to be re-selected in your application. 1. In effect, increasing the ASIO buffer gives your computer "more time" to increase the ASIO Buffer setting without the associated latency problems during recording and overdubbing. The input ground is lifted when the A or B slide switch is closest to the GND LIFT label. Troubleshooting 48 TROUBLESHOOTING...
Owners Manual
Page 49
... the Audio Input and Audio Output. USB 1.1 Operation (Windows only) The 0404 can cause the 0404 to lowest, are selected in the OSX Audio MIDI Setup, 2-channel mode is running in. 0404 USB comes up in USB 1.1 mode (Windows only) Always turn the 0404 USB power off , wait a few seconds, then turn power off before connecting or disconnecting the USB cable. When these higher sample rates are AC-3, ASIO, WDM. When you see the Windows message, "This device could perform faster...", simply turn power...
... the Audio Input and Audio Output. USB 1.1 Operation (Windows only) The 0404 can cause the 0404 to lowest, are selected in the OSX Audio MIDI Setup, 2-channel mode is running in. 0404 USB comes up in USB 1.1 mode (Windows only) Always turn the 0404 USB power off , wait a few seconds, then turn power off before connecting or disconnecting the USB cable. When these higher sample rates are AC-3, ASIO, WDM. When you see the Windows message, "This device could perform faster...", simply turn power...
Owners Manual
Page 56
... USB Jack 17 V VST Instruments 26 VST Plug-ins, locating in /out 16 mode button 15 output format 19 S/PDIF to Analog Converter 19 Save Live Set, Ableton Live Lite 45 Save Project, Sonar LE 33 56 Signal Level Indicators 15 Simultaneous WDM/ASIO/AC-3 Playback 49 Skin, selecting 18 Soft Limit Control 19 Software Installation Mac OSX 9 Windows XP 8 Sonar LE multitrack recording 32 project window 32 Sub-Bank, Ableton Live Lite 45 Surround Sound...
... USB Jack 17 V VST Instruments 26 VST Plug-ins, locating in /out 16 mode button 15 output format 19 S/PDIF to Analog Converter 19 Save Live Set, Ableton Live Lite 45 Save Project, Sonar LE 33 56 Signal Level Indicators 15 Simultaneous WDM/ASIO/AC-3 Playback 49 Skin, selecting 18 Soft Limit Control 19 Software Installation Mac OSX 9 Windows XP 8 Sonar LE multitrack recording 32 project window 32 Sub-Bank, Ableton Live Lite 45 Surround Sound...


