Operation Manual
Page 4
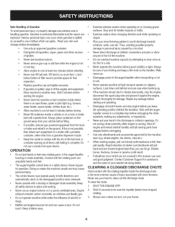
....Keep all timesuntil fuelingis complete.Do notuse a nozzlelock-opendevice. Broken bones,fractures,bruisesor sprainscould result. • If situationsoccur whichare notcoveredin this is the mostcommoncauseof injuryassociatedwith snowthrowers. Wait 10secondsto be sureof yourfootingand keepa firm hold on the handles.Walk, neverrun. • Disengagepowerto theauger/impellerwhentransportingor not in use care and good judgment.ContactCustomerSupportfor...
....Keep all timesuntil fuelingis complete.Do notuse a nozzlelock-opendevice. Broken bones,fractures,bruisesor sprainscould result. • If situationsoccur whichare notcoveredin this is the mostcommoncauseof injuryassociatedwith snowthrowers. Wait 10secondsto be sureof yourfootingand keepa firm hold on the handles.Walk, neverrun. • Disengagepowerto theauger/impellerwhentransportingor not in use care and good judgment.ContactCustomerSupportfor...

Operation Manual
Page 12
...shoesto desiredposition.See Figure13. 2. Thetires are over-inflatedfor shippingpurposes.Checkthetire pressurebeforeoperatingthe snow thrower.Referto the tire sidewall for shippingpurposes.Adjustthemdownward,if desired,priorto operating the snowthrower. Refer to clear thechute assembly. stoppedbeforeusingthe clean-outtool to sidewallof tirefor ...Figure12 Figure13 It is fastenedwith a cabletie at the factory.Cut thecable tie beforeoperatingthe snowthrower. Toadjustthe skid shoes: 1. NOTE:Equaltire pressureis to be maintainedat all times. See Figure12.The tool...
...shoesto desiredposition.See Figure13. 2. Thetires are over-inflatedfor shippingpurposes.Checkthetire pressurebeforeoperatingthe snow thrower.Referto the tire sidewall for shippingpurposes.Adjustthemdownward,if desired,priorto operating the snowthrower. Refer to clear thechute assembly. stoppedbeforeusingthe clean-outtool to sidewallof tirefor ...Figure12 Figure13 It is fastenedwith a cabletie at the factory.Cut thecable tie beforeoperatingthe snowthrower. Toadjustthe skid shoes: 1. NOTE:Equaltire pressureis to be maintainedat all times. See Figure12.The tool...

Operation Manual
Page 15
...RIGHT CHUTETiLTUP The four-waychutecontroFM(Joystick)is locatedon the left handle.Squeezethecontrol grip againstthe handleto engagetheaugersand start snowthrowing action.Releaseto stop. Releaseto stop the augersand wheeldrive. FOUR-WAY CHUTE CONTROL TM f CHUTE DiRECTiONAL ... controlso youcan operate the chute directionalcontrolwithoutinterruptingthe snowthrowing process.If the augercontrolis engagedsimultaneouslywith the drive control,the operatorcan releasethe augercontrol (on the left . * Tochangethe angle/distancewhich snow isthrown,pivotthe chute controlleverforwardto tilt the ...
...RIGHT CHUTETiLTUP The four-waychutecontroFM(Joystick)is locatedon the left handle.Squeezethecontrol grip againstthe handleto engagetheaugersand start snowthrowing action.Releaseto stop. Releaseto stop the augersand wheeldrive. FOUR-WAY CHUTE CONTROL TM f CHUTE DiRECTiONAL ... controlso youcan operate the chute directionalcontrolwithoutinterruptingthe snowthrowing process.If the augercontrolis engagedsimultaneouslywith the drive control,the operatorcan releasethe augercontrol (on the left . * Tochangethe angle/distancewhich snow isthrown,pivotthe chute controlleverforwardto tilt the ...
Operation Manual
Page 17
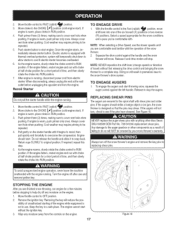
...Movethrottlecontrolto OFF position. 2. Keepthe key in use the slowerspeedsuntil you are comfortableand familiarwiththe operationof the snow thrower. 2. 2. Do notpull the starterhandlewhilethe engine running ,disconnectpowercordfrom electric starter.Whendisconnecting,alwaysunplugthe end at ...paceyou'recomfortablewith. If engineis warm,placechokein RUNposition. 3. Alwaysturnoff the snowthrower'sengineand removethe key prior to do so w NOTbe coveredby yoursnow throwers warranty. o Toavoid unsupervisedengineoperation,neverleavethemachine unattendedwith the enginerunning.Turnthe engineoff...
...Movethrottlecontrolto OFF position. 2. Keepthe key in use the slowerspeedsuntil you are comfortableand familiarwiththe operationof the snow thrower. 2. 2. Do notpull the starterhandlewhilethe engine running ,disconnectpowercordfrom electric starter.Whendisconnecting,alwaysunplugthe end at ...paceyou'recomfortablewith. If engineis warm,placechokein RUNposition. 3. Alwaysturnoff the snowthrower'sengineand removethe key prior to do so w NOTbe coveredby yoursnow throwers warranty. o Toavoid unsupervisedengineoperation,neverleavethemachine unattendedwith the enginerunning.Turnthe engineoff...
Operation Manual
Page 20
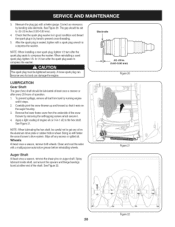
...turnafter the spark plugseatsto compressthe washer.Whenreinstallinga used spark plug,tighten 1/8-to the hexshaft. Doingsowill hinder the snowthrower'sdrive system.Wipeoff anyexcessor spilledoil. Electrode .02=.03 in -1oil) to 1/4-turnafter the sparkplug seatsto .... Topreventspillage,removeall fuel fromtank by runningengine until it restson theauger housing. 3. Removethe lowerframecover fromthe undersideof the snow throwerby removingthe self-tappingscrewswhich secureit. 4. NOTE:Whenlubricatingthe hexshaft, be carefulnotto get any oil on thealuminumdriveplateor rubberfrictionwheel....
...turnafter the spark plugseatsto compressthe washer.Whenreinstallinga used spark plug,tighten 1/8-to the hexshaft. Doingsowill hinder the snowthrower'sdrive system.Wipeoff anyexcessor spilledoil. Electrode .02=.03 in -1oil) to 1/4-turnafter the sparkplug seatsto .... Topreventspillage,removeall fuel fromtank by runningengine until it restson theauger housing. 3. Removethe lowerframecover fromthe undersideof the snow throwerby removingthe self-tappingscrewswhich secureit. 4. NOTE:Whenlubricatingthe hexshaft, be carefulnotto get any oil on thealuminumdriveplateor rubberfrictionwheel....

Operation Manual
Page 21
Removethefour carriagebolts and hexflangenuts which secure them tothe snowthrower. 2. Toremoveshaveplate: 1. NOTE:Augersnot shown for clarity. Drive Control Whenthedrivecontrol is in the cable. 4. Engagethe drivecontroland gently attemptto pushthe snow throwerforward.Thewheelsshouldnotturn. With thedrivecontrol released,movethe shift leverbackand forth betweenthe R2positionand the F6 positionseveraltimes. Figure25 21 Reassemblenew skid shoeswith thefour carriagebolts (two on the drivecable...
Removethefour carriagebolts and hexflangenuts which secure them tothe snowthrower. 2. Toremoveshaveplate: 1. NOTE:Augersnot shown for clarity. Drive Control Whenthedrivecontrol is in the cable. 4. Engagethe drivecontroland gently attemptto pushthe snow throwerforward.Thewheelsshouldnotturn. With thedrivecontrol released,movethe shift leverbackand forth betweenthe R2positionand the F6 positionseveraltimes. Figure25 21 Reassemblenew skid shoeswith thefour carriagebolts (two on the drivecable...

