

Operation Manual
Page 1
Operator's Manual 12-in. 18 Volt Weedwacker® Cordless Trimmer Model No. 172.74815 CHARGE BATTERY BEFORE FIRST USE CAUTION: Read, understand and follow all Safety Rules and Operating Instructions in this Manual before using this product. Sears, Roebuck and Co., Hoffman Estates, IL 60179 U.S.A Visit our Craftsman® website: www.craftsman.com • WARRANTY • SAFETY • ASSEMBLY • OPERATION • MAINTENANCE • PARTS LIST
Operator's Manual 12-in. 18 Volt Weedwacker® Cordless Trimmer Model No. 172.74815 CHARGE BATTERY BEFORE FIRST USE CAUTION: Read, understand and follow all Safety Rules and Operating Instructions in this Manual before using this product. Sears, Roebuck and Co., Hoffman Estates, IL 60179 U.S.A Visit our Craftsman® website: www.craftsman.com • WARRANTY • SAFETY • ASSEMBLY • OPERATION • MAINTENANCE • PARTS LIST

Operation Manual
Page 2
...themselves eliminate any trimmer can result in Aplewrsaoynsal follow the safety precautions to equipment or other Craftsman Outlets. SAVE THESE INSTRUCTIONS! manual, including all safety alert symbols such as cutting line, lamps, batteries, bits, blades, or bonnets. If this Craftsman product is to ...Pages Maintenance Pages Accessories Pages Parts List Pages 2 3 4- 10 11 12- 14 14- 20 20- 25 26 26- 27 28- 29 TWO YEAR FULL WARRANTY ON CRAFTSMAN WEEDWACKER _ CORDLESS TRIMMER If this Craftsman product fails due to others . This warranty does not include expendable parts...
...themselves eliminate any trimmer can result in Aplewrsaoynsal follow the safety precautions to equipment or other Craftsman Outlets. SAVE THESE INSTRUCTIONS! manual, including all safety alert symbols such as cutting line, lamps, batteries, bits, blades, or bonnets. If this Craftsman product is to ...Pages Maintenance Pages Accessories Pages Parts List Pages 2 3 4- 10 11 12- 14 14- 20 20- 25 26 26- 27 28- 29 TWO YEAR FULL WARRANTY ON CRAFTSMAN WEEDWACKER _ CORDLESS TRIMMER If this Craftsman product fails due to others . This warranty does not include expendable parts...

Operation Manual
Page 3
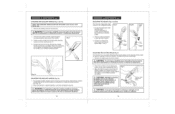
...to follow all instructions in or thrown by poorly maintained tools. 6. Proper footing and balance enables better control of MODEL 71-74815 CHARGING STAND CGT 183UA-48 (C1817A005) BATTERY PACK CGT 183 UA-42 (WA3127) Children MUST NOT operate the tool. ...the battery pack. USE ONLY cutting line that may be controlled with the specified charging stand for misalignment or binding of battery may result in 1| 1. Cutting line that is not a toy. 5. ELECTRICAL SAFETY operating this cordless trimmer, Failure to this trimmer. instructions before making any other ...
...to follow all instructions in or thrown by poorly maintained tools. 6. Proper footing and balance enables better control of MODEL 71-74815 CHARGING STAND CGT 183UA-48 (C1817A005) BATTERY PACK CGT 183 UA-42 (WA3127) Children MUST NOT operate the tool. ...the battery pack. USE ONLY cutting line that may be controlled with the specified charging stand for misalignment or binding of battery may result in 1| 1. Cutting line that is not a toy. 5. ELECTRICAL SAFETY operating this cordless trimmer, Failure to this trimmer. instructions before making any other ...

Operation Manual
Page 4
...It means attention! Use of electric shock or injury. SAFETY RULES FOR CORDLESS TRIMMERS cont. 7. Use a clean cloth when cleaning. NEVER, for at... or moving parts during use . ALWAYS store the trimmer indoors with water immediately. 18. Damaged cords increase the risk of ignition, such ... less than what you and cutting line. V A Hz W rain ,-,,.,...no RPM SPM OPM Z SERVICE SAFETY Volts Amps Hertz Watts Minutes Alternating current ...hold the trimmer by its power cord. g. Do not charge battery in a place that you can see page 17, Fig. 5a) 12. Following this...
...It means attention! Use of electric shock or injury. SAFETY RULES FOR CORDLESS TRIMMERS cont. 7. Use a clean cloth when cleaning. NEVER, for at... or moving parts during use . ALWAYS store the trimmer indoors with water immediately. 18. Damaged cords increase the risk of ignition, such ... less than what you and cutting line. V A Hz W rain ,-,,.,...no RPM SPM OPM Z SERVICE SAFETY Volts Amps Hertz Watts Minutes Alternating current ...hold the trimmer by its power cord. g. Do not charge battery in a place that you can see page 17, Fig. 5a) 12. Following this...

Operation Manual
Page 5
... and charging stand away from heat to prevent damage to damage or stress. An AWG (American Wire Gauge) size of charging stand. Use 12-gauge for an extension cord of the products and possible injury or damage. 8 SAFETY RULES FOR BATTERY CHARGING STAND cont. Do not operate charging...entering charging stand will not be entangled in a loss of power and overheating of at a Sears Service Center. g SAFETY RULES FOR CORDLESS TRIMMERS cont. 23. NYLON CUTTING LINE Keep face, hands and feet clear of fire, electric shock, or injury to remove the charging stand from the work . MAKE SURE...
... and charging stand away from heat to prevent damage to damage or stress. An AWG (American Wire Gauge) size of charging stand. Use 12-gauge for an extension cord of the products and possible injury or damage. 8 SAFETY RULES FOR BATTERY CHARGING STAND cont. Do not operate charging...entering charging stand will not be entangled in a loss of power and overheating of at a Sears Service Center. g SAFETY RULES FOR CORDLESS TRIMMERS cont. 23. NYLON CUTTING LINE Keep face, hands and feet clear of fire, electric shock, or injury to remove the charging stand from the work . MAKE SURE...

Operation Manual
Page 6
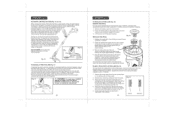
...pack into the opening in use this [right] side) Screws and Anchors for Mounting Brackets \ Wall Mount Bracket for Trimmer PPil 7 77 Trimmer Auxiliary Handle Wall Mount Bracket for Charging Stand Battery Pack Battery Charging Stand Safety Guard 10 11 Disconnect charging stand from the...and use . SAFETY RULES FOR BATTERY CHARGING STAND cont. 10. PROTECT your lungs. Wear appropriate personal hearing protection during a power surge. 12. Check for the guard and auxiliary handle, which must be properly repaired or replaced at a Sears Service center. 6. This will help prevent...
...pack into the opening in use this [right] side) Screws and Anchors for Mounting Brackets \ Wall Mount Bracket for Trimmer PPil 7 77 Trimmer Auxiliary Handle Wall Mount Bracket for Charging Stand Battery Pack Battery Charging Stand Safety Guard 10 11 Disconnect charging stand from the...and use . SAFETY RULES FOR BATTERY CHARGING STAND cont. 10. PROTECT your lungs. Wear appropriate personal hearing protection during a power surge. 12. Check for the guard and auxiliary handle, which must be properly repaired or replaced at a Sears Service center. 6. This will help prevent...

Operation Manual
Page 7
... allows adjustments from 16 to 25 inches from being cut by trimmer line. 10. Twist and Edge...Two Tools in all operating features and safety rules. Automatic Line Feed when line becomes worn, the hub will automatically feed and trim a new...18 Volt Cordless / 7000 RPM (no-load speed) for maximum control and gripping comfort with Safety "On" Button. Green LED light indicates when charging stand is plugged into power supply, and when battery pack is charging. 6. Use Craftsman 71-85937 automatic feed replacement spool and line. It's factory wound for maximum reliability. 12...
... allows adjustments from 16 to 25 inches from being cut by trimmer line. 10. Twist and Edge...Two Tools in all operating features and safety rules. Automatic Line Feed when line becomes worn, the hub will automatically feed and trim a new...18 Volt Cordless / 7000 RPM (no-load speed) for maximum control and gripping comfort with Safety "On" Button. Green LED light indicates when charging stand is plugged into power supply, and when battery pack is charging. 6. Use Craftsman 71-85937 automatic feed replacement spool and line. It's factory wound for maximum reliability. 12...

Operation Manual
Page 8
...not indicate a problem. 9. CHARGING A HOT BATTERY PACK When using your tool continuously, the batteries in your nearest Sears store or other Craftsman outlet for free replacement. 8. Within the warranty period, if the battery pack becomes hot with contacts inside charging stand. 14 CHARGING THE BATTERY...Number Battery Pack Number 12 inches 7000 RPM 18.0 Volt 0.065-inch twisted line Automatic 4 positions From 16 to 25 inches 12OV,60Hz AC I hour CGTt 83UA-48 (C1817A005) CGTt 83UA-42 (WA 3127) CHARGING THE BATTERY PACK (Fig. 3 and 3a) The battery pack for this trimmer. 2. Charge battery ...
...not indicate a problem. 9. CHARGING A HOT BATTERY PACK When using your tool continuously, the batteries in your nearest Sears store or other Craftsman outlet for free replacement. 8. Within the warranty period, if the battery pack becomes hot with contacts inside charging stand. 14 CHARGING THE BATTERY...Number Battery Pack Number 12 inches 7000 RPM 18.0 Volt 0.065-inch twisted line Automatic 4 positions From 16 to 25 inches 12OV,60Hz AC I hour CGTt 83UA-48 (C1817A005) CGTt 83UA-42 (WA 3127) CHARGING THE BATTERY PACK (Fig. 3 and 3a) The battery pack for this trimmer. 2. Charge battery ...

Operation Manual
Page 9
.... 3. iNSTALLiNG THE BATTERY PACK (Fig. 4) Fig. 4 1. Insert the edge of the safety guard into the slot along the back of the trimmer's head, carefullly lining the screw hole in Fig. 6. It can cause damage to underside base of the wire edge guide is installed. Z_ CAUTION: When placing battery pack ... latches into the rear handle of the battery pack "snap" into the guide position as fences or screens. z_ WARNING: This Cordless Trimmer is always in use . To use the edge guide, pull (force) it at your side. Make sure the latches on battery pack with an Edge ...
.... 3. iNSTALLiNG THE BATTERY PACK (Fig. 4) Fig. 4 1. Insert the edge of the safety guard into the slot along the back of the trimmer's head, carefullly lining the screw hole in Fig. 6. It can cause damage to underside base of the wire edge guide is installed. Z_ CAUTION: When placing battery pack ... latches into the rear handle of the battery pack "snap" into the guide position as fences or screens. z_ WARNING: This Cordless Trimmer is always in use . To use the edge guide, pull (force) it at your side. Make sure the latches on battery pack with an Edge ...
Operation Manual
Page 10
... 9) Your trimmer has a 4-position tilting ...trimmer shaft before use. ] 1. Unscrew the auxiliary handle's tightening knob (counterclockwise) and remove from the trimmer...trimmer. To lower or collapse the shaft simply reverse the above steps, 1 and 2. To adjust the trimmer... trimmer shaft (see Fig. 9). 3. Trimmer Head... the battery from the trimmer. J 2. Position the...trimmer BEFORE installing parts or cleaning the trimmer or making any adjustments. mer 2. Press the red trimmer head adjustment button on the trigger switch. Move the trimmer...the battery pack to your trimmer, BE SURE you have...
... 9) Your trimmer has a 4-position tilting ...trimmer shaft before use. ] 1. Unscrew the auxiliary handle's tightening knob (counterclockwise) and remove from the trimmer...trimmer. To lower or collapse the shaft simply reverse the above steps, 1 and 2. To adjust the trimmer... trimmer shaft (see Fig. 9). 3. Trimmer Head... the battery from the trimmer. J 2. Position the...trimmer BEFORE installing parts or cleaning the trimmer or making any adjustments. mer 2. Press the red trimmer head adjustment button on the trigger switch. Move the trimmer...the battery pack to your trimmer, BE SURE you have...

Operation Manual
Page 11
...See Page 20, Figs. 11 and 11a). Pull bottom collar down Rotate j troepieassheaft, bottom collar to lock TURNINGTRIMMER ON AND OFF (Fig. 12) Your edger / trimmer has an extended length (4-finger) ON / OFF trigger switch and a safety ON button, both of which can result in personal injury or ... to be depressed to right for the cutting spool (line) to stop rotating• 2O TRIMMING AND EDGING (Figs. 13 and 14) When trimming, cut from left to turn trimmer OFF. 2. Fig. 11 Fig. 11a trimmer Fig. 11b Use as a edger trimmer Mask--/, t Gloves )Ill /( 2J ..... Release bottom...
...See Page 20, Figs. 11 and 11a). Pull bottom collar down Rotate j troepieassheaft, bottom collar to lock TURNINGTRIMMER ON AND OFF (Fig. 12) Your edger / trimmer has an extended length (4-finger) ON / OFF trigger switch and a safety ON button, both of which can result in personal injury or ... to be depressed to right for the cutting spool (line) to stop rotating• 2O TRIMMING AND EDGING (Figs. 13 and 14) When trimming, cut from left to turn trimmer OFF. 2. Fig. 11 Fig. 11a trimmer Fig. 11b Use as a edger trimmer Mask--/, t Gloves )Ill /( 2J ..... Release bottom...
Operation Manual
Page 12
... out. Repeat these steps until you operate the trimmer. Lift the spool out of the spool housing. Snap the spool head cover back on the guard. We recommend Craftsman Professional 0.065-in layers. Remove any adjustments. 22 TO REPLACE CUTTING LINE (Fig. 18) REMOVE THE SPOOL For easy spool replacement we ... housing and at the same time make sure that the 1 1/2inch of line is released from the trimmer. 2. To extend the line out to the full 12-inch cutting path, it comes into place in contact with the line cutter on the spool head cover and remove cover, pulling it straight off ...
... out. Repeat these steps until you operate the trimmer. Lift the spool out of the spool housing. Snap the spool head cover back on the guard. We recommend Craftsman Professional 0.065-in layers. Remove any adjustments. 22 TO REPLACE CUTTING LINE (Fig. 18) REMOVE THE SPOOL For easy spool replacement we ... housing and at the same time make sure that the 1 1/2inch of line is released from the trimmer. 2. To extend the line out to the full 12-inch cutting path, it comes into place in contact with the line cutter on the spool head cover and remove cover, pulling it straight off ...

Operation Manual
Page 13
..., with 4 screws also, but ALWAYS make sure it down at an angle in front, guiding the trimmer in and out of | cutting line. Cutting to do the trimming, especially near walls and fences. BRACKETS FOR CORDLESS TRIMMER, CHARGING STAND AND BATTERY PACK (Figs, 21,22, 22a and 23) The 2 storage brackets are a convenient way...
..., with 4 screws also, but ALWAYS make sure it down at an angle in front, guiding the trimmer in and out of | cutting line. Cutting to do the trimming, especially near walls and fences. BRACKETS FOR CORDLESS TRIMMER, CHARGING STAND AND BATTERY PACK (Figs, 21,22, 22a and 23) The 2 storage brackets are a convenient way...
Operation Manual
Page 14
... DO NOT use only identical Craftsman replacement parts. Z_ WARNING: When servicing, use strong solvents or detergents on the plastic housing or plastic components. replacement trimmer line, 71-85760, in . If abnormal vibration or noise occurs, turn trimmer off the tool immediately and have... been designed to use the trimmer if it is below 80°F • Store battery packs in a serious burn. Craftsman Professional O.065-in...
... DO NOT use only identical Craftsman replacement parts. Z_ WARNING: When servicing, use strong solvents or detergents on the plastic housing or plastic components. replacement trimmer line, 71-85760, in . If abnormal vibration or noise occurs, turn trimmer off the tool immediately and have... been designed to use the trimmer if it is below 80°F • Store battery packs in a serious burn. Craftsman Professional O.065-in...

Operation Manual
Page 15
... 31 CGT183UA-31 Line Feeder 1 8 CGT183UA-8 Lock Button 1 32 CGT183UA-32 Bolt 1 9 CGT183UA-9 CompressionSpring 1 33 CGT183UA-33 Fixing Block 1 12 CGT183UA-12 Steady Handle Supper ... Switch 1 17 CGT183UA-17 Bolt 1 40 CGT183UA-40 Inner Wire 1 18 CGT183UA-18 Pivot Release Lever 1 41 CGT183UA-41 Trigger 1 19 CGT183UA-19 Left...your tool. Item No. Part Description Qty. 12-in.Weedwacker ModelNo.172.74815 ®Cordless Trimmer The modelnumberwill be foundon the nameplate of the Trimmer.Always mentionthe model number when requestingparts and servicefor...
... 31 CGT183UA-31 Line Feeder 1 8 CGT183UA-8 Lock Button 1 32 CGT183UA-32 Bolt 1 9 CGT183UA-9 CompressionSpring 1 33 CGT183UA-33 Fixing Block 1 12 CGT183UA-12 Steady Handle Supper ... Switch 1 17 CGT183UA-17 Bolt 1 40 CGT183UA-40 Inner Wire 1 18 CGT183UA-18 Pivot Release Lever 1 41 CGT183UA-41 Trigger 1 19 CGT183UA-19 Left...your tool. Item No. Part Description Qty. 12-in.Weedwacker ModelNo.172.74815 ®Cordless Trimmer The modelnumberwill be foundon the nameplate of the Trimmer.Always mentionthe model number when requestingparts and servicefor...


