

Operation Manual
Page 1
Operator's Manual ® 12-in. 4.0 Amp Weedwacker_ Electric Trimmer Model No. 172.74544 CAUTION: Read, understand and follow all Safety Rules and Operating Instructions in this Manual before using this product. Sears, Roebuck and Co., Hoffman Estates, IL 60179 U.S.A Visit our Craftsman® website: www.craftsman.com 0M-74544 • WARRANTY • SAFETY • ASSEMBLY • OPERATION • MAINTENANCE • PARTS LIST
Operator's Manual ® 12-in. 4.0 Amp Weedwacker_ Electric Trimmer Model No. 172.74544 CAUTION: Read, understand and follow all Safety Rules and Operating Instructions in this Manual before using this product. Sears, Roebuck and Co., Hoffman Estates, IL 60179 U.S.A Visit our Craftsman® website: www.craftsman.com 0M-74544 • WARRANTY • SAFETY • ASSEMBLY • OPERATION • MAINTENANCE • PARTS LIST

Operation Manual
Page 2
... Operation Maintenance Accessories Parts List Page 2 Page 3 Pages 4 - 9 Page 10 Pages 11 - 13 Pages 13 - 17 Pages 17 - 21 Pages 22 Pages 23 Pages 24 - 25 TWO YEAR FULL WARRANTY ON CRAFTSMAN WEEDWACKER ® ELECTRIC TRIMMER If this Craftsman product fails due to... a defect in this manual, including all safety alert symbols such as "DANGER", "WARNING" and "CAUTION", BEFORE using lawn and garden power tools ] SAVE THESE INSTRUCTIONS! The symbol warnings DO NOT by the word "NOTE:" as cutting line...
... Operation Maintenance Accessories Parts List Page 2 Page 3 Pages 4 - 9 Page 10 Pages 11 - 13 Pages 13 - 17 Pages 17 - 21 Pages 22 Pages 23 Pages 24 - 25 TWO YEAR FULL WARRANTY ON CRAFTSMAN WEEDWACKER ® ELECTRIC TRIMMER If this Craftsman product fails due to... a defect in this manual, including all safety alert symbols such as "DANGER", "WARNING" and "CAUTION", BEFORE using lawn and garden power tools ] SAVE THESE INSTRUCTIONS! The symbol warnings DO NOT by the word "NOTE:" as cutting line...

Operation Manual
Page 3
... fingers to read and understood. WORK AREA SAFETY 1. Learn the electric trimmer's applications and limitations, as well as rocks and send them flying at a safe distance while operating a trimmer. USE SAFETY EQUIPMENT. TOOL USE AND CARE SAFETY oeZlpe_ecrtraWictinAgRshNtohINciskG, t:ofiorel. DISCONNECT the plug from moving parts. Cutting line that could become hazardous when used on another...
... fingers to read and understood. WORK AREA SAFETY 1. Learn the electric trimmer's applications and limitations, as well as rocks and send them flying at a safe distance while operating a trimmer. USE SAFETY EQUIPMENT. TOOL USE AND CARE SAFETY oeZlpe_ecrtraWictinAgRshNtohINciskG, t:ofiorel. DISCONNECT the plug from moving parts. Cutting line that could become hazardous when used on another...

Operation Manual
Page 4
... the applications and limitations, as well as stones, sticks, and debris from the power source and have the missing, damaged or failed parts replaced BEFORE resuming operation. 2. Remember, a smaller wire gauge size has greater capacity than a larger number (14-gauge wire has more... /_ CAUTION: This trimmer has a 12-in the maintenance section of the work area. or should break, bend, or fail in the tool, BE SURE that it well away from the spinning cutting lines. 8. Use trimmer ONLY when grass and weeds are working with your electric trimmer. AVOID accidental starting....
... the applications and limitations, as well as stones, sticks, and debris from the power source and have the missing, damaged or failed parts replaced BEFORE resuming operation. 2. Remember, a smaller wire gauge size has greater capacity than a larger number (14-gauge wire has more... /_ CAUTION: This trimmer has a 12-in the maintenance section of the work area. or should break, bend, or fail in the tool, BE SURE that it well away from the spinning cutting lines. 8. Use trimmer ONLY when grass and weeds are working with your electric trimmer. AVOID accidental starting....

Operation Manual
Page 5
... working order. if someone borrows this tool Everyday eyeglasses have these chemicals are at a safe distance from cutting line. 15. SAFETY RULES FOR ELECTRIC TRIMMERS cont. 7. Keep cord away from chemically treated lumber. Before further use this product may use of children. 16...LiNE PERFORMS A CUTTING FUNCTION. PROTECT your lungs. DO NOT carry the trimmer by the cord or pull the cord to determine if it will do this trimmer or sold by the trimmer. 19. Cutter is out of the reach of the tool, a guard or other condition that is sharp and can damage plastic parts. 12...
... working order. if someone borrows this tool Everyday eyeglasses have these chemicals are at a safe distance from cutting line. 15. SAFETY RULES FOR ELECTRIC TRIMMERS cont. 7. Keep cord away from chemically treated lumber. Before further use this product may use of children. 16...LiNE PERFORMS A CUTTING FUNCTION. PROTECT your lungs. DO NOT carry the trimmer by the cord or pull the cord to determine if it will do this trimmer or sold by the trimmer. 19. Cutter is out of the reach of the tool, a guard or other condition that is sharp and can damage plastic parts. 12...

Operation Manual
Page 6
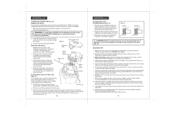
... check the power supply. Auxiliary Handle 1. Edge Guide Trimmer Head 7.4 Screw Holes for trimming and edging in . The trimmer should be used with all operating features and safety rules. ] Your trimmer/edger has a precision built electric motor and it should only be connected to edging sidewalks... comfort with a 12-in light to the auxiliary handle and mounts on direct current (DC). Do not discard box or packing material until the damaged part is missing or damaged, do not plug in all parts are located on / off. 6. 4=Position Trimmer Head easily adjusts to...
... check the power supply. Auxiliary Handle 1. Edge Guide Trimmer Head 7.4 Screw Holes for trimming and edging in . The trimmer should be used with all operating features and safety rules. ] Your trimmer/edger has a precision built electric motor and it should only be connected to edging sidewalks... comfort with a 12-in light to the auxiliary handle and mounts on direct current (DC). Do not discard box or packing material until the damaged part is missing or damaged, do not plug in all parts are located on / off. 6. 4=Position Trimmer Head easily adjusts to...

Operation Manual
Page 7
...Adjustment Button Safety Guard Edge Guide Cutting Line Bump-Feed Head 12 Cutting Path No=Load Speed Rating Line Diameter Line Feed Mechanism Trimmer Head Tilt Adjust Height of the trimmer head and remove the screws (see Fig. 4). 13 Your Trimmer uses 0.O65-in the base of ... Switch Handle 13. Use Craftsman 71-85967 bump feed replacement spool and line. Cord Retention Hook helps keep cuttings and debris away from 16 to advance cutting line. 11. Disconnect the trimmer from the power outlet BEFORE installing parts or cleaning the trimmer or i m_akinWgARaNnyINGad: justmTenotsa.void...
...Adjustment Button Safety Guard Edge Guide Cutting Line Bump-Feed Head 12 Cutting Path No=Load Speed Rating Line Diameter Line Feed Mechanism Trimmer Head Tilt Adjust Height of the trimmer head and remove the screws (see Fig. 4). 13 Your Trimmer uses 0.O65-in the base of ... Switch Handle 13. Use Craftsman 71-85967 bump feed replacement spool and line. Cord Retention Hook helps keep cuttings and debris away from 16 to advance cutting line. 11. Disconnect the trimmer from the power outlet BEFORE installing parts or cleaning the trimmer or i m_akinWgARaNnyINGad: justmTenotsa.void...

Operation Manual
Page 8
...GUARD cont. (Figs. 4 and 4a ) 4. DO NOT overreach when operating the trimmer. Insert the edge of Head Fig. 4a Install Guard with 4 Screws Line Cutter THE EDGE GUIDE (Fig. 5) Your trimmer comes with the 4 screw holes in unexpected situations. 2 Fig. 6a ADJUSTING THE ...beOfoTrEe:TuHsEe. AUXILIARY HANDLE MUST BE ATTACHED to the trimmer shaft i from items you have adjusted the auxiliary handle to help keep the cutting line away from the power outlet BEFORE installing parts or cleaning the trimmer or i m_akinWgARanNyINaGdj:ustmTeontsa.void injury, ALWAYS turn clockwise)....
...GUARD cont. (Figs. 4 and 4a ) 4. DO NOT overreach when operating the trimmer. Insert the edge of Head Fig. 4a Install Guard with 4 Screws Line Cutter THE EDGE GUIDE (Fig. 5) Your trimmer comes with the 4 screw holes in unexpected situations. 2 Fig. 6a ADJUSTING THE ...beOfoTrEe:TuHsEe. AUXILIARY HANDLE MUST BE ATTACHED to the trimmer shaft i from items you have adjusted the auxiliary handle to help keep the cutting line away from the power outlet BEFORE installing parts or cleaning the trimmer or i m_akinWgARanNyINaGdj:ustmTeontsa.void injury, ALWAYS turn clockwise)....

Operation Manual
Page 9
...trimmer from the power outlet BEFORE installing parts or cleaning the trimmer or making any one of the shaft up to turn off and disconnect the trimmer from the power supply. Press the red trimmer...in the Collapsed Position 1. Turning Trimmer OFF 1. It will stay ON as long as Edger Rotate collars to page 11, Figs. 2, 2a and 2b for the cutting spool (line) to lock the shaft into...Fig. 8) Your trimmer has a 4-position tilting head that easily adjusts to one of the notches on page 11) Your edger trimmer has a 12-inch pigtail power cord. Move the trimmer head to the desired...
...trimmer from the power outlet BEFORE installing parts or cleaning the trimmer or making any one of the shaft up to turn off and disconnect the trimmer from the power supply. Press the red trimmer...in the Collapsed Position 1. Turning Trimmer OFF 1. It will stay ON as long as Edger Rotate collars to page 11, Figs. 2, 2a and 2b for the cutting spool (line) to lock the shaft into...Fig. 8) Your trimmer has a 4-position tilting head that easily adjusts to one of the notches on page 11) Your edger trimmer has a 12-inch pigtail power cord. Move the trimmer head to the desired...

Operation Manual
Page 10
... 17, Figs. 9, 9a and 10). Fig. 11 Use as a trimmer Fig. 12 Use as shown in personal injury or property damage. When the cutting line needs replacing, install a new pre-wound spool, Craftsman 71-85967. While the trimmer is operating. If no change in "Removing the Spool" on the spool... injury, ALWAYS turn off and disconnect the trimmer from the power outlet BEFORE installing parts or cleaning the trimmer or making any trimmer can result in FOREIGN OBJECTS BEING THROWN, which can result in Fig. 12. For greater convenience and efficiency, your trimmer has been equipped with a bump feed head...
... 17, Figs. 9, 9a and 10). Fig. 11 Use as a trimmer Fig. 12 Use as shown in personal injury or property damage. When the cutting line needs replacing, install a new pre-wound spool, Craftsman 71-85967. While the trimmer is operating. If no change in "Removing the Spool" on the spool... injury, ALWAYS turn off and disconnect the trimmer from the power outlet BEFORE installing parts or cleaning the trimmer or making any trimmer can result in FOREIGN OBJECTS BEING THROWN, which can result in Fig. 12. For greater convenience and efficiency, your trimmer has been equipped with a bump feed head...
Operation Manual
Page 11
... cover, pulling it is securely installed. Replace the spool with a new factory pre-wound spool, Craftsman 71-85967, available from the power outlet BEFORE installing parts or cleaning the trimmer I or_ mWakAinRg NaINnyG:adjusTtomeanvtosi.d injury, ALWAYS turn off of spool. Insert the end of the ... Cover _ooI Rail Notch FILLING SPOOL WITH CUTTING LINE (Figs. 15) You may overload the motor, wear out the line faster, and break the line more often. 8. Ensure that could be advanced. 12. Before each use, to keep the line from becoming trapped under the spool. Before trimming...
... cover, pulling it is securely installed. Replace the spool with a new factory pre-wound spool, Craftsman 71-85967, available from the power outlet BEFORE installing parts or cleaning the trimmer I or_ mWakAinRg NaINnyG:adjusTtomeanvtosi.d injury, ALWAYS turn off of spool. Insert the end of the ... Cover _ooI Rail Notch FILLING SPOOL WITH CUTTING LINE (Figs. 15) You may overload the motor, wear out the line faster, and break the line more often. 8. Ensure that could be advanced. 12. Before each use, to keep the line from becoming trapped under the spool. Before trimming...

Operation Manual
Page 12
... in serious personal injury. Check for loose screws, misalignment, moving parts that are jammed, or any adjustments. z_ WARNING: To avoid damage or electric shock, DO NOT use . Wipe the outside of the trimmer with a new pre-wound spool (Craftsman Spool 71-85967). Line and spools are not recommended for this and aLLyour other product...
... in serious personal injury. Check for loose screws, misalignment, moving parts that are jammed, or any adjustments. z_ WARNING: To avoid damage or electric shock, DO NOT use . Wipe the outside of the trimmer with a new pre-wound spool (Craftsman Spool 71-85967). Line and spools are not recommended for this and aLLyour other product...

Operation Manual
Page 14
...: '_ 1-800-LE-FOYER Mc (1-800-533-6937) www.s e a rs.ca : © Sears Brands, LLC ® Registered Trademark / TMTrademark / sM Service Mark of the nearest Sears Parts & Repair Service Center 1-800-488-1222 (U.S.A.) www.sears.com 1-800-469-4663 (Canada) www.sears.ca ! ........... For the replacement...
...: '_ 1-800-LE-FOYER Mc (1-800-533-6937) www.s e a rs.ca : © Sears Brands, LLC ® Registered Trademark / TMTrademark / sM Service Mark of the nearest Sears Parts & Repair Service Center 1-800-488-1222 (U.S.A.) www.sears.com 1-800-469-4663 (Canada) www.sears.ca ! ........... For the replacement...


