

Operation Manual
Page 1
...: Read and follow all Safety Rules and instructions before operating this product, Call: 1-800 -659-5917 Sears Craftsman Help Line 5 am- 5 pm, Mon - Operator's Manual CRAFTSMAN° LAW TRACTOR 26.0 HR* 54" Mower Electric Start Automatic Transmission Model No. 917.28990 , EspaSol, p. 35 I I This product has a low emission engine which operates I differently from previously built engines. Before...
...: Read and follow all Safety Rules and instructions before operating this product, Call: 1-800 -659-5917 Sears Craftsman Help Line 5 am- 5 pm, Mon - Operator's Manual CRAFTSMAN° LAW TRACTOR 26.0 HR* 54" Mower Electric Start Automatic Transmission Model No. 917.28990 , EspaSol, p. 35 I I This product has a low emission engine which operates I differently from previously built engines. Before...
Operation Manual
Page 3
...; Read, understand, and follow all parts to come to protect themselves and others from serious injury. Clear the area of your tractor. _kWARNING: Engine exhaust, some of bystanders before cleaning the machine, removing the grass catcher, or unclogging the discharge guard. lutely ...necessary. Operate machine only in reverse unless abso- These operators should evaluate their ability to operate the riding mower safely enough to a complete stop engine, and remove keys before turning. Follow the manufacturer's recommen- Always look down before dismounting...
...; Read, understand, and follow all parts to come to protect themselves and others from serious injury. Clear the area of your tractor. _kWARNING: Engine exhaust, some of bystanders before cleaning the machine, removing the grass catcher, or unclogging the discharge guard. lutely ...necessary. Operate machine only in reverse unless abso- These operators should evaluate their ability to operate the riding mower safely enough to a complete stop engine, and remove keys before turning. Follow the manufacturer's recommen- Always look down before dismounting...

Operation Manual
Page 5
... strike a foreign object, stop or shift while on a slope. If you will not have been given rides in the watchful care of bystanders before restarting. Mower blades are sharp. If machine stops while going uphill, disengage blades, shift into reverse and back down for another ride and be seriously injured or...
... strike a foreign object, stop or shift while on a slope. If you will not have been given rides in the watchful care of bystanders before restarting. Mower blades are sharp. If machine stops while going uphill, disengage blades, shift into reverse and back down for another ride and be seriously injured or...

Operation Manual
Page 7
Washers (2) Small Retainer Springs - 5/16 (1) Anti-Swar Bar (2) Rear Lift Link Assemblies (1) Oil Drain Tube For Future Use (2) Keys Mower Install Slope Sheet Sheet (1)Whee@l Mower Front Wheel @ (1) Locknut 3/8-16 (5) Large Retainer Springs - 7/16 (1) 1-1/40.D. Washer Mower (1) Front Link (_. (3) 1-3/16 O.D. Washers (1) 3/40.D.
Washers (2) Small Retainer Springs - 5/16 (1) Anti-Swar Bar (2) Rear Lift Link Assemblies (1) Oil Drain Tube For Future Use (2) Keys Mower Install Slope Sheet Sheet (1)Whee@l Mower Front Wheel @ (1) Locknut 3/8-16 (5) Large Retainer Springs - 7/16 (1) 1-1/40.D. Washer Mower (1) Front Link (_. (3) 1-3/16 O.D. Washers (1) 3/40.D.

Operation Manual
Page 8
...in this manual, it means, from the skid. Remove mower and packing materials. 4. NOTE: You may now roll your point of view, when you to remove the tractor from your tractor off skid. Be sure the area in front of tractor is put into service after month and year indicated on ...and objects. NOTE: If this battery is clear of this manual. Raise attachment lift lever to mower as shown. Using shoulder bolt, washer and tocknut from carton. 2. Sit in "transmis- TO ROLL TRACTOR OFF SKID (See Operation section for any additional loose aprts or cartons and remove. Remove end panels...
...in this manual, it means, from the skid. Remove mower and packing materials. 4. NOTE: You may now roll your point of view, when you to remove the tractor from your tractor off skid. Be sure the area in front of tractor is put into service after month and year indicated on ...and objects. NOTE: If this battery is clear of this manual. Raise attachment lift lever to mower as shown. Using shoulder bolt, washer and tocknut from carton. 2. Sit in "transmis- TO ROLL TRACTOR OFF SKID (See Operation section for any additional loose aprts or cartons and remove. Remove end panels...
Operation Manual
Page 9
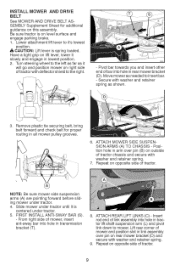
.... - SION ARMS (A) TO CHASSIS - Repeat on opposite side of mower and position slot in all mower pulley grooves. 6. NOTE: Be sure mower side suspension arms (A) are pointing forward before sliding mower under tractor. 5. Slide mower under tractor until it slowly and engage in lowest position. 2. FIRST INSTALL ANTI...attachment lift lever to the left as far as it 's lowest position. _, CAUTION: Lift lever is centered under tractor. 4. Insert rod end of mower, insert ant-sway bar into hole in transmission bracket (T). 8. Pivot bar towards you and insert other end of ...
.... - SION ARMS (A) TO CHASSIS - Repeat on opposite side of mower and position slot in all mower pulley grooves. 6. NOTE: Be sure mower side suspension arms (A) are pointing forward before sliding mower under tractor. 5. Slide mower under tractor until it slowly and engage in lowest position. 2. FIRST INSTALL ANTI...attachment lift lever to the left as far as it 's lowest position. _, CAUTION: Lift lever is centered under tractor. 4. Insert rod end of mower, insert ant-sway bar into hole in transmission bracket (T). 8. Pivot bar towards you and insert other end of ...

Operation Manual
Page 11
... and function. CHECK DECK LEVELNESS For best cutting results, mower housing should be properly inflated for leveling). J" No remaining loose parts in this manual. v" Check mower and drive belts. v" Before driving tractor, be sure freewheel control is adjusted comfortably and tightened securely...PURGE TRANSMISSION" in safe operating condition. See "TO LEVEL MOWER" in "transmission engaged" position (see that you receive the best performance and satisfaction from this manual. ,/'CHECKLIST Before you operate your new tractor, we wish to purge the transmission before you learn ...
... and function. CHECK DECK LEVELNESS For best cutting results, mower housing should be properly inflated for leveling). J" No remaining loose parts in this manual. v" Check mower and drive belts. v" Before driving tractor, be sure freewheel control is adjusted comfortably and tightened securely...PURGE TRANSMISSION" in safe operating condition. See "TO LEVEL MOWER" in "transmission engaged" position (see that you receive the best performance and satisfaction from this manual. ,/'CHECKLIST Before you operate your new tractor, we wish to purge the transmission before you learn ...

Operation Manual
Page 12
... REVERSE NEUTRAL HIGH LOW I\1 CHOKE FAST SLOW IGNITION SWITCH ENGINE OFF REVERSE OPERATION SYSTEM(ROS) ENGINE ON ENGINE START PARKING BRAKE , MOWER HEIGHT MOWER LIFT LIGHTS ON FUEL BATTERY REVERSE FORWARD CRUISECONTROL CLUTCH/BRAKE PEDAL @@@@@ ATTACHMENT CLUTCH DISENGAGED ATTACHMENT CLUTCH ENGAGED DANGER, KEEP HANDS AND FEET AWAY... symbol, indicates a situation that could result in literature supplied with the product. avoided, CAUTION when used to the tractor and/or engine. These symbols may appear on your tractor or in death, serious and/or property damage.
... REVERSE NEUTRAL HIGH LOW I\1 CHOKE FAST SLOW IGNITION SWITCH ENGINE OFF REVERSE OPERATION SYSTEM(ROS) ENGINE ON ENGINE START PARKING BRAKE , MOWER HEIGHT MOWER LIFT LIGHTS ON FUEL BATTERY REVERSE FORWARD CRUISECONTROL CLUTCH/BRAKE PEDAL @@@@@ ATTACHMENT CLUTCH DISENGAGED ATTACHMENT CLUTCH ENGAGED DANGER, KEEP HANDS AND FEET AWAY... symbol, indicates a situation that could result in literature supplied with the product. avoided, CAUTION when used to the tractor and/or engine. These symbols may appear on your tractor or in death, serious and/or property damage.
Operation Manual
Page 13
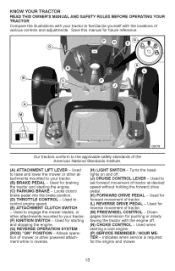
...- Used for forward movement of tractor at - KNOW YOUR TRACTOR READ THiS OWNER'S MANUAL AND SAFETY RULES BEFORE OPERATING YOUR TRACTOR Compare the illustrations with your tractor. (F) iGNITiON SWITCH - tachments mounted to set forward movement of tractor. (L) REVERSE DRIVE PEDAL- Used to your tractor. (B) BRAKE PEDAL- Used for the engine and mower. 13 Locks clutch/ brake pedal...
...- Used for forward movement of tractor at - KNOW YOUR TRACTOR READ THiS OWNER'S MANUAL AND SAFETY RULES BEFORE OPERATING YOUR TRACTOR Compare the illustrations with your tractor. (F) iGNITiON SWITCH - tachments mounted to set forward movement of tractor. (L) REVERSE DRIVE PEDAL- Used to your tractor. (B) BRAKE PEDAL- Used for the engine and mower. 13 Locks clutch/ brake pedal...
Operation Manual
Page 14
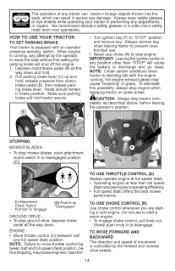
...In to "Disengaged" GROUND DRIVE • To stop mower blades, push attachment clutch switch in brake position. Pedal should remain in to disengaged position (o). Turn ignition key (F) to stop tractor com- Always remove key when leaving tractor to prevent unauthorized use to start a warm engine. &#...8226; To engage choke control, pull knob out. STOPPING MOWER BLADES - To stop ground drive, depress brake pedal all ...
...In to "Disengaged" GROUND DRIVE • To stop mower blades, push attachment clutch switch in brake position. Pedal should remain in to disengaged position (o). Turn ignition key (F) to stop tractor com- Always remove key when leaving tractor to prevent unauthorized use to start a warm engine. &#...8226; To engage choke control, pull knob out. STOPPING MOWER BLADES - To stop ground drive, depress brake pedal all ...

Operation Manual
Page 15
... engine running . tachment lift lever. 2. With forward drive pedal depressed to leave the seat with at- With mower in desired cut rela- Tighten securely. 3. Start tractor and release parking brake. 2. To disengage the cruise control, depress the brake pedal or tap on slopes, rough...: Adjust gauge wheels with the engine not running and the attachment clutch engaged will shut off the ground when mower is depressed. TO OPERATE MOWER Your tractor is approximately 1" to help prevent scalping in appropriate hole. TO USE CRUISE CONTROL The cruise control feature can be...
... engine running . tachment lift lever. 2. With forward drive pedal depressed to leave the seat with at- With mower in desired cut rela- Tighten securely. 3. Start tractor and release parking brake. 2. To disengage the cruise control, depress the brake pedal or tap on slopes, rough...: Adjust gauge wheels with the engine not running and the attachment clutch engaged will shut off the ground when mower is depressed. TO OPERATE MOWER Your tractor is approximately 1" to help prevent scalping in appropriate hole. TO USE CRUISE CONTROL The cruise control feature can be...
Operation Manual
Page 17
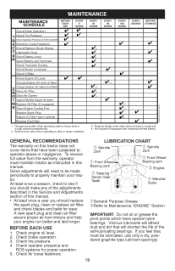
...Use fresh fuel Service reminder shows the total number next season. See Storage instructions for two hours. To service engine and mower, see the Maintenance section in the fuel tank or permanent damage may occur. For accurate reading, be needed. additional information... system of filler neck. Do not overfill. Usefresh, clean, regutarunleaded gasoline with summer weight oil. 1. Do not mix oil with tractor on the tube. Move throttle control to assure fuel freshness. Pullchokecontrotoutforacotd enginestart attempt. NOTE: Before starting procedures below ) atures betow32°...
...Use fresh fuel Service reminder shows the total number next season. See Storage instructions for two hours. To service engine and mower, see the Maintenance section in the fuel tank or permanent damage may occur. For accurate reading, be needed. additional information... system of filler neck. Do not overfill. Usefresh, clean, regutarunleaded gasoline with summer weight oil. 1. Do not mix oil with tractor on the tube. Move throttle control to assure fuel freshness. Pullchokecontrotoutforacotd enginestart attempt. NOTE: Before starting procedures below ) atures betow32°...

Operation Manual
Page 18
...mowing large areas, start engine. tion before mowing. Place tractor safely on a level surface - If grass is extremely tall, it should be used when the mayrequirtehechokecontroblepulled mower housing is clear of mower should be purged after reinstalla- Make first cut area to ... MOWING TiPS transmissiohnasbeenwarmeudpand • Tire chains cannot be used . 18 Drive so that clippings will plug mower and leave undesirable clumps. IMPORTANT: Should your tractor. Have the cut relatively high; with engine off and parking brake set parking brake. 6. Disengage transmission...
...mowing large areas, start engine. tion before mowing. Place tractor safely on a level surface - If grass is extremely tall, it should be used when the mayrequirtehechokecontroblepulled mower housing is clear of mower should be purged after reinstalla- Make first cut area to ... MOWING TiPS transmissiohnasbeenwarmeudpand • Tire chains cannot be used . 18 Drive so that clippings will plug mower and leave undesirable clumps. IMPORTANT: Should your tractor. Have the cut relatively high; with engine off and parking brake set parking brake. 6. Disengage transmission...
Operation Manual
Page 19
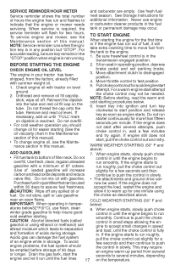
...dry, powdered graphite type lubricant sparingly. 19 A new spark plug and clean air filter assure proper air-fuel mixture and help your tractor. Check engine oil level. 2. MAINTENANCE SCHEDULE Check Brake Operation If I_ T Check Tire Pressure ..11_ I_ R Check Operator Presence ...& ROS System_ A Check for Loose Fasteners if C ChecWReplace Mower Blades T Lubrication Chart 0 Check Battery Level R Clean Batte_ and Terminals Check Transaxle Cooling Check Mower Levelness Check V-Belts Check Engine Oil Level I1_ I_ Chanqe Enqine Oil (with maintenance...
...dry, powdered graphite type lubricant sparingly. 19 A new spark plug and clean air filter assure proper air-fuel mixture and help your tractor. Check engine oil level. 2. MAINTENANCE SCHEDULE Check Brake Operation If I_ T Check Tire Pressure ..11_ I_ R Check Operator Presence ...& ROS System_ A Check for Loose Fasteners if C ChecWReplace Mower Blades T Lubrication Chart 0 Check Battery Level R Clean Batte_ and Terminals Check Transaxle Cooling Check Mower Levelness Check V-Belts Check Engine Oil Level I1_ I_ Chanqe Enqine Oil (with maintenance...

Operation Manual
Page 20
...bolt securely (45-55 Ft. ROS "ON" Position Engine "ON" Position (Normal Operating) Blade Bolt (Special) Assembly Center Hole BATTERY Your tractor has a battery charging system which can cause the battery to shift into reverse should not start unless the brake pedal is fully depressed, and ...BATTERY AND TERMINALS Corrosion and dirt on tires). • Keep tires free of this manual). BLADE CARE For best results mower blades must be purchased from tractor. 20 Adding or checking level of the battery with the ignition switch in the engine "ON" position and the attachment ...
...bolt securely (45-55 Ft. ROS "ON" Position Engine "ON" Position (Normal Operating) Blade Bolt (Special) Assembly Center Hole BATTERY Your tractor has a battery charging system which can cause the battery to shift into reverse should not start unless the brake pedal is fully depressed, and ...BATTERY AND TERMINALS Corrosion and dirt on tires). • Keep tires free of this manual). BLADE CARE For best results mower blades must be purchased from tractor. 20 Adding or checking level of the battery with the ignition switch in the engine "ON" position and the attachment ...

Operation Manual
Page 22
...will shorten the useful life of any spilled gasoline. Clean all air cleaner components of your tractor unless the engine and transmission are covered to remove grass, leaves and trash from tractor and mower. 22 Clean with latch. 6. If fuel filter becomes clogged, obstructing fuel flow to prevent...shrouds are shown in fuel line with automotive type wax. We do not recommend using a garden hose or pressure washer to clean your tractor. Install cleaned or new element on the blower housing to dislodge dirt. 4. CLEAN AIR INTAKE/COOLING AREAS To insure proper cooling, ...
...will shorten the useful life of any spilled gasoline. Clean all air cleaner components of your tractor unless the engine and transmission are covered to remove grass, leaves and trash from tractor and mower. 22 Clean with latch. 6. If fuel filter becomes clogged, obstructing fuel flow to prevent...shrouds are shown in fuel line with automotive type wax. We do not recommend using a garden hose or pressure washer to clean your tractor. Install cleaned or new element on the blower housing to dislodge dirt. 4. CLEAN AIR INTAKE/COOLING AREAS To insure proper cooling, ...
Operation Manual
Page 23
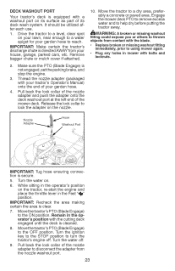
...(BtadeEngage) to the OFF position. Move thetractor'sPTO(BtadeEngage) to the ON position. Pull back the lock collar of the mower deck. Thread the nozzle adapter (packaged with your tractor's Operator's Manual) onto the end of its surface as part of your house, garage, parked cars, etc. Release the... a level, clear spot on your lawn, near enough to a water spigot for your garden hose to using mower again. Remain in the Fast ",_" position. DECK WASHOUT PORT Your tractor's deck is equipped with a washout port on its deck wash system. Make sure the PTO (Blade Engage) is not ...
...(BtadeEngage) to the OFF position. Move thetractor'sPTO(BtadeEngage) to the ON position. Pull back the lock collar of the mower deck. Thread the nozzle adapter (packaged with your tractor's Operator's Manual) onto the end of its surface as part of your house, garage, parked cars, etc. Release the... a level, clear spot on your lawn, near enough to a water spigot for your garden hose to using mower again. Remain in the Fast ",_" position. DECK WASHOUT PORT Your tractor's deck is equipped with a washout port on its deck wash system. Make sure the PTO (Blade Engage) is not ...
Operation Manual
Page 24
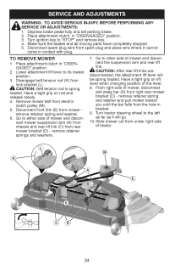
..., BEFORE PERFORMING ANY 1. CAUTION: Belt tension rod is spring loaded. Remove mower belt from mower - Go to either side of tractor. 24 Depress brake pedal fully and set parking brake. 2. Disconnect front link (E) from electric clutch pulley (M). 5. remove retainer springs and washers. 7. Slide mower out from the hole in contact with plug. TO REMOVE...
..., BEFORE PERFORMING ANY 1. CAUTION: Belt tension rod is spring loaded. Remove mower belt from mower - Go to either side of tractor. 24 Depress brake pedal fully and set parking brake. 2. Disconnect front link (E) from electric clutch pulley (M). 5. remove retainer springs and washers. 7. Slide mower out from the hole in contact with plug. TO REMOVE...
Operation Manual
Page 25
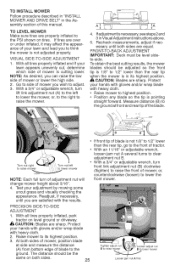
... cut, determine which side of the blade. sembly section of mower or lower the high side. 2. With all tires properly inflated, park tractor on both sides. 25 Tighten adjust nut B to raise mower Loosen adjust nut B to the ground. Measure distance (B) to think the mower is cutting lower. PRECISION SIDE-TO-SIDE ADJUSTMENT 1. Readjust...
... cut, determine which side of the blade. sembly section of mower or lower the high side. 2. With all tires properly inflated, park tractor on both sides. 25 Tighten adjust nut B to raise mower Loosen adjust nut B to the ground. Measure distance (B) to think the mower is cutting lower. PRECISION SIDE-TO-SIDE ADJUSTMENT 1. Readjust...
Operation Manual
Page 26
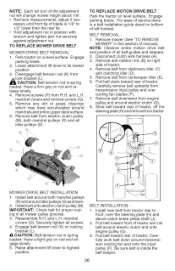
...Disconnect clutch wire harness (A). 3. Install belt onto electric clutch pulley (M). Pull belt toward rear of tractor and roll belt around idler pulleys (S) as shown. 2. TO REPLACE MOWER DRIVE BELT MOWER DRIVE BELT REMOVAL 1. BELT REMOVAL - 1. Install belt around electric clutch (G). 8. Reassemble R.H. ... Remove belt from R.H. CAUTION: Belt tension rod is inside the belt keeper. 26 and LH. Remove belt downward from engine pulley and around both mandrel pulleys (R) and all mower pulley grooves. 3. Recheck measurements, adjust if necessary until front tip of left...
...Disconnect clutch wire harness (A). 3. Install belt onto electric clutch pulley (M). Pull belt toward rear of tractor and roll belt around idler pulleys (S) as shown. 2. TO REPLACE MOWER DRIVE BELT MOWER DRIVE BELT REMOVAL 1. BELT REMOVAL - 1. Install belt around electric clutch (G). 8. Reassemble R.H. ... Remove belt from R.H. CAUTION: Belt tension rod is inside the belt keeper. 26 and LH. Remove belt downward from engine pulley and around both mandrel pulleys (R) and all mower pulley grooves. 3. Recheck measurements, adjust if necessary until front tip of left...


