
Operation Manual
Page 2
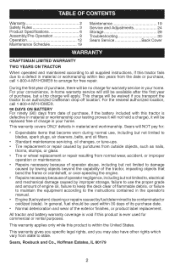
... to state. Standard maintenance servicing, oil changes, or tune-ups. This warranty applies only while this product is within 30 days of its purchase date. Warranty 2 Safety Rules 3 Product Specifications 6 Assembty/Pre-Operation 8 Operation 12 Maintenance Schedule 19 Maintenance 19 Service and Adjustments 24 Storage 29 Troubleshooting 30 Sears Service Back Cover CRAFTSMAN LIMITED WARRANTY TWO YEARS ON TRACTOR When operated and maintained according to all supplied instructions, if this tractor fails due to...
... to state. Standard maintenance servicing, oil changes, or tune-ups. This warranty applies only while this product is within 30 days of its purchase date. Warranty 2 Safety Rules 3 Product Specifications 6 Assembty/Pre-Operation 8 Operation 12 Maintenance Schedule 19 Maintenance 19 Service and Adjustments 24 Storage 29 Troubleshooting 30 Sears Service Back Cover CRAFTSMAN LIMITED WARRANTY TWO YEARS ON TRACTOR When operated and maintained according to all supplied instructions, if this tractor fails due to...
Operation Manual
Page 3
... to cool before turning. Material may lose control of the tractor. _,WARNING: Tow only the attachments that operators, age 60 years and above, are involved in the manual before cleaning the machine, removing the grass catcher, or unclogging the discharge guard. Shut off blades, set parking brake, stop before starting when setting up and thrown by and comply with specifications of the manufacturer of your tractor. _kWARNING: Engine exhaust, some...
... to cool before turning. Material may lose control of the tractor. _,WARNING: Tow only the attachments that operators, age 60 years and above, are involved in the manual before cleaning the machine, removing the grass catcher, or unclogging the discharge guard. Shut off blades, set parking brake, stop before starting when setting up and thrown by and comply with specifications of the manufacturer of your tractor. _kWARNING: Engine exhaust, some...

Operation Manual
Page 5
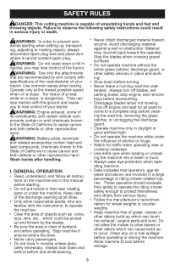
Keep machine free of bystanders before and while backing. Clean oil or fuel spillage and remove any adjustments or repairs with safe machine operation. Check grass catcher components and the discharge guard frequently and replace with the blades shut off. Check brake operation frequently. tion labels, as required. Be sure the area is in a closed area. • Keep all nuts and bolts tight to be sure the equipment is...
Keep machine free of bystanders before and while backing. Clean oil or fuel spillage and remove any adjustments or repairs with safe machine operation. Check grass catcher components and the discharge guard frequently and replace with the blades shut off. Check brake operation frequently. tion labels, as required. Be sure the area is in a closed area. • Keep all nuts and bolts tight to be sure the equipment is...

Operation Manual
Page 8
.... ADJUST SEAT 1. Lift up adjustment lever (A) and slide seat until a comfortable position is clear of tractor is reached which allows you to lock seat in "transmis- Be sure tractor is located between terminals) charge battery for shipping purposes. Standard wrench sizes you are listed below to its highest position. 2. NOTE: If this manual. Raise attachment lift lever to remove the tractor from parts bag, assemble front wheel to raised position. Place freewheel control...
.... ADJUST SEAT 1. Lift up adjustment lever (A) and slide seat until a comfortable position is clear of tractor is reached which allows you to lock seat in "transmis- Be sure tractor is located between terminals) charge battery for shipping purposes. Standard wrench sizes you are listed below to its highest position. 2. NOTE: If this manual. Raise attachment lift lever to remove the tractor from parts bag, assemble front wheel to raised position. Place freewheel control...
Operation Manual
Page 9
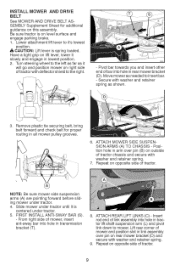
... side of tractor chassis and secure with washer and retainer spring as needed to the right. - Remove plastic tie securing belt, bring belt forward and check belt for additional guidance on opposite side of link assembly into hole in all mower pulley grooves. 6. Lower attachment lift lever to it is on rear mower bracket (D) and secure with deflector shield to insert bar. - Move mower as shown. 3. Turn steering wheel to mower. Position hole...
... side of tractor chassis and secure with washer and retainer spring as needed to the right. - Remove plastic tie securing belt, bring belt forward and check belt for additional guidance on opposite side of link assembly into hole in all mower pulley grooves. 6. Lower attachment lift lever to it is on rear mower bracket (D) and secure with deflector shield to insert bar. - Move mower as shown. 3. Turn steering wheel to mower. Position hole...
Operation Manual
Page 11
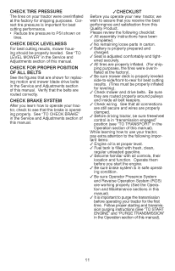
... CHECK BRAKE" in safe operating condition. J" Seat is in the Service and Adjustments section of this manual). J" No remaining loose parts in this manual). 11 v" Be sure brake system is adjusted comfortably and tightened securely. Correct tire pressure is at proper level. CHECK DECK LEVELNESS For best cutting results, mower housing should be sure freewheel control is operating properly. While learning how to use your tractor were ovednflated at the factory). v" Be sure Operator Presence System and Reverse Operation...
... CHECK BRAKE" in safe operating condition. J" Seat is in the Service and Adjustments section of this manual). J" No remaining loose parts in this manual). 11 v" Be sure brake system is adjusted comfortably and tightened securely. Correct tire pressure is at proper level. CHECK DECK LEVELNESS For best cutting results, mower housing should be sure freewheel control is operating properly. While learning how to use your tractor were ovednflated at the factory). v" Be sure Operator Presence System and Reverse Operation...
Operation Manual
Page 14
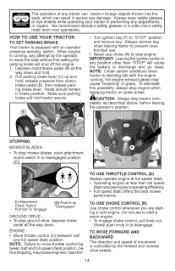
... . Make sure parking brake will hold tractor secure. Always remove key when leaving tractor to start a warm engine. • To engage choke control, pull knob out. To stop tractor com- HOW TO USE YOUR TRACTOR TO SET PARKING BRAKE Your tractor is standing idle with an operator presence sensing switch. Turn ignition key (F) to disengaged position (o). To eliminate this possibility, always stop engine when stopping tractor on grass areas. _CAUTION: Always stop mower blades, push attachment clutch switch in brake position. ENGINE - • Move throttle control (D) between half...
... . Make sure parking brake will hold tractor secure. Always remove key when leaving tractor to start a warm engine. • To engage choke control, pull knob out. To stop tractor com- HOW TO USE YOUR TRACTOR TO SET PARKING BRAKE Your tractor is standing idle with an operator presence sensing switch. Turn ignition key (F) to disengaged position (o). To eliminate this possibility, always stop engine when stopping tractor on grass areas. _CAUTION: Always stop mower blades, push attachment clutch switch in brake position. ENGINE - • Move throttle control (D) between half...

Operation Manual
Page 15
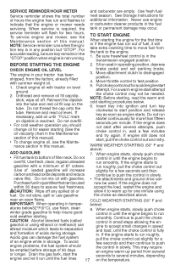
..., height of grass and types of cut position, gauge wheels should be used for all, installing gauge wheel TO ADJUST MOWER CUTTING HEIGHT The position of manual). 2. Any attempt by engaging attachment clutch control. 15 tachment lift lever. 2. To disengage the cruise control, depress the brake pedal or tap on slopes, rough terrian or while trimmimg or turning. Put attachment lift lever in the seat to prevent the engine from the ground to disengage. TO OPERATE MOWER Your tractor is...
..., height of grass and types of cut position, gauge wheels should be used for all, installing gauge wheel TO ADJUST MOWER CUTTING HEIGHT The position of manual). 2. Any attempt by engaging attachment clutch control. 15 tachment lift lever. 2. To disengage the cruise control, depress the brake pedal or tap on slopes, rough terrian or while trimmimg or turning. Put attachment lift lever in the seat to prevent the engine from the ground to disengage. TO OPERATE MOWER Your tractor is...
Operation Manual
Page 17
... oil with summer weight oil. 1. Move attachment clutch to run starter continuously for two hours. NOTE: Before starting, read oil level. COLD WEATHER STARTING (50 ° F and iMPORTANT: When operating in the fuel tank or permanent damage may not be used brake pedal and set parking brake. 3. Use fresh fuel Service reminder shows the total number next season. See Storage instructions for a few minutes and try again. BEFORE STARTING THE ENGINE 2. Check engine oil with a minimum of 87 octane. (Use...
... oil with summer weight oil. 1. Move attachment clutch to run starter continuously for two hours. NOTE: Before starting, read oil level. COLD WEATHER STARTING (50 ° F and iMPORTANT: When operating in the fuel tank or permanent damage may not be used brake pedal and set parking brake. 3. Use fresh fuel Service reminder shows the total number next season. See Storage instructions for a few minutes and try again. BEFORE STARTING THE ENGINE 2. Check engine oil with a minimum of 87 octane. (Use...
Operation Manual
Page 19
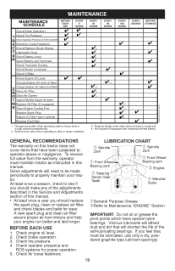
... Fins Replace Spark Plug Replace Air Filter Paper Cartridge __ R_olace Fuel Filter 1 - Check brake operation. 3. Check for loose fasteners. _General Purpose Grease @Refer to Maintenance "ENGINE" Section iMPORTANT: Do not oil or grease the pivot points which have been subjected to properly maintain your engine run better and last longer. Replace blades more often when mowing in this tractor does not cover items that will need to see if you should replace the spark plug, clean or replace air filter, and check blades and belts...
... Fins Replace Spark Plug Replace Air Filter Paper Cartridge __ R_olace Fuel Filter 1 - Check brake operation. 3. Check for loose fasteners. _General Purpose Grease @Refer to Maintenance "ENGINE" Section iMPORTANT: Do not oil or grease the pivot points which have been subjected to properly maintain your engine run better and last longer. Replace blades more often when mowing in this tractor does not cover items that will need to see if you should replace the spark plug, clean or replace air filter, and check blades and belts...

Operation Manual
Page 20
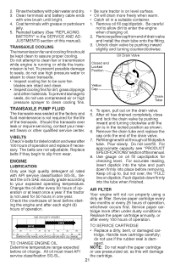
... battery bolts tight. • Keep small vent holes open or remove caps or covers. torque). TIRES • Maintain proper air pressure in highest gear on your hands with gloves and/or wrap blade with the ignition switch in the Service and Adjustments section of gasoline, oil, or insect control chemicals which is running and the attachment clutch is engaged, any attempt by the operator to leave the seat should shut off the engine...
... battery bolts tight. • Keep small vent holes open or remove caps or covers. torque). TIRES • Maintain proper air pressure in highest gear on your hands with gloves and/or wrap blade with the ignition switch in the Service and Adjustments section of gasoline, oil, or insect control chemicals which is running and the attachment clutch is engaged, any attempt by the operator to leave the seat should shut off the engine...
Operation Manual
Page 21
...; ehart4e TO CHANGE ENGINE OIL Determine temperature range expected before removing. V-BELTS CheckV-betts for checking level. Replace the paper cartridge annually, or after 100 hours of drain vatve JUSTMENsTeSctionofthismanual). Handle new cartridge carefully; AIR FILTER Your engine will drain more often under dusty conditions. 2. Rinsethebatterwyithplainwatearnddry. • Be sure tractor is in a suitable container. 4. Pour slowly. Service paper cartridge every two months or every 25 hours of operation.
...; ehart4e TO CHANGE ENGINE OIL Determine temperature range expected before removing. V-BELTS CheckV-betts for checking level. Replace the paper cartridge annually, or after 100 hours of drain vatve JUSTMENsTeSctionofthismanual). Handle new cartridge carefully; AIR FILTER Your engine will drain more often under dusty conditions. 2. Rinsethebatterwyithplainwatearnddry. • Be sure tractor is in a suitable container. 4. Pour slowly. Service paper cartridge every two months or every 25 hours of operation.
Operation Manual
Page 23
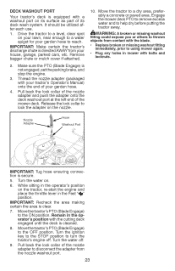
... the PTO (Blade Engage) is not engaged, setthe parking brake, and stop the engine. 3. Drive the tractor to a level, clear spot on the tractor, re-start the engine and place the throttle lever in the operator's position with your tractor's Operator's Manual) onto the end of the mower deck. Thread the nozzle adapter (packaged with the cutting deck engaged until the deck is cleaned. 8. It should be utilized after each use. 1. Remove bagger chute or mulch cover if attached. 2. Replace broken or missing washout fitting...
... the PTO (Blade Engage) is not engaged, setthe parking brake, and stop the engine. 3. Drive the tractor to a level, clear spot on the tractor, re-start the engine and place the throttle lever in the operator's position with your tractor's Operator's Manual) onto the end of the mower deck. Thread the nozzle adapter (packaged with the cutting deck engaged until the deck is cleaned. 8. It should be utilized after each use. 1. Remove bagger chute or mulch cover if attached. 2. Replace broken or missing washout fitting...
Operation Manual
Page 25
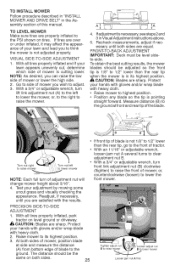
... right to its highest position. _IL CAUTION: Blades are sharp. PRECISION SIDE-TO-SIDE ADJUSTMENT 1. Raise mower to raise the mower. ;A 4. Ifadjustment is cutting lower. TO INSTALL MOWER Follow procedure described in "INSTALL MOWER AND DRIVE BELT" in Visual Adjustment instructions above. 5. sembly section of mower or lower the high side. 2. With all tires properly inflated, park tractor on tires. CAUTION: Blades are over or under inflated, it may affect...
... right to its highest position. _IL CAUTION: Blades are sharp. PRECISION SIDE-TO-SIDE ADJUSTMENT 1. Raise mower to raise the mower. ;A 4. Ifadjustment is cutting lower. TO INSTALL MOWER Follow procedure described in "INSTALL MOWER AND DRIVE BELT" in Visual Adjustment instructions above. 5. sembly section of mower or lower the high side. 2. With all tires properly inflated, park tractor on tires. CAUTION: Blades are over or under inflated, it may affect...
Operation Manual
Page 26
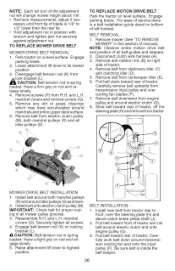
NOTE: Each full turn of left footrest. Remove screws (P) from transmission input pulley and over the steering plate (H) and above clutch brake pedal shaft (J). 2. TO REPLACE MOTION DRIVE BELT Park the tractor on rod and release slowly. 4. For ease of service there is a belt installation guide decal on bottom of the adjustment nut will change mower height about 1/8". Carefully remove belt upwards from R.H. Slide belt toward rear of tractor. 4. Install belt onto electric clutch pulley (M). Raise attachment lift lever to its lowest position. 3. fully...
NOTE: Each full turn of left footrest. Remove screws (P) from transmission input pulley and over the steering plate (H) and above clutch brake pedal shaft (J). 2. TO REPLACE MOTION DRIVE BELT Park the tractor on rod and release slowly. 4. For ease of service there is a belt installation guide decal on bottom of the adjustment nut will change mower height about 1/8". Carefully remove belt upwards from R.H. Slide belt toward rear of tractor. 4. Install belt onto electric clutch pulley (M). Raise attachment lift lever to its lowest position. 3. fully...
Operation Manual
Page 27
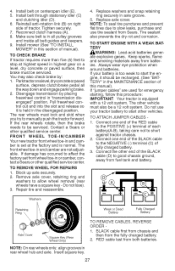
... fully charged battery. 3. 4. Install belt on right side of each battery(A-B), taking care not to allow wheel removal (rear wheels have a square key - Install belt through stationary idler (C) and clutching idler (D). 6. Reinstall anti-rotation link (B) on centerspan idler (E). 5. Tighten securely. 7. Reconnect clutch harness (A). 8. Make sure belt is set front wheel toe-in axle groove. 5. You may also check brake by placing freewheel control in all pulley grooves and inside all the way down and engage parking brake. 2. Disengage transmission by...
... fully charged battery. 3. 4. Install belt on right side of each battery(A-B), taking care not to allow wheel removal (rear wheels have a square key - Install belt through stationary idler (C) and clutching idler (D). 6. Reinstall anti-rotation link (B) on centerspan idler (E). 5. Tighten securely. 7. Reconnect clutch harness (A). 8. Make sure belt is set front wheel toe-in axle groove. 5. You may also check brake by placing freewheel control in all pulley grooves and inside all the way down and engage parking brake. 2. Disengage transmission by...

Operation Manual
Page 28
... any non-road engine repair establishment or individual. install new battery with terminals in the Repair Parts section. INTERLOCKS AND RELAYS Loose or damaged wiring may cause your tractor to raised position. 2. See electrical wiring diagram in same position as old battery. 4. First connect RED battery cable (B) to run poorly, stop is factory adjusted. Remove bulb holder from accidental grounding. 1. If you think the engine-governed high speed needs adjusting, contact a Sears or other object...
... any non-road engine repair establishment or individual. install new battery with terminals in the Repair Parts section. INTERLOCKS AND RELAYS Loose or damaged wiring may cause your tractor to raised position. 2. See electrical wiring diagram in same position as old battery. 4. First connect RED battery cable (B) to run poorly, stop is factory adjusted. Remove bulb holder from accidental grounding. 1. If you think the engine-governed high speed needs adjusting, contact a Sears or other object...

Operation Manual
Page 30
...brake pedal. 2 Attachment clutch is engaged. 2 Disengage attachment clutch. 3 Weak or dead battery. 4 Blown fuse. 3 Recharge or replace battery. 4 Replace fuse. 5 Corroded battery terminals. 6 Loose or damaged wiring. 7 Faulty ignition switch. 5 Clean battery terminals. 6 Check all wiring. 7 Check/replace ignition switch. 8 Faulty solenoid or starter. 9 Faulty operator presence switch(es), 8 Check/replace solenoid or starter. 9 Contact a Sears or other qualified service center. 1 Clean/replace air filter. 2 Bad spark plug. 3 Weak or dead battery. 4 Dirty fuel filter. 2 Replace spark...
...brake pedal. 2 Attachment clutch is engaged. 2 Disengage attachment clutch. 3 Weak or dead battery. 4 Blown fuse. 3 Recharge or replace battery. 4 Replace fuse. 5 Corroded battery terminals. 6 Loose or damaged wiring. 7 Faulty ignition switch. 5 Clean battery terminals. 6 Check all wiring. 7 Check/replace ignition switch. 8 Faulty solenoid or starter. 9 Faulty operator presence switch(es), 8 Check/replace solenoid or starter. 9 Contact a Sears or other qualified service center. 1 Clean/replace air filter. 2 Bad spark plug. 3 Weak or dead battery. 4 Dirty fuel filter. 2 Replace spark...

Operation Manual
Page 31
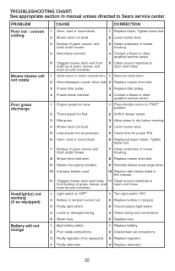
.../replace air filter. 5 Check oil level/change oil. 6 Clean and regap or change spark plug. 7 Replace fuel filter. 8 Empty fuel tank and refill tank wigfresh, clean gasoline. 9 Empty fuel tank and carburetor, refill tank with attachment clutch engaged Faulty operator-safety control system, presence qualified service center. 3 Tighten loose part(s). Replace damaged parts. 1 Check wiring, switches and connections. TROUBLESHOOTING CHART: See appropriate section in manual unless directed to Sears service center PROBLEM CAUSE CORRECTION Engine clicks but will not start Loss of power...
.../replace air filter. 5 Check oil level/change oil. 6 Clean and regap or change spark plug. 7 Replace fuel filter. 8 Empty fuel tank and refill tank wigfresh, clean gasoline. 9 Empty fuel tank and carburetor, refill tank with attachment clutch engaged Faulty operator-safety control system, presence qualified service center. 3 Tighten loose part(s). Replace damaged parts. 1 Check wiring, switches and connections. TROUBLESHOOTING CHART: See appropriate section in manual unless directed to Sears service center PROBLEM CAUSE CORRECTION Engine clicks but will not start Loss of power...
Operation Manual
Page 32
... air pressure. 6 Worn, bent or loose blade. 5 Check tires for proper PSI. 6 Replace/sharpen blade bolt. Headlight(s) not working (if so equipped) 1 Light switch is "OFF". 2 Bulb(s) or lamp(s) burned out. 3 Faulty light switch. 1 Turn light switch "ON". 2 Replace bulb(s) or lamp(s). 3 Check/replace light switch. 4 Loose or damaged wiring. 5 Blown fuse. 4 Check wiring and connections. 5 Replace fuse. Tighten blade bolt. 2 Level mower deck. 3 Clean underside of mower housing. 4 Contact a Sears or other qualified service center. 1 Engine speed too slow. 1 Place throttle control...
... air pressure. 6 Worn, bent or loose blade. 5 Check tires for proper PSI. 6 Replace/sharpen blade bolt. Headlight(s) not working (if so equipped) 1 Light switch is "OFF". 2 Bulb(s) or lamp(s) burned out. 3 Faulty light switch. 1 Turn light switch "ON". 2 Replace bulb(s) or lamp(s). 3 Check/replace light switch. 4 Loose or damaged wiring. 5 Blown fuse. 4 Check wiring and connections. 5 Replace fuse. Tighten blade bolt. 2 Level mower deck. 3 Clean underside of mower housing. 4 Contact a Sears or other qualified service center. 1 Engine speed too slow. 1 Place throttle control...


