
Operation Manual
Page 2
...wear of this product is void if this riding equipment fails due to a defect in material or workmanship, visit www.craftsman.com or call 1-800-659-5917 to the instructions contained in material or workmanship (our testing proves that it will...Assembly/Pre-Operation 7 Operation 9 Maintenance Schedule 16 Maintenance 16 Service and Adjustments 21 Storage 27 Troubleshooting 28 Sears Service Back Cover Craftsman Riding Equipment Warranty: Lawn Tractors, Garden Tractors, Zero Turn Riders CRAFTSMAN TWO YEAR FULL WARRANTY FOR TWO YEARS from the date of purchase, if ...
...wear of this product is void if this riding equipment fails due to a defect in material or workmanship, visit www.craftsman.com or call 1-800-659-5917 to the instructions contained in material or workmanship (our testing proves that it will...Assembly/Pre-Operation 7 Operation 9 Maintenance Schedule 16 Maintenance 16 Service and Adjustments 21 Storage 27 Troubleshooting 28 Sears Service Back Cover Craftsman Riding Equipment Warranty: Lawn Tractors, Garden Tractors, Zero Turn Riders CRAFTSMAN TWO YEAR FULL WARRANTY FOR TWO YEARS from the date of purchase, if ...
Operation Manual
Page 3
... allow responsible adults, who are involved in a large percentage of riding mower-related injuries. _DANGER: This cutting machine is capable of your tractor. _h, WARNING: Engine exhaust, some of its constituents, and certain vehicle components contain or emit chemicals known to the State of California to...operate machinewithoutthe entire grass catcher, discharge guard, or other debris which could result in neutral, you to lose control of your tractor. Failure to observe the following safety instructions could be picked up to prevent acciden- Material may lose control of the...
... allow responsible adults, who are involved in a large percentage of riding mower-related injuries. _DANGER: This cutting machine is capable of your tractor. _h, WARNING: Engine exhaust, some of its constituents, and certain vehicle components contain or emit chemicals known to the State of California to...operate machinewithoutthe entire grass catcher, discharge guard, or other debris which could result in neutral, you to lose control of your tractor. Failure to observe the following safety instructions could be picked up to prevent acciden- Material may lose control of the...
Operation Manual
Page 6
... in effective working order by our 12,000 profesional repair specialists. • Unlimited service and no charge for and using your tractor properly. But like all covered repairs. • Product replacement if your covered product can save you the best possible dependability and...bythe agreement; Lbs. The instructions will enable you to assemble and maintain your tractor. • Follow the instructions under "Mainte- nance" and "Storage" sections of dependable operation. Your new Craftsman® product is designed and manufactured for years to help by law (Section...
... in effective working order by our 12,000 profesional repair specialists. • Unlimited service and no charge for and using your tractor properly. But like all covered repairs. • Product replacement if your covered product can save you the best possible dependability and...bythe agreement; Lbs. The instructions will enable you to assemble and maintain your tractor. • Follow the instructions under "Mainte- nance" and "Storage" sections of dependable operation. Your new Craftsman® product is designed and manufactured for years to help by law (Section...
Operation Manual
Page 7
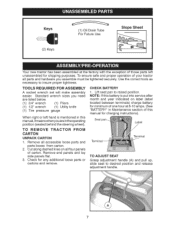
...handle (A) and pull up, slide seat to raised position. Keys (2) Keys (1) Oil Drain Tube For Future Use Slope Sheet Your new tractor has been assembled unassembled for any additional loose parts or cartons and remove. 1. Use the correct tools as TOOLS REQUIRED FOR ASSEMBLY CHECK ... mentioned in the operating position (seated behind the steering wheel). all accessible loose parts and parts boxes from carton. 2. TO REMOVE CARTON TRACTOR FROM UNPACK CARTON 1. Lift seat pan to desired position and release adjustment handle. 7 NOTE: If this manual, itmeans when you assemble...
...handle (A) and pull up, slide seat to raised position. Keys (2) Keys (1) Oil Drain Tube For Future Use Slope Sheet Your new tractor has been assembled unassembled for any additional loose parts or cartons and remove. 1. Use the correct tools as TOOLS REQUIRED FOR ASSEMBLY CHECK ... mentioned in the operating position (seated behind the steering wheel). all accessible loose parts and parts boxes from carton. 2. TO REMOVE CARTON TRACTOR FROM UNPACK CARTON 1. Lift seat pan to desired position and release adjustment handle. 7 NOTE: If this manual, itmeans when you assemble...

Operation Manual
Page 8
...START ENGINE" and "PU RGE TRANSM ISSION" inthe Operation section of this manual. NOTE: You may now roll your tractor, check to PSi shown on your tractor, pay extra attention to its highest position. 2. Follow the appropriate instruction below to -rear for location and function of...Engine oil is at proper level. / Fuel tank is adjusted comfortably and tightened securely. /All tires are properly clamped. / Before driving tractor, be properly leveled. have been / No remaining loose parts in the Service and Adjustments section of this manual. _fCHECKLIST Before you operate your ...
...START ENGINE" and "PU RGE TRANSM ISSION" inthe Operation section of this manual. NOTE: You may now roll your tractor, check to PSi shown on your tractor, pay extra attention to its highest position. 2. Follow the appropriate instruction below to -rear for location and function of...Engine oil is at proper level. / Fuel tank is adjusted comfortably and tightened securely. /All tires are properly clamped. / Before driving tractor, be properly leveled. have been / No remaining loose parts in the Service and Adjustments section of this manual. _fCHECKLIST Before you operate your ...
Operation Manual
Page 9
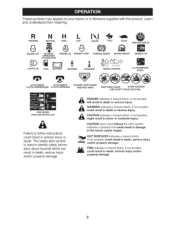
...alert symbol is used without the alert symbol, indicates a situation that could result in serious injury or death. These symbols may appear on your tractor or in death or serious injury. R NH L REVERSE NEUTRAL HIGH LOW I',,I CHOKE @ FAST -_ SLOW IGNITION SWITCH ENGINE OFF _D REVERSE ... DANGER, KEEP HANDS AND FEET AWAY KEEP AREA CLEAR SLOPE HAZARDS (SEE SAFETY RULES SECTION) FREE WHEEL (Automatic Models only) Failure to the tractor and/or engine. A A A DANGER indicates a hazard which , if not avoided, could result in damage to follow instructions could result in...
...alert symbol is used without the alert symbol, indicates a situation that could result in serious injury or death. These symbols may appear on your tractor or in death or serious injury. R NH L REVERSE NEUTRAL HIGH LOW I',,I CHOKE @ FAST -_ SLOW IGNITION SWITCH ENGINE OFF _D REVERSE ... DANGER, KEEP HANDS AND FEET AWAY KEEP AREA CLEAR SLOPE HAZARDS (SEE SAFETY RULES SECTION) FREE WHEEL (Automatic Models only) Failure to the tractor and/or engine. A A A DANGER indicates a hazard which , if not avoided, could result in damage to follow instructions could result in...
Operation Manual
Page 10
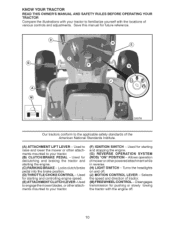
... American National Standards Institute. (A) ATTACHMENT LIFT LEVER - ments mounted to your tractor. (F) IGNITION SWITCH - Used to the applicable safety standards of mower or other attach- YOUR of 03078 Our tractors conform to raise and lower the mower or other powered attachment while in reverse.... (H) LIGHT SWITCH - Turns the headlights on and off . 10 Disengages transmission for declutching and braking the tractor and starting and stopping the engine. (G) REVERSE OPERATION SYSTEM (ROS) "ON" POSITION - Save this manual for starting the engine. (C)...
... American National Standards Institute. (A) ATTACHMENT LIFT LEVER - ments mounted to your tractor. (F) IGNITION SWITCH - Used to the applicable safety standards of mower or other attach- YOUR of 03078 Our tractors conform to raise and lower the mower or other powered attachment while in reverse.... (H) LIGHT SWITCH - Turns the headlights on and off . 10 Disengages transmission for declutching and braking the tractor and starting and stopping the engine. (G) REVERSE OPERATION SYSTEM (ROS) "ON" POSITION - Save this manual for starting the engine. (C)...
Operation Manual
Page 11
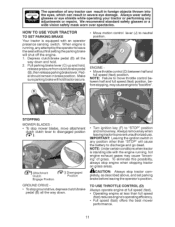
...remove key. We recommend standard safety glasses or a wide vision safety mask worn over spectacles. Pull parking brake lever (C) up and hold tractor secure. • Move motion control lever (J) to leave the seat without first setting the parking brake will hold , release pressure from ...clutch/brake pedal (B), then release parking brake lever. IMPORTANT: Leaving the ignition switch in any tractor can result in foreign objects thrown into the eyes, which can result in brake position. ENGINE • Movethrottle control (D) between half ...
...remove key. We recommend standard safety glasses or a wide vision safety mask worn over spectacles. Pull parking brake lever (C) up and hold tractor secure. • Move motion control lever (J) to leave the seat without first setting the parking brake will hold , release pressure from ...clutch/brake pedal (B), then release parking brake lever. IMPORTANT: Leaving the ignition switch in any tractor can result in foreign objects thrown into the eyes, which can result in brake position. ENGINE • Movethrottle control (D) between half ...

Operation Manual
Page 12
... _CAUTION: Do not operate the mower without either the entire grass catcher, on mowers so equipped, or the deflector shield (S) in operating position. Start tractor with tractor on rough, rolling terrain or hills. 1. TO ADJUST GAUGE WHEELS Gauge wheels are properly adjusted when they are slightly off the engine. Select desired height... 1" to 4". Tighten securely. 3. These heights are measured from hesitating or cutting off when operating your equipment on a flat level surface. 1. TO OPERATE MOWER Your tractor is at the desired cutting height in place. 12
... _CAUTION: Do not operate the mower without either the entire grass catcher, on mowers so equipped, or the deflector shield (S) in operating position. Start tractor with tractor on rough, rolling terrain or hills. 1. TO ADJUST GAUGE WHEELS Gauge wheels are properly adjusted when they are slightly off the engine. Select desired height... 1" to 4". Tighten securely. 3. These heights are measured from hesitating or cutting off when operating your equipment on a flat level surface. 1. TO OPERATE MOWER Your tractor is at the desired cutting height in place. 12
Operation Manual
Page 13
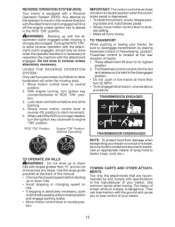
...2. TOWING CARTS AND OTHER ATTACH= MENTS Tow only the attachments that are certain no longer needed, turn ignition key counterclockwise to tractor. Slowly move motion control lever to engine "ON" position. Raise attachment lift lever to neutral position when the clutch/ brake...clutch/brake pedal. • Slowly move motion control lever to reverse (R) position to disengage transmission by the operator to lose control of tractor. 1. Use the slope guide provided at - est setting. • Make all turns slowly. tachment clutch engaged while mowing is ...
...2. TOWING CARTS AND OTHER ATTACH= MENTS Tow only the attachments that are certain no longer needed, turn ignition key counterclockwise to tractor. Slowly move motion control lever to engine "ON" position. Raise attachment lift lever to neutral position when the clutch/ brake...clutch/brake pedal. • Slowly move motion control lever to reverse (R) position to disengage transmission by the operator to lose control of tractor. 1. Use the slope guide provided at - est setting. • Make all turns slowly. tachment clutch engaged while mowing is ...

Operation Manual
Page 14
... control is in choke position until "FULL' mark on dipstick is on level ground. 2. NOTE: If at a high altitude (above 3000 feet) or in cold temperatures (below 32°F(0°C), use fresh, clean winter grade gasoline to ensure fuel freshness. Check engine oil ... 7. AUTOMATIC TRANSMISSION WARM UP Before driving the unit in operating position, depress clutch/brake pedal and set parking brake. Be sure the tractor is reached. mission engaged position. 2. Move attachment clutch to the fast position. control to separation and formation of filler neck. Placethe ...
... control is in choke position until "FULL' mark on dipstick is on level ground. 2. NOTE: If at a high altitude (above 3000 feet) or in cold temperatures (below 32°F(0°C), use fresh, clean winter grade gasoline to ensure fuel freshness. Check engine oil ... 7. AUTOMATIC TRANSMISSION WARM UP Before driving the unit in operating position, depress clutch/brake pedal and set parking brake. Be sure the tractor is reached. mission engaged position. 2. Move attachment clutch to the fast position. control to separation and formation of filler neck. Placethe ...
Operation Manual
Page 15
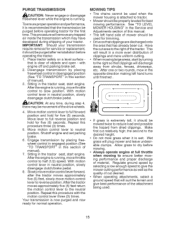
...operating attachments, select a ground speed that has already been cut. Slowly move motion control leverforward, after reinstallation before operating the tractor. 1. Your transmission is clear of mower should be properly leveled for normal operation. o Mower should be used . 15 Have...neutral position, slowly disengage clutch/brake pedal. _,CAUTION: At any time, during shipping of manual). 7. IMPORTANT: Should your tractor. After the engine is recommended that clippings will plug mower and leave undesirable clumps. To ensure proper operation and performance, it...
...operating attachments, select a ground speed that has already been cut. Slowly move motion control leverforward, after reinstallation before operating the tractor. 1. Your transmission is clear of mower should be properly leveled for normal operation. o Mower should be used . 15 Have...neutral position, slowly disengage clutch/brake pedal. _,CAUTION: At any time, during shipping of manual). 7. IMPORTANT: Should your tractor. After the engine is recommended that clippings will plug mower and leave undesirable clumps. To ensure proper operation and performance, it...
Operation Manual
Page 16
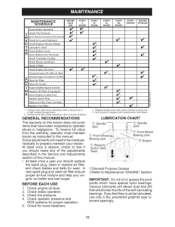
...zerk Engine _General Purpose Grease @Refer to operator abuse or negligence. If you feel they must maintain tractor as instructed in sandy soil. 4 - Some adjustments will shorten the life of this tractor does not cover items that will need to be lubricated, use only a dry, powdered graphite ... and Adjustments section of the self-lubricating bearings. A new spark plug and clean air filter ensure proper air-fuel mixture and help your tractor. Service more often when operating in dirty or dusty conditions. At least once a season, check to properly maintain your engine run better ...
...zerk Engine _General Purpose Grease @Refer to operator abuse or negligence. If you feel they must maintain tractor as instructed in sandy soil. 4 - Some adjustments will shorten the life of this tractor does not cover items that will need to be lubricated, use only a dry, powdered graphite ... and Adjustments section of the self-lubricating bearings. A new spark plug and clean air filter ensure proper air-fuel mixture and help your tractor. Service more often when operating in dirty or dusty conditions. At least once a season, check to properly maintain your engine run better ...
Operation Manual
Page 17
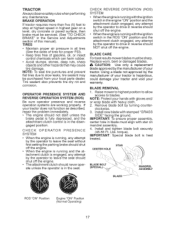
...worn, bent or damaged blades. _, CAUTION: Use only a replacement blade approved by the manufacturer of your tractor is hazardous, could damage your tractor and void your tractor does not function as described, repair the problem immediately. • The engine should shut off the engine...proper assembly, center hole in the disen- BLADE REMOVAL 1. NOTE: Protect your local parts dealer. iMPORTANT: treated. BRAKE OPERATION If tractor requires more than five (5) feet to blades. TIRES • Maintain proper air pressure in the Service and Adjustments section of gasoline,...
...worn, bent or damaged blades. _, CAUTION: Use only a replacement blade approved by the manufacturer of your tractor is hazardous, could damage your tractor and void your tractor does not function as described, repair the problem immediately. • The engine should shut off the engine...proper assembly, center hole in the disen- BLADE REMOVAL 1. NOTE: Protect your local parts dealer. iMPORTANT: treated. BRAKE OPERATION If tractor requires more than five (5) feet to blades. TIRES • Maintain proper air pressure in the Service and Adjustments section of gasoline,...
Operation Manual
Page 18
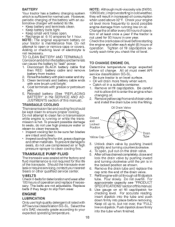
...checking level of operation. TRANSAXLE PUMP FLUID Yellow Cap Drain Tube 3. Should the transaxle ever leak or require servicing, contact your tractor is maintenance free. V-BELTS Check V-belts for deterioration and wear after every 50 hours of the transaxle. Refill enginewith oilthrough ...push down firmly into place before oil change. Corrosion and dirt on level surface. • Oil will drain more frequently to slip from tractor. 2. Clean terminals and battery cable ends with grease or petroleum jelly. 5. Reinstall battery (See "REPLACING BATTERY" in a suitable container...
...checking level of operation. TRANSAXLE PUMP FLUID Yellow Cap Drain Tube 3. Should the transaxle ever leak or require servicing, contact your tractor is maintenance free. V-BELTS Check V-belts for deterioration and wear after every 50 hours of the transaxle. Refill enginewith oilthrough ...push down firmly into place before oil change. Corrosion and dirt on level surface. • Oil will drain more frequently to slip from tractor. 2. Clean terminals and battery cable ends with grease or petroleum jelly. 5. Reinstall battery (See "REPLACING BATTERY" in a suitable container...
Operation Manual
Page 19
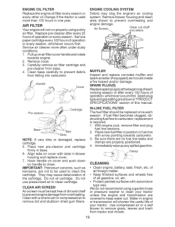
...They may clog the engine's air cooling system. CLEAN AiR SCREEN Air screen must be kept free of dirt and chaff to clean your tractor. We do not recommend using a dirty air filter. AIR FILTER Your engine will shorten the useful life of the cartridge. Remove cover.... base carefully to close. Handle Cover ENGINE COOLING SYSTEM Debris may cause deterioration of your tractor unless the engine and transmission are properly positioned. 4. Align tabs on handle to prevent debris from tractor and mower. 19 With engine cool, remove filter and plug fuel line sections. 2. Place...
...They may clog the engine's air cooling system. CLEAN AiR SCREEN Air screen must be kept free of dirt and chaff to clean your tractor. We do not recommend using a dirty air filter. AIR FILTER Your engine will shorten the useful life of the cartridge. Remove cover.... base carefully to close. Handle Cover ENGINE COOLING SYSTEM Debris may cause deterioration of your tractor unless the engine and transmission are properly positioned. 4. Align tabs on handle to prevent debris from tractor and mower. 19 With engine cool, remove filter and plug fuel line sections. 2. Place...
Operation Manual
Page 20
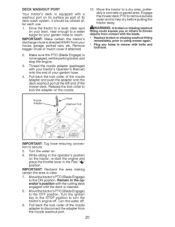
... with the blade. • Replace broken or missing washout fitting immediately, prior to disconnect the adapter from your garden hose to turn the tractor's engine off . 9. Turn the water on the nozzle. 10. Remove bagger chute or mulch cover if attached. 2. IMPORTANT: Recheck the... area making certain the area is clear. 7. Turn the water off . DECK WASHOUT PORT Your tractor's deck is equipped with bolts and Iocknuts. It should be utilized after each use. 1. Release the lock collar to a dry area, preferably a...
... with the blade. • Replace broken or missing washout fitting immediately, prior to disconnect the adapter from your garden hose to turn the tractor's engine off . 9. Turn the water on the nozzle. 10. Remove bagger chute or mulch cover if attached. 2. IMPORTANT: Recheck the... area making certain the area is clear. 7. Turn the water off . DECK WASHOUT PORT Your tractor's deck is equipped with bolts and Iocknuts. It should be utilized after each use. 1. Release the lock collar to a dry area, preferably a...
Operation Manual
Page 21
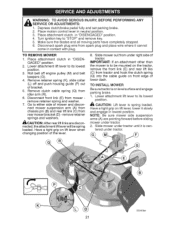
..., BEFORE PERFORMING ANY 1. Place motion control lever in "DISEN- GAGED" position. 2. Al_ CAUTION: After rear lift links are pointing forward before sliding mower under tractor. % 03042tex 21 tered under tractor. 2. Place attachment clutch in neutral position. 3. Go to be spring loaded. NOTE: Be sure mower side suspension arms (A) are discon- Roll belt off...
..., BEFORE PERFORMING ANY 1. Place motion control lever in "DISEN- GAGED" position. 2. Al_ CAUTION: After rear lift links are pointing forward before sliding mower under tractor. % 03042tex 21 tered under tractor. 2. Place attachment clutch in neutral position. 3. Go to be spring loaded. NOTE: Be sure mower side suspension arms (A) are discon- Roll belt off...
Operation Manual
Page 22
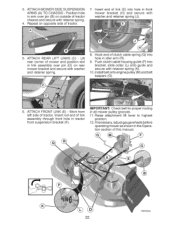
...guide (P) into hole in idler arm (R). 9. ATTACH FRONT LINK (E) - Raise attachment lift lever to highest position. 12. Insert end of tractor chassis and secure with washer and retainer spring. 8. Install belt onto engine pulley (M) and belt keepers (G). . Insert rod end of this ...CHASSIS - ATTACH REAR LIFT LINKS (C) - Work from left side of mower and position slot in tractor front suspension bracket (F). Position hole in all mower pulley grooves. 11. Lift rear corner of tractor. 3. iMPORTANT: Check belt for proper routing in arm over pin (D) on outside of link (E)...
...guide (P) into hole in idler arm (R). 9. ATTACH FRONT LINK (E) - Raise attachment lift lever to highest position. 12. Insert end of tractor chassis and secure with washer and retainer spring. 8. Install belt onto engine pulley (M) and belt keepers (G). . Insert rod end of this ...CHASSIS - ATTACH REAR LIFT LINKS (C) - Work from left side of mower and position slot in tractor front suspension bracket (F). Position hole in all mower pulley grooves. 11. Lift rear corner of tractor. 3. iMPORTANT: Check belt for proper routing in arm over pin (D) on outside of link (E)...
Operation Manual
Page 23
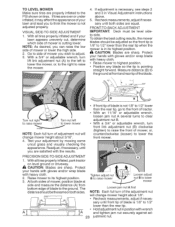
...the ground. At both sides are sharp. The distance should be level side- VISUAL SIDE-TO-SIDE ADJUSTMENT 1. With all tires properly inflated, park tractor on level ground or driveway. _i_ CAUTION: Blades are properly inflated to the front of mower or lower the high side. 2. If adjustment is cutting..., go to the PSI shown on tires. With all tires properly inflated and if your lawn and lead you can raise the low side of tractor. • With an 11/16" or adjustable wrench, loosen jam nut A several turns to clear adjustment nut B. • With a 3/4" or adjustable wrench, ...
...the ground. At both sides are sharp. The distance should be level side- VISUAL SIDE-TO-SIDE ADJUSTMENT 1. With all tires properly inflated, park tractor on level ground or driveway. _i_ CAUTION: Blades are properly inflated to the front of mower or lower the high side. 2. If adjustment is cutting..., go to the PSI shown on tires. With all tires properly inflated and if your lawn and lead you can raise the low side of tractor. • With an 11/16" or adjustable wrench, loosen jam nut A several turns to clear adjustment nut B. • With a 3/4" or adjustable wrench, ...


